2014 NISSAN ROGUE lock
[x] Cancel search: lockPage 2 of 28
*See your Owner’s Manual for information.01
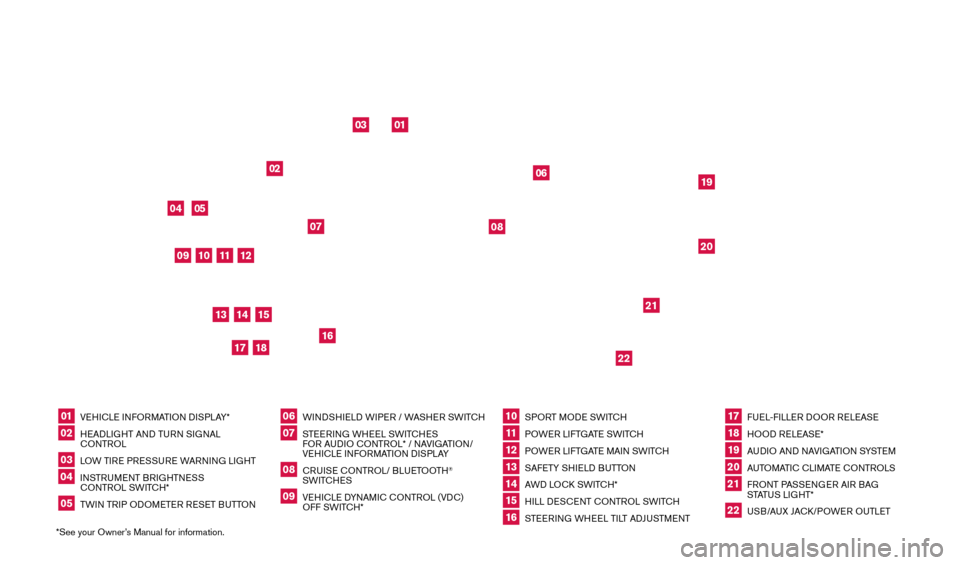
VEHICLE INFORMATION DISPLAY*
02
HEADLIGHT AND TURN SIGNAL
CONTROL
03
LOW TIRE PRESSURE WARNING LIGHT
04
INSTRUMENT BRIGHTNESS
CONTROL SWITCH*
05
TWIN TRIP ODOMETER RESET BUTTON
06
WINDSHIELD WIPER / WASHER SWITCH
07
STEERING WHEEL SWITCHES
FO
R AUDIO CONTROL* / NAVIGATION/
VEHICLE INFORMATION DISPLAY
08
CRUISE CONTROL/ BLUETOOTH
®
SWITCHES
09
VEHICLE DYNAMIC CONTROL (VDC)
OFF SWITCH*
10
SPORT MODE SWITCH
11 POWER LIFTGATE SWITCH
12
POWER LIFTGATE MAIN SWITCH
13
SAFETY SHIELD BUTTON
14
AWD LOCK SWITCH*
15
HILL DESCENT CONTROL SWITCH
16
STEERING WHEEL TILT ADJUSTMENT
17
FUEL-FILLER DOOR RELEASE
18
HOOD RELEASE*
19
AUDIO AND NAVIGATION SYSTEM
20
AUTOMATIC CLIMATE CONTROLS
21
FRONT PASSENGER AIR BAG
STATUS LIGHT*
22
USB/AUX JACK/POWER OUTLET
01
10
03
04
11
19
12
16
05
06
18
17
02
07
08
14
13
21
22
20
09
15
BEHIND STEERING
WHEEL
1766904_14d_Rogue_QRG_062514.indd 46/25/14 3:29 PM
Page 3 of 28
TABLE OF CONTENTS
NEW SYSTEM FEATURES Around View® Monitor with Moving Object Detection (MOD)
(if so equipped) ................................................2 Sport Mode ...................................................3 Blind Spot Warning (B
SW) System (if so equipped)
.....................
3 Lane Departure Warning (LD
W) System (if so equipped)
.................
4 Forward Collision W
arning (FCW) System (if so equipped)
................4 Hill Start Assist (H
SA) System
........................................4 Hill Descent Control (HD
C) System (if so equipped)
.....................5 All-Wheel Drive (A
WD) Indicator Lights
.................................5
ES
SENTIAL INFORMATION
Tire Pressure Monitoring System (TP
MS) with Easy Fill Tire Alert
.......6
Loose Fuel Cap................................................7 Fuel-filler Door.................................................7
Towing Y
our Vehicle
.............................................7
Outside Temperature Display.....................................8 Divide-N-Hide® Floor (if so equipped)..............................8 Clock Set/
Adjustment...........................................9
FIR
ST DRIVE FEATURES
NI
SSAN Intelligent Key
® System (if so equipped)...................10 Po
wer Liftgate (if so equipped)....................................11 Front Seat Adjustments.........................................11 2ND Row Seats................................................12 3RD Row Seats (if so equipped)..................................12 Outside Mirror Control Switch...................................12 Starting/Stopping the Engine....................................13
Headlight Control Switch .......................................13
Windshield W
iper and Washer Switch
............................14 Automatic Climate Controls (if so equipped) .......................15 F
M/AM/SiriusXM
® Satellite Radio with CD Player (if so equipped).....16 Cruise Control . . . . . . . . . . . . . . . . . . . . . . . . . . . . . . . . . . . .\
. . . . . . . . . . . . 17 US
B (Universal Serial Bus) Connection Port/Aux Jack and iPod
® Interface 17 Power Panoramic Moonroof (if so equipped).......................18 Center Console Storage box ....................................18 Tilt and T
elescopic Steering Wheel Adjustments
....................18
SY
STEM GUIDE
Vehicle Information Display......................................19 Bluetooth® Hands-free Phone System ............................20 System Operating Tips.......................................20 Bluetooth® System without Navigation (if so equipped)...............20 Bluetooth® System with Navigation (if so equipped) .................21 Navigation System (if so equipped)...............................23 HomeLink® Universal Transceiver (if so equipped).......................24
Please see your Owner’s Manual for important safety
information and system operation limitations.
•
A cellular telephone should not be used for any purpose while
driving so full attention may be given to vehicle operation.
• Always wear your seat belt.
• Supplement
al air bags do not replace proper seat belt usage.
•
Children 12 and under should always ride in the rear seat
properly secured in c
hild restraints or seat belts according to
their age and weight.
• Do not drink and drive.
For more information, refer to the “Safety — Seats, seat belts and
supplemental restraint system (section 1)”, “Center display, heater,
air conditioner, audio, phone and voice recognition systems (section
4)” and “Starting and driving (section 5)” of your Owner’s Manual.
Additional information about your vehicle is also available in your
Owner’s Manual, Navigation System Owner’s Manual and at www.nissanusa.com.
To view detailed
instructional videos, go to
www.nissanownersinfo.mobi/
2014/rogue
or snap this barcode with an appropriate barcode reader.
1766904_14d_Rogue_QRG_062514.indd 56/25/14 3:29 PM
Page 7 of 28
5
HILL DESCENT CONTROL (HDC) SYSTEM (if so equipped)
The HDC system is designed to apply the brakes to help
control the speed of the vehicle and reduce the workload
of the driver while descending steep hills. To activate
the system:
The AWD Lock switch 01 must be on.
The Hill Descent Control system switch 02 must be ON. To deactivate the Hill Descent
Control system, push the switch
02 to the OFF position.
The shift lever must be in a forward or reverse gear.
The Hill Descent Control system operates at speeds of 15 mph (25 km/h) and below.
For more information, refer to the “Starting and driving (section 5)” of your Owner’s Manual.
02
ALL-WHEEL DRIVE (AWD) INDICATOR LIGHTS
With the ignition switch in the ON position, the AWD indicator light illuminates and
stays illuminated. The AWD indicator light
staying illuminated is a normal condition
and does not indicate a malfunction with the All-Wheel Drive system. Distribution of
torque to the front and rear wheels changes automatically, depending on the road
conditions encountered.
When AWD Lock is selected, both the AWD indicator light and the AWD Lock light
will illuminate.
For more information, refer to the “Instruments and controls (section 2)” and the “Starting and driving (section 5)”
of your Owner’s Manual.
01
1766904_14d_Rogue_QRG_062514.indd 56/25/14 3:29 PM
To view detailed instructional videos regarding these and other features, please go\
to www.nissanownersinfo.mobi.
Page 9 of 28
7
LOOSE FUEL CAP
A Loose fuel cap warning mess age will appear in
the vehicle information display
01 when the fuel-filler
cap is not tightened correctly.
To tighten, turn the cap clockwise until a single click
is heard.
The warning message will disappear when the
vehicle detects the fuel-filler cap is properly tightened and the
button, located on the
steering wheel, is pressed.
If the cap is not properly tightened, the Malfunction Indicator Light may illuminate.
For more information, refer to the “Instruments and controls (section 2)” and the “Pre-driving checks and adjustments
(section 3)” of your Owner’s Manual.
01
TOWING YOUR VEHICLE
ALL-WHEEL DRIVE (AWD) VEHICLE ( if so equipped)
• An all-wheel drive vehicle must be towed with all wheels off the groun\
d.
For proper towing and to avoid accidental damage to your vehicle, NISSAN recommends
that a service operator tow your vehicle after carefully reading the Own\
er
’s Manual precautions.
For more information, refer to the “In case of emergency (section 6)” of your Owner’s Manual.
FUEL-FILLER DOOR
The fuel-filler door is located on the passenger
side of the vehicle.
To open the fuel-filler door, pull the release lever
01, located on the instrument panel to the left of
the steering wheel.
For more information, refer to the “Pre-driving checks and adjustments (section 3)” of your Owner’s Manual.
01
1766904_14d_Rogue_QRG_062514.indd 76/25/14 3:29 PM
To view detailed instructional videos regarding these and other features, please go\
to www.nissanownersinfo.mobi.
Page 11 of 28
9
CLOCK SET/ADJUSTMENT
To adjust the time and the appearance of the clock
on the display:
1. Press the button 01
2. Touch the “Settings” key.
3. Touc
h the “System” key.
4. Touc
h the “Clock” key.
The following settings can be adjusted:
• T
ime Format: The clock can be set to 12 hours or 24 hours.
• Date
Format: The date can be changed to one of 5 different formats.
• Clock Mode
: From here the clock mode options are:
· Manual: Allows for the option “Set Cloc
k Manually”. Touch this to begin setting the clock
manually using the “+” or “–“ to adjust the hours,
minutes, day and month up or down.
· T
ime Zone: Touch the “Time Zone” key
02 to
choose from the applicable time zone list, and/or
touch “Daylight savings time” to
switch between on and off.
· Auto
: Automatically sets the clock to the vehicles
current location.
Press the BACK button 03 to return to the previous screen.
For more information please refer to the “Monitor, climate, audio, phone and voice recognition systems (section 4)” of
your Owner’s Manual.
03
01
02
1766904_14d_Rogue_QRG_062514.indd 96/25/14 3:29 PM
To view detailed instructional videos regarding these and other features, please go\
to www.nissanownersinfo.mobi.
Page 12 of 28
10
FIRST DRIVE FEATURES
NISSAN INTELLIGENT KEY® SYSTEM (if so equipped)
The NISSAN Intelligent Key® System allows you to lock or
unlock the vehicle, open your liftgate and start the engine. It
is important to make sure the Intelligent Key is with you
(that is, in your pocket or purse).
The operating range of the Intelligent Key is within
31.5 in (8 0 cm) from each request switch.
To lock the vehicle, push either door handle request
switc h
01, push the liftgate opener switch 02
or press the
button 03 on the key fob.
To unlock the vehicle, perform one of the
following procedures:
• Push either door handle request switch 01 once
or the liftgate opener switch
02 once; the
corresponding door will unlock. Push the request
switch again within 5 seconds; all other doors
will unlock, or
• Press the button 04 on the key fob to unlock
the driver’s side door. Press the
button again; all
other doors will unlock.
LIFTGATE RELEASE
To open the rear liftgate, press the button 05 for longer than 1 second.
To close the rear liftgate, press the
button 05 again for longer than 1 second.
The Intelligent Key can also be used to activate the panic alarm by pressing and holding \
the
button 06 for more than 1 second. Once activated, the panic alarm and headlights \
will
stay on for a period of time.
INTELLIGENT KEY BATTERY DISCHARGE
If the battery of the Intelligent Key is disc harged, or environmental conditions interfere with
the Intelligent Key operation, start the engine according to the following procedure:
1. Move the shift lever to the P (P
ARK) position.
2. Firmly apply the foot brake.
3. Touc
h the ignition switch with the Intelligent Key and a chime will sound.
4. Within 1
0 seconds after the chime sounds, push the ignition switch while depressing the
brake pedal and the engine will start.
For more information, refer to the “Pre-driving checks and adjustments (section 3)” of your Owner’s Manual.
01
03
04
05
02
06
1766904_14d_Rogue_QRG_062514.indd 106/25/14 3:29 PM
To view detailed instructional videos regarding these and other features, please go\
to www.nissanownersinfo.mobi.
Page 13 of 28
11
POWER LIFTGATE (if so equipped)
When the liftgate is closed and locked, the liftgate will
open automatically by:
•
Pushing the power liftgate switch 01 on the
instrument panel.
• Pushing the liftgate opener switch 02. The
liftgate must be unlocked, or you must have the
Intelligent Key with you (in your pocket or purse).
• Pressing
the
button 03 on the NISSAN
Intelligent Key® for more than 1 second.
The power liftgate operation can be turned on or
off by the power liftgate on/off switc h
04 on the
instrument panel.
• When the power liftgate on/off switc
h
04 is
pushed to the OFF position, power operation is not
available using the power liftgate switch
05 on the
liftgate or the liftgate opener switch
02.
LIFTGATE POSITION SETTING (if so equipped)
The liftgate can be set to open to a specific height by performing the \
following:
1. Open the liftgate using the request switch or the Intelligent K
ey.
2. Pull the liftgate down to the desired position and hold the liftgate (t\
he liftgate will have some
resist
ance when being manually adjusted).
3. While holding the liftgate in position, press and hold the p
ower liftgate switch
05 located
on the liftgate for approximately 5 seconds or until 3 beeps are heard.
The liftgate will open to the selected position setting. To change the position of the liftgate,
repeat steps 1-3 for setting the position of the liftgate.
For more information, refer to the “Pre-driving checks and adjustments (section 3)” of your Owner’s Manual.
03
0401
02
05
FRONT SEAT ADJUSTMENTS
To slide the seat forward or backward, push the control switch 01 forward or backward.
To recline the seatback, push the switch 02 forward or backward.
SEAT LIFTER
To raise or lower the front portion or height of the
seat, push the front or bac k end of the switch
01
up or down.
POWER LUMBAR SUPPORT
(if so equipped for driver’s seat)
To adjust the seat lumbar support, push the front or back end of the switch 03.
For more information, refer to the “Safety — Seats, seat belts and supplemental restraint system (se\
ction 1)” of your
Owner’s Manual.
0102
03
1766904_14d_Rogue_QRG_062514.indd 116/25/14 3:29 PM
To view detailed instructional videos regarding these and other features, please go\
to www.nissanownersinfo.mobi.
Page 14 of 28
12
FIRST DRIVE FEATURES
2ND ROW SEATS
To access the 3RD row seats, lift the seatback release
lever
01 to fold and slide the 2ND row seat forward.
Pull the release strap 02 to fold down the 2ND row
armrest and access the cup holders.
Pull the bar 03 and hold it while sliding the seat
forward or backward to the desired position. Release
the bar to lock the seat in place.
For more information, refer to the “Safety — Seats, seat belts and
supplemental restraint system (section 1)” of your Owner’s Manual.
01
OUTSIDE MIRROR CONTROL SWITCH
Move the small switch 01 to select the right or left
side mirror.
Adjust each mirror to the desired position using the
large switch
02.
To prevent accidentally moving the mirror, move the
small switc h
01 to the middle (neutral) position.
For more information, refer to the “Pre-driving checks and adjustments (section 3)” of your Owner’s Manual.
3RD ROW SEATS (if so equipped)
To fold the seatback forward, pull the release strap 01
and push the seatback forward.
To return the seatback to the upright position, pull
the release strap
01 and the seatback up at the
same time.
The 3
RD row seats can fold forward for additional storage.
Pull the handle 02 and lift the floor.
Pull the straps 03 on both sides simultaneously, to
unlatch the 3RD row seat.
Lift the 3RD row seat to access the storage area
beneath the 3RD row seat 04.
For more information, refer to the “Safety — Seats, seat belts and
supplemental restraint system (section 1)” of your Owner’s Manual.
01
02
02
03
0101
02
0303
04
1766904_14d_Rogue_QRG_062514.indd 126/25/14 3:29 PM
To view detailed instructional videos regarding these and other features, please go\
to www.nissanownersinfo.mobi.