2014 NISSAN ROGUE audio
[x] Cancel search: audioPage 2 of 28
*See your Owner’s Manual for information.01
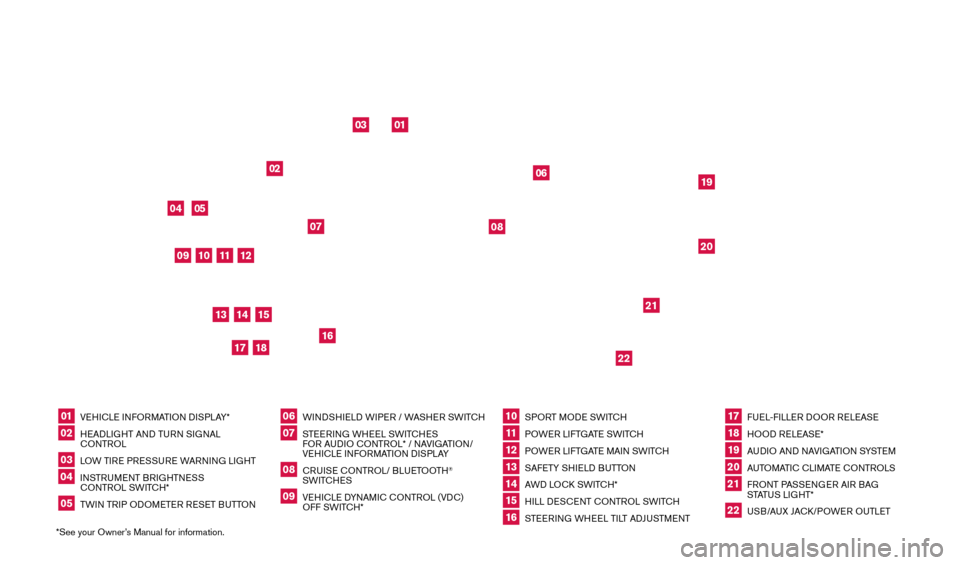
VEHICLE INFORMATION DISPLAY*
02
HEADLIGHT AND TURN SIGNAL
CONTROL
03
LOW TIRE PRESSURE WARNING LIGHT
04
INSTRUMENT BRIGHTNESS
CONTROL SWITCH*
05
TWIN TRIP ODOMETER RESET BUTTON
06
WINDSHIELD WIPER / WASHER SWITCH
07
STEERING WHEEL SWITCHES
FO
R AUDIO CONTROL* / NAVIGATION/
VEHICLE INFORMATION DISPLAY
08
CRUISE CONTROL/ BLUETOOTH
®
SWITCHES
09
VEHICLE DYNAMIC CONTROL (VDC)
OFF SWITCH*
10
SPORT MODE SWITCH
11 POWER LIFTGATE SWITCH
12
POWER LIFTGATE MAIN SWITCH
13
SAFETY SHIELD BUTTON
14
AWD LOCK SWITCH*
15
HILL DESCENT CONTROL SWITCH
16
STEERING WHEEL TILT ADJUSTMENT
17
FUEL-FILLER DOOR RELEASE
18
HOOD RELEASE*
19
AUDIO AND NAVIGATION SYSTEM
20
AUTOMATIC CLIMATE CONTROLS
21
FRONT PASSENGER AIR BAG
STATUS LIGHT*
22
USB/AUX JACK/POWER OUTLET
01
10
03
04
11
19
12
16
05
06
18
17
02
07
08
14
13
21
22
20
09
15
BEHIND STEERING
WHEEL
1766904_14d_Rogue_QRG_062514.indd 46/25/14 3:29 PM
Page 3 of 28
TABLE OF CONTENTS
NEW SYSTEM FEATURES Around View® Monitor with Moving Object Detection (MOD)
(if so equipped) ................................................2 Sport Mode ...................................................3 Blind Spot Warning (B
SW) System (if so equipped)
.....................
3 Lane Departure Warning (LD
W) System (if so equipped)
.................
4 Forward Collision W
arning (FCW) System (if so equipped)
................4 Hill Start Assist (H
SA) System
........................................4 Hill Descent Control (HD
C) System (if so equipped)
.....................5 All-Wheel Drive (A
WD) Indicator Lights
.................................5
ES
SENTIAL INFORMATION
Tire Pressure Monitoring System (TP
MS) with Easy Fill Tire Alert
.......6
Loose Fuel Cap................................................7 Fuel-filler Door.................................................7
Towing Y
our Vehicle
.............................................7
Outside Temperature Display.....................................8 Divide-N-Hide® Floor (if so equipped)..............................8 Clock Set/
Adjustment...........................................9
FIR
ST DRIVE FEATURES
NI
SSAN Intelligent Key
® System (if so equipped)...................10 Po
wer Liftgate (if so equipped)....................................11 Front Seat Adjustments.........................................11 2ND Row Seats................................................12 3RD Row Seats (if so equipped)..................................12 Outside Mirror Control Switch...................................12 Starting/Stopping the Engine....................................13
Headlight Control Switch .......................................13
Windshield W
iper and Washer Switch
............................14 Automatic Climate Controls (if so equipped) .......................15 F
M/AM/SiriusXM
® Satellite Radio with CD Player (if so equipped).....16 Cruise Control . . . . . . . . . . . . . . . . . . . . . . . . . . . . . . . . . . . .\
. . . . . . . . . . . . 17 US
B (Universal Serial Bus) Connection Port/Aux Jack and iPod
® Interface 17 Power Panoramic Moonroof (if so equipped).......................18 Center Console Storage box ....................................18 Tilt and T
elescopic Steering Wheel Adjustments
....................18
SY
STEM GUIDE
Vehicle Information Display......................................19 Bluetooth® Hands-free Phone System ............................20 System Operating Tips.......................................20 Bluetooth® System without Navigation (if so equipped)...............20 Bluetooth® System with Navigation (if so equipped) .................21 Navigation System (if so equipped)...............................23 HomeLink® Universal Transceiver (if so equipped).......................24
Please see your Owner’s Manual for important safety
information and system operation limitations.
•
A cellular telephone should not be used for any purpose while
driving so full attention may be given to vehicle operation.
• Always wear your seat belt.
• Supplement
al air bags do not replace proper seat belt usage.
•
Children 12 and under should always ride in the rear seat
properly secured in c
hild restraints or seat belts according to
their age and weight.
• Do not drink and drive.
For more information, refer to the “Safety — Seats, seat belts and
supplemental restraint system (section 1)”, “Center display, heater,
air conditioner, audio, phone and voice recognition systems (section
4)” and “Starting and driving (section 5)” of your Owner’s Manual.
Additional information about your vehicle is also available in your
Owner’s Manual, Navigation System Owner’s Manual and at www.nissanusa.com.
To view detailed
instructional videos, go to
www.nissanownersinfo.mobi/
2014/rogue
or snap this barcode with an appropriate barcode reader.
1766904_14d_Rogue_QRG_062514.indd 56/25/14 3:29 PM
Page 5 of 28
3
BLIND SPOT WARNING (BSW) SYSTEM
(if so equipped)
The BSW system helps alert the driver of other vehicles
in adjacent lanes when c
hanging lanes.
The system will operate when the vehicle is driven at
speeds of approximately 20 mph (32 km/h) and above.
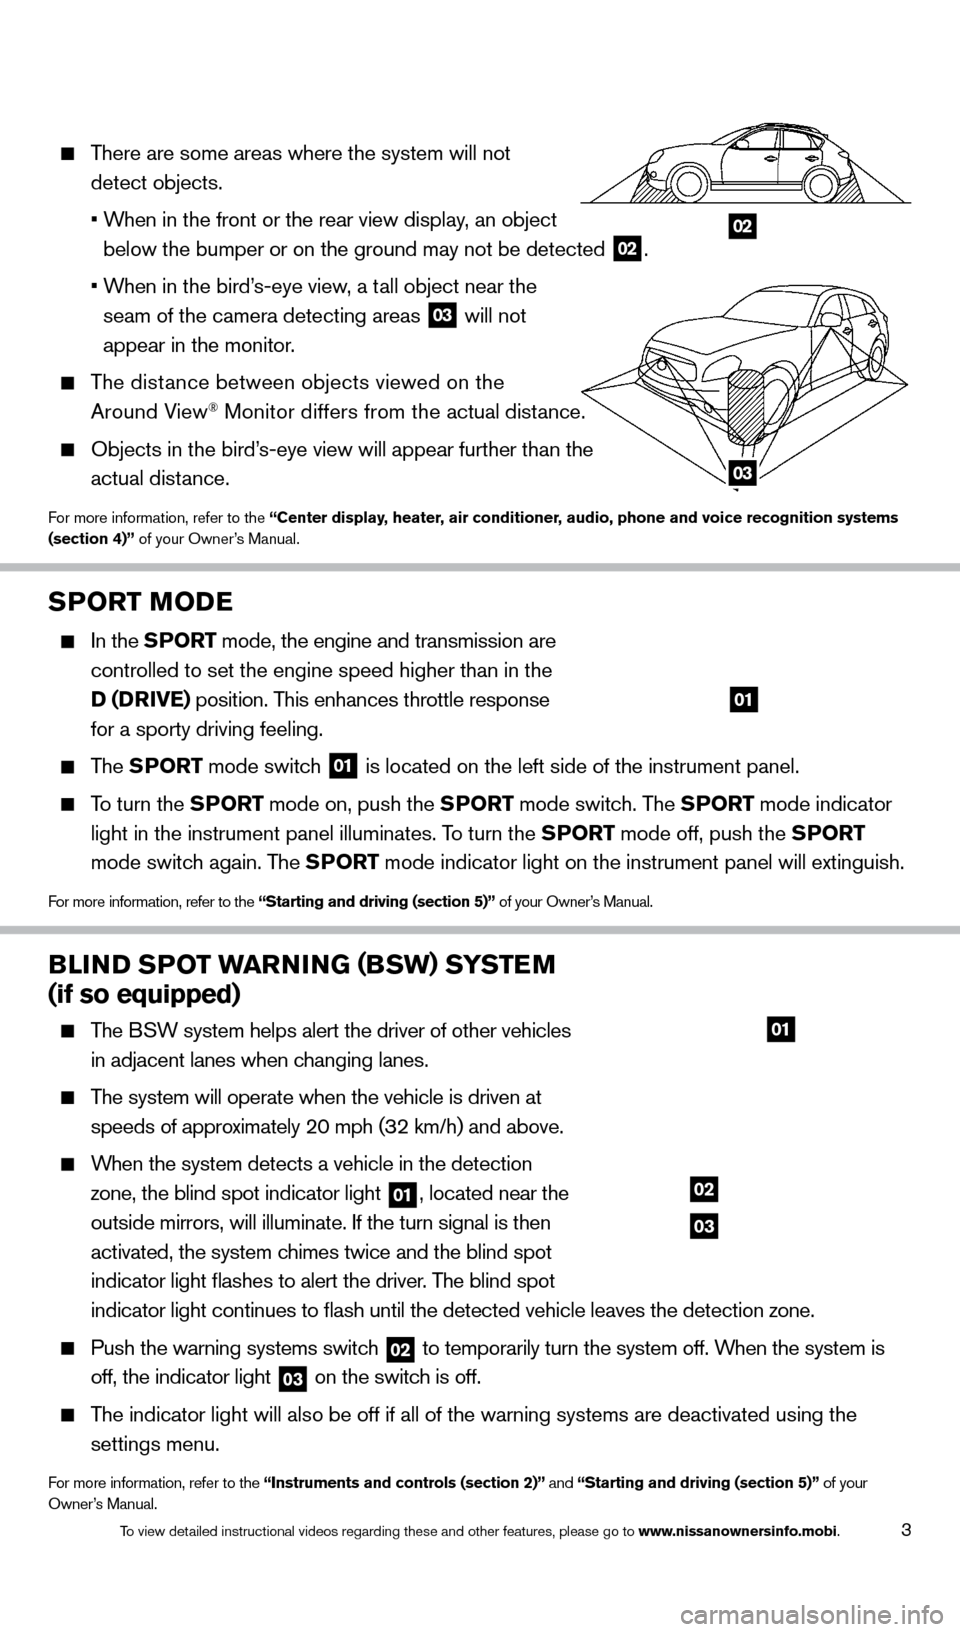
When the system detects a vehicle in the detection
zone, the blind spot indicator light
01, located near the
outside mirrors, will illuminate. If the turn signal is then
activated, the system chimes twice and the blind spot
indicator light flashes to alert the driver. The blind spot
indicator light continues to flash until the detected vehicle leaves t\
he detection zone.
Push the warning systems switch 02 to temporarily turn the system off. When the system is
off, the indicator light
03 on the switch is off.
The indicator light will also be off if all of the warning systems are de\
activated using the
settings menu.
For more information, refer to the “Instruments and controls (section 2)” and “Starting and driving (section 5)” of your
Owner’s Manual.
SPORT MODE
In the
SPORT mode, the engine and transmission are
controlled to set the engine speed higher than in the
D (DRIVE) position. This enhances throttle response
for a sporty driving feeling.
The SPORT mode switch 01 is located on the left side of the instrument panel.
To turn the
SP ORT mode on, push the SPORT mode switch. The SPORT mode indicator
light in the instrument panel illuminates. To turn the SPORT mode off, push the SPORT
mode switch again. The SPORT mode indicator light on the instrument panel will extinguish.
For more information, refer to the “Starting and driving (section 5)” of your Owner’s Manual.
01
02
03
02
03
01
There are some areas where the system will not
detect objects.
• When in the front or the rear view display
, an object
below the bumper or on the ground may not be detected
02.
• When in the bird’
s-eye view, a tall object near the
seam of the camera detecting areas
03 will not
appear in the monitor.
The distance between objects viewed on the
Around V iew® Monitor differs from the actual distance.
Objects in the bird’s-eye view will appear further than the
actual distance.
For more information, refer to the “Center display, heater, air conditioner, audio, phone and voice recognition systems
(section 4)” of your Owner’s Manual.
1766904_14d_Rogue_QRG_062514.indd 36/25/14 3:29 PM
To view detailed instructional videos regarding these and other features, please go\
to www.nissanownersinfo.mobi.
Page 11 of 28
9
CLOCK SET/ADJUSTMENT
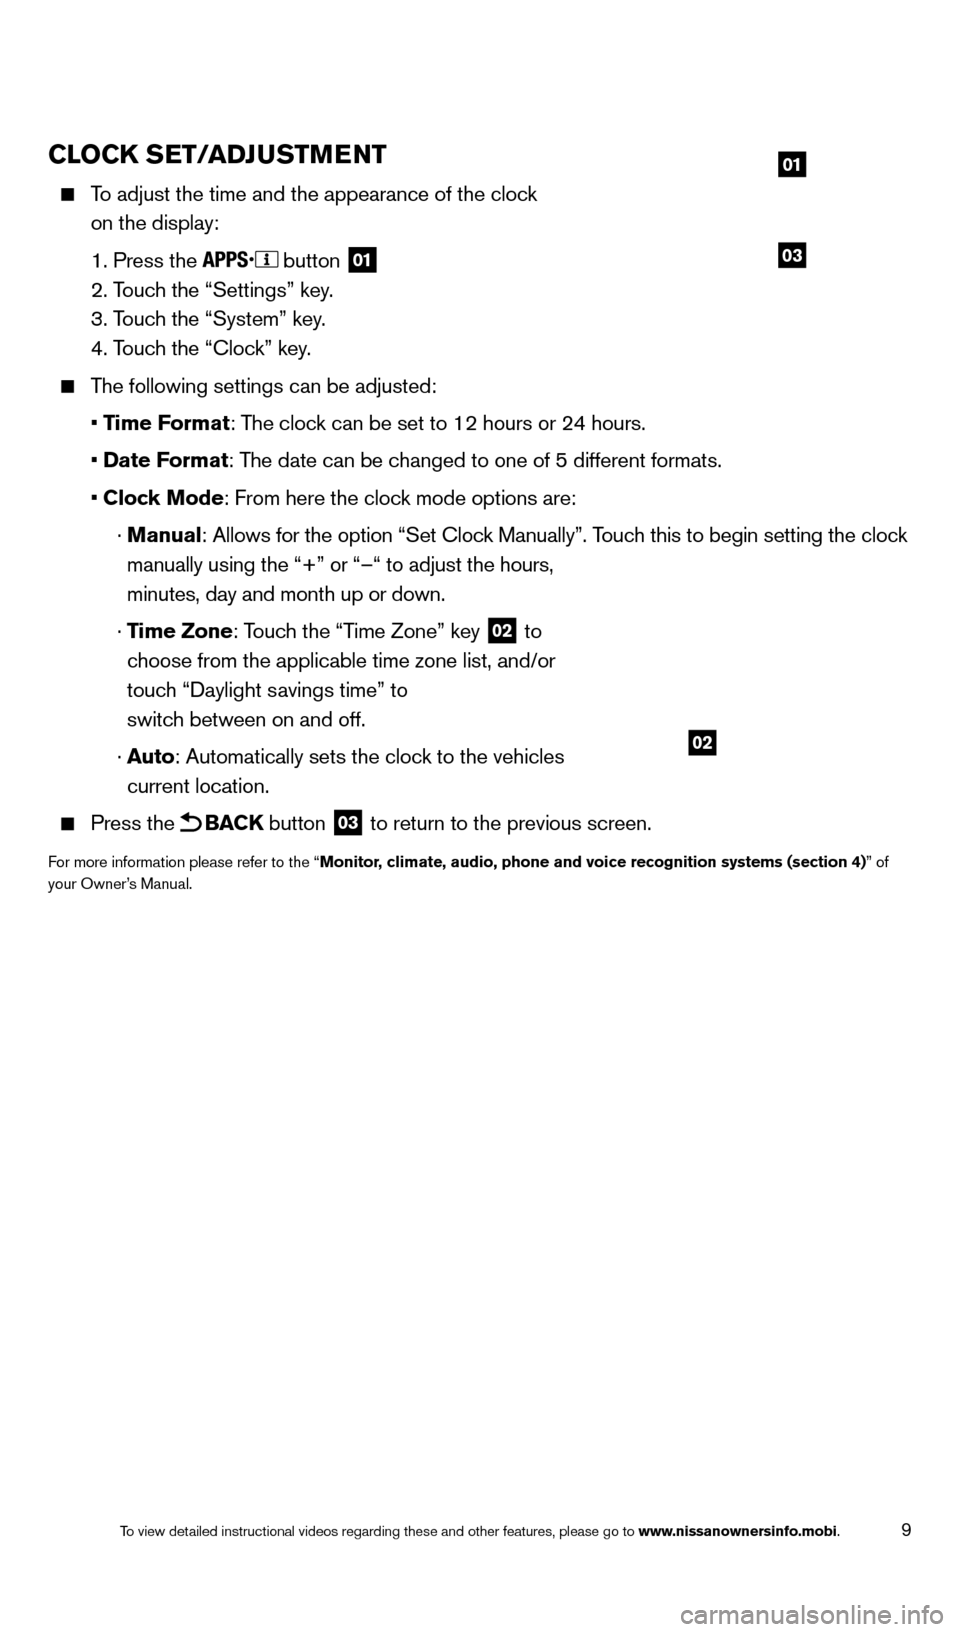
To adjust the time and the appearance of the clock
on the display:
1. Press the button 01
2. Touch the “Settings” key.
3. Touc
h the “System” key.
4. Touc
h the “Clock” key.
The following settings can be adjusted:
• T
ime Format: The clock can be set to 12 hours or 24 hours.
• Date
Format: The date can be changed to one of 5 different formats.
• Clock Mode
: From here the clock mode options are:
· Manual: Allows for the option “Set Cloc
k Manually”. Touch this to begin setting the clock
manually using the “+” or “–“ to adjust the hours,
minutes, day and month up or down.
· T
ime Zone: Touch the “Time Zone” key
02 to
choose from the applicable time zone list, and/or
touch “Daylight savings time” to
switch between on and off.
· Auto
: Automatically sets the clock to the vehicles
current location.
Press the BACK button 03 to return to the previous screen.
For more information please refer to the “Monitor, climate, audio, phone and voice recognition systems (section 4)” of
your Owner’s Manual.
03
01
02
1766904_14d_Rogue_QRG_062514.indd 96/25/14 3:29 PM
To view detailed instructional videos regarding these and other features, please go\
to www.nissanownersinfo.mobi.
Page 18 of 28
16
FIRST DRIVE FEATURES
FM/AM/SiriusXM®* SATELLITE RADIO WITH CD PLAYER
(if so equipped)
01 VOLU ME CONTROL KNOB/POWER BUTTON
Turn the VOLUME control knob to the right or left to increase or decrease the volume.
Press the P
OWE R button to turn the system on or off.
02 TUNE/SCROLL KNOB/ENTER/AUDIO BUTTON
To manually tune the radio, turn the TUNE/SCROLL
knob left or right.
Press the ENTER/AUDIO button to go to the audio settings screen.
03 SEEK BUTTONS
To tune and stop at the next or previous broadcast station, press the seek buttons or .
For satellite radio, to switch to the first channel of the previous or next category,
press the seek buttons
or .
To change tracks on a CD, press the seek buttons or .
To fast forward or rewind a track on a CD, press and hold the seek buttons or .
04 STA TION SELECT KEYS
Twelve stations can be set for the FM band, 6 for the AM band and 18 for
s
atellite radio.
To store a station in a preset, you must first select a radio band by pressing the \
FM•AM button
05 or SXM button 06 then tune to the desired FM, AM or satellite
radio station.
*SiriusXM® Satellite Radio is only available on vehicles equipped with an optional s\
atellite radio subscription service.
06
04
03
05
0102
09 AUT O BUTTON Press the
AUT O button to turn the system on and the system will automatically control \
the
inside temperature (automatic cooling and/or dehumidified heating), \
air flow distribution
and fan speed.
10 FRE SH AIR INTAKE BUTTON Press the fresh air intake
button to draw outside air into the passenger compartment.
The fresh air intake indicator light on the button will illuminate.
For more information, refer to the “Instruments and controls (section 2)” and the “Center display, heater, air conditioner,
audio, phone and voice recognition systems (section 4)” of your Owner’s Manual.
1766904_14d_Rogue_QRG_062514.indd 166/25/14 3:29 PM
To view detailed instructional videos regarding these and other features, please go\
to www.nissanownersinfo.mobi.
Page 19 of 28
17
CRUISE CONTROL
The cruise control system enables you to set a constant
cruising speed once the vehicle has reac hed 25 mph
(40 km/h). The system will automatically maintain the
set speed until you tap the brake pedal, accelerate,
cancel or turn the system off.
To activate the cruise control, push the ON•OFF
switch
01. The CRUISE indicator light in the
instrument panel will illuminate.
To set cruising speed, accelerate the vehicle to the
desired speed, push the COAST/SET switch
02 and release. The SET indicator light
in the instrument panel will illuminate and the set speed will display next to \
the indicator
light. Take your foot off the accelerator pedal. Your vehicle will maintain the set speed.
To reset at a faster cruising speed, push and hold the ACCEL/RES switc h 03.
When the vehicle attains the desired speed, release the switch.
To reset at a slower cruising speed, push and hold the COAST/SET switch 02.
Release the switch when the vehicle slows to the desired speed.
To cancel the preset speed, tap the brake pedal or push the CANCEL switch 04.
To turn off cruise control, push the ON•OFF switch 01. Both the CRUISE indicator light
and SET indicator light in the instrument panel will extinguish.
For more information, refer to the “Starting and driving (section 5)” of your Owner’s Manual.
03
02
01
04
USB (Universal Serial Bus) CONNECTION PORT/AUX JACK
and iPOD® INTERFACE
The USB port/Aux jack 01 is located beneath the
climate controls.
When a compatible USB memory device, iPod® or
auxiliary device is plugged into the USB port/Aux
jack, compatible audio files stored on the device can
be played through the vehicle’s audio system.
For more information, refer to the “Center display, heater, air conditioner, audio, phone and voice recognition systems
(section 4)” of your Owner’s Manual.
01
Then press and hold the desired station select button (1 -6 ) until a beep is heard and the
sound is briefly muted. The channel indicator will appear on the display and the sound will
resume. Programing is now complete.
To retrieve a previously set station, select the radio band where the preset was stored
then press the corresponding st ation select button (1-6 ).
For more information, refer to the “Center display, heater, air conditioner, audio, phone and voice recognition systems
(section 4)” of your Owner’s Manual.
1766904_14d_Rogue_QRG_062514.indd 176/25/14 3:29 PM
To view detailed instructional videos regarding these and other features, please go\
to www.nissanownersinfo.mobi.
Page 21 of 28
19
SYSTEM GUIDE
VEHICLE INFORMATION DISPLAY
The vehicle information display 01 displays such items as:
Vehicle settings
Trip computer information
Drive system warnings and settings (if so equipped)
Audio information
Navigation turn-by-turn
Cruise control system information
NISSAN Intelligent Key® operation information
Indicators and warnings
Tire pressure information
USI NG THE VEHICLE INFORMATION DISPLAY
The vehicle information display can be changed using
the
button 02 and the ENTER buttons 03
located on the steering wheel.
Press 02 to change the display mode.
Move the switch 03 up or down to navigate
through the vehicle information display menu.
Press ENTER 04 to change or select an item.
Press 05 to go back to the previous menu.
STARTUP DISPLAY
When the ignition is in the ON position, the vehicle information display will support four of the
following modes:
Active system status (if so equipped) Fuel economy
Trip computer Warnings (if there are any)
Tire pressure information
R
ESETTING THE TRIP COMPUTER
1.
Press
the
button 02 until you reach the trip computer mode.
2.
Press
the
button 02 for more than 1.5 seconds to reset fuel consumption, average
speed, distance to empty and journey time.
3.
Pushing
the TRIP RESET switch
06 for more than 1 second resets the currently
displayed trip odometer to zero.
SETTINGS
The setting mode allows you to change the information displayed in the vehicle
information display:
Driver Assistance Alarm
Clock Unit
Meter Settings Language
Vehicle Settings Factory Reset
Maintenance
For more information, refer to the “Instruments and controls (section 2)” of your Owner’s Manual.
05
03
02
04
06
01
1766904_14d_Rogue_QRG_062514.indd 196/25/14 3:30 PM
To view detailed instructional videos regarding these and other features, please go\
to www.nissanownersinfo.mobi.
Page 22 of 28
20
SYSTEM GUIDE
BLUETOOTH® HANDS-FREE PHONE SYSTEM
A cellular telephone should not be used while driving
so full attention may be given to vehicle operation.*
S
YSTEM OPERATING TIPS
Press the button to interrupt the voice prompts
at any time and speak a command after the tone.
To use the system faster, you may speak the second
level commands with the main menu command on
the main menu. F
or example, press the
button
and after the tone say, “Call Redial”.
The “Help” command can be used to hear a list of
available commands at any time.
Reduce background noise as muc h as possible by
closing windows and pointing HVAC vents away from
the ceiling.
Speak naturally without long pauses and without
raising your voice.
When speaking Phonebook names, please be aware some phones require the la\
st name to be
spoken before the first name. F or example, “Michael Smith” may be spoken as “Smith Michael”.
To cancel a voice recognition session, say “Exit” or press and hold the button.
To decrease or increase the volume of the voice prompts, push the volume \
control switches
or
on the steering wheel or turn the VOL/ON•OFF control knob on the audio
system while the system is responding.
Voice commands can be used to operate various Bluetooth® System features using the
NISSAN Voice Recognition system. See your Owner’s Manual for detailed information.
For more detailed information and instructions, refer to your cellular phone Owner’s Manual and
visit www
.nissanusa.com/bluetooth.
BLUETOOTH® SYSTEM WITHOUT NAVIGATION (if so equipped)
PAIRING PROCEDURE
1.
Press
the
button on the steering wheel. The system announces the available commands.
3.
Say: “
Add Phone”. The system acknowledges the command and asks you to initiate connecting
from the phone handset.
4.
Initiate pairing from the phone.
• The connecting procedure varies according to eac
h cellular phone model.
For detailed connecting instructions and a list of compatible phones,
please visit www.nissanusa.com/bluetooth.
• When prompted, compare the P
IN on the display with the PIN code shown on the handset.
If your device does not support Secure Simple Pairing and requests you t\
o input a PIN,
enter “1234” from the handset.
5.
Say a name for the phone when the system asks you to provide one. Y
ou can give the phone a
name of your choice.
*Some jurisdictions prohibit the use of cellular telephones while drivin\
g.
1766904_14d_Rogue_QRG_062514.indd 206/25/14 3:30 PM
To view detailed instructional videos regarding these and other features, please go\
to www.nissanownersinfo.mobi.