2014 NISSAN QUEST battery
[x] Cancel search: batteryPage 420 of 482
JUMP STARTING
If jump starting is necessary, see “Jump starting”
(P.6-10) . If the engine does not start by jump
starting, the battery may have to be replaced.
Contact a NISSAN dealer.CAUTION
.Do not ground accessories directly
to the battery terminal. Doing so will
bypass the variable voltage control
system and the vehicle battery may
not charge completely.
. Use electrical accessories with the
engine running to avoid discharging
the vehicle battery.
The variable voltage control system measures
the amount of electrical discharge from the
battery and controls voltage generated by the
generator.
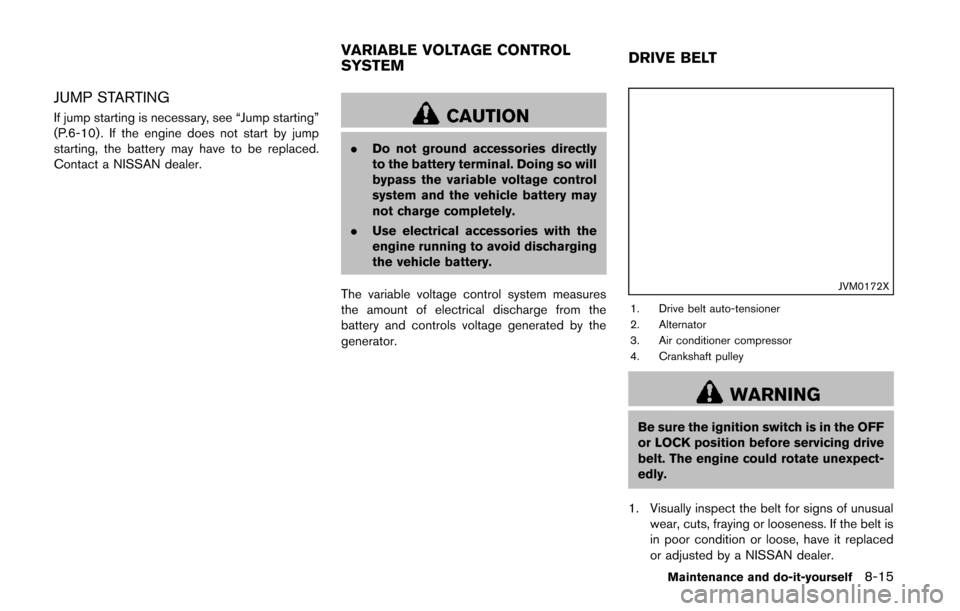
JVM0172X
1. Drive belt auto-tensioner
2. Alternator
3. Air conditioner compressor
4. Crankshaft pulley
WARNING
Be sure the ignition switch is in the OFF
or LOCK position before servicing drive
belt. The engine could rotate unexpect-
edly.
1. Visually inspect the belt for signs of unusual wear, cuts, fraying or looseness. If the belt is
in poor condition or loose, have it replaced
or adjusted by a NISSAN dealer.
Maintenance and do-it-yourself8-15
VARIABLE VOLTAGE CONTROL
SYSTEM DRIVE BELT
Page 427 of 482
8-22Maintenance and do-it-yourself
JVM0187X
PASSENGER COMPARTMENT
CAUTION
Never use a fuse of a higher or lower
amperage rating than that specified on
the fuse box cover. This could damage
the electrical system or cause a fire.
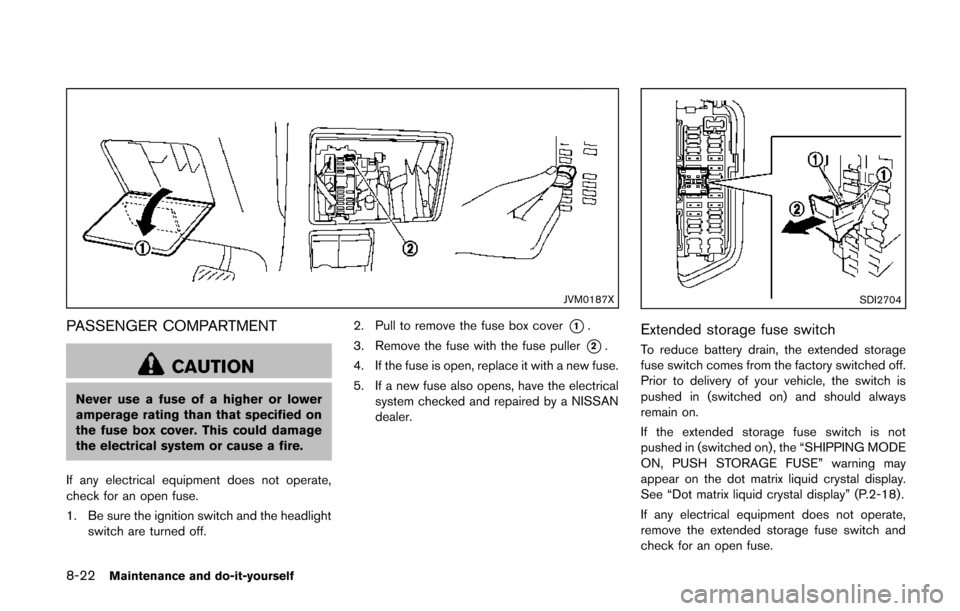
If any electrical equipment does not operate,
check for an open fuse.
1. Be sure the ignition switch and the headlight switch are turned off. 2. Pull to remove the fuse box cover
*1.
3. Remove the fuse with the fuse puller
*2.
4. If the fuse is open, replace it with a new fuse.
5. If a new fuse also opens, have the electrical system checked and repaired by a NISSAN
dealer.
SDI2704
Extended storage fuse switch
To reduce battery drain, the extended storage
fuse switch comes from the factory switched off.
Prior to delivery of your vehicle, the switch is
pushed in (switched on) and should always
remain on.
If the extended storage fuse switch is not
pushed in (switched on), the “SHIPPING MODE
ON, PUSH STORAGE FUSE” warning may
appear on the dot matrix liquid crystal display.
See “Dot matrix liquid crystal display” (P.2-18) .
If any electrical equipment does not operate,
remove the extended storage fuse switch and
check for an open fuse.
Page 428 of 482
NOTE:
If the extended storage fuse switch mal-
functions, or if the fuse is open, it is not
necessary to replace the switch. In this
case, remove the extended storage fuse
switch and replace it with a new fuse of the
same rating.
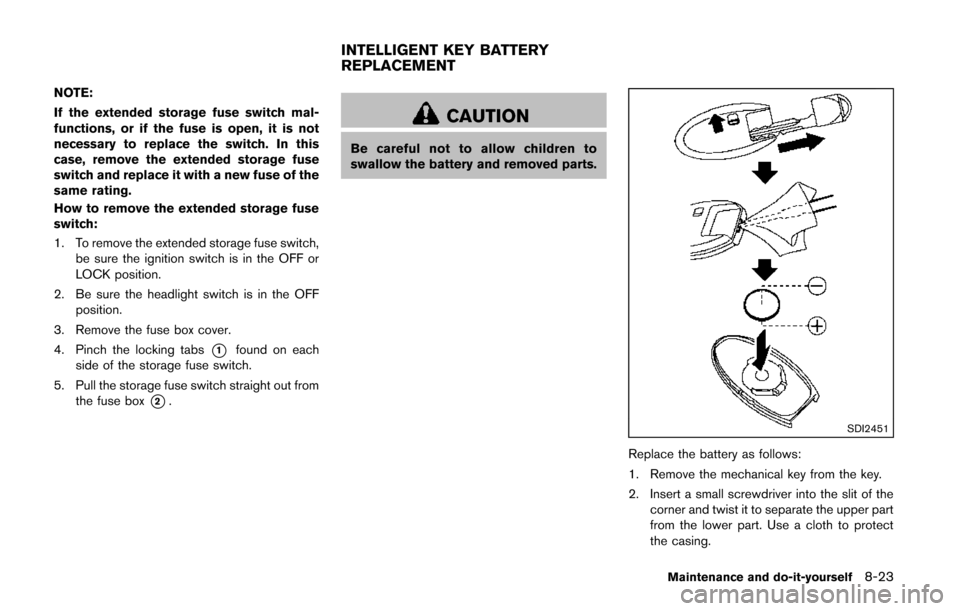
How to remove the extended storage fuse
switch:
1. To remove the extended storage fuse switch,be sure the ignition switch is in the OFF or
LOCK position.
2. Be sure the headlight switch is in the OFF position.
3. Remove the fuse box cover.
4. Pinch the locking tabs
*1found on each
side of the storage fuse switch.
5. Pull the storage fuse switch straight out from the fuse box
*2.
CAUTION
Be careful not to allow children to
swallow the battery and removed parts.
SDI2451
Replace the battery as follows:
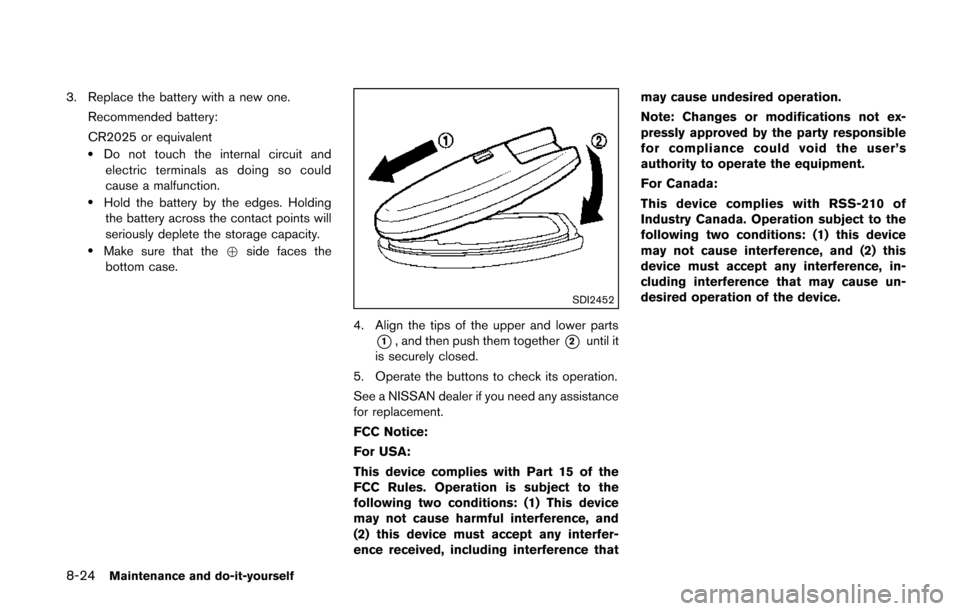
1. Remove the mechanical key from the key.
2. Insert a small screwdriver into the slit of the
corner and twist it to separate the upper part
from the lower part. Use a cloth to protect
the casing.
Maintenance and do-it-yourself8-23
INTELLIGENT KEY BATTERY
REPLACEMENT
Page 429 of 482
8-24Maintenance and do-it-yourself
3. Replace the battery with a new one.Recommended battery:
CR2025 or equivalent
.Do not touch the internal circuit andelectric terminals as doing so could
cause a malfunction.
.Hold the battery by the edges. Holdingthe battery across the contact points will
seriously deplete the storage capacity.
.Make sure that the +side faces the
bottom case.
SDI2452
4. Align the tips of the upper and lower parts
*1, and then push them together*2until it
is securely closed.
5. Operate the buttons to check its operation.
See a NISSAN dealer if you need any assistance
for replacement.
FCC Notice:
For USA:
This device complies with Part 15 of the
FCC Rules. Operation is subject to the
following two conditions: (1) This device
may not cause harmful interference, and
(2) this device must accept any interfer-
ence received, including interference that may cause undesired operation.
Note: Changes or modifications not ex-
pressly approved by the party responsible
for compliance could void the user’s
authority to operate the equipment.
For Canada:
This device complies with RSS-210 of
Industry Canada. Operation subject to the
following two conditions: (1) this device
may not cause interference, and (2) this
device must accept any interference, in-
cluding interference that may cause un-
desired operation of the device.
Page 431 of 482
8-26Maintenance and do-it-yourself
HEADLIGHTS
Fog may temporarily form inside the lens of the
exterior lights in the rain or in a car wash. A
temperature difference between the inside and
the outside of the lens causes the fog. This is
not a malfunction. If large drops of water collect
inside the lens, contact a NISSAN dealer.
Replacing
If replacement is required, see a NISSAN dealer.
Xenon headlight model:
WARNING
HIGH VOLTAGE
When xenon headlights are on, they
produce a high voltage. To prevent an
electric shock, never attempt to modify
or disassemble. Always have your xe-
non headlights replaced at a NISSAN
dealer. For additional information, see
“Headlight and turn signal switch” (P.2-
33) . Halogen headlight model:
The headlight is a semi-sealed beam type which
uses a replaceable headlight (halogen) bulb.
CAUTION
.
Do not leave the bulb out of the
headlight reflector for a long period
of time. Dust, moisture, smoke, etc.
entering the headlight body may
affect bulb performance.
. High pressure halogen gas is sealed
inside the halogen bulb. The bulb
may break if the glass envelope is
scratched or the bulb is dropped.
. Only touch the plastic base when
handling the bulb. Never touch the
glass envelope.
. Aiming is not necessary after repla-
cing the bulb. When aiming adjust-
ment is necessary, contact a
NISSAN dealer.
Use the same number and wattage as originally
installed as shown in the chart.
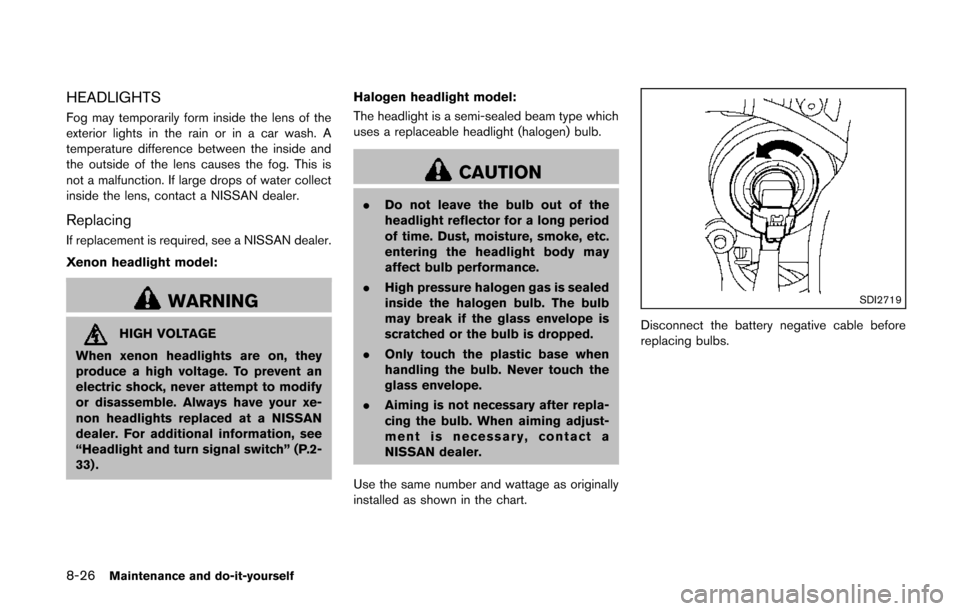
SDI2719
Disconnect the battery negative cable before
replacing bulbs.
Page 466 of 482
is removed, seal the bolt holes to
prevent exhaust fumes, water or
dust from entering the passenger
compartment.
. Regularly check that all trailer hitch
mounting bolts are securely
mounted.
Tire pressures
.When towing a trailer, inflate the vehicle
tires to the recommended cold tire
pressure indicated on the Tire and
Loading Information label.
.Trailer tire condition, size, load rating
and proper inflation pressure should be
in accordance with the trailer and tire
manufacturers’ specifications.
Safety chains
Always use a suitable chain between your
vehicle and the trailer. The safety chains should
be crossed and should be attached to the hitch,
not to the vehicle bumper or axle. The safety
chains can be attached to the bumper if the
hitch ball is mounted to the bumper. Be sure to
leave enough slack in the chains to permit
turning corners.
Trailer lights
CAUTION
When splicing into the vehicle electrical
system, a commercially available
power-type module/converter must be
used to provide power for all trailer
lighting. This unit uses the vehicle
battery as a direct power source for all
trailer lights while using the vehicle tail
light, stoplight and turn signal circuits
as a signal source. The module/con-
verter must draw no more than 15
milliamps from the stop and tail lamp
circuits. Using a module/converter that
exceeds these power requirements may
damage the vehicle’s electrical system.
See a reputable trailer dealer to obtain
the proper equipment and to have it
installed.
Trailer lights should comply with federal and/or
local regulations. For assistance in hooking up
trailer lights, contact a NISSAN dealer or
reputable trailer dealer.
Trailer brakes
If your trailer is equipped with a braking system,
make sure it conforms to federal and/or local
regulations and that it is properly installed.
WARNING
Never connect a trailer brake system
directly to the vehicle brake system.
Pre-towing tips
. Be certain your vehicle maintains a level
position when a loaded or unloaded trailer is
hitched. Do not drive the vehicle if it has an
abnormal nose-up or nose-down condition;
check for improper tongue load, overload,
worn suspension or other possible causes
of either condition.
. Always secure items in the trailer to prevent
load shift while driving.
. Keep the cargo load as low as possible in
the trailer to keep the trailer center of gravity
low.
. Load the trailer so approximately 60% of the
trailer load is in the front half and 40% is in
the back half. Also make sure the load is
balanced side to side.
Technical and consumer information9-21
Page 472 of 482
Due to legal requirements in some states/areas
or provinces, your vehicle may be required to be
in what is called the “ready condition” for an
Inspection/Maintenance (I/M) test of the emis-
sion control system.
The vehicle is set to the “ready condition” when
it is driven through certain driving patterns.
Usually, the “ready condition” can be obtained
by ordinary usage of the vehicle.
If a powertrain system component is repaired or
the battery is disconnected, the vehicle may be
reset to a “not ready condition”. Before taking
the I/M test, check the vehicle’s inspection/
maintenance test readiness condition. Place the
ignition switch in the ON position without
starting the engine. If the Malfunction Indicator
Light (MIL) comes on steady for 20 seconds and
then blinks for 10 seconds, the I/M test
condition is “not ready”. If the MIL does not
blink after 20 seconds, the I/M test condition is
“ready”.
Contact a NISSAN dealer to set “ready condi-
tion” or to prepare the vehicle for testing.This vehicle is equipped with an Event Data
Recorder (EDR) . The main purpose of an EDR is
to record, in certain crash or near crash-like
situations, such as an air bag deployment or
hitting a road obstacle, data that will assist in
understanding how a vehicle’s systems per-
formed. The EDR is designed to record data
related to vehicle dynamics and safety systems
for a short period of time, typically 30 seconds
or less. The EDR in this vehicle is designed to
record such data as:
.
How various systems in your vehicle were
operating;
. Whether or not the driver and passenger
safety belts were buckled/fastened;
. How far (if at all) the driver was depressing
the accelerator and/or brake pedal; and,
. How fast the vehicle was traveling.
. Sounds are not recorded.
These data can help provide a better under-
standing of the circumstances in which crashes
and injuries occur.
NOTE: EDR data are recorded by your vehicle
only if a nontrivial crash situation occurs; no data
are recorded by the EDR under normal driving
conditions and no personal data (e.g. name,
gender, age and crash location) are recorded.
However, other parties, such as law enforce-
ment, could combine the EDR data with the type of personally identifying data routinely acquired
during a crash investigation.
To read data recorded by an EDR, special
equipment is required and access to the vehicle
or the EDR is needed. In addition to the vehicle
manufacturer and NISSAN dealer, other parties,
such as law enforcement, that have the special
equipment, can read the information if they have
access to the vehicle or the EDR. EDR data will
only be accessed with the consent of the vehicle
owner or lessee or as otherwise required or
permitted by law.
Technical and consumer information9-27
READINESS FOR INSPECTION/
MAINTENANCE (I/M) TEST
EVENT DATA RECORDERS (EDR)
Page 474 of 482
10 Index
A
A/C (Air Conditioner) operation.............................. 4-42
ABS (Anti-lock Braking System) ............................ 5-30
Advanced air bag system ......................................... 1-52
Aiming control, Headlights........................................ 2-36
Air bag systemAdvanced air bag system .................................. 1-52
Front passenger air bag and status light....... 1-53
Front-seat mounted side-impact
supplemental air bag system ............................ 1-57
Roof-mounted curtain side-impact
supplemental air bag system ............................ 1-57
Air bag warning labels............................................... 1-59
Air bag warning light...................................... 1-59, 2-15
Air cleaner housing filter ........................................... 8-17
Air conditioner Air conditioner operation.................................... 4-39
Air conditioner service ........................................ 4-52
Air conditioner specification label.................... 9-10
Air conditioning system refrigerant and
lubricant recommendations....................... 4-52, 9-6
In-cabin microfilter ............................................... 4-53
Alarm, How to stop alarm (see vehicle
security system)........................................................... 2-29
Alcohol, drugs and driving.......................................... 5-8
Antenna....................................................................... 4-101
Anti-lock Braking System (ABS) ............................ 5-30
Anti-lock braking system (ABS) warning light..... 2-12
Appearance care Exterior appearance care ...................................... 7-2
Interior appearance care ....................................... 7-4
Armrests .......................................................................... 1-7
Around view
TMmonitor.............................................. 4-29
Audible reminders....................................................... 2-18
Audio operation precautions.................................... 4-53 Audio system................................................................ 4-53
Steering wheel audio controls........................ 4-100
Auto closure ................................................................. 3-29
Autolight system.......................................................... 2-34
Automatic Air conditioner....................................................... 4-46
Door locks................................................................. 3-7
Drive positioner..................................................... 3-37
Moonroof................................................................ 2-53
Seat positioner...................................................... 3-37
AUX (Auxiliary) input................................................... 4-75
Avoiding collision and rollover ................................... 5-6
B
Back door (See lift gate) .......................................... 3-26
Battery............................................................................ 8-13 Battery saver system........................................... 2-35
Intelligent Key........................................................ 8-23
Variable voltage control system........................ 8-15
Before starting the engine........................................ 5-12
Blind Spot Warning (BSW) system....................... 5-17
Blind Spot Warning (BSW) system
warning light................................................................. 2-12
Bluetooth
®hands-free phone system
(models with navigation system).......................... 4-114
Bluetooth
®hands-free phone system
(models without navigation system) .................... 4-124
Bluetooth
®streaming audio ..................................... 4-91
Booster seats............................................................... 1-43
Brake Anti-lock Braking System (ABS) ..................... 5-30
Brake fluid.............................................................. 8-12
Brake system......................................................... 5-29
Parking brake operation ..................................... 5-17
Warning light......................................................... 2-12 Break-in schedule ....................................................... 5-26
Brightness control
Display ON/OFF button ........................................ 4-8
Instrument panel................................................... 2-37
Bulb check/instrument panel ................................... 2-12
Bulb replacement........................................................ 8-25
C
Cabin air filter............................................................... 4-53
Capacities and recommended fuel/lubricants ....... 9-2
Car phone or CB radio .......................................... 4-113
Cargo floor box............................................................ 2-47
Cargo lights.................................................................. 2-58
Catalytic converter, Three way catalyst................... 5-3
CD/CF/USB memory care and cleaning .............. 4-99
Center multi-function control panel.......................... 4-3
Child restraints............................................................. 1-26 Booster seats........................................................ 1-43
LATCH system...................................................... 1-28
Precautions on child restraints......................... 1-27
Top tether strap.................................................... 1-31
Child safety................................................................... 1-24
Chimes Audible reminders................................................ 2-18
Seat belt warning light and chime................... 2-15
Circuit breaker, Fusible link...................................... 8-21
Cleaning exterior and interior............................ 7-2, 7-4
Clock.............................................................................. 4-72
Coat hooks ................................................................... 2-50
Cockpit ............................................................................ 2-3
Cold weather driving.................................................. 5-33
Communication mirror................................................ 3-36
Compact Disc (CD) player (See
audio system)................................................... 4-74, 4-82
Compass......................................................................... 2-8