2014 NISSAN QUEST ECU
[x] Cancel search: ECUPage 168 of 482
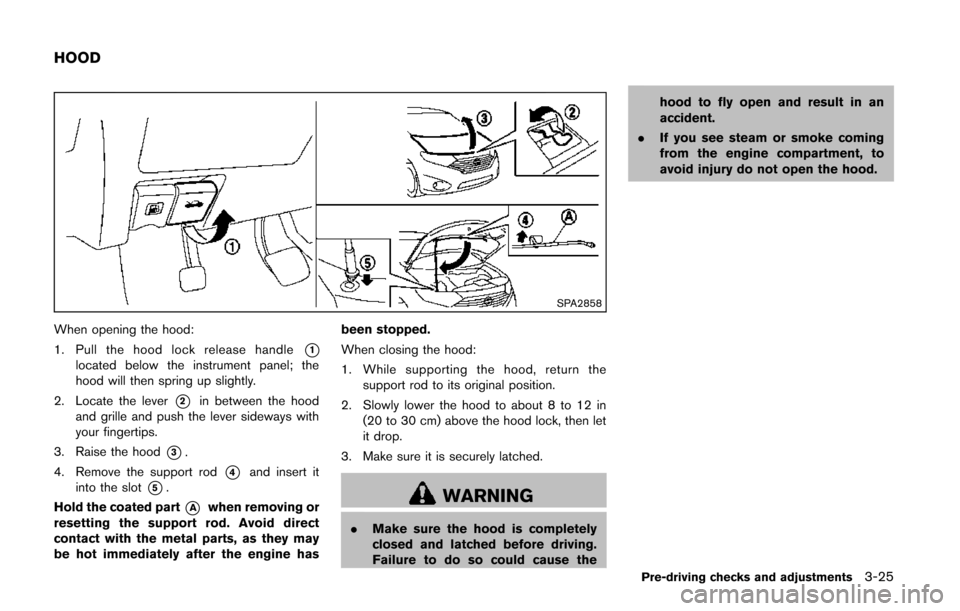
SPA2858
When opening the hood:
1. Pull the hood lock release handle
*1located below the instrument panel; the
hood will then spring up slightly.
2. Locate the lever
*2in between the hood
and grille and push the lever sideways with
your fingertips.
3. Raise the hood
*3.
4. Remove the support rod
*4and insert it
into the slot
*5.
Hold the coated part
*Awhen removing or
resetting the support rod. Avoid direct
contact with the metal parts, as they may
be hot immediately after the engine has been stopped.
When closing the hood:
1. While supporting the hood, return the
support rod to its original position.
2. Slowly lower the hood to about 8 to 12 in (20 to 30 cm) above the hood lock, then let
it drop.
3. Make sure it is securely latched.WARNING
. Make sure the hood is completely
closed and latched before driving.
Failure to do so could cause the hood to fly open and result in an
accident.
. If you see steam or smoke coming
from the engine compartment, to
avoid injury do not open the hood.
Pre-driving checks and adjustments3-25
HOOD
Page 169 of 482
3-26Pre-driving checks and adjustments
WARNING
.Always be sure the lift gate has
been closed securely to prevent it
from opening while driving.
. Do not drive with the lift gate open.
This could allow dangerous exhaust
gases to be drawn into the vehicle.
See “Exhaust gas (carbon monox-
ide)” (P.5-2) of this manual.
. Do not leave children unattended
inside the vehicle. They could un-
knowingly activate switches or con-
trols. Unattended children could
become involved in serious acci-
dents.
. Always be sure that hands and feet
are clear of the gate frame to avoid
injury while closing the lift gate.
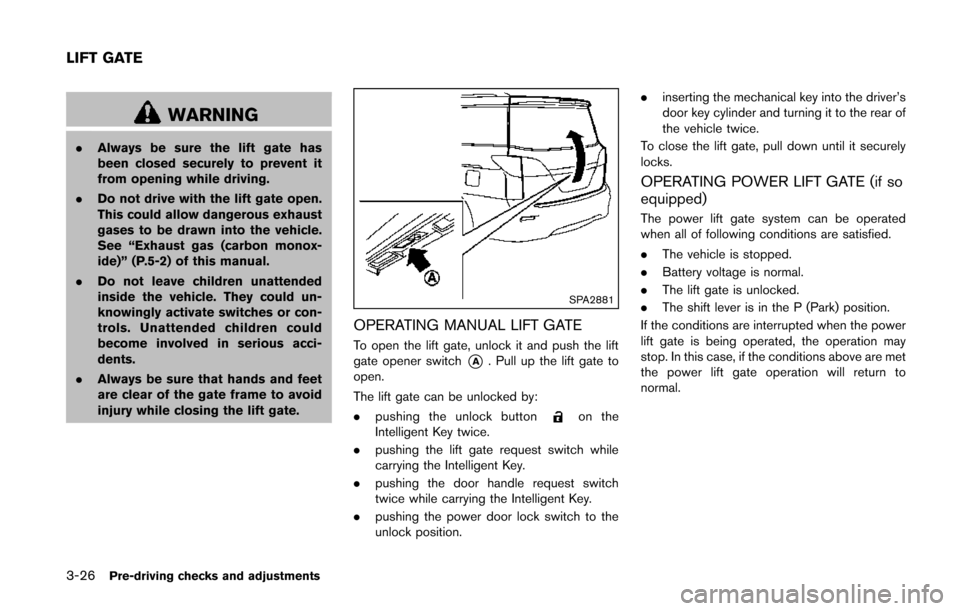
SPA2881
OPERATING MANUAL LIFT GATE
To open the lift gate, unlock it and push the lift
gate opener switch
*A. Pull up the lift gate to
open.
The lift gate can be unlocked by:
. pushing the unlock button
on the
Intelligent Key twice.
. pushing the lift gate request switch while
carrying the Intelligent Key.
. pushing the door handle request switch
twice while carrying the Intelligent Key.
. pushing the power door lock switch to the
unlock position. .
inserting the mechanical key into the driver’s
door key cylinder and turning it to the rear of
the vehicle twice.
To close the lift gate, pull down until it securely
locks.
OPERATING POWER LIFT GATE (if so
equipped)
The power lift gate system can be operated
when all of following conditions are satisfied.
. The vehicle is stopped.
. Battery voltage is normal.
. The lift gate is unlocked.
. The shift lever is in the P (Park) position.
If the conditions are interrupted when the power
lift gate is being operated, the operation may
stop. In this case, if the conditions above are met
the power lift gate operation will return to
normal.
LIFT GATE
Page 206 of 482
The system is designed as an aid to the driver in
situations such as slot parking or parallel
parking.
When the shift lever is shifted into the R
(Reverse) position, the monitor display shows
the view to the rear of the vehicle.
WARNING
.The RearView Monitor is a conve-
nience but it is not a substitute to
check behind the vehicle when
backing up.
. The driver is always responsible for
safety during parking and other
maneuvers.
. Objects viewed in the RearView
Monitor differ from actual distance
because a wide-angle lens is used.
Objects in the RearView Monitor
will appear visually opposite like
ones viewed in the inside and out-
side mirrors.
. Make sure that the lift gate is
securely closed when backing up.
. Underneath the bumper and the
corner areas of the bumper cannot
be viewed on the RearView Monitor because of its monitoring range
limitation.
. Do not put anything on the Rear-
View camera. The RearView camera
is installed above the license plate.
. When washing the vehicle with
high-pressure water, be sure not to
spray it around the camera. Other-
wise, water may enter the camera
unit causing water condensation on
the lens, a malfunction, fire or an
electric shock.
. Do not strike the camera. It is a
precision instrument. Otherwise, it
may malfunction or cause damage
resulting in a fire or an electric
shock.
CAUTION
Do not scratch the camera lens when
cleaning dirt or snow from the lens.
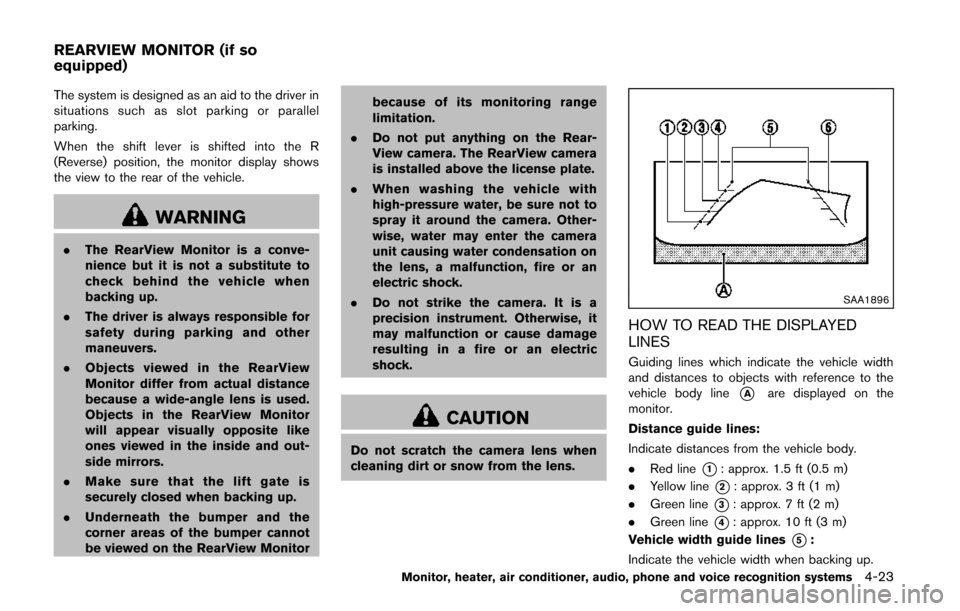
SAA1896
HOW TO READ THE DISPLAYED
LINES
Guiding lines which indicate the vehicle width
and distances to objects with reference to the
vehicle body line
*Aare displayed on the
monitor.
Distance guide lines:
Indicate distances from the vehicle body.
. Red line
*1: approx. 1.5 ft (0.5 m)
. Yellow line
*2: approx. 3 ft (1 m)
. Green line
*3: approx. 7 ft (2 m)
. Green line
*4: approx. 10 ft (3 m)
Vehicle width guide lines
*5:
Indicate the vehicle width when backing up.
Monitor, heater, air conditioner, audio, phone and voice recognition systems4-23
REARVIEW MONITOR (if so
equipped)
Page 213 of 482
4-30Monitor, heater, air conditioner, audio, phone and voice recognition systems
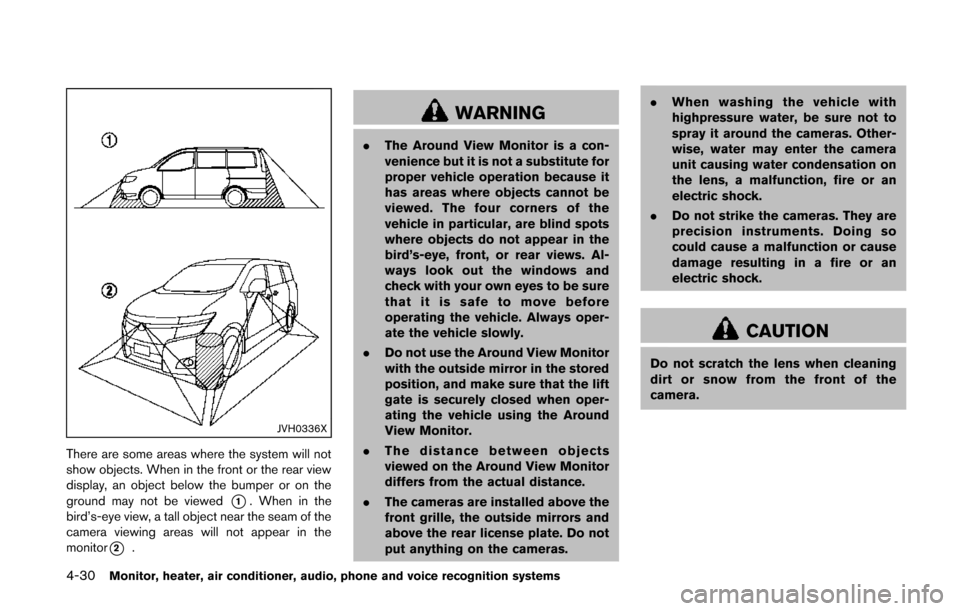
JVH0336X
There are some areas where the system will not
show objects. When in the front or the rear view
display, an object below the bumper or on the
ground may not be viewed
*1. When in the
bird’s-eye view, a tall object near the seam of the
camera viewing areas will not appear in the
monitor
*2.
WARNING
. The Around View Monitor is a con-
venience but it is not a substitute for
proper vehicle operation because it
has areas where objects cannot be
viewed. The four corners of the
vehicle in particular, are blind spots
where objects do not appear in the
bird’s-eye, front, or rear views. Al-
ways look out the windows and
check with your own eyes to be sure
that it is safe to move before
operating the vehicle. Always oper-
ate the vehicle slowly.
. Do not use the Around View Monitor
with the outside mirror in the stored
position, and make sure that the lift
gate is securely closed when oper-
ating the vehicle using the Around
View Monitor.
. The distance between objects
viewed on the Around View Monitor
differs from the actual distance.
. The cameras are installed above the
front grille, the outside mirrors and
above the rear license plate. Do not
put anything on the cameras. .
When washing the vehicle with
highpressure water, be sure not to
spray it around the cameras. Other-
wise, water may enter the camera
unit causing water condensation on
the lens, a malfunction, fire or an
electric shock.
. Do not strike the cameras. They are
precision instruments. Doing so
could cause a malfunction or cause
damage resulting in a fire or an
electric shock.
CAUTION
Do not scratch the lens when cleaning
dirt or snow from the front of the
camera.
Page 290 of 482
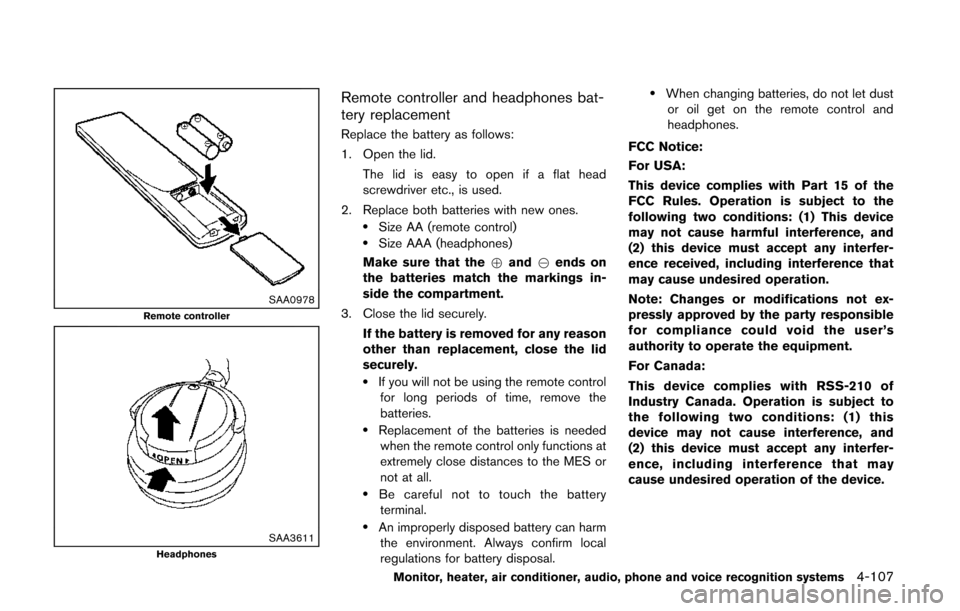
SAA0978Remote controller
SAA3611Headphones
Remote controller and headphones bat-
tery replacement
Replace the battery as follows:
1. Open the lid.The lid is easy to open if a flat head
screwdriver etc., is used.
2. Replace both batteries with new ones.
.Size AA (remote control).Size AAA (headphones)
Make sure that the +and 7ends on
the batteries match the markings in-
side the compartment.
3. Close the lid securely.
If the battery is removed for any reason
other than replacement, close the lid
securely.
.If you will not be using the remote controlfor long periods of time, remove the
batteries.
.Replacement of the batteries is neededwhen the remote control only functions at
extremely close distances to the MES or
not at all.
.Be careful not to touch the batteryterminal.
.An improperly disposed battery can harm the environment. Always confirm local
regulations for battery disposal.
.When changing batteries, do not let dustor oil get on the remote control and
headphones.
FCC Notice:
For USA:
This device complies with Part 15 of the
FCC Rules. Operation is subject to the
following two conditions: (1) This device
may not cause harmful interference, and
(2) this device must accept any interfer-
ence received, including interference that
may cause undesired operation.
Note: Changes or modifications not ex-
pressly approved by the party responsible
for compliance could void the user’s
authority to operate the equipment.
For Canada:
This device complies with RSS-210 of
Industry Canada. Operation is subject to
the following two conditions: (1) this
device may not cause interference, and
(2) this device must accept any interfer-
ence, including interference that may
cause undesired operation of the device.
Monitor, heater, air conditioner, audio, phone and voice recognition systems4-107
Page 296 of 482
controller and tilt the joystick to the right or left.
Push the BACK button on the remote controller
to apply the settings and return to the previous
display.
To return the adjustment levels to the default
value, select “Execute” next to “Initialization”
using the joystick on the remote controller and
push the ENTER
button. The “Execute” key
is deactivated when the picture mode settings
are already in the default value.
Color System:
To choose the color system, select from
“NTSC”, “PAL”, “PAL-60”, “PAL-M”, “PAL-N” or
“AUTO” using the joystick on the remote
controller and tilt the joystick to the right or left.
3D Y/C filter:
Set to ON/OFF using the joystick on the remote
controller. When turned on, small characters
and an outline of the shapes will be displayed
more clearly than when turned off.
CARE AND MAINTENANCE
Use a lightly dampened, lint free cloth to clean
the surfaces of your Mobile Entertainment
System (DVD player face, screen, remote
controller, etc.) .
CAUTION
. Do not use any solvents or cleaning
solutions when cleaning the video
system.
. Do not use excessive force on the
monitor screen.
. Avoid touching or scratching the
monitor screen as it may become
dirty or damaged.
. Do not attempt to operate the
system in extreme temperature con-
ditions [below −48F( −208 C) and
above 1588F (708C)].
. Do not attempt to operate the
system in extreme humidity condi-
tions (less than 10% or more than
75%) . When installing a car phone or a CB radio in
your vehicle, be sure to observe the following
cautions, otherwise the new equipment may
adversely affect the electronic control modules
and electronic control system harness.
WARNING
.
A cellular phone should not be used
for any purpose while driving so full
attention may be given to vehicle
operation. Some jurisdictions prohi-
bit the use of cellular phones while
driving.
. If you must make a call while your
vehicle is in motion, the hands-free
cellular phone operational mode (if
so equipped) is highly recom-
mended. Exercise extreme caution
at all times so full attention may be
given to vehicle operation.
. If a conversation in a moving vehicle
requires you to take notes, pull off
the road to a safe location and stop
your vehicle before doing so.
Monitor, heater, air conditioner, audio, phone and voice recognition systems4-113
CAR PHONE OR CB RADIO
Page 345 of 482
5-2Starting and driving
WARNING
.Do not leave children or adults who
would normally require the support
of others alone in your vehicle. Pets
should not be left alone either. They
could accidentally injure themselves
or others through inadvertent op-
eration of the vehicle. Also, on hot,
sunny days, temperatures in a
closed vehicle could quickly become
high enough to cause severe or
possibly fatal injuries to people or
animals.
. Properly secure all cargo with ropes
or straps to help prevent it from
sliding or shifting. Do not place
cargo higher than the seatbacks. In
a sudden stop or collision, unse-
cured cargo could cause personal
injury.
EXHAUST GAS (carbon monoxide)
WARNING
.Do not breathe exhaust gases; they
contain colorless and odorless car-
bon monoxide. Carbon monoxide is
dangerous. It can cause uncon-
sciousness or death.
. If you suspect that exhaust fumes
are entering the vehicle, drive with
all windows fully open, and have the
vehicle inspected immediately.
. Do not run the engine in closed
spaces such as a garage.
. Do not park the vehicle with the
engine running for any extended
length of time.
. Keep the lift gate closed while
driving, otherwise exhaust gases
could be drawn into the passenger
compartment. If you must drive with
the lift gate open, follow these
precautions:
1. Open all the windows.
2. Set the
air recirculation to off
and the fan control to high to circulate the air.
. If electrical wiring or other cable
connections must pass to a trailer
through the seal on the lift gate or
the body, follow the manufacturer’s
recommendation to prevent carbon
monoxide entry into the vehicle.
. If a special body, camper or other
equipment is added for recreational
or other usage, follow the manufac-
turer’s recommendation to prevent
carbon monoxide entry into the
vehicle. (Some recreational vehicle
appliances such as stoves, refrig-
erators, heaters, etc. may also gen-
erate carbon monoxide.)
. The exhaust system and body
should be inspected by a qualified
mechanic whenever:
— The vehicle is raised for service.
— You suspect that exhaust fumes
are entering into the passenger
compartment.
— You notice a change in the sound of the exhaust system.
— You have had an accident invol- ving damage to the exhaust
PRECAUTIONS WHEN STARTING
AND DRIVING
Page 351 of 482
5-8Starting and driving
6. Turn on the hazard warning flashers andeither contact a roadside emergency service
to change the tire or see “Changing a flat
tire” (P.6-3) .
DRINKING ALCOHOL/DRUGS AND
DRIVING
WARNING
Never drive under the influence of
alcohol or drugs. Alcohol in the blood-
stream reduces coordination, delays
reaction time and impairs judgement.
Driving after drinking alcohol increases
the likelihood of being involved in an
accident injuring yourself and others.
Additionally, if you are injured in an
accident, alcohol can increase the se-
verity of the injury.
NISSAN is committed to safe driving. However,
you must choose not to drive under the influence
of alcohol. Every year thousands of people are
injured or killed in alcohol-related accidents.
Although the local laws vary on what is
considered to be legally intoxicated, the fact is
that alcohol affects all people differently and
most people underestimate the effects of
alcohol. Remember, drinking and driving don’t mix! And
that is true for drugs, too (over-the-counter,
prescription, and illegal drugs) . Don’t drive if
your ability to operate your vehicle is impaired by
alcohol, drugs, or some other physical condition.
WARNING
Do not operate the push-button ignition
switch while driving the vehicle except
in an emergency. (The engine will stop
when the ignition switch is pushed 3
consecutive times or the ignition switch
is pushed and held for more than 2
seconds.) If the engine stops while the
vehicle is being driven, this could lead
to a crash and serious injury.
Before operating the push-button ignition
switch, be sure to move the shift lever to the P
(Park) position.
INTELLIGENT KEY SYSTEM
The Intelligent Key system can operate the
ignition switch without taking the Intelligent
Key out from your pocket or purse. The
operating environment and/or conditions may
affect the Intelligent Key system operation.
CAUTION
. Be sure to carry the Intelligent Key
with you when operating the vehi-
cle.
PUSH-BUTTON IGNITION SWITCH