2014 NISSAN QUEST navigation
[x] Cancel search: navigationPage 284 of 482
.Pushing the menu control switch will show
the XM Menu.
iPod
®(if so equipped):
. Tilting up/down for less than 1.5 seconds
will skip up/down to the next or previous
track.
. Tilting up/down for more than 1.5 seconds
will skip to the next or previous playlist.
. Pushing the menu control switch will show
the iPod Menu.
CD:
. Tilting up/down for less than 1.5 seconds
will skip up/down to the next or previous
track.
. Tilting up/down for more than 1.5 seconds
will skip up/down to the next or previous
folder number (if playing compressed audio
files) .
. Pushing the menu control switch will show
the CD Menu.
DVD (if so equipped):
. Tilting up/down for less than 1.5 seconds
will skip up/down to the next or previous
track.
. Tilting up/down for more than 1.5 seconds
will skip up/down to the next or previous
title. .
Pushing the menu control switch will select
an item from the DVD display.
. When the transparent operation menu ap-
pears, the switch will control the menu.
USB (if so equipped):
. Tilting up/down for less than 1.5 seconds
will skip up/down to the next or previous
track.
. Tilting up/down for more than 1.5 seconds
will skip up/down to the next or previous
folder number
. Pushing the menu control switch will show
the USB Menu.
Bluetooth
®Audio (models with navigation
system):
. Tilting up/down for less than 1.5 seconds
will skip up/down to the next or previous
track.
BACK switch (models with navi-
gation system)
Push this switch to go back to the previous
screen or cancel the selection if it is not
completed.
Volume control switches
Push the upper (+) or lower (−) side switch to
increase or decrease the volume.
SOURCE select switch
Push the source select switch to change the
mode to available audio source.
ANTENNA
Window antenna
The antenna pattern is printed inside the rear
side window.
CAUTION
. Do not place metalized film near the
rear side window glass or attach any
metal parts to it. This may cause
poor reception or noise.
. When cleaning the inside of the rear
side window, be careful not to
scratch or damage the rear side
window antenna. Lightly wipe along
the antenna with a dampened soft
cloth.
Monitor, heater, air conditioner, audio, phone and voice recognition systems4-101
Page 288 of 482
SAA3609
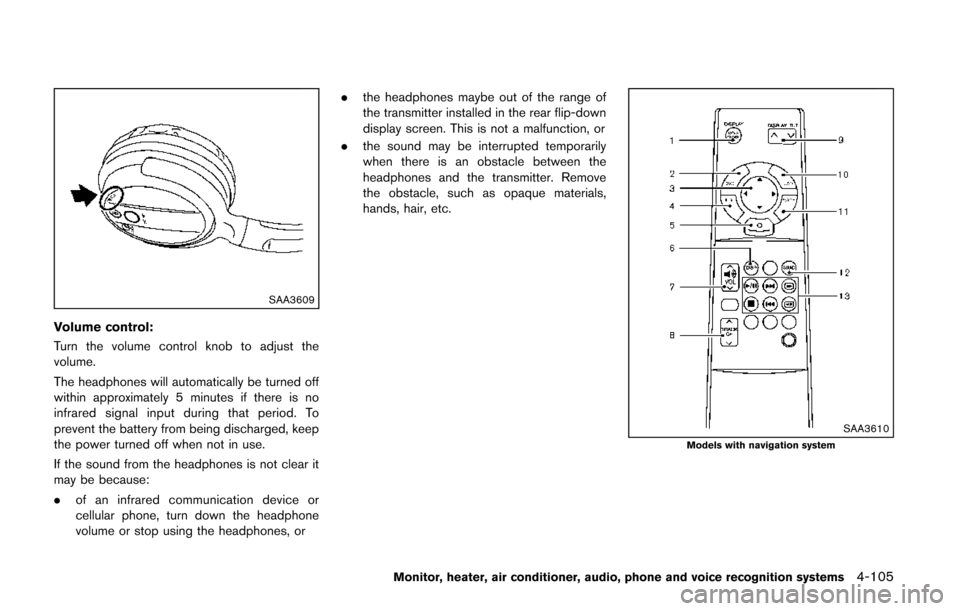
Volume control:
Turn the volume control knob to adjust the
volume.
The headphones will automatically be turned off
within approximately 5 minutes if there is no
infrared signal input during that period. To
prevent the battery from being discharged, keep
the power turned off when not in use.
If the sound from the headphones is not clear it
may be because:
.of an infrared communication device or
cellular phone, turn down the headphone
volume or stop using the headphones, or .
the headphones maybe out of the range of
the transmitter installed in the rear flip-down
display screen. This is not a malfunction, or
. the sound may be interrupted temporarily
when there is an obstacle between the
headphones and the transmitter. Remove
the obstacle, such as opaque materials,
hands, hair, etc.
SAA3610Models with navigation system
Monitor, heater, air conditioner, audio, phone and voice recognition systems4-105
Page 289 of 482
4-106Monitor, heater, air conditioner, audio, phone and voice recognition systems
SAA3704Models without navigation system
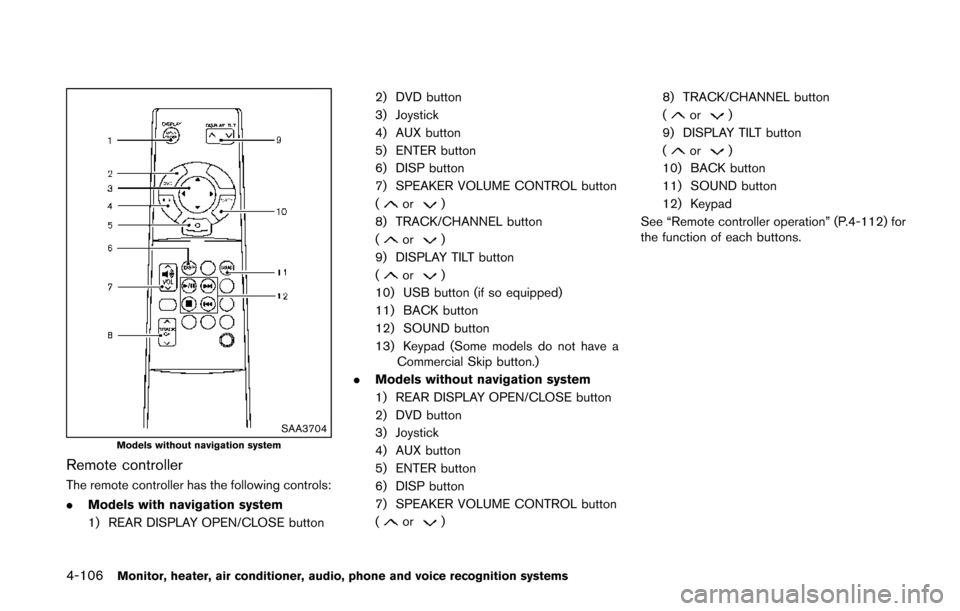
Remote controller
The remote controller has the following controls:
.Models with navigation system
1) REAR DISPLAY OPEN/CLOSE button 2) DVD button
3) Joystick
4) AUX button
5) ENTER button
6) DISP button
7) SPEAKER VOLUME CONTROL button
(
or)
8) TRACK/CHANNEL button
(
or)
9) DISPLAY TILT button
(
or)
10) USB button (if so equipped)
11) BACK button
12) SOUND button
13) Keypad (Some models do not have a Commercial Skip button.)
. Models without navigation system
1) REAR DISPLAY OPEN/CLOSE button
2) DVD button
3) Joystick
4) AUX button
5) ENTER button
6) DISP button
7) SPEAKER VOLUME CONTROL button
(
or) 8) TRACK/CHANNEL button
(
or)
9) DISPLAY TILT button
(
or)
10) BACK button
11) SOUND button
12) Keypad
See “Remote controller operation” (P.4-112) for
the function of each buttons.
Page 291 of 482
4-108Monitor, heater, air conditioner, audio, phone and voice recognition systems
BEFORE OPERATING THE DVD MO-
BILE ENTERTAINMENT SYSTEM
Precautions
Start the engine when using the DVD entertain-
ment system.
WARNING
The driver must not attempt to operate
the DVD system or wear the head-
phones while the vehicle is in motion
so that full attention may be given to
vehicle operation.
CAUTION
.Only operate the DVD while the
vehicle engine is running. Operating
the DVD for extended periods of
time with the engine OFF can dis-
charge the vehicle battery.
. Do not allow the system to get wet.
Excessive moisture such as spilled
liquids may cause the system to
malfunction. .
While playing VIDEO-CD media, this
DVD player does not guarantee
complete functionality of all VI-
DEO-CD formats.
Parental level (parental control)
DVDs with the parental control setting can be
played with this system. Please use your own
judgement to set the parental control with the
system.
Disc selection
The following disc formats can be played with
the DVD drive.
.DVD-VIDEO
. VIDEO-CD
. DTS-CD (models with navigation system)
Use DVDs with the region code “ALL” or the
code applicable to your country. (The region
code is displayed as a small symbol printed on
the top of the DVD.) This vehicle-installed DVD
player can only play DVDs with an applicable
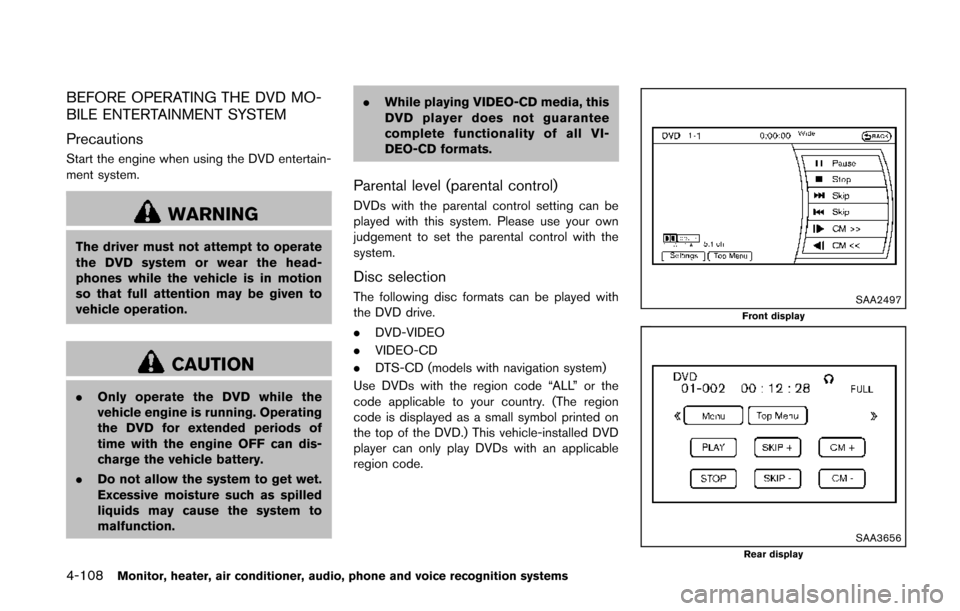
region code.SAA2497Front display
SAA3656Rear display
Page 293 of 482
4-110Monitor, heater, air conditioner, audio, phone and voice recognition systems
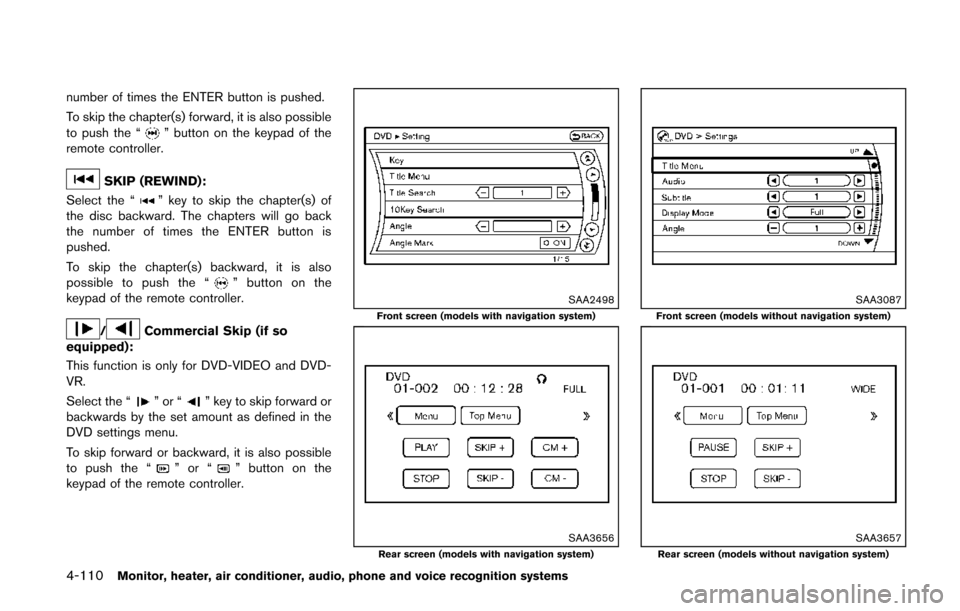
number of times the ENTER button is pushed.
To skip the chapter(s) forward, it is also possible
to push the “
” button on the keypad of the
remote controller.
SKIP (REWIND):
Select the “
” key to skip the chapter(s) of
the disc backward. The chapters will go back
the number of times the ENTER button is
pushed.
To skip the chapter(s) backward, it is also
possible to push the “
” button on the
keypad of the remote controller.
/Commercial Skip (if so
equipped):
This function is only for DVD-VIDEO and DVD-
VR.
Select the “
”or“” key to skip forward or
backwards by the set amount as defined in the
DVD settings menu.
To skip forward or backward, it is also possible
to push the “
”or“” button on the
keypad of the remote controller.
SAA2498Front screen (models with navigation system)
SAA3656Rear screen (models with navigation system)
SAA3087Front screen (models without navigation system)
SAA3657Rear screen (models without navigation system)
Page 294 of 482
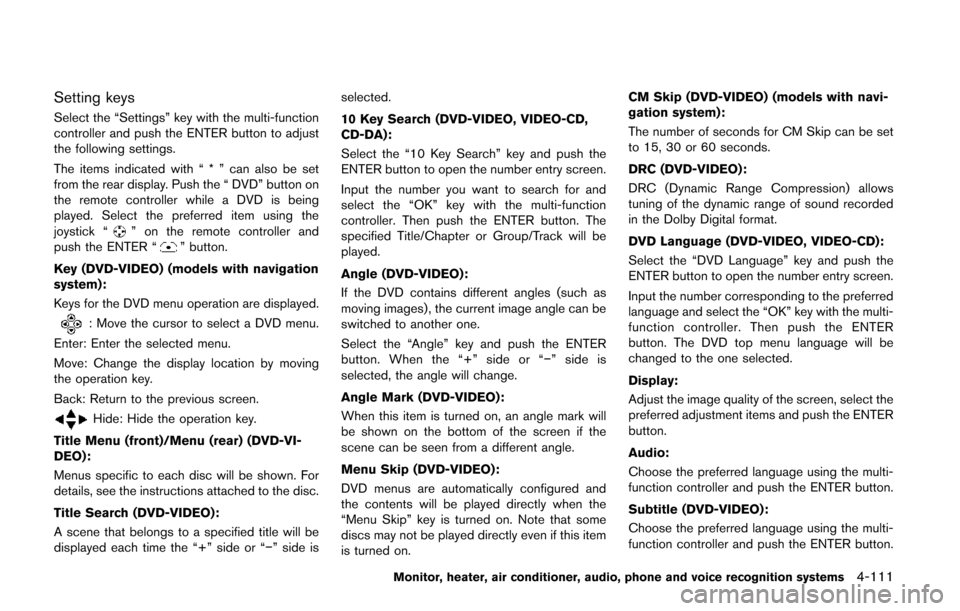
Setting keys
Select the “Settings” key with the multi-function
controller and push the ENTER button to adjust
the following settings.
The items indicated with “ * ” can also be set
from the rear display. Push the “ DVD” button on
the remote controller while a DVD is being
played. Select the preferred item using the
joystick “
” on the remote controller and
push the ENTER “” button.
Key (DVD-VIDEO) (models with navigation
system):
Keys for the DVD menu operation are displayed.
: Move the cursor to select a DVD menu.
Enter: Enter the selected menu.
Move: Change the display location by moving
the operation key.
Back: Return to the previous screen.
Hide: Hide the operation key.
Title Menu (front)/Menu (rear) (DVD-VI-
DEO):
Menus specific to each disc will be shown. For
details, see the instructions attached to the disc.
Title Search (DVD-VIDEO):
A scene that belongs to a specified title will be
displayed each time the “+” side or “−” side is selected.
10 Key Search (DVD-VIDEO, VIDEO-CD,
CD-DA):
Select the “10 Key Search” key and push the
ENTER button to open the number entry screen.
Input the number you want to search for and
select the “OK” key with the multi-function
controller. Then push the ENTER button. The
specified Title/Chapter or Group/Track will be
played.
Angle (DVD-VIDEO):
If the DVD contains different angles (such as
moving images), the current image angle can be
switched to another one.
Select the “Angle” key and push the ENTER
button. When the “+” side or “−
” side is
selected, the angle will change.
Angle Mark (DVD-VIDEO):
When this item is turned on, an angle mark will
be shown on the bottom of the screen if the
scene can be seen from a different angle.
Menu Skip (DVD-VIDEO):
DVD menus are automatically configured and
the contents will be played directly when the
“Menu Skip” key is turned on. Note that some
discs may not be played directly even if this item
is turned on. CM Skip (DVD-VIDEO) (models with navi-
gation system):
The number of seconds for CM Skip can be set
to 15, 30 or 60 seconds.
DRC (DVD-VIDEO):
DRC (Dynamic Range Compression) allows
tuning of the dynamic range of sound recorded
in the Dolby Digital format.
DVD Language (DVD-VIDEO, VIDEO-CD):
Select the “DVD Language” key and push the
ENTER button to open the number entry screen.
Input the number corresponding to the preferred
language and select the “OK” key with the multi-
function controller. Then push the ENTER
button. The DVD top menu language will be
changed to the one selected.
Display:
Adjust the image quality of the screen, select the
preferred adjustment items and push the ENTER
button.
Audio:
Choose the preferred language using the multi-
function controller and push the ENTER button.
Subtitle (DVD-VIDEO):
Choose the preferred language using the multi-
function controller and push the ENTER button.
Monitor, heater, air conditioner, audio, phone and voice recognition systems4-111
Page 297 of 482
4-114Monitor, heater, air conditioner, audio, phone and voice recognition systems
CAUTION
.Keep the antenna as far away as
possible from the electronic control
modules.
. Keep the antenna wire more than 8
in (20 cm) away from the electronic
control system harness. Do not
route the antenna wire next to any
harness.
. Adjust the antenna standing-wave
ratio as recommended by the man-
ufacturer.
. Connect the ground wire from the
CB radio chassis to the body.
. For details, consult a NISSAN deal-
er.
WARNING
.Use a phone after stopping your
vehicle in a safe location. If you
have to use a phone while driving,
exercise extreme caution at all
times so full attention may be given
to vehicle operation.
. If you find yourself unable to devote
full attention to vehicle operation
while talking on the phone, pull off
the road to a safe location and stop
your vehicle before doing so.
CAUTION
To avoid draining the vehicle battery,
use a phone after starting the engine.
Your NISSAN is equipped with Bluetooth
®
Hands-Free Phone System. If you are an owner
of a compatible Bluetooth®enabled cellular
phone, you can set up the wireless connection
between your cellular phone and the in-vehicle
phone module. With Bluetooth
®wireless tech-
nology, you can make or receive a telephone call
with your cellular phone in your pocket. Once a cellular phone is connected to the in-
vehicle phone module, no phone connecting
procedure is required anymore. Your phone is
automatically connected with the in-vehicle
phone module when the ignition switch is
pushed to the ON position with the registered
cellular phone turned on and carried in the
vehicle.
You can register up to 5 different Bluetooth
®
cellular phones in the in-vehicle phone module.
However, you can talk on only one cellular phone
at a time.
The NISSAN Voice Recognition system sup-
ports the phone commands, so dialing a phone
number using your voice is possible. For more
details, see “NISSAN voice recognition system
(models with navigation system)” (P.4-137).
Before using the Bluetooth
®Hands-Free Phone
System, refer to the following notes.
. Wireless LAN (Wi-Fi) and the Bluetooth
®
functions share the same frequency band
(2.4 GHz) . Using the Bluetooth®and the
wireless LAN functions at the same time may
slow down or disconnect the communica-
tion and cause undesired noise. It is
recommended that you turn off the wireless
LAN (Wi-Fi) when using the Bluetooth
®
functions.
Bluetooth®HANDS-FREE PHONE
SYSTEM (models with navigation
system)
Page 299 of 482
4-116Monitor, heater, air conditioner, audio, phone and voice recognition systems
Bluetooth trademark:
Bluetooth®is a trademark owned
by Bluetooth SIG, Inc., and
licensed to Clarion Co., Ltd.
VOICE COMMANDS
You can use voice commands to operate various
Bluetooth®Hands-Free Phone System features
using the NISSAN Voice Recognition system.
For more details, see “NISSAN voice recogni-
tion system (models with navigation system)”
(P.4-137) .
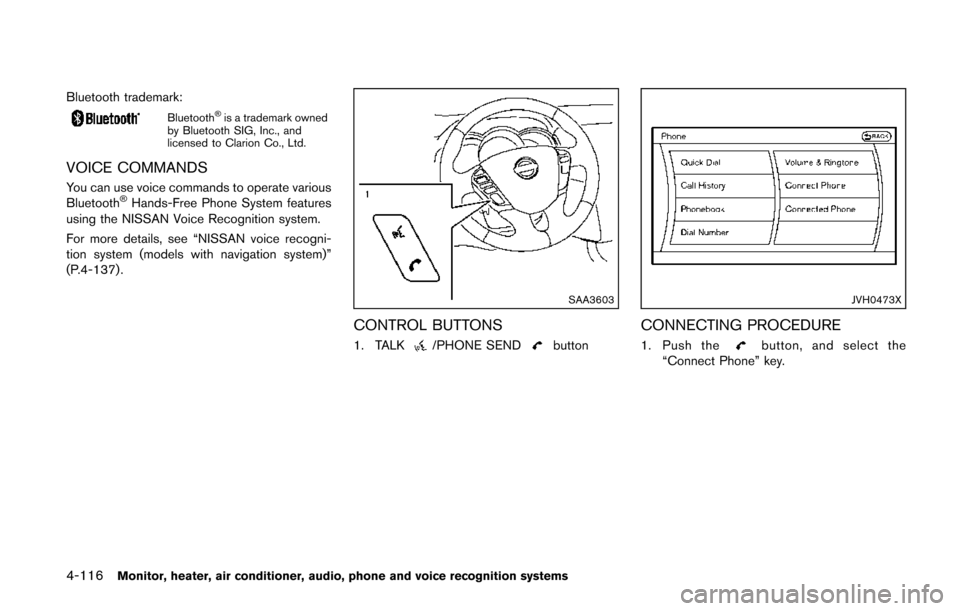
SAA3603
CONTROL BUTTONS
1. TALK/PHONE SENDbutton
JVH0473X
CONNECTING PROCEDURE
1. Push thebutton, and select the
“Connect Phone” key.