2014 NISSAN QUEST key
[x] Cancel search: keyPage 171 of 482
3-28Pre-driving checks and adjustments
Power open
When the lift gate is fully closed, the lift gate will
fully open automatically by:
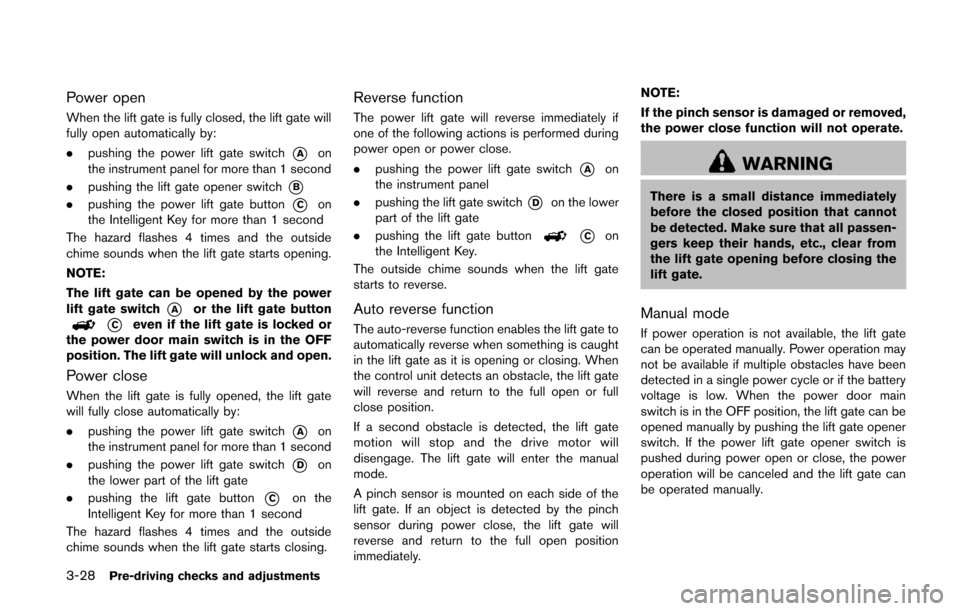
.pushing the power lift gate switch
*Aon
the instrument panel for more than 1 second
. pushing the lift gate opener switch
*B
.pushing the power lift gate button*Con
the Intelligent Key for more than 1 second
The hazard flashes 4 times and the outside
chime sounds when the lift gate starts opening.
NOTE:
The lift gate can be opened by the power
lift gate switch
*Aor the lift gate button
*Ceven if the lift gate is locked or
the power door main switch is in the OFF
position. The lift gate will unlock and open.
Power close
When the lift gate is fully opened, the lift gate
will fully close automatically by:
. pushing the power lift gate switch
*Aon
the instrument panel for more than 1 second
. pushing the power lift gate switch
*Don
the lower part of the lift gate
. pushing the lift gate button
*Con the
Intelligent Key for more than 1 second
The hazard flashes 4 times and the outside
chime sounds when the lift gate starts closing.
Reverse function
The power lift gate will reverse immediately if
one of the following actions is performed during
power open or power close.
. pushing the power lift gate switch
*Aon
the instrument panel
. pushing the lift gate switch
*Don the lower
part of the lift gate
. pushing the lift gate button
*Con
the Intelligent Key.
The outside chime sounds when the lift gate
starts to reverse.
Auto reverse function
The auto-reverse function enables the lift gate to
automatically reverse when something is caught
in the lift gate as it is opening or closing. When
the control unit detects an obstacle, the lift gate
will reverse and return to the full open or full
close position.
If a second obstacle is detected, the lift gate
motion will stop and the drive motor will
disengage. The lift gate will enter the manual
mode.
A pinch sensor is mounted on each side of the
lift gate. If an object is detected by the pinch
sensor during power close, the lift gate will
reverse and return to the full open position
immediately. NOTE:
If the pinch sensor is damaged or removed,
the power close function will not operate.
WARNING
There is a small distance immediately
before the closed position that cannot
be detected. Make sure that all passen-
gers keep their hands, etc., clear from
the lift gate opening before closing the
lift gate.
Manual mode
If power operation is not available, the lift gate
can be operated manually. Power operation may
not be available if multiple obstacles have been
detected in a single power cycle or if the battery
voltage is low. When the power door main
switch is in the OFF position, the lift gate can be
opened manually by pushing the lift gate opener
switch. If the power lift gate opener switch is
pushed during power open or close, the power
operation will be canceled and the lift gate can
be operated manually.
Page 180 of 482
The automatic drive positioner system has two
features:
.Entry/exit function
. Memory storage
ENTRY/EXIT FUNCTION
This system is designed so that the driver’s seat
will automatically move when the shift lever is in
the P (Park) position. This allows the driver to
get into and out of the driver’s seat more easily.
The driver’s seat will slide backward when the
driver’s door is opened with the ignition switch
in the LOCK position.
The driver’s seat will return to the previous
positions when the ignition switch is pushed to
the ACC position.
The driver’s seat will not return to the previous
positions if the seat adjusting switch is operated
when the seat is at the exit position.
Cancel or activate entry/exit function
The shift lever must be in the P (Park) position
with the ignition switch in the OFF position.
The entry/exit function can be activated or
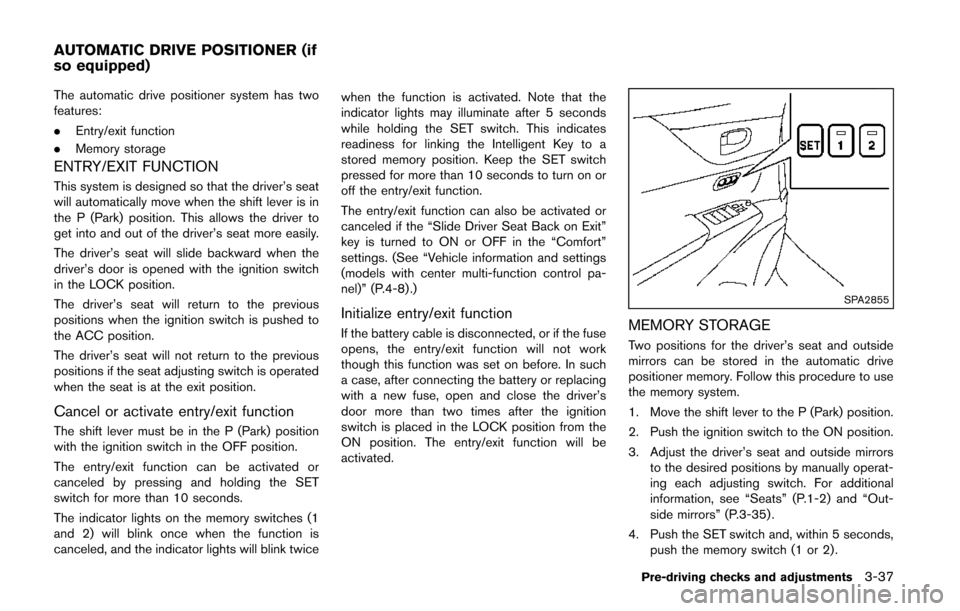
canceled by pressing and holding the SET
switch for more than 10 seconds.
The indicator lights on the memory switches (1
and 2) will blink once when the function is
canceled, and the indicator lights will blink twice when the function is activated. Note that the
indicator lights may illuminate after 5 seconds
while holding the SET switch. This indicates
readiness for linking the Intelligent Key to a
stored memory position. Keep the SET switch
pressed for more than 10 seconds to turn on or
off the entry/exit function.
The entry/exit function can also be activated or
canceled if the “Slide Driver Seat Back on Exit”
key is turned to ON or OFF in the “Comfort”
settings. (See “Vehicle information and settings
(models with center multi-function control pa-
nel)” (P.4-8) .)
Initialize entry/exit function
If the battery cable is disconnected, or if the fuse
opens, the entry/exit function will not work
though this function was set on before. In such
a case, after connecting the battery or replacing
with a new fuse, open and close the driver’s
door more than two times after the ignition
switch is placed in the LOCK position from the
ON position. The entry/exit function will be
activated.
SPA2855
MEMORY STORAGE
Two positions for the driver’s seat and outside
mirrors can be stored in the automatic drive
positioner memory. Follow this procedure to use
the memory system.
1. Move the shift lever to the P (Park) position.
2. Push the ignition switch to the ON position.
3. Adjust the driver’s seat and outside mirrors
to the desired positions by manually operat-
ing each adjusting switch. For additional
information, see “Seats” (P.1-2) and “Out-
side mirrors” (P.3-35) .
4. Push the SET switch and, within 5 seconds, push the memory switch (1 or 2) .
Pre-driving checks and adjustments3-37
AUTOMATIC DRIVE POSITIONER (if
so equipped)
Page 181 of 482
3-38Pre-driving checks and adjustments
The indicator light for the pushed memory
switch will stay on for approximately 5
seconds after pushing the switch.
If memory is stored in the same memory
switch, the previous memory will be deleted.
Linking Intelligent Key to a stored mem-
ory position
The Intelligent Key can be linked to a stored
memory position with the following procedure.
1. Follow one of the steps for storing a memoryposition.
. While the indicator light for the memory
switch being set is illuminated for 5 sec-
onds, push the
button on the Intelligent
Key.
. Push the ignition switch to the OFF position,
and then push the SET switch. Push the
button while pushing the memory button
while the indicator light stays on for approxi-
mately 5 seconds.
If the indicator light blinks, the Intelligent Key is
linked to that memory setting.
Push the ignition switch to the OFF position, and
then push the
button on the Intelligent Key.
The driver’s seat and outside mirrors will move to
the memorized position.
Confirming memory storage
. Push the ignition switch to the ON position
and push the SET switch. If the main
memory has not been stored, the indicator
light will come on for approximately 0.5
second. When the memory has stored in
position, the indicator light will stay on for
approximately 5 seconds.
. If the battery cable is disconnected, or if the
fuse opens, the memory will be canceled. In
this case, reset the desired position using
the previous procedure.
. If optional keys are added to your vehicle,
the memory storage procedure to switch 1
or 2 and linking Intelligent Key procedure to
a stored memory position should be per-
formed again for each Intelligent Key. For
additional Intelligent Key information, see
“Keys” (P.3-3) .
Selecting the memorized position
1. Move the shift lever to the P (Park) position.
2. Use one of the following methods to move
the driver’s seat and outside mirrors.
.Push the ignition switch to the ONposition and push the memory switch (1
or 2) .
.Within 45 seconds of opening thedriver’s door, push the memory switch (1 or 2) .
The driver’s seat and outside mirrors will
move to the memorized position with the
indicator light flashing, and then the light will
stay on for approximately 5 seconds.
SYSTEM OPERATION
The automatic drive positioner system will not
work or will stop operating under the following
conditions:
. When the vehicle speed is above 4 MPH (7
km/h) (entry/exit function) .
. When the vehicle is driven (memory sto-
rage).
. When the adjusting switch for the driver’s
seat is turned on while the automatic drive
positioner is operating.
. When the driver’s seat and outside mirrors
have already been moved to the memorized
position.
. When no position is stored in the memory
switch.
. When the engine is started while moving the
automatic drive positioner.
. When the shift lever is moved from the P
(Park) position to any other position. (How-
ever, it will not be canceled while the driver’s
seat is returning to the previous positions
(entry/exit function).)
Page 191 of 482
4-8Monitor, heater, air conditioner, audio, phone and voice recognition systems
HOW TO SELECT MENUS ON THE
SCREEN
Vehicle functions are viewed on the display
screen in menus. To select each key item,
highlight the preferred item using the multi-
function controller and push the ENTER button.
Whenever a menu selection is made or menu
item is highlighted, different areas on the screen
provide you with important information. See the
following for details.
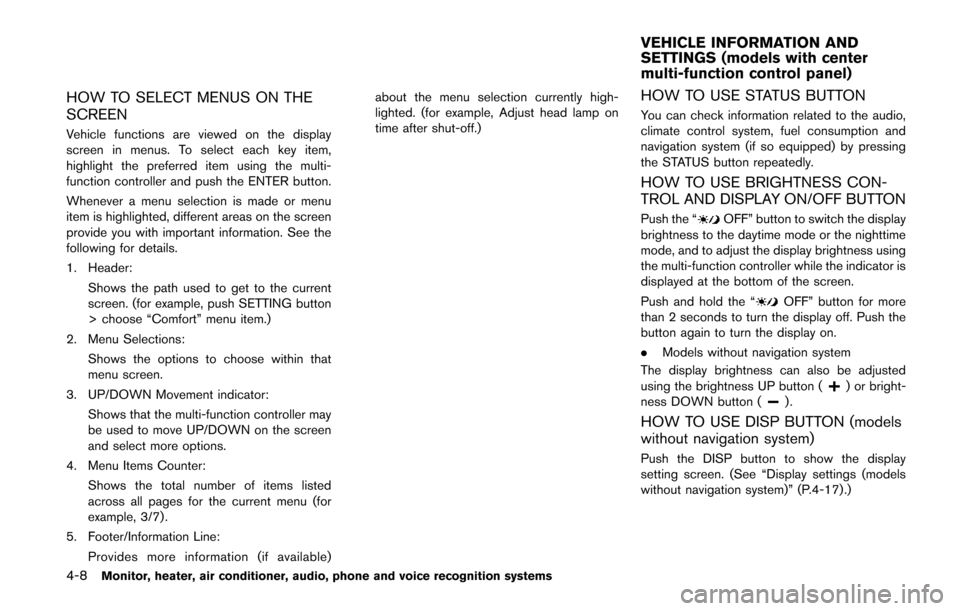
1. Header:Shows the path used to get to the current
screen. (for example, push SETTING button
> choose “Comfort” menu item.)
2. Menu Selections: Shows the options to choose within that
menu screen.
3. UP/DOWN Movement indicator: Shows that the multi-function controller may
be used to move UP/DOWN on the screen
and select more options.
4. Menu Items Counter: Shows the total number of items listed
across all pages for the current menu (for
example, 3/7) .
5. Footer/Information Line: Provides more information (if available) about the menu selection currently high-
lighted. (for example, Adjust head lamp on
time after shut-off.)
HOW TO USE STATUS BUTTON
You can check information related to the audio,
climate control system, fuel consumption and
navigation system (if so equipped) by pressing
the STATUS button repeatedly.
HOW TO USE BRIGHTNESS CON-
TROL AND DISPLAY ON/OFF BUTTON
Push the “OFF” button to switch the display
brightness to the daytime mode or the nighttime
mode, and to adjust the display brightness using
the multi-function controller while the indicator is
displayed at the bottom of the screen.
Push and hold the “
OFF” button for more
than 2 seconds to turn the display off. Push the
button again to turn the display on.
. Models without navigation system
The display brightness can also be adjusted
using the brightness UP button (
) or bright-
ness DOWN button ().
HOW TO USE DISP BUTTON (models
without navigation system)
Push the DISP button to show the display
setting screen. (See “Display settings (models
without navigation system)” (P.4-17).)
VEHICLE INFORMATION AND
SETTINGS (models with center
multi-function control panel)
Page 192 of 482
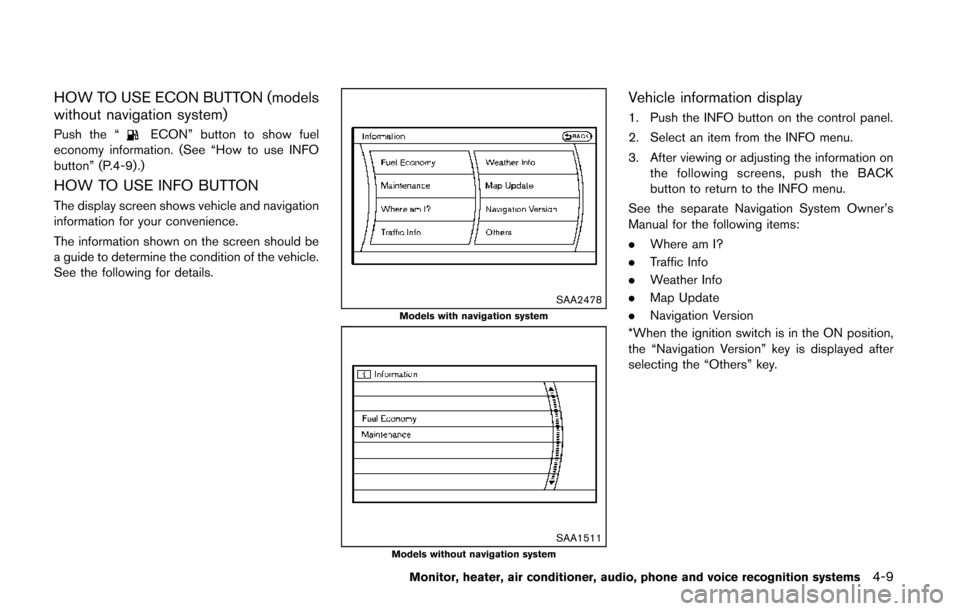
HOW TO USE ECON BUTTON (models
without navigation system)
Push the “ECON” button to show fuel
economy information. (See “How to use INFO
button” (P.4-9).)
HOW TO USE INFO BUTTON
The display screen shows vehicle and navigation
information for your convenience.
The information shown on the screen should be
a guide to determine the condition of the vehicle.
See the following for details.
SAA2478Models with navigation system
SAA1511Models without navigation system
Vehicle information display
1. Push the INFO button on the control panel.
2. Select an item from the INFO menu.
3. After viewing or adjusting the information on
the following screens, push the BACK
button to return to the INFO menu.
See the separate Navigation System Owner’s
Manual for the following items:
. Where am I?
. Traffic Info
. Weather Info
. Map Update
. Navigation Version
*When the ignition switch is in the ON position,
the “Navigation Version” key is displayed after
selecting the “Others” key.
Monitor, heater, air conditioner, audio, phone and voice recognition systems4-9
Page 193 of 482
4-10Monitor, heater, air conditioner, audio, phone and voice recognition systems
SAA2479
SAA2480Models with navigation system
JVH0180M
JVH0181MModels without navigation system
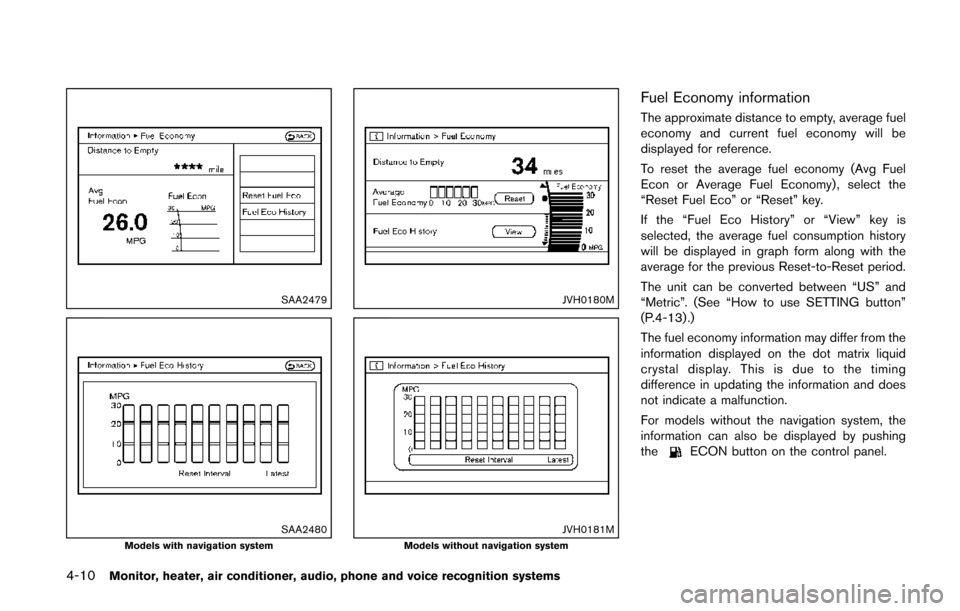
Fuel Economy information
The approximate distance to empty, average fuel
economy and current fuel economy will be
displayed for reference.
To reset the average fuel economy (Avg Fuel
Econ or Average Fuel Economy) , select the
“Reset Fuel Eco” or “Reset” key.
If the “Fuel Eco History” or “View” key is
selected, the average fuel consumption history
will be displayed in graph form along with the
average for the previous Reset-to-Reset period.
The unit can be converted between “US” and
“Metric”. (See “How to use SETTING button”
(P.4-13) .)
The fuel economy information may differ from the
information displayed on the dot matrix liquid
crystal display. This is due to the timing
difference in updating the information and does
not indicate a malfunction.
For models without the navigation system, the
information can also be displayed by pushing
the
ECON button on the control panel.
Page 195 of 482
4-12Monitor, heater, air conditioner, audio, phone and voice recognition systems
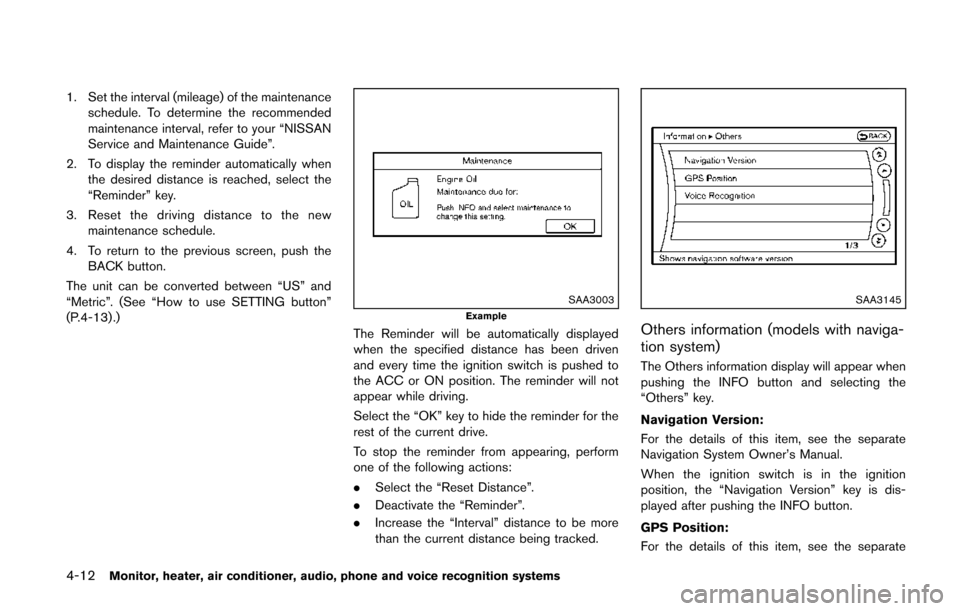
1. Set the interval (mileage) of the maintenanceschedule. To determine the recommended
maintenance interval, refer to your “NISSAN
Service and Maintenance Guide”.
2. To display the reminder automatically when the desired distance is reached, select the
“Reminder” key.
3. Reset the driving distance to the new maintenance schedule.
4. To return to the previous screen, push the BACK button.
The unit can be converted between “US” and
“Metric”. (See “How to use SETTING button”
(P.4-13) .)
SAA3003Example
The Reminder will be automatically displayed
when the specified distance has been driven
and every time the ignition switch is pushed to
the ACC or ON position. The reminder will not
appear while driving.
Select the “OK” key to hide the reminder for the
rest of the current drive.
To stop the reminder from appearing, perform
one of the following actions:
. Select the “Reset Distance”.
. Deactivate the “Reminder”.
. Increase the “Interval” distance to be more
than the current distance being tracked.
SAA3145
Others information (models with naviga-
tion system)
The Others information display will appear when
pushing the INFO button and selecting the
“Others” key.
Navigation Version:
For the details of this item, see the separate
Navigation System Owner’s Manual.
When the ignition switch is in the ignition
position, the “Navigation Version” key is dis-
played after pushing the INFO button.
GPS Position:
For the details of this item, see the separate
Page 197 of 482
4-14Monitor, heater, air conditioner, audio, phone and voice recognition systems
SAA2485Models with navigation system
SAA2740Models without navigation system
Audio settings
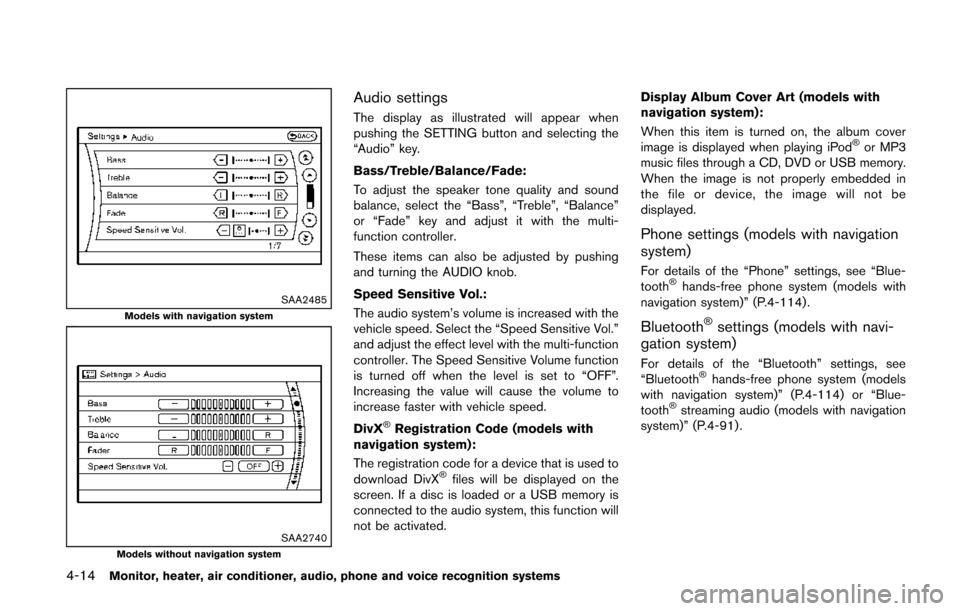
The display as illustrated will appear when
pushing the SETTING button and selecting the
“Audio” key.
Bass/Treble/Balance/Fade:
To adjust the speaker tone quality and sound
balance, select the “Bass”, “Treble”, “Balance”
or “Fade” key and adjust it with the multi-
function controller.
These items can also be adjusted by pushing
and turning the AUDIO knob.
Speed Sensitive Vol.:
The audio system’s volume is increased with the
vehicle speed. Select the “Speed Sensitive Vol.”
and adjust the effect level with the multi-function
controller. The Speed Sensitive Volume function
is turned off when the level is set to “OFF”.
Increasing the value will cause the volume to
increase faster with vehicle speed.
DivX
®Registration Code (models with
navigation system):
The registration code for a device that is used to
download DivX
®files will be displayed on the
screen. If a disc is loaded or a USB memory is
connected to the audio system, this function will
not be activated. Display Album Cover Art (models with
navigation system):
When this item is turned on, the album cover
image is displayed when playing iPod
®or MP3
music files through a CD, DVD or USB memory.
When the image is not properly embedded in
the file or device, the image will not be
displayed.
Phone settings (models with navigation
system)
For details of the “Phone” settings, see “Blue-
tooth®hands-free phone system (models with
navigation system)” (P.4-114) .
Bluetooth®settings (models with navi-
gation system)
For details of the “Bluetooth” settings, see
“Bluetooth®hands-free phone system (models
with navigation system)” (P.4-114) or “Blue-
tooth
®streaming audio (models with navigation
system)” (P.4-91) .