2014 NISSAN QUEST wheel
[x] Cancel search: wheelPage 185 of 482
DVD (Digital Versatile Disc) player operation (if
so equipped) ..................................................................... 4-83
USB memory operation (models with center
multi-function control panel) ......................................... 4-86
Bluetooth
®streaming audio (models with
navigation system) ........................................................... 4-91
iPod
®player operation (models with center
multi-function control panel) ......................................... 4-96
Auxiliary input jacks (if so equipped) .......................... 4-98
CD/DVD/USB memory care and cleaning ................ 4-99
Steering-wheel-mounted controls for audio (if
so equipped) .................................................................. 4-100
Antenna ........................................................................\
.... 4-101
NISSAN mobile entertainment system (MES) (if
so equipped) ........................................................................\
4-102 Digital versatile disc (DVD)
system components ...................................................... 4-103
Before operating the dvd mobile
entertainment system ................................................... 4-108
Playing a DVD ................................................................ 4-109
Care and maintenance ................................................. 4-113
Car phone or CB radio ..................................................... 4-113
Bluetooth
®hands-free phone system (models with
navigation system) .............................................................. 4-114
Regulatory information ................................................. 4-115
Voice commands ........................................................... 4-116
Control buttons .............................................................. 4-116 Connecting procedure ............................................... 4-116
Phone selection ........................................................... 4-117
Quick Dial ..................................................................... 4-117
Making a call ................................................................ 4-120
Receiving a call ........................................................... 4-120
During a call ................................................................. 4-121
Phone setting ............................................................... 4-122
Troubleshooting guide ............................................... 4-123
Bluetooth
®hands-free phone system (models without
navigation system) (if so equipped) .............................. 4-124
Regulatory information ............................................... 4-125
Using the system ........................................................ 4-126
Control buttons ............................................................ 4-128
Getting started ............................................................ 4-128
List of voice commands ............................................ 4-130
Speaker adaptation (SA) mode ............................... 4-133
Troubleshooting guide ............................................... 4-136
NISSAN voice recognition system (models with
navigation system) ............................................................. 4-137 NISSAN voice recognition standard mode .......... 4-137
Using the system ........................................................ 4-140
NISSAN voice recognition alternate
command mode ........................................................... 4-148
Using the system ........................................................ 4-154
Troubleshooting guide ............................................... 4-159
Page 190 of 482
SAA3673
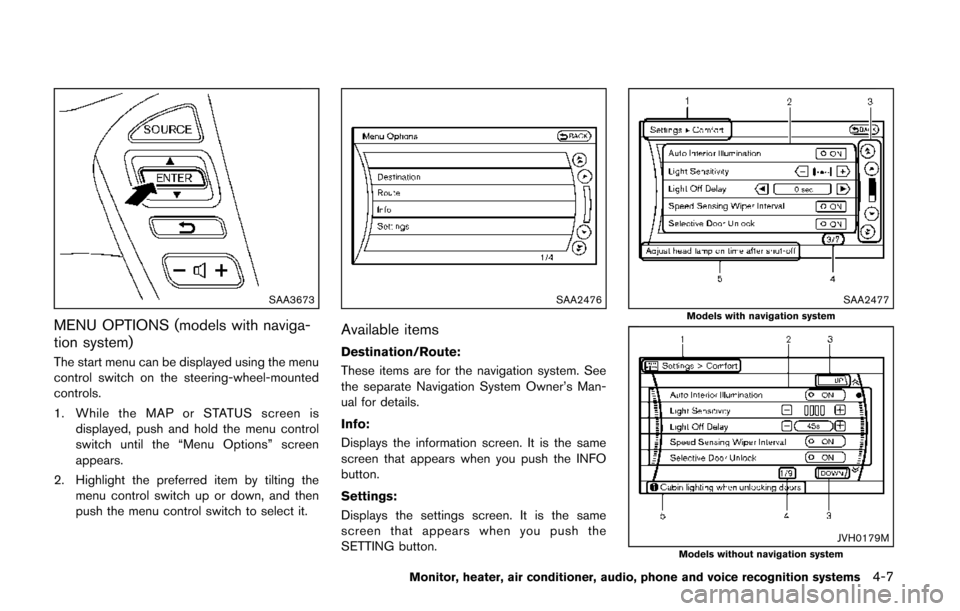
MENU OPTIONS (models with naviga-
tion system)
The start menu can be displayed using the menu
control switch on the steering-wheel-mounted
controls.
1. While the MAP or STATUS screen isdisplayed, push and hold the menu control
switch until the “Menu Options” screen
appears.
2. Highlight the preferred item by tilting the menu control switch up or down, and then
push the menu control switch to select it.
SAA2476
Available items
Destination/Route:
These items are for the navigation system. See
the separate Navigation System Owner’s Man-
ual for details.
Info:
Displays the information screen. It is the same
screen that appears when you push the INFO
button.
Settings:
Displays the settings screen. It is the same
screen that appears when you push the
SETTING button.
SAA2477Models with navigation system
JVH0179MModels without navigation system
Monitor, heater, air conditioner, audio, phone and voice recognition systems4-7
Page 207 of 482
4-24Monitor, heater, air conditioner, audio, phone and voice recognition systems
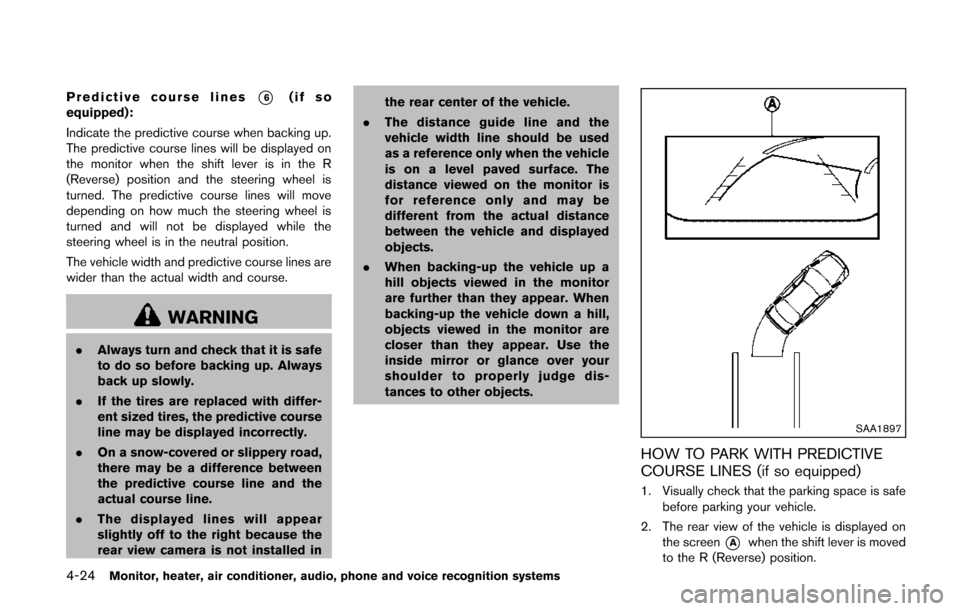
Predictive course lines*6(if so
equipped):
Indicate the predictive course when backing up.
The predictive course lines will be displayed on
the monitor when the shift lever is in the R
(Reverse) position and the steering wheel is
turned. The predictive course lines will move
depending on how much the steering wheel is
turned and will not be displayed while the
steering wheel is in the neutral position.
The vehicle width and predictive course lines are
wider than the actual width and course.
WARNING
. Always turn and check that it is safe
to do so before backing up. Always
back up slowly.
. If the tires are replaced with differ-
ent sized tires, the predictive course
line may be displayed incorrectly.
. On a snow-covered or slippery road,
there may be a difference between
the predictive course line and the
actual course line.
. The displayed lines will appear
slightly off to the right because the
rear view camera is not installed in the rear center of the vehicle.
. The distance guide line and the
vehicle width line should be used
as a reference only when the vehicle
is on a level paved surface. The
distance viewed on the monitor is
for reference only and may be
different from the actual distance
between the vehicle and displayed
objects.
. When backing-up the vehicle up a
hill objects viewed in the monitor
are further than they appear. When
backing-up the vehicle down a hill,
objects viewed in the monitor are
closer than they appear. Use the
inside mirror or glance over your
shoulder to properly judge dis-
tances to other objects.
SAA1897
HOW TO PARK WITH PREDICTIVE
COURSE LINES (if so equipped)
1. Visually check that the parking space is safe
before parking your vehicle.
2. The rear view of the vehicle is displayed on the screen
*Awhen the shift lever is moved
to the R (Reverse) position.
Page 208 of 482
SAA1898
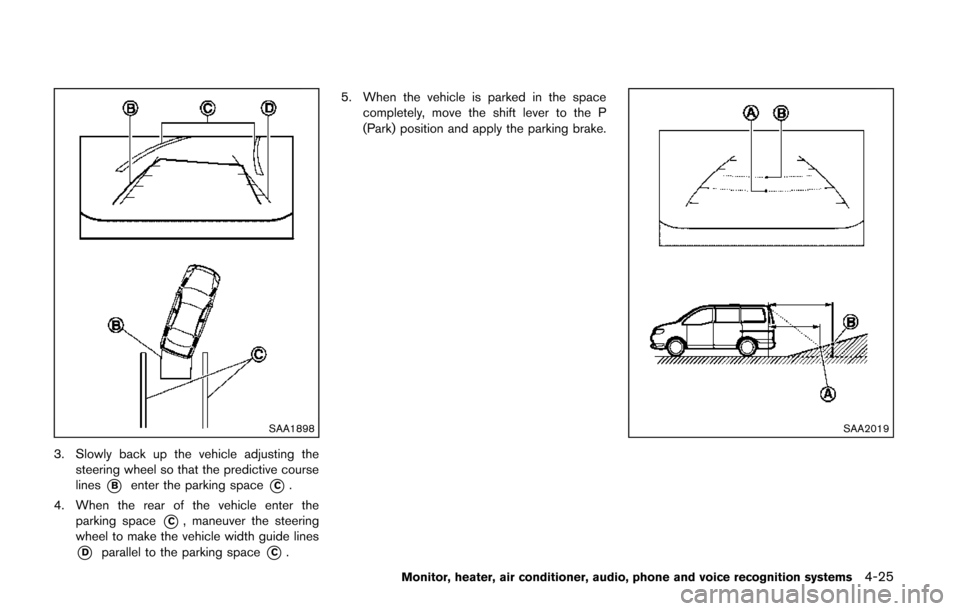
3. Slowly back up the vehicle adjusting thesteering wheel so that the predictive course
lines
*Benter the parking space*C.
4. When the rear of the vehicle enter the parking space
*C, maneuver the steering
wheel to make the vehicle width guide lines
*Dparallel to the parking space*C. 5. When the vehicle is parked in the space
completely, move the shift lever to the P
(Park) position and apply the parking brake.
SAA2019
Monitor, heater, air conditioner, audio, phone and voice recognition systems4-25
Page 212 of 482
OPERATING TIPS
.When the shift lever is shifted to the R
(Reverse) position, the monitor screen auto-
matically changes to the RearView Monitor
mode. However, the radio can be heard.
. When the temperature is extremely high or
low, the screen may not clearly display
objects. This is not a malfunction.
. When strong light is directly coming on the
camera, objects may not be displayed
clearly. This is not a malfunction.
. Vertical lines may be seen in objects on the
screen. This is due to strong reflected light
from the bumper. This is not a malfunction.
. The screen may flicker under fluorescent
light. This is not a malfunction.
. The colors of objects on the RearView
Monitor may differ somewhat from the actual
color of objects. This is not a malfunction.
. Objects on the monitor may not be clear in a
dark environment. This is not a malfunction.
. If dirt, rain or snow accumulates on the
camera, the RearView Monitor may not
display objects clearly. Clean the camera.
. Do not use alcohol, benzine or thinner to
clean the camera. This will cause discolora-
tion. To clean the camera, wipe with a cloth
dampened with diluted mild cleaning agent
and then wipe with a dry cloth. .
Do not damage the camera as the monitor
screen may be adversely affected.
. Do not use wax on the camera window.
Wipe off any wax with a clean cloth
dampened with mild detergent diluted with
water. When you push the CAMERA button on the
center multi-function control panel or shift the
shift lever into the “R” (Reverse) position while
the ignition switch is in the ON position, the
Around View Monitor operates. The monitor
displays various views of the position of the
vehicle.
Available views:
.
Bird-eye View
The surrounding view of the vehicle.
. Front-side View
The view around and ahead of the front
passenger’s side wheel.
. Front View
The view to the front of the vehicle.
. Rear View
The view to the rear of the vehicle.
The system is designed as an aid to the driver in
situations such as slot parking or parallel
parking.
Monitor, heater, air conditioner, audio, phone and voice recognition systems4-29
AROUND VIEWTMMONITOR (if so
equipped)
Page 216 of 482
SAA1840Front view
SAA1896Rear view
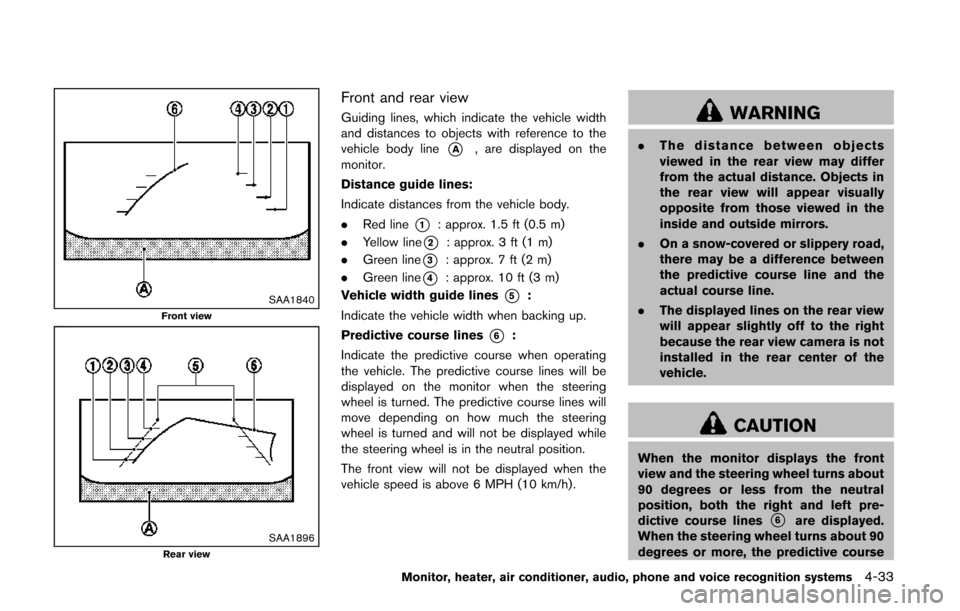
Front and rear view
Guiding lines, which indicate the vehicle width
and distances to objects with reference to the
vehicle body line
*A, are displayed on the
monitor.
Distance guide lines:
Indicate distances from the vehicle body.
. Red line
*1: approx. 1.5 ft (0.5 m)
. Yellow line
*2: approx. 3 ft (1 m)
. Green line
*3: approx. 7 ft (2 m)
. Green line
*4: approx. 10 ft (3 m)
Vehicle width guide lines
*5:
Indicate the vehicle width when backing up.
Predictive course lines
*6:
Indicate the predictive course when operating
the vehicle. The predictive course lines will be
displayed on the monitor when the steering
wheel is turned. The predictive course lines will
move depending on how much the steering
wheel is turned and will not be displayed while
the steering wheel is in the neutral position.
The front view will not be displayed when the
vehicle speed is above 6 MPH (10 km/h).
WARNING
. The distance between objects
viewed in the rear view may differ
from the actual distance. Objects in
the rear view will appear visually
opposite from those viewed in the
inside and outside mirrors.
. On a snow-covered or slippery road,
there may be a difference between
the predictive course line and the
actual course line.
. The displayed lines on the rear view
will appear slightly off to the right
because the rear view camera is not
installed in the rear center of the
vehicle.
CAUTION
When the monitor displays the front
view and the steering wheel turns about
90 degrees or less from the neutral
position, both the right and left pre-
dictive course lines
*6are displayed.
When the steering wheel turns about 90
degrees or more, the predictive course
Monitor, heater, air conditioner, audio, phone and voice recognition systems4-33
Page 283 of 482
4-100Monitor, heater, air conditioner, audio, phone and voice recognition systems
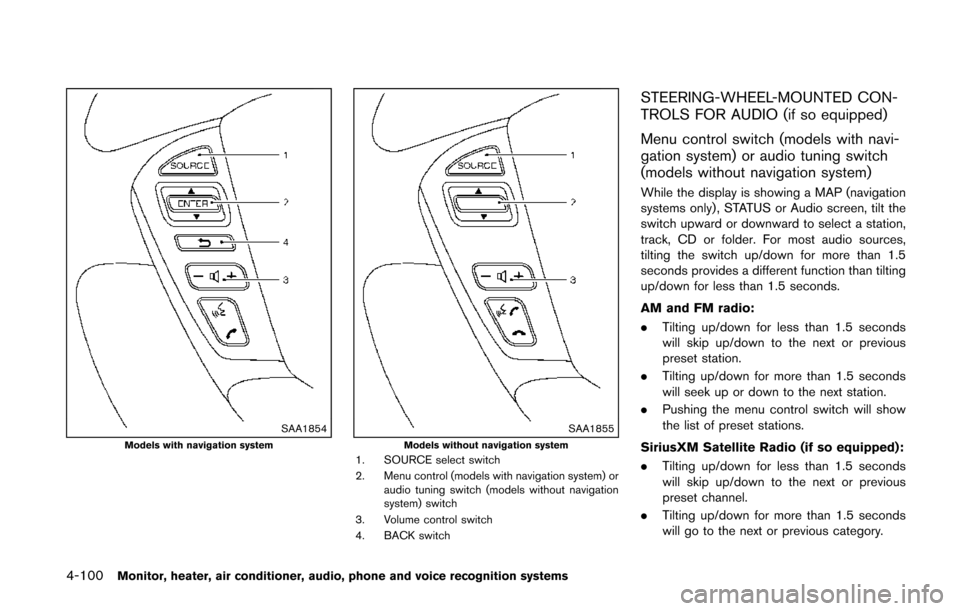
SAA1854Models with navigation systemSAA1855Models without navigation system1. SOURCE select switch
2. Menu control (models with navigation system) oraudio tuning switch (models without navigation
system) switch
3. Volume control switch
4. BACK switch
STEERING-WHEEL-MOUNTED CON-
TROLS FOR AUDIO (if so equipped)
Menu control switch (models with navi-
gation system) or audio tuning switch
(models without navigation system)
While the display is showing a MAP (navigation
systems only), STATUS or Audio screen, tilt the
switch upward or downward to select a station,
track, CD or folder. For most audio sources,
tilting the switch up/down for more than 1.5
seconds provides a different function than tilting
up/down for less than 1.5 seconds.
AM and FM radio:
. Tilting up/down for less than 1.5 seconds
will skip up/down to the next or previous
preset station.
. Tilting up/down for more than 1.5 seconds
will seek up or down to the next station.
. Pushing the menu control switch will show
the list of preset stations.
SiriusXM Satellite Radio (if so equipped):
. Tilting up/down for less than 1.5 seconds
will skip up/down to the next or previous
preset channel.
. Tilting up/down for more than 1.5 seconds
will go to the next or previous category.
Page 303 of 482
4-120Monitor, heater, air conditioner, audio, phone and voice recognition systems
JVH0479X
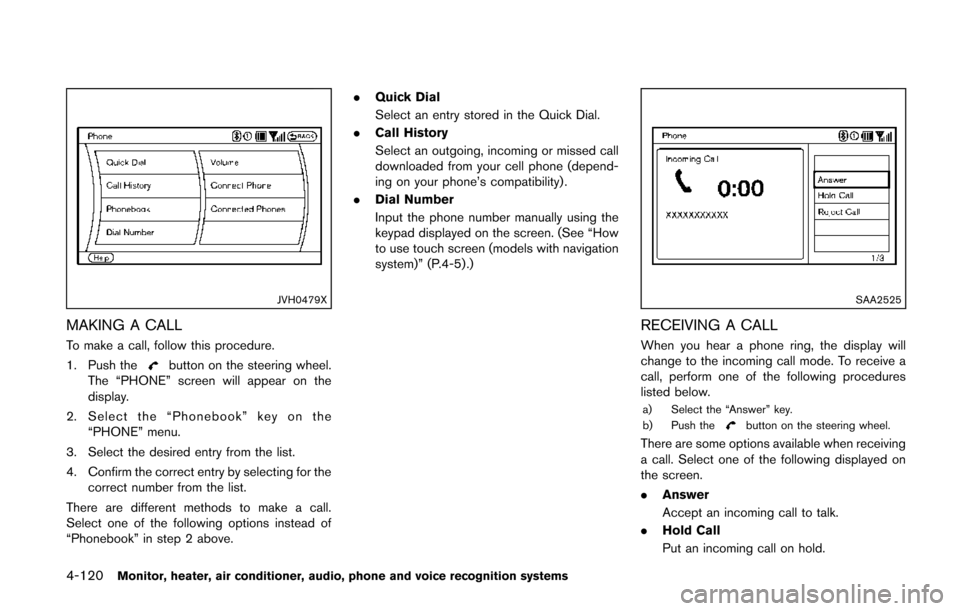
MAKING A CALL
To make a call, follow this procedure.
1. Push the
button on the steering wheel.
The “PHONE” screen will appear on the
display.
2. Select the “Phonebook” key on the “PHONE” menu.
3. Select the desired entry from the list.
4. Confirm the correct entry by selecting for the correct number from the list.
There are different methods to make a call.
Select one of the following options instead of
“Phonebook” in step 2 above. .
Quick Dial
Select an entry stored in the Quick Dial.
. Call History
Select an outgoing, incoming or missed call
downloaded from your cell phone (depend-
ing on your phone’s compatibility) .
. Dial Number
Input the phone number manually using the
keypad displayed on the screen. (See “How
to use touch screen (models with navigation
system)” (P.4-5) .)
SAA2525
RECEIVING A CALL
When you hear a phone ring, the display will
change to the incoming call mode. To receive a
call, perform one of the following procedures
listed below.
a) Select the “Answer” key.
b) Push thebutton on the steering wheel.
There are some options available when receiving
a call. Select one of the following displayed on
the screen.
.Answer
Accept an incoming call to talk.
. Hold Call
Put an incoming call on hold.