2014 NISSAN QUEST start stop button
[x] Cancel search: start stop buttonPage 266 of 482
When theorbutton is pushed for less
than 1.5 seconds while the CD is being played,
the next track or the beginning of the current
track on the CD will be played.
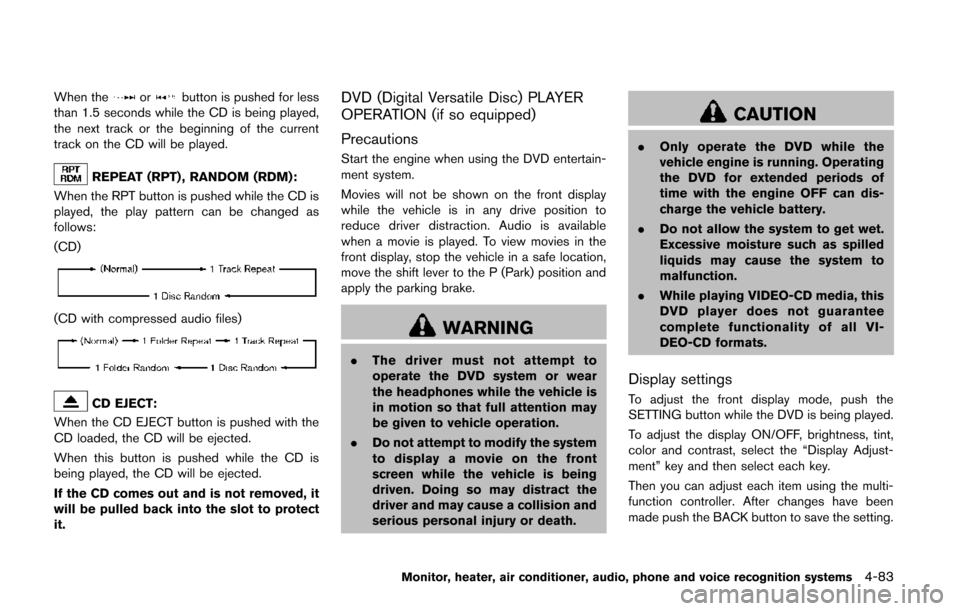
REPEAT (RPT) , RANDOM (RDM):
When the RPT button is pushed while the CD is
played, the play pattern can be changed as
follows:
(CD)
(CD with compressed audio files)
CD EJECT:
When the CD EJECT button is pushed with the
CD loaded, the CD will be ejected.
When this button is pushed while the CD is
being played, the CD will be ejected.
If the CD comes out and is not removed, it
will be pulled back into the slot to protect
it.
DVD (Digital Versatile Disc) PLAYER
OPERATION (if so equipped)
Precautions
Start the engine when using the DVD entertain-
ment system.
Movies will not be shown on the front display
while the vehicle is in any drive position to
reduce driver distraction. Audio is available
when a movie is played. To view movies in the
front display, stop the vehicle in a safe location,
move the shift lever to the P (Park) position and
apply the parking brake.
WARNING
. The driver must not attempt to
operate the DVD system or wear
the headphones while the vehicle is
in motion so that full attention may
be given to vehicle operation.
. Do not attempt to modify the system
to display a movie on the front
screen while the vehicle is being
driven. Doing so may distract the
driver and may cause a collision and
serious personal injury or death.
CAUTION
. Only operate the DVD while the
vehicle engine is running. Operating
the DVD for extended periods of
time with the engine OFF can dis-
charge the vehicle battery.
. Do not allow the system to get wet.
Excessive moisture such as spilled
liquids may cause the system to
malfunction.
. While playing VIDEO-CD media, this
DVD player does not guarantee
complete functionality of all VI-
DEO-CD formats.
Display settings
To adjust the front display mode, push the
SETTING button while the DVD is being played.
To adjust the display ON/OFF, brightness, tint,
color and contrast, select the “Display Adjust-
ment” key and then select each key.
Then you can adjust each item using the multi-
function controller. After changes have been
made push the BACK button to save the setting.
Monitor, heater, air conditioner, audio, phone and voice recognition systems4-83
Page 267 of 482
4-84Monitor, heater, air conditioner, audio, phone and voice recognition systems
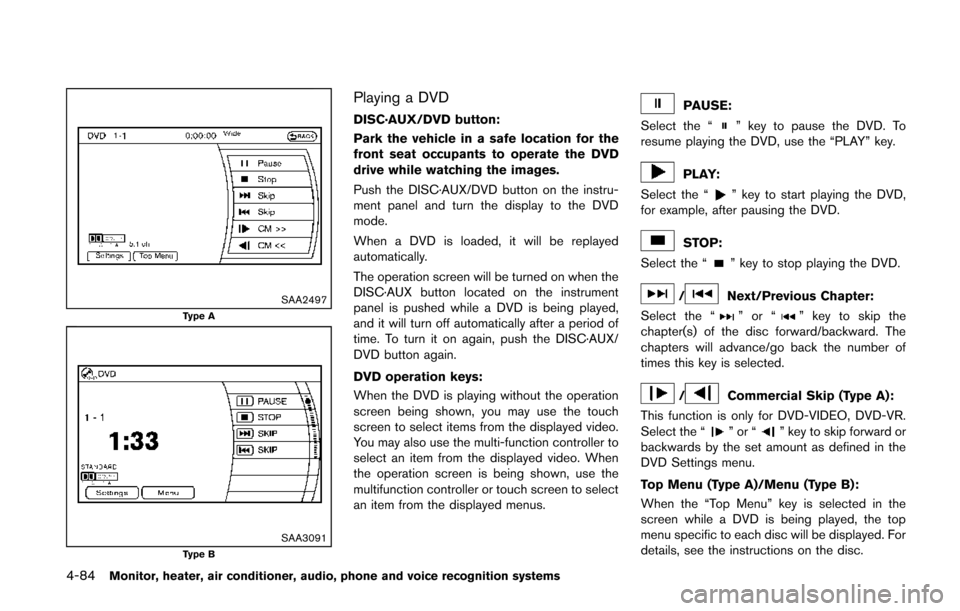
SAA2497Type A
SAA3091Type B
Playing a DVD
DISC·AUX/DVD button:
Park the vehicle in a safe location for the
front seat occupants to operate the DVD
drive while watching the images.
Push the DISC·AUX/DVD button on the instru-
ment panel and turn the display to the DVD
mode.
When a DVD is loaded, it will be replayed
automatically.
The operation screen will be turned on when the
DISC·AUX button located on the instrument
panel is pushed while a DVD is being played,
and it will turn off automatically after a period of
time. To turn it on again, push the DISC·AUX/
DVD button again.
DVD operation keys:
When the DVD is playing without the operation
screen being shown, you may use the touch
screen to select items from the displayed video.
You may also use the multi-function controller to
select an item from the displayed video. When
the operation screen is being shown, use the
multifunction controller or touch screen to select
an item from the displayed menus.PAUSE:
Select the “
” key to pause the DVD. To
resume playing the DVD, use the “PLAY” key.
PLAY:
Select the “
” key to start playing the DVD,
for example, after pausing the DVD.
STOP:
Select the “
” key to stop playing the DVD.
/Next/Previous Chapter:
Select the “
”or“” key to skip the
chapter(s) of the disc forward/backward. The
chapters will advance/go back the number of
times this key is selected.
/Commercial Skip (Type A):
This function is only for DVD-VIDEO, DVD-VR.
Select the “
”or“” key to skip forward or
backwards by the set amount as defined in the
DVD Settings menu.
Top Menu (Type A)/Menu (Type B):
When the “Top Menu” key is selected in the
screen while a DVD is being played, the top
menu specific to each disc will be displayed. For
details, see the instructions on the disc.
Page 273 of 482
4-90Monitor, heater, air conditioner, audio, phone and voice recognition systems
Operation keys:
To operate the USB memory, select the desired
key displayed on the operation screen using the
multi-function controller.
Pause
Select the “
” key to pause the movie file. To
resume playing the movie file, select the “”
key.
Play
Select the “
” key to start playing a movie file,
for example, after pausing a movie file.
STOP
Select the “
” key to stop playing a movie file.
Skip (Next chapter)
Select the “
” key to skip the chapter(s) of
the file forward. The chapters will advance the
number of times the ENTER button is pushed.
Skip (Previous chapter)
Select the “
” key to skip the chapter(s) of
the file backward. The chapters will go back the
number of times the “
” key is selected. List:
Select the “List” key on the movie file operation
screen to display the file list.
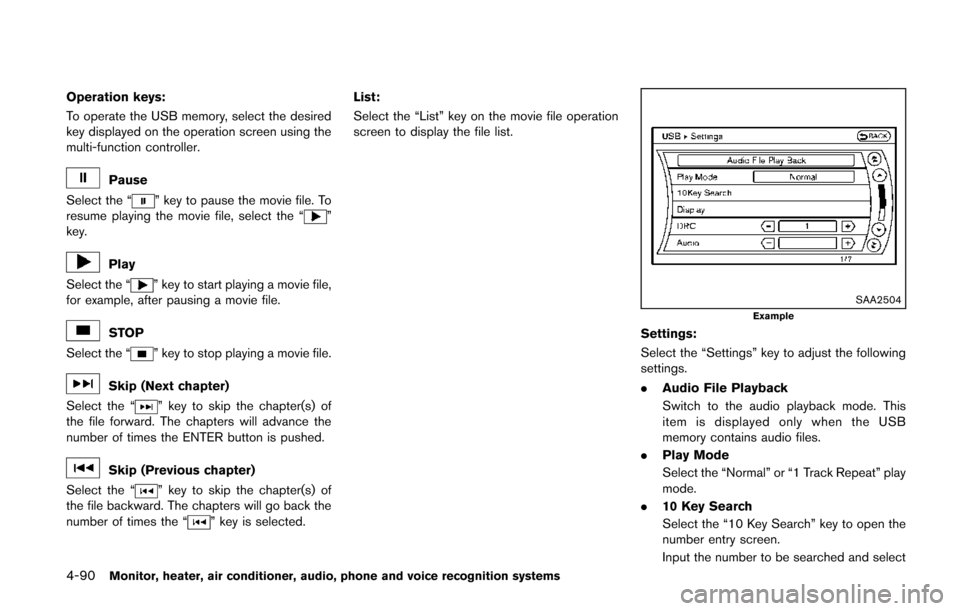
SAA2504Example
Settings:
Select the “Settings” key to adjust the following
settings.
.
Audio File Playback
Switch to the audio playback mode. This
item is displayed only when the USB
memory contains audio files.
. Play Mode
Select the “Normal” or “1 Track Repeat” play
mode.
. 10 Key Search
Select the “10 Key Search” key to open the
number entry screen.
Input the number to be searched and select
Page 292 of 482
PLAYING A DVD
DISC·AUX button
Park the vehicle in a safe location for the
front seat occupants to operate the DVD
drive while watching the images.
Insert a DVD into the CD/DVD slot with the
labeled side up. The DVD will be guided
automatically into the slot. When ejecting the
DVD, push the EJECT button.
Push the DISC·AUX button on the instrument
panel, turn the display to the DVD mode, and
begin playing DVD automatically.
When a DVD is loaded, it will be replayed
automatically.
The front screen will be turned on when the
DISC·AUX button is pushed while a DVD is
being played, and it will turn off automatically
after a period of time. To turn it on again, push
the DISC·AUX button again.
Adjust Front/Rear display
Front display:
To adjust the front display, push theSETTING
button while the DVD is being played, select the
“Others” key and then select the “Display” key.
To adjust the display ON/OFF, brightness, tint,
color and contrast, select the “Display Adjust-
ment” key and then select the preferred key for
setting.
You can then adjust each item using the multi-
function controller. After changes have been
made press the BACK button to save the
setting.
Rear display:
To adjust the rear display, push the “DISP”
(Display) button on the remote controller.
To adjust aspect, color system, 3D Y/C filter and
picture mode, select each key using the joystick
on the remote controller and tilt the joystick to
right or left.
Push the BACK button to apply the settings and
return to the previous display.
DVD operation keys
To operate the DVD drive, select the desired key
displayed on the operation screen using the
multi-function controller.
PAUSE:
Select the “
” key to pause the DVD. To
resume playing the DVD, use the “PLAY” key.
To pause the DVD, it is also possible to push the
“
” button on the keypad of the remote
controller.
PLAY:
Select the “
” key to start playing the DVD,
for example, after pausing the DVD.
To start playing the DVD, it is also possible to
push the “
” button on the keypad of the
remote controller.
STOP:
Select the “
” key to stop playing the DVD.
To stop playing the DVD, it is also possible to
push the “
” button on the keypad of the
remote controller.
SKIP (FORWARD):
Select the “
” key to skip the chapter(s) of
the disc forward. The chapters will advance the
Monitor, heater, air conditioner, audio, phone and voice recognition systems4-109
Page 307 of 482
4-124Monitor, heater, air conditioner, audio, phone and voice recognition systems
WARNING
.Use a phone after stopping your
vehicle in a safe location. If you
have to use a phone while driving,
exercise extreme caution at all
times so full attention may be given
to vehicle operation.
. If you find yourself unable to devote
full attention to vehicle operation
while talking on the phone, pull off
the road to a safe location and stop
your vehicle before doing so.
CAUTION
To avoid draining the vehicle battery,
use a phone after starting the engine.
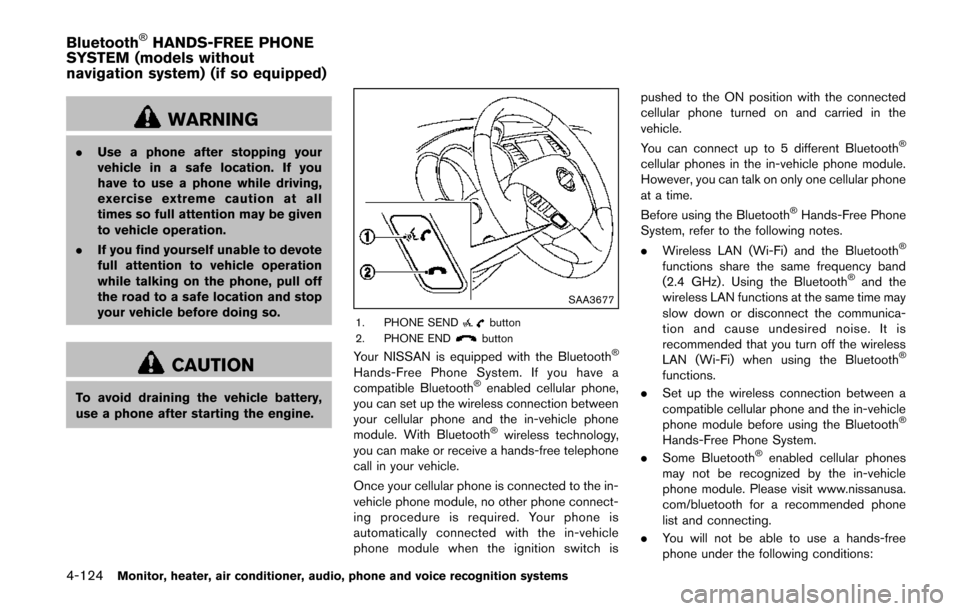
SAA3677
1. PHONE SENDbutton
2. PHONE ENDbutton
Your NISSAN is equipped with the Bluetooth®
Hands-Free Phone System. If you have a
compatible Bluetooth®enabled cellular phone,
you can set up the wireless connection between
your cellular phone and the in-vehicle phone
module. With Bluetooth
®wireless technology,
you can make or receive a hands-free telephone
call in your vehicle.
Once your cellular phone is connected to the in-
vehicle phone module, no other phone connect-
ing procedure is required. Your phone is
automatically connected with the in-vehicle
phone module when the ignition switch is pushed to the ON position with the connected
cellular phone turned on and carried in the
vehicle.
You can connect up to 5 different Bluetooth
®
cellular phones in the in-vehicle phone module.
However, you can talk on only one cellular phone
at a time.
Before using the Bluetooth
®Hands-Free Phone
System, refer to the following notes.
. Wireless LAN (Wi-Fi) and the Bluetooth
®
functions share the same frequency band
(2.4 GHz) . Using the Bluetooth®and the
wireless LAN functions at the same time may
slow down or disconnect the communica-
tion and cause undesired noise. It is
recommended that you turn off the wireless
LAN (Wi-Fi) when using the Bluetooth
®
functions.
. Set up the wireless connection between a
compatible cellular phone and the in-vehicle
phone module before using the Bluetooth
®
Hands-Free Phone System.
. Some Bluetooth®enabled cellular phones
may not be recognized by the in-vehicle
phone module. Please visit www.nissanusa.
com/bluetooth for a recommended phone
list and connecting.
. You will not be able to use a hands-free
phone under the following conditions:
Bluetooth®HANDS-FREE PHONE
SYSTEM (models without
navigation system) (if so equipped)
Page 351 of 482
5-8Starting and driving
6. Turn on the hazard warning flashers andeither contact a roadside emergency service
to change the tire or see “Changing a flat
tire” (P.6-3) .
DRINKING ALCOHOL/DRUGS AND
DRIVING
WARNING
Never drive under the influence of
alcohol or drugs. Alcohol in the blood-
stream reduces coordination, delays
reaction time and impairs judgement.
Driving after drinking alcohol increases
the likelihood of being involved in an
accident injuring yourself and others.
Additionally, if you are injured in an
accident, alcohol can increase the se-
verity of the injury.
NISSAN is committed to safe driving. However,
you must choose not to drive under the influence
of alcohol. Every year thousands of people are
injured or killed in alcohol-related accidents.
Although the local laws vary on what is
considered to be legally intoxicated, the fact is
that alcohol affects all people differently and
most people underestimate the effects of
alcohol. Remember, drinking and driving don’t mix! And
that is true for drugs, too (over-the-counter,
prescription, and illegal drugs) . Don’t drive if
your ability to operate your vehicle is impaired by
alcohol, drugs, or some other physical condition.
WARNING
Do not operate the push-button ignition
switch while driving the vehicle except
in an emergency. (The engine will stop
when the ignition switch is pushed 3
consecutive times or the ignition switch
is pushed and held for more than 2
seconds.) If the engine stops while the
vehicle is being driven, this could lead
to a crash and serious injury.
Before operating the push-button ignition
switch, be sure to move the shift lever to the P
(Park) position.
INTELLIGENT KEY SYSTEM
The Intelligent Key system can operate the
ignition switch without taking the Intelligent
Key out from your pocket or purse. The
operating environment and/or conditions may
affect the Intelligent Key system operation.
CAUTION
. Be sure to carry the Intelligent Key
with you when operating the vehi-
cle.
PUSH-BUTTON IGNITION SWITCH
Page 355 of 482
5-12Starting and driving
.Make sure the area around the vehicle is
clear.
. Check fluid levels such as engine oil, cool-
ant, brake fluid and window washer fluid as
frequently as possible, or at least whenever
you refuel.
. Check that all windows and lights are clean.
. Visually inspect tires for their appearance
and condition. Also check tires for proper
inflation.
. Lock all doors.
. Position seats and adjust head restraints/
headrests.
. Adjust inside and outside mirrors.
. Fasten seat belts and ask all passengers to
do likewise.
. Check the operation of warning lights when
the ignition switch is pushed to the ON
position. (See “Warning/indicator lights and
audible reminders” (P.2-11) .) 1. Apply the parking brake.
2. Move the shift lever to the P (Park) or N
(Neutral) position. (P is recommended.)
The starter is designed not to operate unless
the shift lever is in either of the above
positions.
3. Push the ignition switch to the ON position. Depress the brake pedal and push the
ignition switch to start the engine.
To start the engine immediately, push and
release the ignition switch while depressing
the brake pedal with the ignition switch in
any position.
.If the engine is very hard to start inextremely cold weather or when restart-
ing, depress the accelerator pedal a little
(approximately 1/3 to the floor) and while
holding, crank the engine. Release the
accelerator pedal when the engine starts.
.If the engine is very hard to start becauseit is flooded, depress the accelerator
pedal all the way to the floor and hold it.
Push the ignition switch to the ON
position to start cranking the engine.
After 5 or 6 seconds, stop cranking by
pushing the ignition switch to OFF. After
cranking the engine, release the accel-
erator pedal. Crank the engine with your
foot off the accelerator pedal bydepressing the brake pedal and pushing
the push-button ignition switch to start
the engine. If the engine starts, but fails
to run, repeat the above procedure.
CAUTION
Do not operate the starter for more
than 15 seconds at a time. If the engine
does not start, push the ignition switch
to OFF and wait 10 seconds before
cranking again, otherwise the starter
could be damaged.
4. Warm-up
Allow the engine to idle for at least 30
seconds after starting. Do not race the
engine while warming it up. Drive at
moderate speed for a short distance first,
especially in cold weather. In cold weather,
keep the engine running for a minimum of 2 -
3 minutes before shutting it off. Starting and
stopping the engine over a short period of
time may make the vehicle more difficult to
start.
5. To stop the engine, shift the shift lever to the P (Park) position and push the ignition
switch to the OFF position.
BEFORE STARTING THE ENGINE STARTING THE ENGINE
Page 357 of 482
5-14Starting and driving
CAUTION
.Except in an emergency, do not shift
to the N (Neutral) position while
driving. Coasting with the transmis-
sion in the N (Neutral) position may
cause serious damage to the trans-
mission.
. When stopping the vehicle on an
uphill grade, do not hold the vehicle
by depressing the accelerator pedal.
The foot brake should be used for
this purpose.
. Do not downshift abruptly on slip-
pery roads. This may cause a loss of
control.
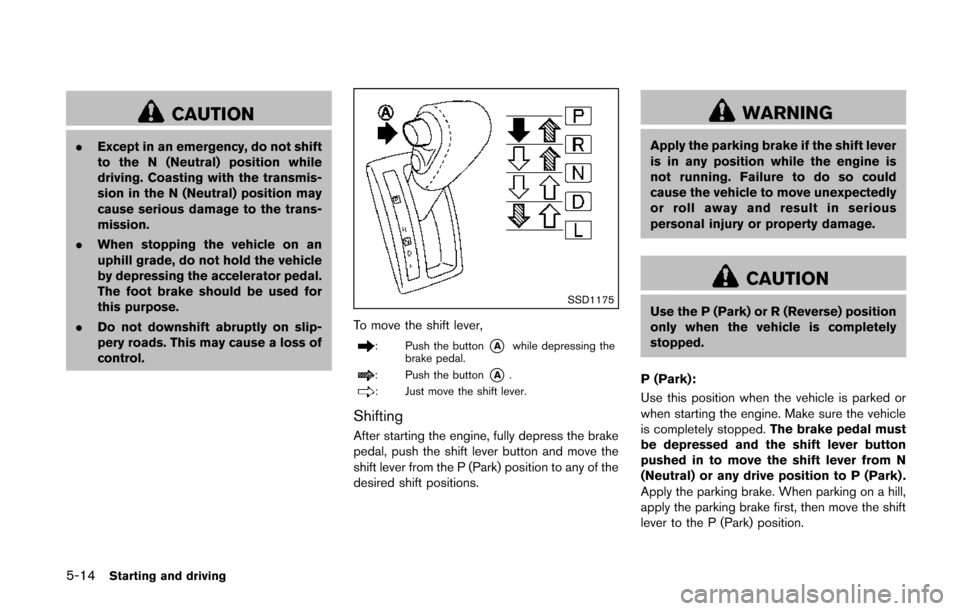
SSD1175
To move the shift lever,
: Push the button*Awhile depressing the
brake pedal.
: Push the button*A.
: Just move the shift lever.
Shifting
After starting the engine, fully depress the brake
pedal, push the shift lever button and move the
shift lever from the P (Park) position to any of the
desired shift positions.
WARNING
Apply the parking brake if the shift lever
is in any position while the engine is
not running. Failure to do so could
cause the vehicle to move unexpectedly
or roll away and result in serious
personal injury or property damage.
CAUTION
Use the P (Park) or R (Reverse) position
only when the vehicle is completely
stopped.
P (Park):
Use this position when the vehicle is parked or
when starting the engine. Make sure the vehicle
is completely stopped. The brake pedal must
be depressed and the shift lever button
pushed in to move the shift lever from N
(Neutral) or any drive position to P (Park) .
Apply the parking brake. When parking on a hill,
apply the parking brake first, then move the shift
lever to the P (Park) position.