2014 NISSAN QUEST start stop button
[x] Cancel search: start stop buttonPage 108 of 482
by releasing the door inside lock knob, the
alarm will activate.)
How to stop an activated alarm
The alarm will stop by unlocking a door by
pushing the unlock button on the Intelligent Key,
the door handle request switch or using the
mechanical key. The alarm will not stop if the
ignition switch is pushed to the ACC or ON
position.
If the system does not operate as de-
scribed above, have it checked by a
NISSAN dealer.
NISSAN VEHICLE IMMOBILIZER SYS-
TEM
The NISSAN Vehicle Immobilizer System will not
allow the engine to start without the use of the
registered Intelligent Key.Never leave these
keys in the vehicle.
FCC Notice:
For USA:
This device complies with Part 15 of the
FCC Rules. Operation is subject to the
following two conditions:
(1) This device may not cause harmful
interference, and (2) this device must
accept any interference received, including
interference that may cause undesired operation.
Note: Changes or modifications not ex-
pressly approved by the party responsible
for compliance could void the user’s
authority to operate the equipment.
For Canada:
This device complies with RSS-210 of
Industry Canada. Operation is subject to
the following two conditions:
(1) this device may not cause interference,
and (2) this device must accept any inter-
ference, including interference that may
cause undesired operation of the device.
SIC2045
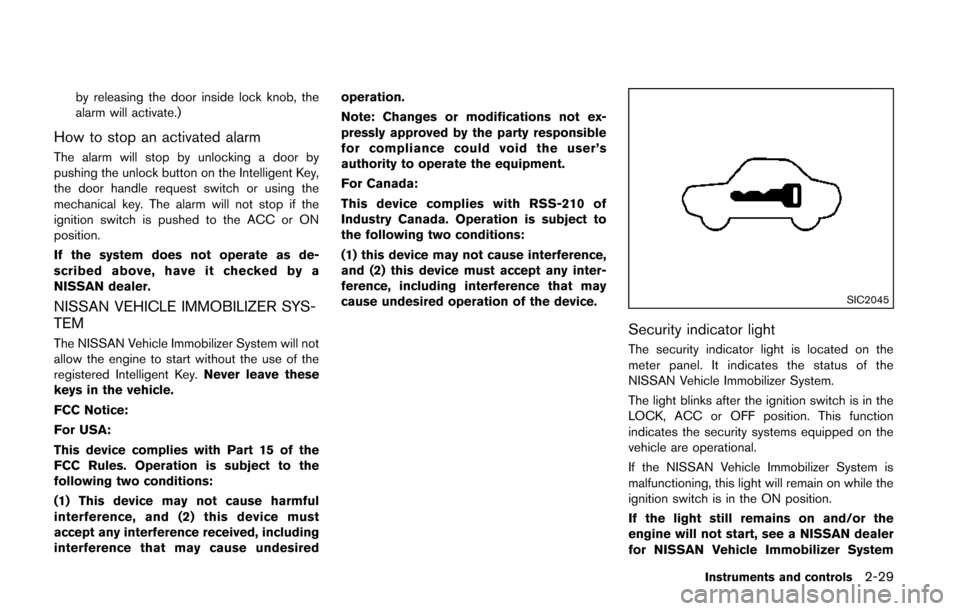
Security indicator light
The security indicator light is located on the
meter panel. It indicates the status of the
NISSAN Vehicle Immobilizer System.
The light blinks after the ignition switch is in the
LOCK, ACC or OFF position. This function
indicates the security systems equipped on the
vehicle are operational.
If the NISSAN Vehicle Immobilizer System is
malfunctioning, this light will remain on while the
ignition switch is in the ON position.
If the light still remains on and/or the
engine will not start, see a NISSAN dealer
for NISSAN Vehicle Immobilizer System
Instruments and controls2-29
Page 155 of 482
3-12Pre-driving checks and adjustments
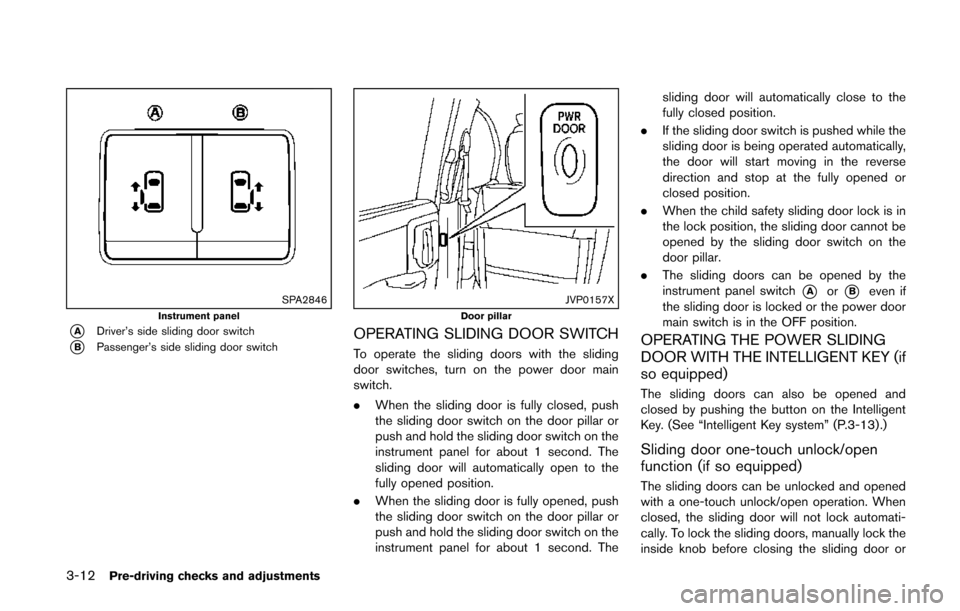
SPA2846Instrument panel
*ADriver’s side sliding door switch
*BPassenger’s side sliding door switch
JVP0157XDoor pillar
OPERATING SLIDING DOOR SWITCH
To operate the sliding doors with the sliding
door switches, turn on the power door main
switch.
.When the sliding door is fully closed, push
the sliding door switch on the door pillar or
push and hold the sliding door switch on the
instrument panel for about 1 second. The
sliding door will automatically open to the
fully opened position.
. When the sliding door is fully opened, push
the sliding door switch on the door pillar or
push and hold the sliding door switch on the
instrument panel for about 1 second. The sliding door will automatically close to the
fully closed position.
. If the sliding door switch is pushed while the
sliding door is being operated automatically,
the door will start moving in the reverse
direction and stop at the fully opened or
closed position.
. When the child safety sliding door lock is in
the lock position, the sliding door cannot be
opened by the sliding door switch on the
door pillar.
. The sliding doors can be opened by the
instrument panel switch
*Aor*Beven if
the sliding door is locked or the power door
main switch is in the OFF position.
OPERATING THE POWER SLIDING
DOOR WITH THE INTELLIGENT KEY (if
so equipped)
The sliding doors can also be opened and
closed by pushing the button on the Intelligent
Key. (See “Intelligent Key system” (P.3-13).)
Sliding door one-touch unlock/open
function (if so equipped)
The sliding doors can be unlocked and opened
with a one-touch unlock/open operation. When
closed, the sliding door will not lock automati-
cally. To lock the sliding doors, manually lock the
inside knob before closing the sliding door or
Page 156 of 482
push the LOCK button on the Intelligent Key
after the door is closed. See “Remote keyless
entry system” (P.3-21) .
OPERATING SLIDING DOOR BY
POWER ASSIST
To operate, pull the inside or outside door
handle until you hear the buzzer, the door will
automatically open or close.
If the door handle is operated while the sliding
door is moving, the door will reverse directions
and stop at either the full open or closed
position.
SLIDING DOOR AUTO REVERSE
FUNCTION
If an obstacle is detected while the power
sliding door is being operated, the door will
reverse directions and return to the full open or
full closed position.
If you touch the sensor of the sliding door while
the sliding door is closing automatically, the door
will start moving in the reverse direction and
stop at the fully opened position.
WARNING
.Radio waves could adversely affect
electric medical equipment. Those
who use a pacemaker should con-
tact the electric medical equipment
manufacturer for the possible influ-
ences before use.
. The Intelligent Key transmits radio
waves when the buttons are
pushed. The FAA advises that radio
waves may affect aircraft navigation
and communication systems. Do not
operate the Intelligent Key while on
an airplane. Make sure the buttons
are not operated unintentionally
when the unit is stored for a flight.
The Intelligent Key system can operate all the
door locks (including the lift gate) using the
remote keyless function or pushing the request
switch on the vehicle without taking the key out
from a pocket or purse. The operating environ-
ment and/or conditions may affect the Intelligent
Key system operation.
Be sure to read the following before using the
Intelligent Key system.
CAUTION
. Be sure to carry the Intelligent Key
with you when operating the vehi-
cle.
. Never leave the Intelligent Key in
the vehicle when you leave the
vehicle.
The Intelligent Key is always communicating with
the vehicle as it receives radio waves. The
Intelligent Key system transmits weak radio
signals. Environmental conditions may interfere
with the operation of the Intelligent Key system
under the following operating conditions.
. When operating near a location where
strong radio signals are transmitted, such
as a TV tower, power station and broad-
casting station.
. When in possession of wireless equipment,
such as a cellular telephone, transceiver,
and CB radio.
. When the Intelligent Key is in contact with or
covered by metallic materials.
. When any type of radio wave remote control
is used nearby.
. When the Intelligent Key is placed near an
electric appliance such as a personal
Pre-driving checks and adjustments3-13
INTELLIGENT KEY SYSTEM
Page 163 of 482
3-20Pre-driving checks and adjustments
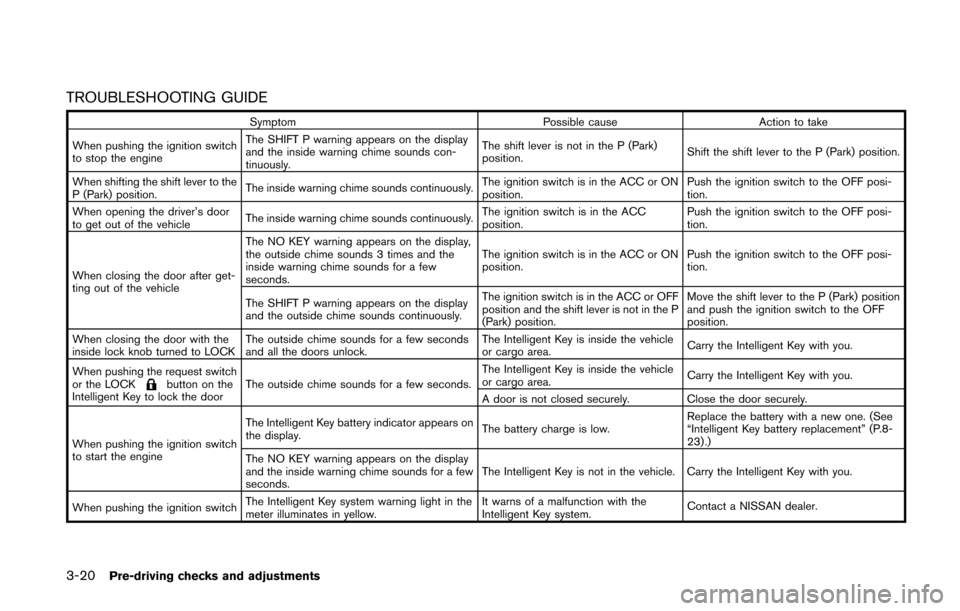
TROUBLESHOOTING GUIDE
SymptomPossible causeAction to take
When pushing the ignition switch
to stop the engine The SHIFT P warning appears on the display
and the inside warning chime sounds con-
tinuously.
The shift lever is not in the P (Park)
position.
Shift the shift lever to the P (Park) position.
When shifting the shift lever to the
P (Park) position. The inside warning chime sounds continuously.
The ignition switch is in the ACC or ON
position.Push the ignition switch to the OFF posi-
tion.
When opening the driver’s door
to get out of the vehicle The inside warning chime sounds continuously. The ignition switch is in the ACC
position.Push the ignition switch to the OFF posi-
tion.
When closing the door after get-
ting out of the vehicle The NO KEY warning appears on the display,
the outside chime sounds 3 times and the
inside warning chime sounds for a few
seconds.
The ignition switch is in the ACC or ON
position.
Push the ignition switch to the OFF posi-
tion.
The SHIFT P warning appears on the display
and the outside chime sounds continuously. The ignition switch is in the ACC or OFF
position and the shift lever is not in the P
(Park) position.Move the shift lever to the P (Park) position
and push the ignition switch to the OFF
position.
When closing the door with the
inside lock knob turned to LOCK The outside chime sounds for a few seconds
and all the doors unlock. The Intelligent Key is inside the vehicle
or cargo area.
Carry the Intelligent Key with you.
When pushing the request switch
or the LOCK
button on the
Intelligent Key to lock the door The outside chime sounds for a few seconds. The Intelligent Key is inside the vehicle
or cargo area.
Carry the Intelligent Key with you.
A door is not closed securely. Close the door securely.
When pushing the ignition switch
to start the engine The Intelligent Key battery indicator appears on
the display.
The battery charge is low.Replace the battery with a new one. (See
“Intelligent Key battery replacement” (P.8-
23).)
The NO KEY warning appears on the display
and the inside warning chime sounds for a few
seconds. The Intelligent Key is not in the vehicle. Carry the Intelligent Key with you.
When pushing the ignition switch The Intelligent Key system warning light in the
meter illuminates in yellow. It warns of a malfunction with the
Intelligent Key system.
Contact a NISSAN dealer.
Page 171 of 482
3-28Pre-driving checks and adjustments
Power open
When the lift gate is fully closed, the lift gate will
fully open automatically by:
.pushing the power lift gate switch
*Aon
the instrument panel for more than 1 second
. pushing the lift gate opener switch
*B
.pushing the power lift gate button*Con
the Intelligent Key for more than 1 second
The hazard flashes 4 times and the outside
chime sounds when the lift gate starts opening.
NOTE:
The lift gate can be opened by the power
lift gate switch
*Aor the lift gate button
*Ceven if the lift gate is locked or
the power door main switch is in the OFF
position. The lift gate will unlock and open.
Power close
When the lift gate is fully opened, the lift gate
will fully close automatically by:
. pushing the power lift gate switch
*Aon
the instrument panel for more than 1 second
. pushing the power lift gate switch
*Don
the lower part of the lift gate
. pushing the lift gate button
*Con the
Intelligent Key for more than 1 second
The hazard flashes 4 times and the outside
chime sounds when the lift gate starts closing.
Reverse function
The power lift gate will reverse immediately if
one of the following actions is performed during
power open or power close.
. pushing the power lift gate switch
*Aon
the instrument panel
. pushing the lift gate switch
*Don the lower
part of the lift gate
. pushing the lift gate button
*Con
the Intelligent Key.
The outside chime sounds when the lift gate
starts to reverse.
Auto reverse function
The auto-reverse function enables the lift gate to
automatically reverse when something is caught
in the lift gate as it is opening or closing. When
the control unit detects an obstacle, the lift gate
will reverse and return to the full open or full
close position.
If a second obstacle is detected, the lift gate
motion will stop and the drive motor will
disengage. The lift gate will enter the manual
mode.
A pinch sensor is mounted on each side of the
lift gate. If an object is detected by the pinch
sensor during power close, the lift gate will
reverse and return to the full open position
immediately. NOTE:
If the pinch sensor is damaged or removed,
the power close function will not operate.
WARNING
There is a small distance immediately
before the closed position that cannot
be detected. Make sure that all passen-
gers keep their hands, etc., clear from
the lift gate opening before closing the
lift gate.
Manual mode
If power operation is not available, the lift gate
can be operated manually. Power operation may
not be available if multiple obstacles have been
detected in a single power cycle or if the battery
voltage is low. When the power door main
switch is in the OFF position, the lift gate can be
opened manually by pushing the lift gate opener
switch. If the power lift gate opener switch is
pushed during power open or close, the power
operation will be canceled and the lift gate can
be operated manually.
Page 181 of 482
3-38Pre-driving checks and adjustments
The indicator light for the pushed memory
switch will stay on for approximately 5
seconds after pushing the switch.
If memory is stored in the same memory
switch, the previous memory will be deleted.
Linking Intelligent Key to a stored mem-
ory position
The Intelligent Key can be linked to a stored
memory position with the following procedure.
1. Follow one of the steps for storing a memoryposition.
. While the indicator light for the memory
switch being set is illuminated for 5 sec-
onds, push the
button on the Intelligent
Key.
. Push the ignition switch to the OFF position,
and then push the SET switch. Push the
button while pushing the memory button
while the indicator light stays on for approxi-
mately 5 seconds.
If the indicator light blinks, the Intelligent Key is
linked to that memory setting.
Push the ignition switch to the OFF position, and
then push the
button on the Intelligent Key.
The driver’s seat and outside mirrors will move to
the memorized position.
Confirming memory storage
. Push the ignition switch to the ON position
and push the SET switch. If the main
memory has not been stored, the indicator
light will come on for approximately 0.5
second. When the memory has stored in
position, the indicator light will stay on for
approximately 5 seconds.
. If the battery cable is disconnected, or if the
fuse opens, the memory will be canceled. In
this case, reset the desired position using
the previous procedure.
. If optional keys are added to your vehicle,
the memory storage procedure to switch 1
or 2 and linking Intelligent Key procedure to
a stored memory position should be per-
formed again for each Intelligent Key. For
additional Intelligent Key information, see
“Keys” (P.3-3) .
Selecting the memorized position
1. Move the shift lever to the P (Park) position.
2. Use one of the following methods to move
the driver’s seat and outside mirrors.
.Push the ignition switch to the ONposition and push the memory switch (1
or 2) .
.Within 45 seconds of opening thedriver’s door, push the memory switch (1 or 2) .
The driver’s seat and outside mirrors will
move to the memorized position with the
indicator light flashing, and then the light will
stay on for approximately 5 seconds.
SYSTEM OPERATION
The automatic drive positioner system will not
work or will stop operating under the following
conditions:
. When the vehicle speed is above 4 MPH (7
km/h) (entry/exit function) .
. When the vehicle is driven (memory sto-
rage).
. When the adjusting switch for the driver’s
seat is turned on while the automatic drive
positioner is operating.
. When the driver’s seat and outside mirrors
have already been moved to the memorized
position.
. When no position is stored in the memory
switch.
. When the engine is started while moving the
automatic drive positioner.
. When the shift lever is moved from the P
(Park) position to any other position. (How-
ever, it will not be canceled while the driver’s
seat is returning to the previous positions
(entry/exit function).)
Page 252 of 482
TRACK button is pushed and held.
SCAN tuning:
When the SCAN button is pushed, the system
will seek and stop at the detected broadcasting
station for 5 seconds, and then it will start to
seek for the next broadcasting station.
Push the SCAN button in this 5-second period
to stop seeking.
*1to*6Radio memory operations:
The audio system can store up to 12 FM station
frequencies (for FM1 and FM2) and 6 AM
station frequencies.
During radio reception, pushing the radio
memory button for less than 1.5 seconds will
play the stored radio station.
To store the station frequency manually:
1. Tune to the desired broadcasting station frequency using the SEEK /TRACK buttons.
2. Push and hold one of the radio memory buttons
*1-*6until a beep sounds.
3. The frequency of the selected channel will appear on the display when the memory is
stored properly.
4. Perform steps 1 - 3 for all other memory buttons.
Compact Disc (CD) player operation
Place the ignition switch in the ACC or ON
position, and insert the CD into the slot with the
label side facing up. The CD will be guided
automatically into the slot and start playing. After
loading the disc, the number of tracks on the
disc will appear on the display.
If the radio is already operating, it will auto-
matically turn off and the CD will play.
If the system has been turned off while the CD
was playing, pushing the Power button will start
the CD.
CD PLAY:
When the CD button is pushed while a CD is
loaded, the CD will start playing.
CD DISPLAY information:
When the DISP is pushed while a CD with title
information is playing, the information text on the
display will change as follows:
CD:
Track time ?Album Title ?Artist Name ?
Song Title ?Track time
CD with MP3/WMA:
Track time ?Folder Title ?Album Title ?Artist
Name ?Song Title ?Track time
/Next/Previous Track and Fast
Forward/Rewind:
Fast forward/Rewind:
Push and hold the FF or REW button for more
than 1.5 seconds to fast forward or rewind
through the track. Release the button to play the
CD at normal speed.
Track up/down:
To play the next track, push the FF button for
less than 1.5 seconds while a CD is playing.
To play the previous track, push the REW button
for less than 1.5 seconds within 2 seconds after
the current track started playing. To return to the
beginning of the current track, push the REW
button for less than 1.5 seconds after 2 seconds
from when the current track started playing.
Folder Selector Knob (CD with MP3/
WMA):
To skip to the next folder, turn the
TUNE·FOLDER knob.
To skip to the next or previous track within the
folder, push SEEK/TRACK button
Monitor, heater, air conditioner, audio, phone and voice recognition systems4-69
Page 257 of 482
4-74Monitor, heater, air conditioner, audio, phone and voice recognition systems
from low to high frequencies and stop at each
broadcasting station/channel for 5 seconds.
Pushing the button again during this 5 seconds
period will stop SCAN tuning and the radio will
remain tuned to that station/channel.
If the Radio SCAN tuning button is not pushed
within 5 seconds, SCAN tuning moves to the
next station/channel.
*1to*6Station memory operations:
12 stations/channels can be set for the FM band
(6 each for FM1 and FM2) , 18 for SiriusXM
Satellite Radio (6 each for XM1, XM2 and XM3)
and 6 stations can be set for the AM band.
1. Choose the radio band using the radio band select button.
2. Tune to the desired station/channel using the SEEK·CAT, SCAN button or the radio
TUNE·SCROLL control knob.
3. Push and hold the desired station preset button
*1to*6until the radio mutes.
4. The station indicator will then come on and the sound will resume. Memorizing is now
complete.
5. Other buttons can be set in the same manner.
If the battery cable is disconnected, or if the fuse
opens, the radio memory will be erased. In that
case, reset the desired stations/channels.
SAA3607
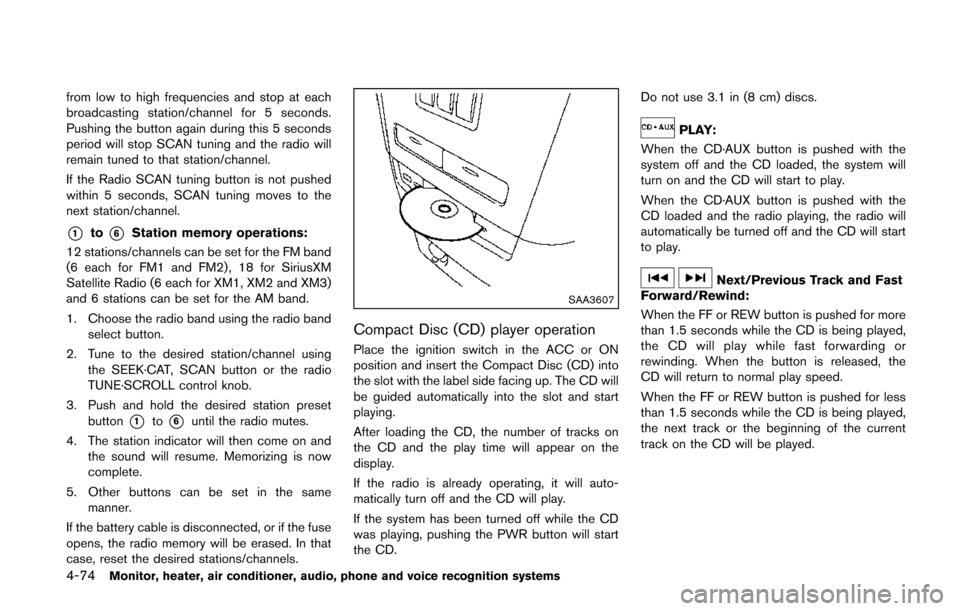
Compact Disc (CD) player operation
Place the ignition switch in the ACC or ON
position and insert the Compact Disc (CD) into
the slot with the label side facing up. The CD will
be guided automatically into the slot and start
playing.
After loading the CD, the number of tracks on
the CD and the play time will appear on the
display.
If the radio is already operating, it will auto-
matically turn off and the CD will play.
If the system has been turned off while the CD
was playing, pushing the PWR button will start
the CD. Do not use 3.1 in (8 cm) discs.
PLAY:
When the CD·AUX button is pushed with the
system off and the CD loaded, the system will
turn on and the CD will start to play.
When the CD·AUX button is pushed with the
CD loaded and the radio playing, the radio will
automatically be turned off and the CD will start
to play.
Next/Previous Track and Fast
Forward/Rewind:
When the FF or REW button is pushed for more
than 1.5 seconds while the CD is being played,
the CD will play while fast forwarding or
rewinding. When the button is released, the
CD will return to normal play speed.
When the FF or REW button is pushed for less
than 1.5 seconds while the CD is being played,
the next track or the beginning of the current
track on the CD will be played.