2014 NISSAN QUEST flat tire
[x] Cancel search: flat tirePage 350 of 482
significantly more likely to be injured or
killed than a person properly wearing a
seat belt.
OFF-ROAD RECOVERY
If the right side or left side wheels leave the road
surface, maintain control of the vehicle by
following the procedure below. Please note that
this procedure is only a general guide. The
vehicle must be driven as appropriate based on
the conditions of the vehicle, road and traffic.
1. Remain calm and do not overreact.
2. Do not apply the brakes.
3. Maintain a firm grip on the steering wheelwith both hands and try to hold a straight
course.
4. When appropriate, slowly release the accel- erator pedal to gradually slow the vehicle.
5. If there is nothing in the way, steer the vehicle to follow the road while the vehicle
speed is reduced. Do not attempt to drive
the vehicle back onto the road surface until
vehicle speed is reduced.
6. When it is safe to do so, gradually turn the steering wheel until both tires return to the
road surface. When all tires are on the road
surface, steer the vehicle to stay in the
appropriate driving lane.
.If you decide that it is not safe to returnthe vehicle to the road surface based on
vehicle, road or traffic conditions, gradu-
ally slow the vehicle to a stop in a safe
place off the road.
RAPID AIR PRESSURE LOSS
Rapid air pressure loss or a “blow-out” can
occur if the tire is punctured or is damaged due
to hitting a curb or pothole. Rapid air pressure
loss can also be caused by driving on under-
inflated tires.
Rapid air pressure loss can affect the handling
and stability of the vehicle, especially at highway
speeds.
Help prevent rapid air pressure loss by main-
taining the correct air pressure and visually
inspect the tires for wear and damage. See
“Wheels and tires” (P.8-30).
If a tire rapidly loses air pressure or “blows-out”
while driving maintain control of the vehicle by
following the procedure below. Please note that
this procedure is only a general guide. The
vehicle must be driven as appropriate based on
the conditions of the vehicle, road and traffic.
WARNING
The following actions can increase the
chance of losing control of the vehicle if
there is a sudden loss of tire air
pressure. Losing control of the vehicle
may cause a collision and result in
personal injury.
. The vehicle generally moves or pulls
in the direction of the flat tire.
. Do not rapidly apply the brakes.
. Do not rapidly release the accelera-
tor pedal.
. Do not rapidly turn the steering
wheel.
1. Remain calm and do not overreact.
2. Maintain a firm grip on the steering wheel with both hands and try to hold a straight
course.
3. When appropriate, slowly release the accel- erator pedal to gradually slow the vehicle.
4. Gradually steer the vehicle to a safe location off the road and away from traffic if possible.
5. Lightly apply the brake pedal to gradually stop the vehicle.
Starting and driving5-7
Page 351 of 482
5-8Starting and driving
6. Turn on the hazard warning flashers andeither contact a roadside emergency service
to change the tire or see “Changing a flat
tire” (P.6-3) .
DRINKING ALCOHOL/DRUGS AND
DRIVING
WARNING
Never drive under the influence of
alcohol or drugs. Alcohol in the blood-
stream reduces coordination, delays
reaction time and impairs judgement.
Driving after drinking alcohol increases
the likelihood of being involved in an
accident injuring yourself and others.
Additionally, if you are injured in an
accident, alcohol can increase the se-
verity of the injury.
NISSAN is committed to safe driving. However,
you must choose not to drive under the influence
of alcohol. Every year thousands of people are
injured or killed in alcohol-related accidents.
Although the local laws vary on what is
considered to be legally intoxicated, the fact is
that alcohol affects all people differently and
most people underestimate the effects of
alcohol. Remember, drinking and driving don’t mix! And
that is true for drugs, too (over-the-counter,
prescription, and illegal drugs) . Don’t drive if
your ability to operate your vehicle is impaired by
alcohol, drugs, or some other physical condition.
WARNING
Do not operate the push-button ignition
switch while driving the vehicle except
in an emergency. (The engine will stop
when the ignition switch is pushed 3
consecutive times or the ignition switch
is pushed and held for more than 2
seconds.) If the engine stops while the
vehicle is being driven, this could lead
to a crash and serious injury.
Before operating the push-button ignition
switch, be sure to move the shift lever to the P
(Park) position.
INTELLIGENT KEY SYSTEM
The Intelligent Key system can operate the
ignition switch without taking the Intelligent
Key out from your pocket or purse. The
operating environment and/or conditions may
affect the Intelligent Key system operation.
CAUTION
. Be sure to carry the Intelligent Key
with you when operating the vehi-
cle.
PUSH-BUTTON IGNITION SWITCH
Page 355 of 482
5-12Starting and driving
.Make sure the area around the vehicle is
clear.
. Check fluid levels such as engine oil, cool-
ant, brake fluid and window washer fluid as
frequently as possible, or at least whenever
you refuel.
. Check that all windows and lights are clean.
. Visually inspect tires for their appearance
and condition. Also check tires for proper
inflation.
. Lock all doors.
. Position seats and adjust head restraints/
headrests.
. Adjust inside and outside mirrors.
. Fasten seat belts and ask all passengers to
do likewise.
. Check the operation of warning lights when
the ignition switch is pushed to the ON
position. (See “Warning/indicator lights and
audible reminders” (P.2-11) .) 1. Apply the parking brake.
2. Move the shift lever to the P (Park) or N
(Neutral) position. (P is recommended.)
The starter is designed not to operate unless
the shift lever is in either of the above
positions.
3. Push the ignition switch to the ON position. Depress the brake pedal and push the
ignition switch to start the engine.
To start the engine immediately, push and
release the ignition switch while depressing
the brake pedal with the ignition switch in
any position.
.If the engine is very hard to start inextremely cold weather or when restart-
ing, depress the accelerator pedal a little
(approximately 1/3 to the floor) and while
holding, crank the engine. Release the
accelerator pedal when the engine starts.
.If the engine is very hard to start becauseit is flooded, depress the accelerator
pedal all the way to the floor and hold it.
Push the ignition switch to the ON
position to start cranking the engine.
After 5 or 6 seconds, stop cranking by
pushing the ignition switch to OFF. After
cranking the engine, release the accel-
erator pedal. Crank the engine with your
foot off the accelerator pedal bydepressing the brake pedal and pushing
the push-button ignition switch to start
the engine. If the engine starts, but fails
to run, repeat the above procedure.
CAUTION
Do not operate the starter for more
than 15 seconds at a time. If the engine
does not start, push the ignition switch
to OFF and wait 10 seconds before
cranking again, otherwise the starter
could be damaged.
4. Warm-up
Allow the engine to idle for at least 30
seconds after starting. Do not race the
engine while warming it up. Drive at
moderate speed for a short distance first,
especially in cold weather. In cold weather,
keep the engine running for a minimum of 2 -
3 minutes before shutting it off. Starting and
stopping the engine over a short period of
time may make the vehicle more difficult to
start.
5. To stop the engine, shift the shift lever to the P (Park) position and push the ignition
switch to the OFF position.
BEFORE STARTING THE ENGINE STARTING THE ENGINE
Page 370 of 482
.Recirculating the cool air in the cabinwhen the A/C is on reduces cooling load.
4. Drive at economical speeds and distances.
.Observing the speed limit and not ex- ceeding 60 MPH (97 km/h) (where
legally allowed) can improve fuel effi-
ciency due to reduced aerodynamic
drag.
.Maintaining a safe following distancebehind other vehicles reduces unneces-
sary braking.
.Safely monitoring traffic to anticipatechanges in speed permits reduced brak-
ing and smooth acceleration changes.
.Select a gear range suitable to road conditions.
5. Use cruise control.
.Using cruise control during highway driving helps maintain a steady speed.
.Cruise control is particularly effective in providing fuel savings when driving on
flat terrains.
6. Plan for the shortest route.
.Utilize a map or navigation system to determine the best route to save time.
7. Avoid idling.
.Shutting off your engine when safe for stops exceeding 30-60 seconds saves fuel and reduces emissions.
8. Buy an automated pass for toll roads.
.Automated passes permit drivers to use special lanes to maintain cruising speed
through the toll and avoid stopping and
starting.
9. Winter warm up.
.Limit idling time to minimize impact to fuel economy.
.Vehicles typically need no more than 30seconds of idling at start-up to effectively
circulate the engine oil before driving.
.Your vehicle will reach its ideal operatingtemperature more quickly while driving
versus idling.
10. Keeping your vehicle cool.
.Park your vehicle in a covered parking area or in the shade whenever possible.
.When entering a hot vehicle, opening thewindows will help to reduce the inside
temperature faster, resulting in reduced
demand on your A/C system. .
Keep your engine tuned up.
. Follow the recommended scheduled main-
tenance.
. Keep the tires inflated to the correct
pressure. Low tire pressure increases tire
wear and lowers fuel economy.
. Keep the wheels in correct alignment.
Improper alignment increases tire wear and
lowers fuel economy.
. Use the recommended viscosity engine oil.
(See “Engine oil and oil filter recommenda-
tion” (P.9-5) .)
Starting and driving5-27
INCREASING FUEL ECONOMY
Page 380 of 482
6 In case of emergency
Hazard warning flasher switch .............................................. 6-2
Emergency engine shut off ..................................................... 6-2
Flat tire ........................................................................\
................. 6-3Tire Pressure Monitoring System (TPMS) .................... 6-3
Changing a flat tire ............................................................. 6-3
Jump starting ........................................................................\
... 6-10 Push starting ........................................................................\
... 6-12
If your vehicle overheats ...................................................... 6-12
Towing your vehicle .............................................................. 6-14
Towing recommended by NISSAN ........................... 6-15
Vehicle recovery (freeing a stuck vehicle) ............... 6-16
Page 382 of 482
TIRE PRESSURE MONITORING SYS-
TEM (TPMS)
This vehicle is equipped with the Tire Pressure
Monitoring System (TPMS) . It monitors tire
pressure of all tires except the spare. When
the low tire pressure warning light is lit and the
CHECK TIRE PRESSURE warning appears on
the dot matrix liquid crystal display, one or more
of your tires is significantly under-inflated. If the
vehicle is being driven with low tire pressure, the
TPMS will activate and warn you of it by the low
tire pressure warning light. This system will
activate only when the vehicle is driven at
speeds above 16 MPH (25 km/h). For more
details, see “Warning/indicator lights and audi-
ble reminders” (P.2-11) and “Tire Pressure
Monitoring System (TPMS)” (P.5-3) .
WARNING
.If the low tire pressure warning light
illuminates while driving, avoid sud-
den steering maneuvers or abrupt
braking, reduce vehicle speed, pull
off the road to a safe location and
stop the vehicle as soon as possi-
ble. Driving with under-inflated tires
may permanently damage the tires
and increase the likelihood of tire failure. Serious vehicle damage
could occur and may lead to an
accident and could result in serious
personal injury. Check the tire pres-
sure for all four tires. Adjust the tire
pressure to the recommended COLD
tire pressure shown on the Tire and
Loading Information label to turn
the low tire pressure warning light
OFF. If the light still illuminates
while driving after adjusting the tire
pressure, a tire may be flat. If you
have a flat tire, replace it with a
spare tire as soon as possible.
. When a spare tire is mounted or a
wheel is replaced, the TPMS will not
function and the low tire pressure
warning light will flash for approxi-
mately 1 minute. The light will
remain on after 1 minute. Contact
your NISSAN dealer as soon as
possible for tire replacement and/
or system resetting.
. Replacing tires with those not ori-
ginally specified by NISSAN could
affect the proper operation of the
TPMS.
. Do not inject any tire liquid or
aerosol tire sealant into the tires, as this may cause a malfunction of
the tire pressure sensors.
CHANGING A FLAT TIRE
If you have a flat tire, follow the instructions
below.
Stopping the vehicle
1. Safely move the vehicle off the road and
away from traffic.
2. Turn on the hazard warning flashers.
3. Park on a level surface and apply the parking brake. Move the shift lever to the P (Park)
position.
4. Turn off the engine.
5. Raise the hood to warn other traffic, and to signal professional road assistance person-
nel that you need assistance.
6. Have all passengers get out of the vehicle and stand in a safe place, away from traffic
and clear of the vehicle.
WARNING
. Make sure the parking brake is
securely applied and the transmis-
sion is shifted into the P (Park)
position.
In case of emergency6-3
FLAT TIRE
Page 383 of 482
6-4In case of emergency
.Never change tires when the vehicle
is on a slope, ice or slippery areas.
This is hazardous.
. Never change tires if oncoming
traffic is close to your vehicle. Wait
for professional road assistance.
MCE0001A
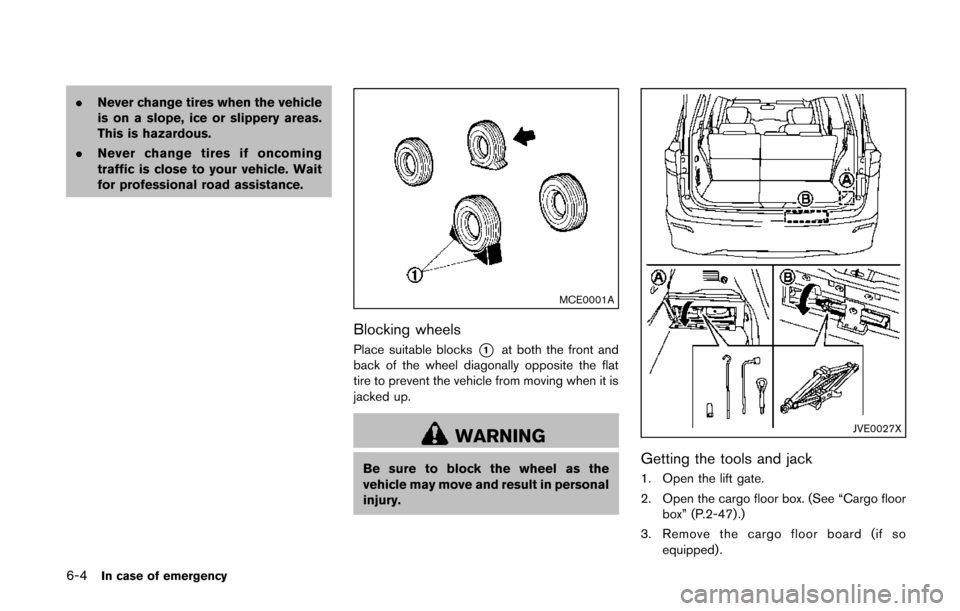
Blocking wheels
Place suitable blocks*1at both the front and
back of the wheel diagonally opposite the flat
tire to prevent the vehicle from moving when it is
jacked up.
WARNING
Be sure to block the wheel as the
vehicle may move and result in personal
injury.
JVE0027X
Getting the tools and jack
1. Open the lift gate.
2. Open the cargo floor box. (See “Cargo floor
box” (P.2-47) .)
3. Remove the cargo floor board (if so equipped) .
Page 385 of 482
6-6In case of emergency
5. Remove the hanging plate*Efrom the
spare tire.
6. After removing the spare tire, raise the spare tire cable completely by turning the spare
tire lowering mechanism clockwise using the
tool
*D.
7. Before moving or jacking up the vehicle, check under the vehicle to make sure the
cable is stored properly.
WARNING
.Never jack up the vehicle before
removing the spare tire from under
the vehicle. This may lead to an
accident could result in serious
personal injury.
. Do not move the vehicle with the
spare tire cable lowered. The cable
could hit or become tangled with an
object on the road. Serious vehicle
damage could occur and may lead
to an accident and could result in
serious personal injury.SCE0630
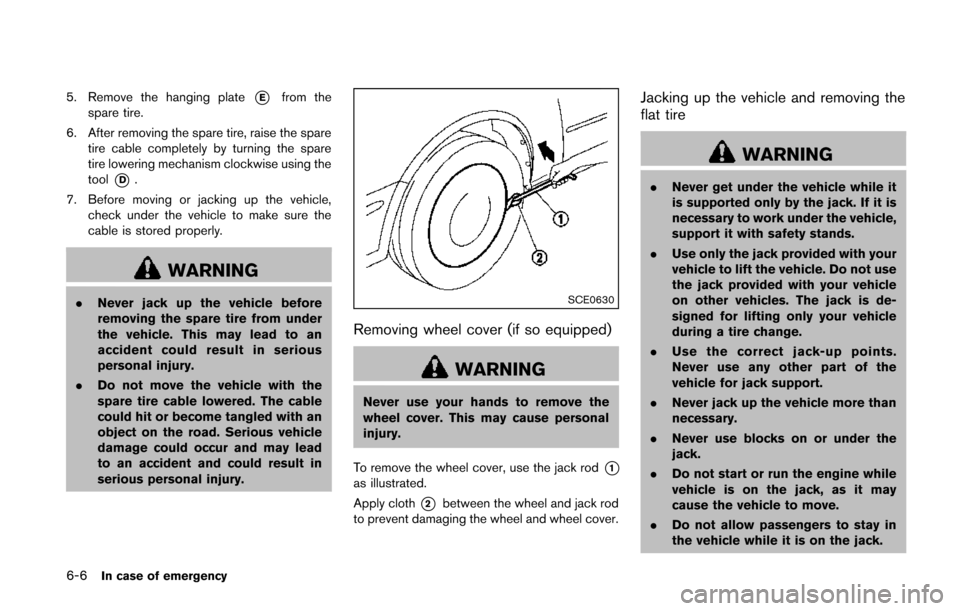
Removing wheel cover (if so equipped)
WARNING
Never use your hands to remove the
wheel cover. This may cause personal
injury.
To remove the wheel cover, use the jack rod
*1as illustrated.
Apply cloth
*2between the wheel and jack rod
to prevent damaging the wheel and wheel cover.
Jacking up the vehicle and removing the
flat tire
WARNING
. Never get under the vehicle while it
is supported only by the jack. If it is
necessary to work under the vehicle,
support it with safety stands.
. Use only the jack provided with your
vehicle to lift the vehicle. Do not use
the jack provided with your vehicle
on other vehicles. The jack is de-
signed for lifting only your vehicle
during a tire change.
. Use the correct jack-up points.
Never use any other part of the
vehicle for jack support.
. Never jack up the vehicle more than
necessary.
. Never use blocks on or under the
jack.
. Do not start or run the engine while
vehicle is on the jack, as it may
cause the vehicle to move.
. Do not allow passengers to stay in
the vehicle while it is on the jack.