2014 NISSAN QUEST buttons
[x] Cancel search: buttonsPage 166 of 482
The door windows can be opened or closed by
turning the mechanical key in a door lock. (See
“Doors” (P.3-5).)
Opening/closing power sliding door (if
so equipped)
To open/close the sliding door, push the power
sliding door button
*3or*4on the Intelligent
Key for about 1 second. The power sliding door
will automatically open/close.
If the power sliding door button
*3or*4is
pushed while the sliding door is being opened or
closed, the sliding door will reverse.
Opening/closing lift gate (if so equipped)
To open/close the lift gate, push the power lift
gatebutton*5on the Intelligent Key for
more than 1 second.
The lift gate will automatically open/close.
The hazard indicator flashes 4 times and the
outside chime sounds for approximately 3
seconds.
If the power lift gate
button*5is pushed
while the lift gate is being opened or closed, the
lift gate will reverse.
Using panic alarm
If you are near your vehicle and feel threatened,
you can activate the alarm according to the
following procedure to call attention.
1. Push the PANIC
button*6for more
than 1 second.
2. The theft warning alarm will sound and the headlights will flash for 25 seconds.
3. The panic alarm stops under either of the following conditions.
.It has run for 25 seconds, or.Any of the buttons is pushed. (Note: thePANICbutton*6should be
pushed for more than 1 second.)
Setting hazard indicator and horn mode
This vehicle is set in hazard indicator and horn
mode when you first receive the vehicle.
In hazard indicator and horn mode, when the
LOCK
button*1is pushed, the hazard
indicator flashes twice and the horn chirps once.
When the UNLOCK
button*2is pushed,
the hazard indicator flashes once.
If horns are not necessary, the system can be
switched to the hazard indicator mode.
In hazard indicator mode, when the LOCK
button*1is pushed, the hazard indicator
flashes twice. When the UNLOCKbutton
*2is pushed, neither the hazard indicator nor
the horn operates.
Pre-driving checks and adjustments3-23
Page 167 of 482
3-24Pre-driving checks and adjustments
Hazard indicator and horn mode:
DOOR LOCKDOOR UNLOCK
Intelligent Key system
(Using door handle or lift gate request switch) HAZARD -
twice
OUTSIDE CHIME - twiceHAZARD -
once
OUTSIDE CHIME - once
Remote keyless entry system (Using
orbutton) HAZARD -
twice
HORN - once HAZARD -
once
HORN - none
Hazard indicator mode:
DOOR LOCK DOOR UNLOCK
Intelligent Key system
(Using door handle or lift gate request switch) HAZARD -
twice
OUTSIDE CHIME - none HAZARD - none
OUTSIDE CHIME - none
Remote keyless entry system (Using
orbutton) HAZARD -
twice
HORN - none HAZARD - none
HORN - none
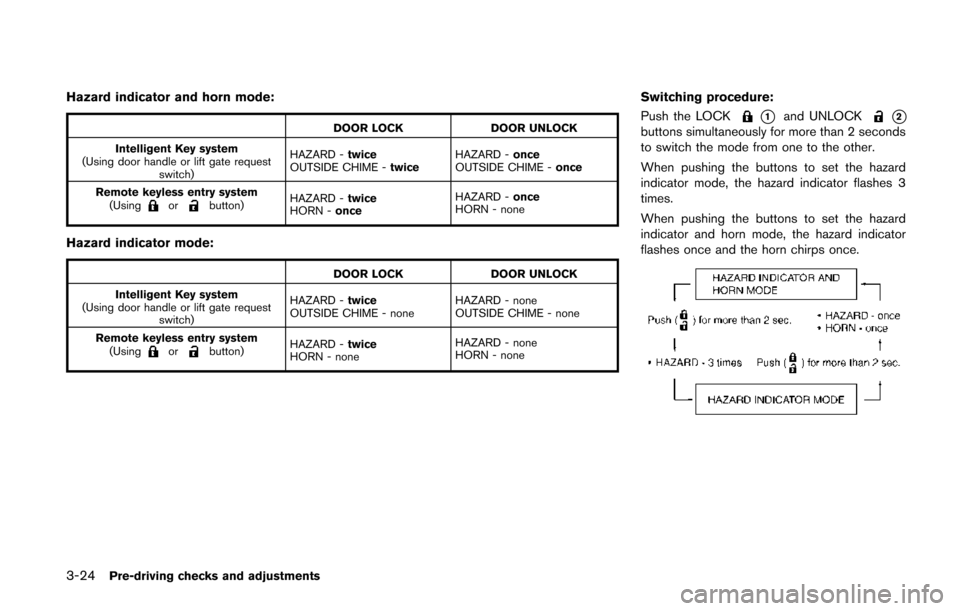
Switching procedure:
Push the LOCK
*1and UNLOCK*2buttons simultaneously for more than 2 seconds
to switch the mode from one to the other.
When pushing the buttons to set the hazard
indicator mode, the hazard indicator flashes 3
times.
When pushing the buttons to set the hazard
indicator and horn mode, the hazard indicator
flashes once and the horn chirps once.
Page 185 of 482
DVD (Digital Versatile Disc) player operation (if
so equipped) ..................................................................... 4-83
USB memory operation (models with center
multi-function control panel) ......................................... 4-86
Bluetooth
®streaming audio (models with
navigation system) ........................................................... 4-91
iPod
®player operation (models with center
multi-function control panel) ......................................... 4-96
Auxiliary input jacks (if so equipped) .......................... 4-98
CD/DVD/USB memory care and cleaning ................ 4-99
Steering-wheel-mounted controls for audio (if
so equipped) .................................................................. 4-100
Antenna ........................................................................\
.... 4-101
NISSAN mobile entertainment system (MES) (if
so equipped) ........................................................................\
4-102 Digital versatile disc (DVD)
system components ...................................................... 4-103
Before operating the dvd mobile
entertainment system ................................................... 4-108
Playing a DVD ................................................................ 4-109
Care and maintenance ................................................. 4-113
Car phone or CB radio ..................................................... 4-113
Bluetooth
®hands-free phone system (models with
navigation system) .............................................................. 4-114
Regulatory information ................................................. 4-115
Voice commands ........................................................... 4-116
Control buttons .............................................................. 4-116 Connecting procedure ............................................... 4-116
Phone selection ........................................................... 4-117
Quick Dial ..................................................................... 4-117
Making a call ................................................................ 4-120
Receiving a call ........................................................... 4-120
During a call ................................................................. 4-121
Phone setting ............................................................... 4-122
Troubleshooting guide ............................................... 4-123
Bluetooth
®hands-free phone system (models without
navigation system) (if so equipped) .............................. 4-124
Regulatory information ............................................... 4-125
Using the system ........................................................ 4-126
Control buttons ............................................................ 4-128
Getting started ............................................................ 4-128
List of voice commands ............................................ 4-130
Speaker adaptation (SA) mode ............................... 4-133
Troubleshooting guide ............................................... 4-136
NISSAN voice recognition system (models with
navigation system) ............................................................. 4-137 NISSAN voice recognition standard mode .......... 4-137
Using the system ........................................................ 4-140
NISSAN voice recognition alternate
command mode ........................................................... 4-148
Using the system ........................................................ 4-154
Troubleshooting guide ............................................... 4-159
Page 186 of 482
WARNING
.Do not disassemble or modify this
system. If you do, it may result in
accidents, fire, or electric shock.
. Do not use this system if you notice
any abnormality, such as a frozen
screen or lack of sound. Continued
use of the system may result in
accident, fire or electric shock.
. In case you notice any foreign
object in the system hardware, spill
liquid on it, or notice smoke or smell
coming from it, stop using the
system immediately and contact
your nearest NISSAN dealer. Ignor-
ing such conditions may lead to
accidents, fire, or electric shock.
. Park the vehicle in a safe location
and apply the parking brake to view
the images on the front center dis-
play screen.
Do not attempt to operate the system in
extreme temperature conditions [below
− 48F( −208 C) and above 1588 F (708C)].
Operating this system under these condi-
tions may result in system malfunctions.
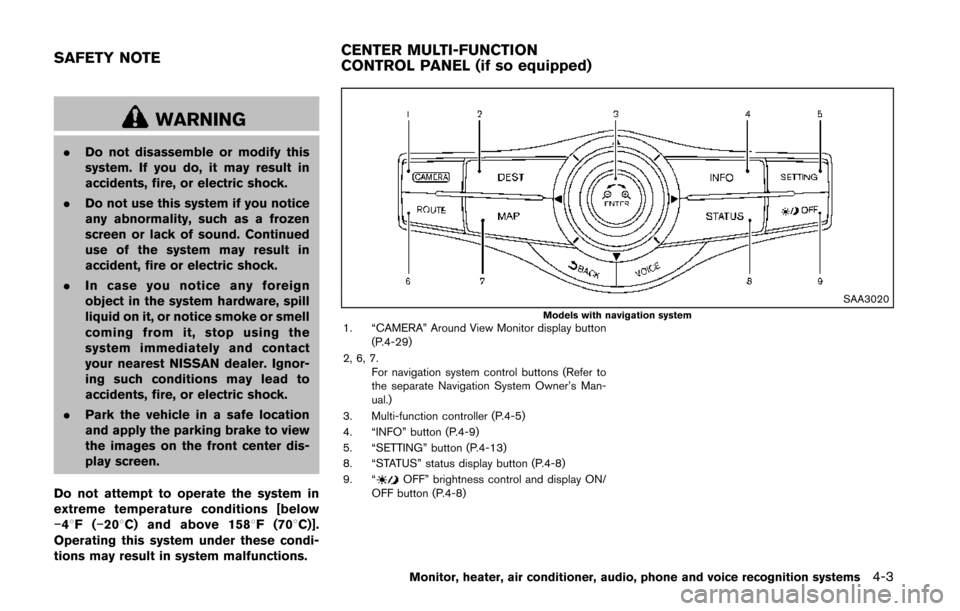
SAA3020Models with navigation system1. “CAMERA” Around View Monitor display button (P.4-29)
2, 6, 7. For navigation system control buttons (Refer to
the separate Navigation System Owner’s Man-
ual.)
3. Multi-function controller (P.4-5)
4. “INFO” button (P.4-9)
5. “SETTING” button (P.4-13)
8. “STATUS” status display button (P.4-8)
9. “
OFF” brightness control and display ON/
OFF button (P.4-8)
Monitor, heater, air conditioner, audio, phone and voice recognition systems4-3
SAFETY NOTE CENTER MULTI-FUNCTION
CONTROL PANEL (if so equipped)
Page 224 of 482
SAA3596
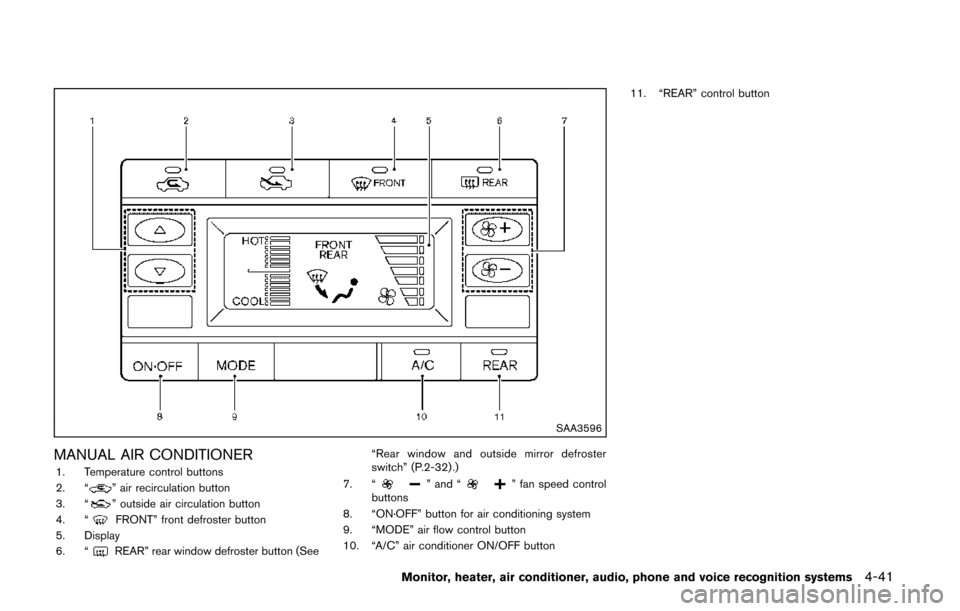
MANUAL AIR CONDITIONER1. Temperature control buttons
2. “” air recirculation button
3. “” outside air circulation button
4. “FRONT” front defroster button
5. Display
6. “
REAR” rear window defroster button (See “Rear window and outside mirror defroster
switch” (P.2-32) .)
7. “
” and “” fan speed control
buttons
8. “ON·OFF” button for air conditioning system
9. “MODE” air flow control button
10. “A/C” air conditioner ON/OFF button 11. “REAR” control button
Monitor, heater, air conditioner, audio, phone and voice recognition systems4-41
Page 225 of 482
4-42Monitor, heater, air conditioner, audio, phone and voice recognition systems
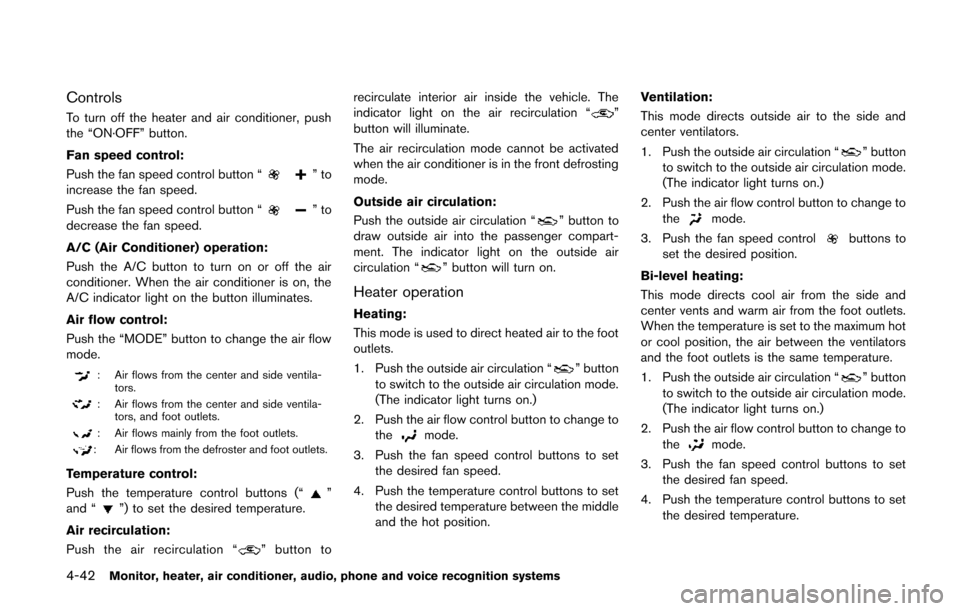
Controls
To turn off the heater and air conditioner, push
the “ON·OFF” button.
Fan speed control:
Push the fan speed control button “
”to
increase the fan speed.
Push the fan speed control button “
”to
decrease the fan speed.
A/C (Air Conditioner) operation:
Push the A/C button to turn on or off the air
conditioner. When the air conditioner is on, the
A/C indicator light on the button illuminates.
Air flow control:
Push the “MODE” button to change the air flow
mode.
: Air flows from the center and side ventila- tors.
: Air flows from the center and side ventila-tors, and foot outlets.
: Air flows mainly from the foot outlets.
: Air flows from the defroster and foot outlets.
Temperature control:
Push the temperature control buttons (“
”
and “”) to set the desired temperature.
Air recirculation:
Push the air recirculation “
” button to recirculate interior air inside the vehicle. The
indicator light on the air recirculation “
”
button will illuminate.
The air recirculation mode cannot be activated
when the air conditioner is in the front defrosting
mode.
Outside air circulation:
Push the outside air circulation “
” button to
draw outside air into the passenger compart-
ment. The indicator light on the outside air
circulation “
” button will turn on.
Heater operation
Heating:
This mode is used to direct heated air to the foot
outlets.
1. Push the outside air circulation “
” button
to switch to the outside air circulation mode.
(The indicator light turns on.)
2. Push the air flow control button to change to the
mode.
3. Push the fan speed control buttons to set the desired fan speed.
4. Push the temperature control buttons to set the desired temperature between the middle
and the hot position. Ventilation:
This mode directs outside air to the side and
center ventilators.
1. Push the outside air circulation “
” button
to switch to the outside air circulation mode.
(The indicator light turns on.)
2. Push the air flow control button to change to the
mode.
3. Push the fan speed control
buttons to
set the desired position.
Bi-level heating:
This mode directs cool air from the side and
center vents and warm air from the foot outlets.
When the temperature is set to the maximum hot
or cool position, the air between the ventilators
and the foot outlets is the same temperature.
1. Push the outside air circulation “
” button
to switch to the outside air circulation mode.
(The indicator light turns on.)
2. Push the air flow control button to change to the
mode.
3. Push the fan speed control buttons to set the desired fan speed.
4. Push the temperature control buttons to set the desired temperature.
Page 226 of 482
Heating and defogging:
This mode heats the interior and defogs the
windows.
1. Push the air flow control button to change tothe
mode.
2. Push the fan speed control
buttons to
set the desired fan speed.
3. Push the temperature control buttons to set the desired temperature.
When the
mode is selected, the air
conditioner will automatically turn on. This will
dehumidify the air and help to defog the
windows. The A/C indicator light will illuminate
when the air conditioner automatically turns on.
The air conditioner and A/C indicator light will
remain on in all flow control modes until the A/C
button is pressed.
Air conditioner operation
The air conditioner system should be operated
for approximately 10 minutes at least once a
month. This helps prevent damage to the air
conditioner system due to the lack of lubrication.
Cooling:
This mode is used to cool and dehumidify the air.
1. Push the outside air circulation “
” button
to switch to the outside air circulation mode.
(The indicator light turns on.) 2. Push the air flow control button to change to
the
mode.
3. Push the fan speed control buttons to set the desired fan speed.
4. Push the A/C button on. (The A/C indicator light will illuminate.)
5. Push the temperature control buttons to set the desired temperature between the middle
and the cool position.
. For quick cooling when the outside tem-
perature is high, push the air recirculation
button to switch to the air recirculation
mode. (The indicator light turns on.) Be sure
to turn off the air recirculation mode for
normal cooling.
. A visible mist may be seen coming from the
ventilators in hot, humid conditions as the air
is cooled rapidly. This does not indicate a
malfunction.
Dehumidified heating:
This mode is used to heat and dehumidify the
air.
1. Push the outside air circulation “
” button
to switch to the outside air circulation mode.
(The indicator light turns on.)
2. Push the air flow control button to change to the
position. 3. Push the fan speed control buttons to the
desired fan speed.
4. Push the A/C button on. (The A/C indicator light will illuminate.)
5. Push the temperature control buttons to set the desired temperature between the middle
and the hot position.
Dehumidified or defrosting/defogging:
This mode is used to defog the windows and
dehumidify the air.
1. Push the front defroster button
on. (The
indicator light turns on.)
2. Push the fan speed control buttons to set the desired fan speed.
3. Push the temperature control buttons to set the desired temperature.
When the
mode is selected, the air
conditioner will automatically turn on. This will
dehumidify the air and help to defog the
windows. The A/C indicator light will illuminate
when the air conditioner automatically turns on.
The air conditioner and A/C indicator light will
remain on in all flow control modes until the A/C
button is pushed.
To remove frost from the outside surface of the
windshield quickly, set the temperature to the
maximum hot position and the fan speed to
maximum position.
Monitor, heater, air conditioner, audio, phone and voice recognition systems4-43
Page 227 of 482
4-44Monitor, heater, air conditioner, audio, phone and voice recognition systems
Rear air conditioning system
Operating from front control buttons:
To control the rear air conditioning system
independently with the front air conditioner
control panel, push the “REAR” button. When
the rear air conditioning system control is on, the
indicator light on the “REAR” button will
illuminate and “REAR” will appear on the display.
In this state, the rear air conditioning system can
be adjusted with the front air conditioner control
panel. However, if no operation is conducted for
approximately 10 seconds after the “REAR”
button is pushed, the front air conditioner
control panel will automatically switch to the
front air conditioning mode.
To cancel the rear air conditioning mode and
switch back to the front air conditioning mode,
push “REAR” button one more time.
.Temperature control
Push the temperature control buttons
(“
” and “”) to set the desired
temperature.
. Fan speed control
Push the fan speed control “
”
button or “” button to control the
fan speed.
. Air flow control
Push the “MODE” button to change the air flow mode.
: The air outlet is fixed at foot level.
: The air outlet is fixed at both the head and
foot level.
: The air outlet is fixed at the head level.
NOTE:
Pushing the “A/C” button when the rear air
conditioning system is turned on and
“REAR” does not appear on the display
will turn off the rear air conditioning
system (except when the air flow is set to
the
position) .
. Rear Heating (A/C off)
1. Push the “REAR” button to display “REAR” on the front display when the rear air
conditioning system is on.
2. Switch the air flow mode to
by pressing
the “MODE” button.
3. If the A/C indicator light illuminates, push the “A/C” button. (The A/C indicator light will
turn off.)
4. Push the temperature control buttons (“
” and “”) to set the desired
temperature between the middle and the
hot position.
. To dehumidify the air, push the “A/C” button
before turning on the heater. .
Air does not blow out from the vents on the
ceiling when the system is used for heating.
Turning the system off:
To turn off the rear air conditioner, push the
“ON·OFF” button when “REAR” is on the
display.