2014 NISSAN QASHQAI ignition
[x] Cancel search: ignitionPage 129 of 338

AUTOMATIC ANTI-DAZZLING INSIDE
MIRROR (where fitted)
The inside mirror is designed so that it automatically
adjusts the reflection according to the intensity of
the following vehicle’s headlights on the sensor
jC.
The automatic anti-dazzling inside mirror will oper-
ate when the ignition switch is in the Acc or ON
position. The light
jA shows the system is activated.
The automatic anti-dazzling inside mirror can be de-
activated by pressing the power button
jB . The lightjA will turn off to show system deactivation.
CAUTION
Do not cover the sensor, hang any object on the
mirror or spray glass cleaner directly on the mir-
ror. Doing so will reduce the sensitivity of the
sensor, resulting in improper operation.
OUTSIDE REAR-VIEW MIRRORS
WARNING
•Check the position of all mirrors before driv-
ing. Altering their position while driving could
distract your attention from the driving opera-
tion.
•Objects viewed in the outside mirrors are
closer than they appear.
•Never touch the outside rear-view mirrors
while they are in motion. Doing so may pinch
your fingers or damage the mirror.
•Never drive the vehicle with the outside rear-
view mirrors folded. This reduces rear view
visibility and may lead to an accident.
Adjusting — Remote control
j
ALHD models
jBRHD models
Slide the control to the left
j1 or to the rightj2to
select the left or right outside rear-view mirror, then
adjust the mirror to the desired position by pushing
the control as illustrated
j3.
NPA1273
NPA1276
NPA1278
Pre-driving checks and adjustments3-19
Page 134 of 338

•Do not damage the transparent camera cover as
the NissanConnect display may be adversely af-
fected.
•Do not use body wax on the transparent camera
cover. Wipe off any wax with a clean cloth damp-
ened with mild detergent diluted with water.
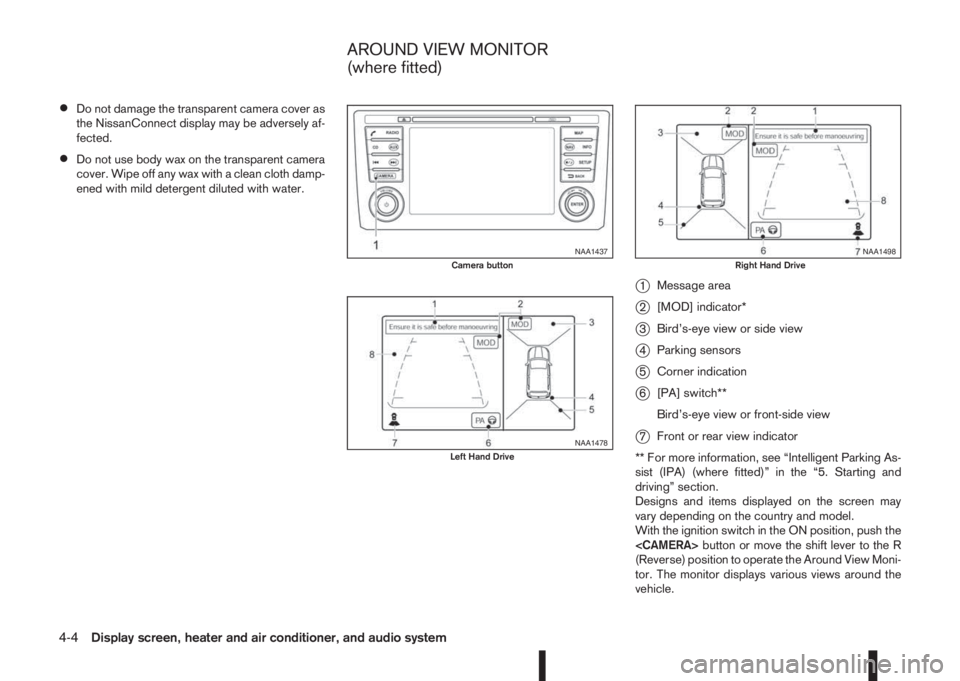
j1Message area
j2[MOD] indicator*
j3Bird’s-eye view or side view
j4Parking sensors
j5Corner indication
j6[PA] switch**
Bird’s-eye view or front-side view
j7Front or rear view indicator
** For more information, see “Intelligent Parking As-
sist (IPA) (where fitted)” in the “5. Starting and
driving” section.
Designs and items displayed on the screen may
vary depending on the country and model.
With the ignition switch in the ON position, push the
(Reverse) position to operate the Around View Moni-
tor. The monitor displays various views around the
vehicle.
NAA1437Camera button
NAA1478Left Hand Drive
NAA1498Right Hand Drive
AROUND VIEW MONITOR
(where fitted)
4-4Display screen, heater and air conditioner, and audio system
Page 145 of 338

m:This symbol indicates that the vents are
closed. Moving the side control to this
position will close the vents.
Adjust the air flow direction of the vents by mov-
ing the centre knob (up/down, left/right) until the
desired position is achieved.
WARNING
•Do not leave children or adults who would
normally require the support of others alone
in your vehicle. Pets should not be left alone
either. On hot, sunny days, temperatures in a
closed vehicle could quickly become high
enough to cause severe or possibly fatal inju-
ries to people or animals.
•Do not use the recirculation mode for long
periods as it may cause the interior air to be-
come stale and the windows to fog up. It is
recommended that you use the outside air
mode in cold weather to keep the windows
clear.
•Do not adjust the positioning of the heating/
ventilation or air conditioning controls while
driving.
NOTE
•Condensation forms inside the air condition-
ing unit when the air conditioner is running,
and is safely discharged underneath your ve-
hicle.
Traces of water on the ground are therefore
normal.
•Models with Stop/Start System:
Whilst the engine is stopped by the Stop/Start
System, selecting airflow to the front defog-
ger will cause the engine to be automatically
restarted.Whilst the engine is running, selecting airflow
to the front defogger will prevent the Stop/
Start System automatically stopping the en-
gine.
The Stop/Start System will prevent unneces-
sary fuel consumption and exhaust emis-
sions. When the engine is stopped by the
Stop/Start System heater and air conditioner
performance may be reduced. To keep full
heater and air conditioner performance, re-
start the engine by pressing the Stop/Start
System OFF switch, or by turning the ignition
switch.
For more information on the Stop/Start Sys-
tem, see “Stop/Start System (where fitted)”
in the “5. Starting and driving” section.
•Odours from inside and outside the vehicle
can build up inside the air conditioner unit
and it can enter the passenger compartment
through the vents.
•When parking, set the air recirculation mode
to off to allow fresh air flowing into the pas-
senger compartment. This should help reduc-
ing the odours inside the vehicle.
NAA1377Side vents
HEATER AND AIR CONDITIONER
OPERATION
Display screen, heater and air conditioner, and audio system4-15
Page 147 of 338

•Air recirculation
Press the air recirculation (
) button to the
“ON” position (the indicator light goes on). Use
the “ON” position in situations such as: driving
on a dust raised road, avoiding traffic fumes or
having maximum cooling from the air conditioner
(where fitted).
If the windows fog up, switch on the air condi-
tioning (where fitted).
A/C (Air Conditioner) button (where fitted):
Press the A/C button to turn the air conditioner on
or off. When the air conditioner is on, the A/C indi-
cator light illuminates.
Operation
The heater and air conditioner operate when the
engine is running. The air blower will operate even if
the engine is turned off and the ignition switch is in
the ON position.
NOTE
The air conditioner cooling function operates only
when the engine is running and the fan is acti-
vated.
1. Press the air recirculation (
) button to the
“OFF” position.
2. Use the airflow control buttons for:
–Cooling: select the
orsetting.
–Heating: select the
orsetting.–Heating and defogging: select the
set-
ting.
–Ventilation: select the
orsetting.
–Windscreen defogging: select the
set-
ting.
3. Set the fan speed to the desired position.
4. Turn the temperature control dial to the desired
position.
NOTE
When selecting the
orsetting, turn
the temperature control dial to the desired
position between the middle and the maxi-
mum “HOT” (right) position.
5. Press the A/C button (where fitted) to the “ON”
position and the indicator light will come on.
Switch this mode on for dehumidified heating or
cooling.
NOTE
•The air conditioner mode is used to cool and
dehumidify. For quick cooling when the out-
side temperature is high, select the air recir-
culation mode position (
). Be sure to re-
turn to the outside air mode to avoid windows
from fogging-up and interior air from becom-
ing stale.
A visible mist may be seen coming from the
vents in hot, humid conditions as the air is
cooled rapidly this is not a malfunction.
•For quick heating, press the air recirculation
() button to the “ON” position. Be sure to
return to the “OFF” position for normal heat-
ing (no indicator light) in order to avoid win-
dow fog and stale interior.
Windscreen defogger
m(manual mode):
Use this mode for defogging the windscreen as fol-
lows:
1. Press the
button.
The system will set the fan speed to maximum.
Air circulation is cancelled, the airflow mode
and the air conditioner is activated automatically.
Air flows mainly from the defogger outlets.
2. Set the temperature control dial to the maximum
(HOT) position.
3. To switch off, press the
button to return to
the previous mode.
NOTE
•To quickly defrost/defog the windscreen, set
the fan speed to the maximum position.
•As soon as possible after the windscreen has
been cleared of ice or fog, press the wind-
screen defogger button.
•When the windscreen defogging mode is acti-
vated, the air conditioner will automatically
switch on at outside temperatures above –2°C
(28°F) and the air recirculation mode will be
switched off.
Display screen, heater and air conditioner, and audio system4-17
Page 153 of 338

WARNING
Do not adjust the audio system while driving.
The audio system operates when the ignition switch
is in the Acc or ON position. If you want to listen to
the radio or CD while the engine is not running, turn
the ignition switch to the Acc position.Do not use
for an extended period of time with the engine
stopped.
AUDIO OPERATION PRECAUTIONS
NOTE
Models with NissanConnect system, see the au-
dio operation precautions in the separately pro-
vided NissanConnect Owner’s Manual.
Radio
•Radio reception is affected by station signal
strength, distance from radio transmitter, build-
ings, bridges, mountains and other external influ-
ences. Intermittent changes in reception quality
are normally caused by these external influences.
•Using a mobile phone in or near the vehicle may
influence radio reception quality.
•Use the antenna for the best reception.
Compact Disc (CD) player
•During cold weather or rainy days, the player
may malfunction due to the humidity. If this
occurs, remove the CD and dehumidify or
ventilate the player completely.
•The player may skip while driving on rough
roads.
•Occasionally, the CD player may not function
when the compartment temperature is ex-
tremely high. Decrease the temperature be-
fore use.
•Do not expose the CD to direct sunlight.
•CDs that are of poor quality, dirty, scratched,
covered with finger prints, or that have pin
holes may not work properly.
•The following CDs may not work properly.
•Copy control compact discs (CCCD)
•Recordable compact discs (CD-R)
•Rewritable compact discs (CD-RW)
•Do not use the following CDs as they may
cause the CD player to malfunction.
•8 cm (3.1 in) discs with an adaptor
•CDs that are not round
•CDs with a paper label
ANTENNA
Removing the antenna
To remove the antenna, hold the lower part of the
antenna and turn it anticlockwise.
CAUTION
Make sure to remove the antenna before the ve-
hicle enters a garage with a low ceiling or an
automatic car wash otherwise the antenna can
be damaged.
NAA956Z
AUDIO SYSTEM
Display screen, heater and air conditioner, and audio system4-23
Page 155 of 338

AUDIO MAIN OPERATION
The audio unit operates when the ignition switch is
in Acc or ON position.
mPower ON/OFF button
Press thebutton to switch on the audio unit. If
the audio unit was switched off using the ignition
switch, it can also be switched on with the ignition
switch. The source that was playing immediately
before the unit was switched off will resume playing
and the volume will be set to the previous volume
level.
The audio unit can be switched off by pressing
,
or by turning the ignition switch to the “OFF” or
LOCK position.
mVolume (VOL) level control
Turn the
adjust the volume level.
The audio unit is equipped with a speed control vol-
ume function, this means that the audio system au-
tomatically adjusts the volume level in relation to
vehicle speed. For details, see “[Speed Volume]
menu” later in this section.
RADIO OPERATION
When the(power ON/OFF) button is pressed,
the audio unit will switch on with the last received
radio station, if the audio unit was previously
switched off in radio mode.The radio is able to receive multiple kinds of audio
transmissions:
–FM
–AM
Radio band select buttons
Press the
transmission source as follows:
FM1→FM2→AM→FM1
When
come on at the last received radio station. If audio is
already playing using one of the other input sources
(iPod, Bluetooth, CD, USB, AUX-in) pressing the
mode and the last received radio station will be se-
lected.
Setting preset stations
Auto populating the [FM List]:
When the
1.5 seconds the six stations with the strongest sig-
nals are stored in the preset (1 to 6) buttons of the
band. During the search, a notification message
[Updating FM List] appears in the display and the
sound is muted until the operation is complete. Once
completed, the radio reverts to the previously se-
lected radio station.
Manual tuning
When adjusting the broadcasting station frequency
manually access the [FM List] and turn the
Page 157 of 338
![NISSAN QASHQAI 2014 Owner´s Manual [Sound] menu:
Submenus in the sound menu:
[Bass] Use this control to enhance or
attenuate bass response sound.
Turn the<MENU>dial clockwise
or anticlockwise to adjust the bass
settings then press<ENTE NISSAN QASHQAI 2014 Owner´s Manual [Sound] menu:
Submenus in the sound menu:
[Bass] Use this control to enhance or
attenuate bass response sound.
Turn the<MENU>dial clockwise
or anticlockwise to adjust the bass
settings then press<ENTE](/manual-img/5/40326/w960_40326-156.png)
[Sound] menu:
Submenus in the sound menu:
[Bass] Use this control to enhance or
attenuate bass response sound.
Turn the
Page 159 of 338

Track up/down buttons:
Pressing the
orbutton once, the track will
be skipped forward to the next track or backward to
the beginning of the current played track. Press the
orbutton more than once to skip through
the tracks.
Folder browsing:
If the recorded media contains folders with music
files, pressing the
orbutton will play in
sequence the tracks of each folder.
To select a preferred folder:
1. Press the
dial and a list of tracks in the current folder is dis-
played.
2. Turn the
3. Press
turn the
select another track.
If the current selected folder contains sub folders,
press
folders will be displayed. Turn the
the sub folder then press
lect the [Root] folder item when songs are recorded
additionally in the root folder.
To return to the previous folder screen, press
.
Repeat button:
Push the
j1 button and the current track will
be played continuously.
button:
Push the
j2 button and all the tracks in the
current folder (MP3 CD/USB) or playlist (iPod) will
be played in a random order.
When the entire folder/playlist has been played the
system will start playing the next folder/playlist.
button:
While a CD with recorded music information tags
(CD-text/ID3–text tags) is being played, the title of
the played track is displayed. If the title information
is not provided then [Track] is displayed.
When the
j5 button is pressed repeatedly,
further information about the track can be displayed
along with the track title as follows:
CD:
Track time→Artist name→Album title→Track
time
CD with MP3/WMA:
Track time→Artist name→Album title→Folder
name→Track time
The track name is always displayed.Track details:
A long press on the
j5 button will turn the
display into a detailed overview and after a few sec-
onds it returns to the main display, or press
j5 briefly.
Quick search:
When a MP3 CD with recorded music information
tags (ID3–text tags) is being played from list view
mode, a quick search can be performed to find a
track from the list.
Push the
j6 button then turn the
dial for the first alphabetic/numerical letter of the
track title then press
of the available tracks will be displayed. When there
is no match (the display shows [No match] the next
item will be shown. Select, and press
play the preferred track.
CD eject button
CD player:
Press the
(eject) button and the CD will be
ejected.
Ejecting CD (with ignition switch in “OFF” or
LOCK):
When the ignition switch is in the “OFF” or LOCK
position it is possible to eject the currently played
CD. However the audio unit will not be activated.
Display screen, heater and air conditioner, and audio system4-29