2014 NISSAN QASHQAI ignition
[x] Cancel search: ignitionPage 254 of 338

6. Insert its power plug into the power outlet in the
vehicle. Make sure no other accessories are fit-
ted to the power outlet. For details, see “Power
outlet” in the “2. Instruments and controls” sec-
tion.
7. Turn the ignition switch to the Acc position.
8. Switch on the compressor, and inflate the tyre to
the pressure that is specified on the tyre placard
affixed to the driver’s side centre pillar.
CAUTION
Do not operate the compressor for more than 10
minutes.
If the tyre pressure does not increase to the speci-
fied pressurewithin 10 minutes, the tyre may be
seriously damaged andthe tyre cannot be repaired
with this tyre repair kit. Contact a NISSAN dealer
or qualified workshop.
9. Remove the air compressor from the tyre valve.
Immediately drive the vehicle at a speed of 80
km/h (50 MPH) or less.
10. After 10 minute or 10 km (6 miles) drive, check
the tyre pressure. The temporary repair is com-
pleted if the tyre pressure does not drop.
If the tyre pressure is lower than specified, re-
peat the steps from step5.
If the pressure drops again or under 130 kPa
(1,3 bar, 19 psi),the tyre cannot be repaired
with this tyre repair kit. Contact a NISSAN
dealer or qualified workshop.After repairing tyre
See a NISSAN dealer or qualified workshop for tyre
repair/replacement, inspection/replacement of the
TPMS sensor and for a new tyre sealant bottle and
hose, as soon as possible.
6-10In case of emergency
Page 256 of 338

4. Switch off all unnecessary electrical systems
(headlights, hazard lights etc,).
5. Ensure that the ignition switch of the vehicle be-
ing jump-started is in the LOCK position.
6. Open the bonnet. For details, see “Bonnet
release” in the “3. Pre-driving checks and
adjustments” section.
7. Remove the vent caps (where fitted) on the bat-
tery and cover the battery with an old cloth.
8. Connect the jump leads in the sequence (
j1→j2→j3→j4 ) as illustrated.
CAUTION
•Always connect positivej+ to positivej+
and negativej- to body ground (for ex-
ample, engine mount, etc.) – not to the
battery’s negative
j-.
•An incorrect connection could damage the
charging system.
•Be sure that the jumper cables do not
touch moving parts in the engine compart-
ment.
•Be careful not to allow contact between
the positive jump lead connector and the
vehicle or the negative lead during con-
nection and disconnection.
9. Start the engine of the other vehicle
jA and let it
run for a few minutes. Keep the engine speed at
about 2,000 rpm.10. Start the engine of your vehicle
jB in the nor-
mal way.
CAUTION
Do not keep the starter motor engaged for
more than 10 seconds. If the engine does not
start immediately, turn the ignition switch to
“OFF” and wait 10 seconds before trying
again.
11. After starting the engine of your vehicle, care-
fully disconnect the negative lead and then the
positive lead (
j4→j3→j2→j1).
12. Remove and dispose of the cloth that was used
to cover the vent holes as it may be contami-
nated with corrosive acid.
13. Install the vent caps (where fitted).
14. Close the bonnet.
NOTE
For models which incorporate the Stop/Start
System:
•Ensure that the battery fitted is the special
battery that is enhanced with regard to the
charge-discharge capacity and life perfor-
mance. Avoid using any other battery for the
Stop/Start System, as this may cause early
deterioration of the battery or a malfunction
of the Stop/Start System. It is recommended
that a Genuine NISSAN battery is fitted. For
more information, contact a NISSAN dealer or
qualified workshop
•If the battery terminal is disconnected (for bat-
tery replacement, etc.) and then reconnected,
there may be some delay before the Stop/
Start System reactivates.
6-12In case of emergency
Page 259 of 338

RECOMMENDED TOWING FOR
TWO-WHEEL DRIVE (2WD) MODELS
CAUTION
NEVER tow XTRONIC transmission (CVT) models
with the front wheels on the ground or with all
four wheels on the ground (forwards or back-
wards), this may cause serious and expensive
damage to the transmission. If it is necessary to
tow the vehicle with the rear wheels raised, al-
ways use towing dollies under the front wheels.
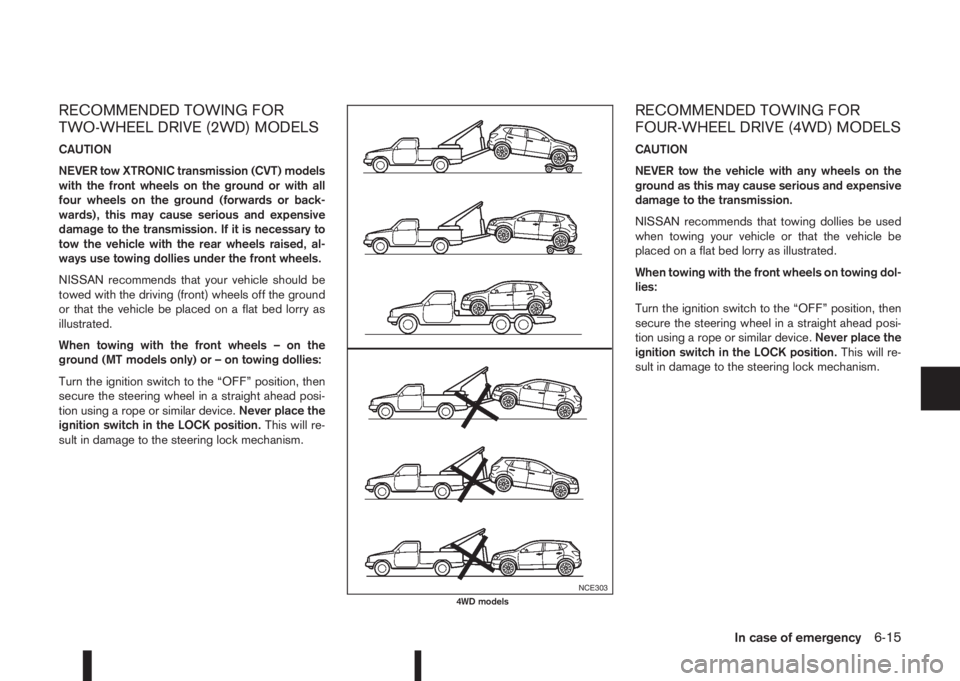
NISSAN recommends that your vehicle should be
towed with the driving (front) wheels off the ground
or that the vehicle be placed on a flat bed lorry as
illustrated.
When towing with the front wheels – on the
ground (MT models only) or – on towing dollies:
Turn the ignition switch to the “OFF” position, then
secure the steering wheel in a straight ahead posi-
tion using a rope or similar device.Never place the
ignition switch in the LOCK position.This will re-
sult in damage to the steering lock mechanism.
RECOMMENDED TOWING FOR
FOUR-WHEEL DRIVE (4WD) MODELS
CAUTION
NEVER tow the vehicle with any wheels on the
ground as this may cause serious and expensive
damage to the transmission.
NISSAN recommends that towing dollies be used
when towing your vehicle or that the vehicle be
placed on a flat bed lorry as illustrated.
When towing with the front wheels on towing dol-
lies:
Turn the ignition switch to the “OFF” position, then
secure the steering wheel in a straight ahead posi-
tion using a rope or similar device.Never place the
ignition switch in the LOCK position.This will re-
sult in damage to the steering lock mechanism.
NCE3034WD models
In case of emergency6-15
Page 264 of 338

Occasionally remove loose dust from the interior
trim, plastic parts and seats using a vacuum cleaner
or soft bristled brush. Wipe the vinyl and leather sur-
faces with a clean, soft cloth dampened in mild soap
solution, then wipe clean with a dry, soft cloth.
Regular care and cleaning is required in order to
maintain the appearance of the leather.
Before using any fabric protector, read the manu-
facturer’s recommendations. Some fabric protec-
tors contain chemicals that may stain or bleach the
seat material.
Use a soft cloth dampened only with water to clean
the meter and gauge lens covers.
CAUTION
•Never use benzine, thinner or any similar ma-
terial.
•Small dirt particles can be abrasive and dam-
aging to leather surfaces and should be re-
moved promptly. Do not use saddle soap, car
waxes, polishes, oils cleaning fluids, solvents,
detergents or ammonia based cleaners as
they may damage the leather’s natural finish.
•Never use fabric protectors unless recom-
mended by the manufacturer.
•Do not use glass or plastic cleaner on meter
or gauge lens covers. It may damage the lens
covers.
MONITOR DISPLAY’S MAINTENANCE
(where fitted)
•To clean the display screen, first turn the ignition
off and wipe it with a dry soft cloth.
•Never use a rough cloth, alcohol, benzine, thin-
ner, any kind of solvent, or paper tissues with
chemical cleaning agent. They would scratch or
deteriorate the panel.
•Do not splash any liquid such as water or car fra-
grance on the display. Contact with liquid will
cause the system to malfunction and damage
the hardware.
•In case of extreme stain, use a small amount of
neutral detergent with a soft cloth. Never soak
the screen display with water detergent.
AIR FRESHENERS
Most air fresheners use a solvent that could affect
the vehicle interior. If you use an air freshener, take
the following precautions:
•Hanging-type air fresheners can cause perma-
nent discoloration when they contact vehicle in-
terior surfaces. Place the air freshener in a loca-
tion that allows it to hang free and not contact an
interior surface.
•Liquid-type air fresheners typically clip on the
vents. These products can cause immediate
damage and discoloration when spilled on inte-
rior surfaces.
Carefully read and follow the manufacturer’s instruc-
tions before using air fresheners.
FLOOR MATS
The use of NISSAN floor mats can extend the life of
your vehicle carpet and make it easier to clean the
interior. Regardless of what mats are used, be sure
they are fitted for your vehicle and are properly posi-
tioned in the foot well to prevent interference with
pedal operation. Mats should be maintained with
regular cleaning and replaced if they become exces-
sively worn.
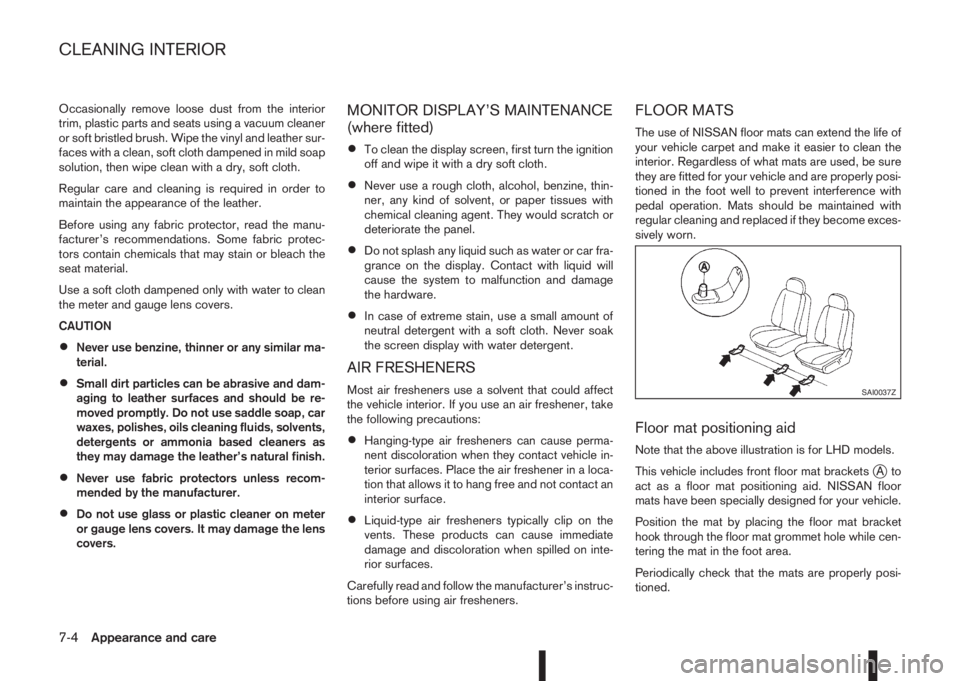
Floor mat positioning aid
Note that the above illustration is for LHD models.
This vehicle includes front floor mat brackets
jAto
act as a floor mat positioning aid. NISSAN floor
mats have been specially designed for your vehicle.
Position the mat by placing the floor mat bracket
hook through the floor mat grommet hole while cen-
tering the mat in the foot area.
Periodically check that the mats are properly posi-
tioned.
SAI0037Z
CLEANING INTERIOR
7-4Appearance and care
Page 272 of 338

longer to stop, contact a NISSAN dealer or qualified
workshop immediately. Keep the floor mat away
from the pedal.
Parking brake*:
Confirm that your vehicle is held securely on a fairly
steep hill with only the parking brake applied.
Seats:
Check seat position controls such as seat adjust-
ers, seatback recliner, etc. to ensure they operate
smoothly and all latches lock securely in every posi-
tion. Check that the head restraints move up and
down smoothly and the locks hold securely in all
latched positions.
Seat belts:
Check that all parts of the seat belt system (e.g.
buckles, anchors, adjusters and retractors) operate
properly and smoothly, and are installed securely.
Check the belt webbing for cuts, fraying, wear or
damage. See “Seat belts” in the “1. Safety — Seats,
Seat belts and Supplemental Restraint System” sec-
tion for further details.
Steering wheel:
Check for any change in the steering conditions,
such as excessive free play, hard steering or strange
noises.
Warning lights and audible reminders:
Make sure that all warning/indicator lights and au-
dible reminders are operating properly.Windscreen defogger:
Check that the air comes out of the defogger outlets
properly when operating the heater or air condi-
tioner.
Windscreen wiper and washer*:
Check that the wipers and washer operate properly
and that the wipers do not streak.When performing any inspection or maintenance
work on your vehicle, always take care to prevent
serious accidental injury to yourself or damage to
the vehicle. The following are general precautions
which should be closely observed.
•Park the vehicle on a level surface, apply the
parking brake securely and block the wheels
to prevent the vehicle from moving. For
manual transmission models, move the shift
lever to N (Neutral) position.For continuously
variable transmission models: move the shift
lever to P (Park) position.
•Do not work under the engine bonnet while
the engine is hot. Turn off the engine and wait
until it cools down.
•Be sure to turn the ignition switch to the “OFF”
or LOCK position.
When the ignition switch is in the ON or Acc
position, the cooling fan may start to operate
suddenly even when the engine is not run-
ning. To avoid injury, always disconnect the
negative battery cable before working near
the engine.
•If you must work with the engine running,
keep your hands, clothing, hair and tools away
from moving fans, belts and any other moving
parts.
•It is advisable to remove ties and any jewel-
lery, such as rings, watches, etc. before work-
ing on your vehicle.
MAINTENANCE PRECAUTIONS
8-4Maintenance and do-it-yourself
Page 273 of 338

•If you must run the engine in an enclosed
space such as a garage, be sure there is
proper ventilation for exhaust gases.
•DO NOT GET UNDER A VEHICLE THAT IS
SUPPORTED BY A JACK.
•Keep smoking materials, flame and sparks
away from fuel and battery.
•Never connect or disconnect either the bat-
tery or any transistorised component connec-
tor while the ignition switch is in the ON posi-
tion.
•Never leave the engine or transmission re-
lated component harness connector discon-
nected while the ignition switch is in the ON
position.
•On petrol engine models with the multiport
fuel injection (MFI) system, the fuel filter or
fuel lines should be serviced by a NISSAN
dealer or qualified workshop because the fuel
lines are under high pressure even when the
engine is off.
•Always wear eye protection whenever you
work on your vehicle.
•Failure to follow these or other common sense
guidelines may lead to serious injury or ve-
hicle damage.
NISSAN Blue Citizenship
Improperly disposed engine oil and/or other
vehicle fluids can pollute the environment. Al-
ways conform to local regulations for disposal
of vehicle fluid.
This section gives instructions regarding only those
items which are relatively easy for an owner to per-
form.
You should be aware that incomplete or improper
servicing may result in operating difficulties or ex-
cessive emissions, and could affect your warranty
coverage.If in doubt about any servicing, have it
done by your NISSAN dealer or qualified work-
shop.For an overview of the engine compartment, see
“Engine compartment” in the “0. Illustrated table
of contents” section.
ENGINE COMPARTMENT
Maintenance and do-it-yourself8-5
Page 288 of 338

Replacement
1. Slide the locking pin to the unlock position.
2. Remove the key.
3. Insert a flat blade screwdriver or a suitable tool
into the slot and twist it to open the lid.
4. Replace the battery with a new one with the same
specifications.
For models equipped with Intelligent Key, use
the following battery type:
CR2032
•Do not touch the internal circuit and electric
terminals as doing so could cause a malfunc-
tion.
•Make sure that the + side faces the bottom of
the case, as illustrated.
5. Install the lid in the reverse order of removal.6. Operate the buttons to check that the key works
correctly.
Contact a NISSAN dealer or qualified workshop
if you need assistance for battery replacement.
WARNING
Be sure the ignition switch is in the “OFF” or
LOCK position. Otherwise the cooling fan or the
engine may start to operate suddenly.
1. Visually inspect each belt for signs of unusual
wear, cuts, fraying or looseness. If the belt is in
poor condition or loose, have it replaced or ad-
justed by a NISSAN dealer or qualified work-
shop.
2. Have the belts checked regularly for condition
and tension in accordance with the maintenance
schedule as shown in a separately provided War-
ranty Information and Maintenance booklet.
NDI1455Intelligent Key
DRIVE BELTS
8-20Maintenance and do-it-yourself
Page 289 of 338

WARNING
Be sure the engine and ignition switch are off
and that the parking brake is engaged securely.
CAUTION
•Be sure to use the correct socket to remove
the spark plugs. An incorrect socket can
cause damage to the spark plugs.
•Always replace spark plugs with recom-
mended or equivalent ones.
Replace spark plugs according to the maintenance
schedule shown in the separately provided War-
ranty Information & Maintenance Booklet.
If replacement is required, see a NISSAN dealer or
qualified workshop for servicing.NOTE
Some maintenance procedures require the re-
moval of the air duct.
Be sure the ignition switch is in the “OFF” or
LOCK position before working in the engine com-
partment.
SPARK PLUGS (Petrol engine
models)AIR DUCT REMOVAL
Maintenance and do-it-yourself8-21