2014 NISSAN QASHQAI ECU
[x] Cancel search: ECUPage 275 of 338

MR20DD, MR16DE or R9M engine
1. Set the heater or air conditioner temperature
control to the maximum “HOT” position.
2. Open the bonnet. For details, see “Bonnet
release” in the “3. Pre-driving checks and
adjustments” section.
3. Open the engine coolant reservoir cap
j1to
help drain the coolant.
4. Loosen the engine coolant radiator drain plug
j3
to help drain the coolant.
5. Disconnect the end of the hose
j2 to drain the
coolant.
6. Flush the cooling system by running clean water
through the engine coolant reservoir.
7. Install the hose
j2.
8. Tighten the engine coolant radiator drain plug
j3.
9. Fill the coolant reservoir up to the MAX level.
See “Capacities and recommended fuel/
lubricants” in the “9. Technical information” sec-
tion for cooling system capacity.
10. Install the engine coolant reservoir cap.
11. Start the engine, and rev the engine two or
three times under no load.
12. Touch the radiator hose and feel if the water
flows.
13. Keep racing the engine at a speed of 3,000 rpm
for about 10 minutes.14. Observe the coolant temperature gauge for
signs of overheating.
15. Stop the engine and check coolant level, allow
to cool and refill up to the MAX level.
16. Check radiator lower hose for any signs of leak-
age.
17. Close the bonnet.HRA2DDT or K9K engine
1. Set the heater or air conditioner temperature
control to the maximum “HOT” position.
2. Open the bonnet. For details, see “Bonnet
release” in the “3. Pre-driving checks and
adjustments” section.
3. Loosen the engine coolant radiator drain plug
j1
to help drain the coolant.
4. Disconnect the radiator lower hose
j2 and open
the drain plugj3 on the engine block.5. Open the engine coolant reservoir cap to help to
drain the coolant.
6. Flush the cooling system by running fresh water
through the engine coolant reservoir.
7. Install the hose
j2 and securely tighten the en-
gine block drain plugj3.
8. Tighten the engine coolant radiator drain plug
j1.
9. Fill the reservoir up to the MAX level with cool-
ant. See “Capacities and recommended
fuel/lubricants” in the “9. Technical information”
section for cooling system capacity.
10. Install the engine coolant reservoir cap.
11. Start the engine, and rev the engine two or
three times under no load.
12. Touch the radiator hose and feel if the water
flows.
13. Keep racing the engine at a speed of 2,000 –
2,500 rpm for about 10 minutes.
14. Observe the coolant temperature gauge for
signs of overheating.
15. Stop the engine and check coolant level, allow
to cool and refill up to the MAX level.
16. Check the radiator lower hose for any signs of
leakage.
17. Close the bonnet.
NDI1491
Maintenance and do-it-yourself8-7
Page 277 of 338

5. Open the bonnet. For details, see “Bonnet
release” in the “3. Pre-driving checks and
adjustments” section.
6. Remove the dipstick and wipe it clean.
Models with K9K engine: the engine oil dipstick
is attached to the engine oil filler cap. Remove
the engine oil filler cap and wipe the dipstick
clean.
7. Reinsert it all the way.
Models with K9K engine: install the engine oil
filler cap.
8. Remove the dipstick again and check the oil level.
It should be in the normal range
j1.
9. If the oil level is below MIN
j2 , remove the en-
gine oil filler cap and pour the recommended oil
through the opening.Do not overfill
j3.
10. Recheck the oil level with the dipstick.
11. Install the engine oil filler cap securely.
12. Close the bonnet.
It is normal to add some engine oil between oil
maintenance intervals depending on the severity
of operating conditions or depending on the prop-
erty of the engine oil used. More engine oil is
consumed by frequent acceleration/deceleration
especially when the engine rpm is high. Con-
sumption is likely to be higher when the engine
is new. If the rate of oil consumption, after hav-
ing driven for 5,000 km (3,000 miles), is morethan 0.5 litre per 1,000 km (621 miles), consult a
NISSAN dealer or qualified workshop.
CHANGING ENGINE OIL
WARNING
•NISSAN recommends contacting a NISSAN
dealer or qualified workshop for engine oil
servicing.
NISSAN Blue Citizenship
Used oil must not be poured into the ground,
canals, rivers, etc. It should be disposed of at
a rubbish tip having proper facilities. Check
your local regulations.
•Be careful not to burn yourself, as the engine
oil is hot.
•Prolonged and repeated contact with used
engine oil may cause skin cancer.
•Avoid direct skin contact with used oil. If skin
contact is made, wash thoroughly with soap
or hand cleaner and plenty of water as soon
as possible.
•Store used engine oil in marked containers
out of the reach of children.
NDI653ZMR20DD engine
NDI1064K9K engine
Maintenance and do-it-yourself8-9
Page 278 of 338

1. Park the vehicle on a level surface and apply the
parking brake.
2. Start the engine. If the engine is cold, start and
let the engine idle until the engine temperature
reaches the operational temperature.
3. Turn the engine off and wait at least 10 minutes
to let the engine oil drain back into the oil pan.4. Open the bonnet. For details, see “Bonnet
release” in the “3. Pre-driving checks and
adjustments” section.
5. Remove the engine oil filler cap.
6. Raise and support the vehicle using a suitable
floor jack and safety jack stands.
Place the safety jack stands under the vehicle
jack-up points.
For details, see “Flat tyre” in the “6. In case of
emergency” section.
7. Remove the engine compartment under cover.
8. Place a large drain pan under the drain plug.
9. Remove the drain plug with a wrench and com-
pletely drain the oil.
If the engine oil filter needs to be changed, re-
move and replace it at this time. See “Changing
engine oil filter” later in this section.
10. Clean and re-install the drain plug along with a
new washer. Securely tighten the drain plug
with a wrench.Do not use excessive force.
Drain plug tightening torques:
MR20DD engine:
34.3 N•m (3.5 kg-m, 25 ft-lb)
K9K engine:
20 N•m (2.1 kg-m, 15 ft-lb)
R9M engine:
50 N•m (5.1 kg-m, 36.9 ft-lb)
11. Refill the engine with recommended engine oil
and quantity.See “Capacities and recommended
fuel/lubricants” in the “9. Technical information”
section.
12. Check the oil level with the dipstick. For details,
see “Checking engine oil level” earlier in this
section. If necessary, add engine oil.
13. Install the engine oil filler cap securely.
14. Start the engine.
15. Check for any leakage around the drain plug.
Correct as required.
16. Turn the engine off and wait several minutes.
17. Check the oil level again with the dipstick. If
necessary, add engine oil.
18. Install the engine compartment under cover.
19. Lower the vehicle carefully to the ground.
20. Close the bonnet.
CHANGING ENGINE OIL FILTER
WARNING
•NISSAN recommends contacting a NISSAN
dealer or qualified workshop for engine oil fil-
ter servicing.
NISSAN Blue Citizenship
A used oil filter should be disposed of at a
rubbish tip having proper facilities.
NDI978ZR9M engine
NDI1477HRA2DDT engine
8-10Maintenance and do-it-yourself
Page 284 of 338
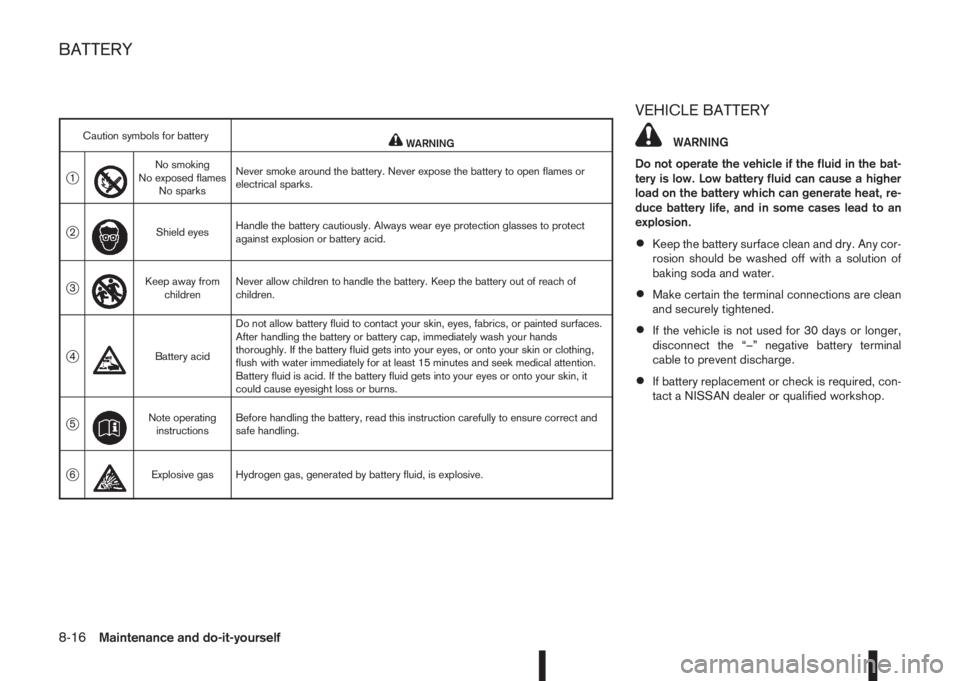
VEHICLE BATTERY
WARNING
Do not operate the vehicle if the fluid in the bat-
tery is low. Low battery fluid can cause a higher
load on the battery which can generate heat, re-
duce battery life, and in some cases lead to an
explosion.
•Keep the battery surface clean and dry. Any cor-
rosion should be washed off with a solution of
baking soda and water.
•Make certain the terminal connections are clean
and securely tightened.
•If the vehicle is not used for 30 days or longer,
disconnect the “–” negative battery terminal
cable to prevent discharge.
•If battery replacement or check is required, con-
tact a NISSAN dealer or qualified workshop.
Caution symbols for batterymWARNING
j1
m
No smoking
No exposed flames
No sparksNever smoke around the battery. Never expose the battery to open flames or
electrical sparks.
j2
m
Shield eyesHandle the battery cautiously. Always wear eye protection glasses to protect
against explosion or battery acid.
j3
m
Keep away from
childrenNever allow children to handle the battery. Keep the battery out of reach of
children.
j4
m
Battery acidDo not allow battery fluid to contact your skin, eyes, fabrics, or painted surfaces.
After handling the battery or battery cap, immediately wash your hands
thoroughly. If the battery fluid gets into your eyes, or onto your skin or clothing,
flush with water immediately for at least 15 minutes and seek medical attention.
Battery fluid is acid. If the battery fluid gets into your eyes or onto your skin, it
could cause eyesight loss or burns.
j5
m
Note operating
instructionsBefore handling the battery, read this instruction carefully to ensure correct and
safe handling.
j6mExplosive gas Hydrogen gas, generated by battery fluid, is explosive.
BATTERY
8-16Maintenance and do-it-yourself
Page 289 of 338

WARNING
Be sure the engine and ignition switch are off
and that the parking brake is engaged securely.
CAUTION
•Be sure to use the correct socket to remove
the spark plugs. An incorrect socket can
cause damage to the spark plugs.
•Always replace spark plugs with recom-
mended or equivalent ones.
Replace spark plugs according to the maintenance
schedule shown in the separately provided War-
ranty Information & Maintenance Booklet.
If replacement is required, see a NISSAN dealer or
qualified workshop for servicing.NOTE
Some maintenance procedures require the re-
moval of the air duct.
Be sure the ignition switch is in the “OFF” or
LOCK position before working in the engine com-
partment.
SPARK PLUGS (Petrol engine
models)AIR DUCT REMOVAL
Maintenance and do-it-yourself8-21
Page 296 of 338

HEADLIGHTS
LED headlight (where fitted)
The LED headlight is a projector style which uses a
LED module without serviceable parts.
CAUTION
•To prevent an electric shock, never attempt to
modify or disassemble the LED headlights as-
sembly.
•If replacement is required, contact a NISSAN
dealer or qualified workshop.
Replacing the halogen headlight bulb
CAUTION
•High pressure halogen gas is sealed inside
the halogen bulb. The bulb may break if the
glass envelope is scratched or the bulb is
dropped.
•When handling the bulb, DO NOT TOUCH THE
GLASS ENVELOPE.
•Use the same number type and wattage as
originally installed.
•Aiming is usually not necessary after replac-
ing the bulb. When aiming adjustment is nec-
essary, contact a NISSAN dealer or qualified
workshop.
•Do not leave the bulb out of the headlight
reflector for a long period of time as dust,moisture or smoke may enter the headlight
body and affect the performance of the head-
light.
The headlight is a semi-sealed beam type which
uses a replaceable headlight (halogen) bulb. A bulb
can be replaced from inside the engine compart-
ment without removing the headlight assembly.
Contact a NISSAN dealer or qualified workshop, if
you need assistance for bulb replacement.
High beam bulb replacement:
1. Open the bonnet. For details, see “Bonnet
release” in the “3. Pre-driving checks and
adjustments” section.
2. Disconnect the negative (—) battery cable.
3. When the broken bulb is located in the headlight
assembly under the air duct, carefully remove the
air duct, see “Air duct removal” earlier in this
section.
4. Remove the connector from the back of the cover
assembly
j1.
5. Turn the cover assembly 1/4 of a turn in the anti
clockwise direction and remove the cover by dis-
connecting the internal connector
j2.
6. Push and turn the retaining pin to loosen it
j3.
7. Remove the headlight bulb. Do not shake or ro-
tate the bulb when removing it.
8. Install the new bulb in the reverse order of re-
moval.9. Re-install the covers internal connector on the
back of the bulb.
10. Re-install the cover by turning the cover assem-
bly 1/4 of a turn in the clockwise direction.
11. Re-install the connector on the back of the cover
assembly.
12. Where removed (step 3.), re-install the air duct,
bolt and clips in the reverse order of removal.
13. Reconnect the negative (—) battery cable and
close the bonnet.
Low beam bulb replacement:
1. Open the bonnet. For details, see “Bonnet
release” in the “3. Pre-driving checks and
adjustments” section.
2. Disconnect the negative (—) battery cable.
3. When the broken bulb is located in the headlight
assembly under the air duct, carefully remove the
air duct, see “Air duct removal” earlier in this
section.
4. Remove the connector from the back of the bulb
assembly
j4.
5. Turn the bulb assembly 1/8 of a turn in the anti
clockwise direction and remove the headlight
bulb
j5.
6. Install the new bulb in the headlight body by turn-
ing it clockwise until it is securely sealed within
the headlight body.
7. Re-install the connector on the back of the bulb
assembly.
8-28Maintenance and do-it-yourself
Page 302 of 338

•A NISSAN dealer or qualified workshop may
be able to help you with information about
tyre type, size, speed rating and availability.
•Replacement tyres may have a lower speed
rating than the factory equipped tyres, and
may not match the potential maximum vehicle
speed. Never exceed the maximum speed rat-
ing of the tyre.
All season tyres
NISSAN specifies all season tyres on some models
to provide good performance for use all year around,
including snowy and icy road conditions. All season
tyres are identified by ALL SEASON and/or M&S
on the tyre sidewall. Snow tyres have better snow
traction than all season tyres and may be more ap-
propriate in some areas.
Summer tyres
NISSAN specifies summer tyres as standard fit.
These tyres provide superior performance under
typical mild weather conditions.
If you plan to operate your vehicle in snowy or icy
conditions, NISSAN recommends the use of SNOW
or ALL SEASON tyres on all four wheels.
Snow tyres
If snow tyres are needed, it is necessary to select
tyres equivalent in size and load rating to the original
equipment tyres. If you do not, it can adversely af-
fect the safety and handling of your vehicle.
Generally, snow tyres will have lower speed ratingsthan factory equipped tyres and may not match the
potential maximum vehicle speed. Never exceed the
maximum speed rating of the tyre.
For additional traction on icy roads, studded tyres
may be used. However, some provinces and states
prohibit their use. Check local, state and provincial
laws before installing studded tyres. Skid and trac-
tion capabilities of studded snow tyres, on wet or
dry surfaces, may be poorer than that of non-stud-
ded snow tyres.
SNOW CHAINS
Use of snow chains may be prohibited in some ar-
eas. Check the local laws before installing snow
chains. When installing snow chains, make sure they
are of proper size for the tyres on your vehicle and
are installed according to the chain manufacturer’s
suggestions. Use chain tensioners when recom-
mended by the snow chain manufacturer to ensure
a tight fit. Loose end links of the snow chain must be
secured or removed to prevent the possibility of
whipping action damage to the fenders or undercar-
riage.
In addition, drive at a reduced speed. Otherwise,
your vehicle can be damaged and/or vehicle han-
dling and performance may be adversely affected.
Snow chains must be installed only on the front
wheels and not on the rear wheels.
CAUTION
•Never install snow chains on a temporary-use
or small size spare tyre.
•Do not drive with snow chains on paved roads
which are clear of snow. Driving with chains in
such conditions can cause damage to the
various mechanisms of the vehicle due to
some overstress. When driving on clear paved
roads, be sure to change to 2WD mode, see
“Four-wheel Drive (4WD) (where fitted)” in the
“5. Starting and driving” section.
TYRE ROTATION
NISSAN recommends that tyres be rotated every
10,000 km (6,000 miles) for Two-Wheel Drive
(2WD) vehicles and 5,000 km (3,000 miles) for
Four-Wheel Drive (4WD) vehicles. After rotating
tyres and adjusting the tyre pressure, perform a
TPMS temperature calibration (see “TPMS tem-
perature calibration” in the “5. Starting and driving”
section).
See “Flat tyre” in the “6. In case of emergency” sec-
tion for tyre replacing procedures.
NDI762Z
8-34Maintenance and do-it-yourself
Page 326 of 338

Map lights ........................................................................... 2-50
Maximum load limits (for Australia) ....................................... 5-55
Mechanical/emergency key ................................................... 3-3
Meter and gauges
– Engine coolant temperature gauge ................................... 2-3
– Fuel gauge ...................................................................... 2-2
– Speedometer .................................................................. 2-2
– Tachometer ..................................................................... 2-2
Meters and gauges ............................................................... 2-2
Mirror .................................................................................. 3-18
– Automatic anti-dazzling inside mirror ....................... 3-19, 7-5
– Inside rear-view mirror ................................................... 3-18
– Outside rear-view mirrors .............................................. 3-19
– Vanity mirror .................................................................. 3-20
Mobile phone integration for FM AM radio with CD player ... 4-39
Monitor display
– Monitor display’s maintenance ......................................... 7-4
– Rear-view monitor ............................................................ 4-2
Moving object detection (MOD) ........................................... 4-12
N
NISSAN Anti-Theft System (NATS) .............................. 3-2, 5-12
– NATS key ........................................................................ 3-2
– NATS security indicator light .......................................... 3-13
– Radio approval number and information ........................... 9-8
O
Odometer/twin trip odometer ................................................ 2-2
Oil
– Changing engine oil ......................................................... 8-9
– Changing engine oil filter ............................................... 8-10
– Checking engine oil level ................................................. 8-8
– Engine oil ........................................................................ 8-8– Recommended lubricants ................................................ 9-2
– Recommended SAE viscosity number .............................. 9-4
On-pavement and off-road driving precautions ....................... 5-9
Overheat
– Engine overheat ............................................................. 6-13
P
Parcel shelf
– Installation ..................................................................... 2-45
– Removal ........................................................................ 2-45
Parking ............................................................................... 5-43
– Ultrasonic parking sensors ............................................. 5-45
Parking brake switch ........................................................... 3-16
Phone
– Bluetooth® .................................................................... 4-39
– Mobile phone integration for FM AM radio with CD
player ............................................................................ 4-39
Power
– Electric power steering system ...................................... 5-57
– Power door lock switch ................................................. 3-10
– Power outlet .................................................................. 2-42
Pre-tensioner seat belt system ............................................. 1-13
Precautions
– Audio operation precautions .......................................... 4-23
– Brake precautions ......................................................... 5-58
– Cruise control precautions ............................................. 5-36
– Maintenance precautions ................................................. 8-4
– On-pavement and off-road driving precautions ................. 5-9
– Operating precautions (trailer) ....................................... 5-54
– Precautions on push-button ignition switch operation ..... 5-12
– Precautions on Supplemental Restraint System ............. 1-29
– Safety precautions ........................................................... 4-2
– Towing precautions ....................................................... 6-14
– When starting and driving ................................................ 5-3
Precautions on child restraints ............................................. 1-15
10-6Index