2014 NISSAN QASHQAI ESP
[x] Cancel search: ESPPage 106 of 338

POWER WINDOWS
The power window switches are located on the door
panels and will only operate when the ignition switch
is in the ON position.
WARNING
•Make sure that all passengers have their
hands, etc. inside the vehicle before operat-
ing the power windows.
•Never leave children or adults who would nor-
mally require the support of others alone in
the vehicle. They could unknowingly activate
switches or controls and inadvertently
become involved in an accident.
•It is recommended to instruct all occupants in
the safe operation of power windows with par-
ticular emphasis given to the safety and su-
pervision of children.
The power windows only operate when the ignition
switch is in the “ON” position.
To open a window, push down the power window
switch.
To close a window, pull up the power window
switch.
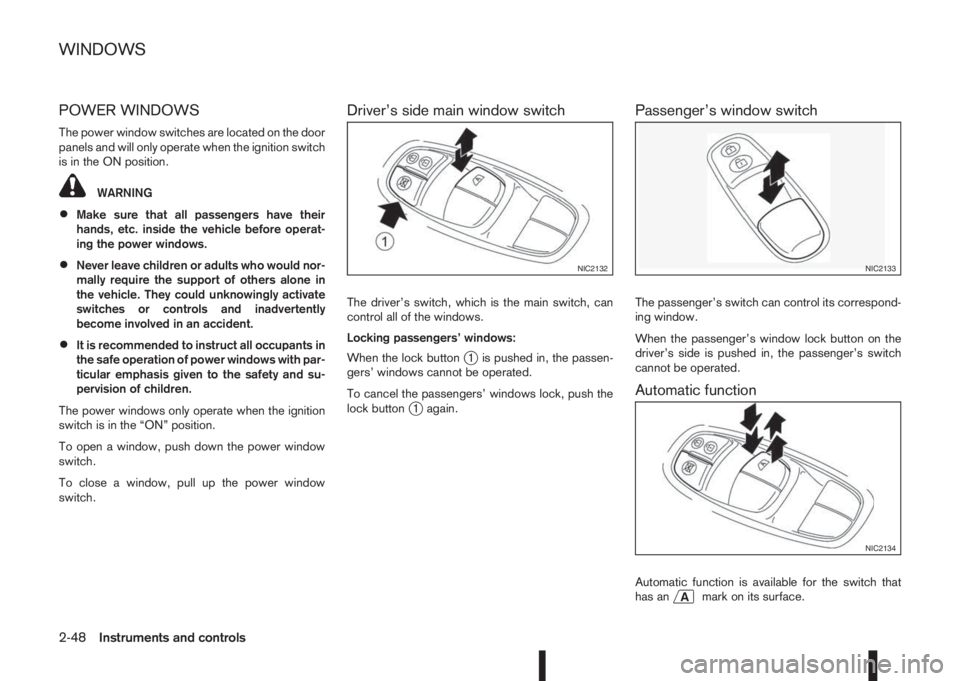
Driver’s side main window switch
The driver’s switch, which is the main switch, can
control all of the windows.
Locking passengers’ windows:
When the lock button
j1 is pushed in, the passen-
gers’ windows cannot be operated.
To cancel the passengers’ windows lock, push the
lock button
j1 again.
Passenger’s window switch
The passenger’s switch can control its correspond-
ing window.
When the passenger’s window lock button on the
driver’s side is pushed in, the passenger’s switch
cannot be operated.
Automatic function
Automatic function is available for the switch that
has anmark on its surface.
NIC2132NIC2133
NIC2134
WINDOWS
2-48Instruments and controls
Page 118 of 338
![NISSAN QASHQAI 2014 Owner´s Manual Convenience mode:
Push the door/back door request button.
– All doors and the back door will be unlocked.
– The direction indicators flash twice.
– The message [All door unlock] appears in the
v NISSAN QASHQAI 2014 Owner´s Manual Convenience mode:
Push the door/back door request button.
– All doors and the back door will be unlocked.
– The direction indicators flash twice.
– The message [All door unlock] appears in the
v](/manual-img/5/40326/w960_40326-117.png)
Convenience mode:
Push the door/back door request button.
– All doors and the back door will be unlocked.
– The direction indicators flash twice.
– The message [All door unlock] appears in the
vehicle information display.
Anti-hijack mode (where fitted):
1. Push the door/back door request button.
– The corresponding door unlocks.
– The direction indicators flash twice quickly.
2. Push the request button again within 5 seconds.
– All the doors and the back door will be unlocked.
– The direction indicators flash twice.
NOTE
•External interference may impair the Intelli-
gent Key’s operation. In this case, use the
emergency key located in the Intelligent Key
integrated keyfob. See “Door locks” later in
this section for further details.
•If the vehicle is unlocked and no doors are
opened for 2 minutes the doors will automati-
cally be locked.
CAUTION
•Make sure the Intelligent Key battery is in good
condition. Note that battery life may vary de-
pending on condition, amount of use, ambi-
ent temperature, etc.
•The Intelligent Key contains a miniature radio
transmitter that may be affected when placed
near metal objects.
•Keep the Intelligent Key away from mobile
phones, laptop computers and other metal
objects or electronics.
STARTING THE ENGINE WITH THE
INTELLIGENT KEY
See “Push-button ignition switch (where fitted)” in
the “5. Starting and driving” section.
CAUTION
•Make sure you carry the Intelligent Key with
you when starting and driving the vehicle.
•If the Intelligent Key is too far away from the
passenger compartment, the vehicle may not
start. See “Intelligent Key operating range” in
the “3. Pre-driving checks and adjustments”
section
SUPER LOCK SYSTEM (RHD models)
WARNING
Super Lock system equipped models:
Failure to follow the precautions below may lead
to hazardous situations. Make sure the Super
Lock system activation is always conducted
safely.
•When the vehicle is occupied, never lock the
doors with the integrated keyfob. Doing so
will trap the occupants, since the Super Lock
system prevents the doors from being opened
from the inside of the vehicle.
•Only operate the integrated keyfob “LOCK”
button when there is a clear view of the ve-
hicle. This is to prevent anybody from being
trapped inside the vehicle through the Super
Lock system activation.
Pressing the “LOCK” button (
) on the integrated
keyfob or locking the doors using one of the request
buttons (Intelligent Key models) will activate the Su-
per Lock system.
When the Super Lock system is active, none of the
doors can be opened from inside the vehicle. This
provides additional security in case of theft or break-
in.
The Super Lock system will be released when all
the doors are unlocked using the integrated keyfob
or a request button (Intelligent Key models).
DOOR LOCKS
3-8Pre-driving checks and adjustments
Page 121 of 338

–Intelligent Key models:If the Intelligent Key has
been left inside the vehicle, all doors will unlock
and an audible warning will sound.
Super Lock equipped models (RHD
models)
If the doors are locked using the integrated keyfob
lock button () or a request button (Intelligent Key
models), the Super Lock system will be activated.
The
indicator light in the centre console comes
on to indicate that all doors are locked, but it will not
be possible to use the
button of the power door
lock switch to unlock the doors.
Locking the doors with the power door lock switch
will not activate the Super Lock system.
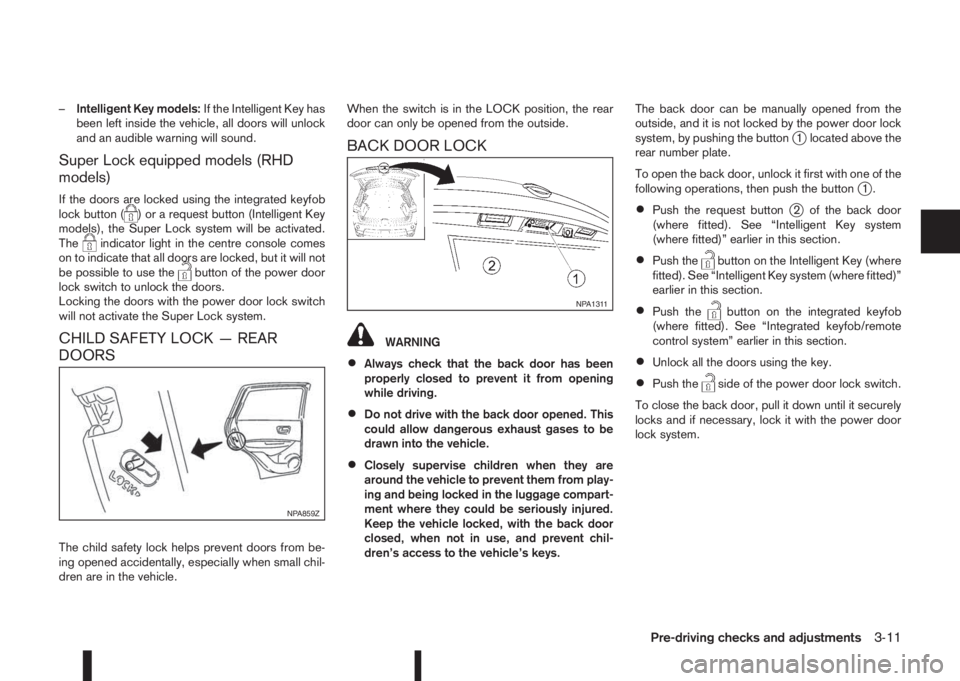
CHILD SAFETY LOCK — REAR
DOORS
The child safety lock helps prevent doors from be-
ing opened accidentally, especially when small chil-
dren are in the vehicle.When the switch is in the LOCK position, the rear
door can only be opened from the outside.
BACK DOOR LOCK
WARNING
•Always check that the back door has been
properly closed to prevent it from opening
while driving.
•Do not drive with the back door opened. This
could allow dangerous exhaust gases to be
drawn into the vehicle.
•Closely supervise children when they are
around the vehicle to prevent them from play-
ing and being locked in the luggage compart-
ment where they could be seriously injured.
Keep the vehicle locked, with the back door
closed, when not in use, and prevent chil-
dren’s access to the vehicle’s keys.The back door can be manually opened from the
outside, and it is not locked by the power door lock
system, by pushing the button
j1 located above the
rear number plate.
To open the back door, unlock it first with one of the
following operations, then push the button
j1.
•Push the request buttonj2 of the back door
(where fitted). See “Intelligent Key system
(where fitted)” earlier in this section.
•Push thebutton on the Intelligent Key (where
fitted). See “Intelligent Key system (where fitted)”
earlier in this section.
•Push thebutton on the integrated keyfob
(where fitted). See “Integrated keyfob/remote
control system” earlier in this section.
•Unlock all the doors using the key.
•Push theside of the power door lock switch.
To close the back door, pull it down until it securely
locks and if necessary, lock it with the power door
lock system.
NPA859Z
NPA1311
Pre-driving checks and adjustments3-11
Page 135 of 338

NOTE
At first operation, the corner lines are blinking
yellow for about 3 seconds. This is not a malfunc-
tion but a reminder to be cautious.
Available views:
•Bird’s-eye View
The surrounding view of the vehicle.
•Front-side View
The view around and ahead of the front passen-
ger’s side wheel.
•Front view
The view to the front of the vehicle.
•Rear view
The view to the rear of the vehicle.
•Full screen rear view
The view to the rear of the vehicle (which is a
little wider than the standard rear view)
The system is designed as an aid to the driver in
situations such as slot parking or parallel parking.
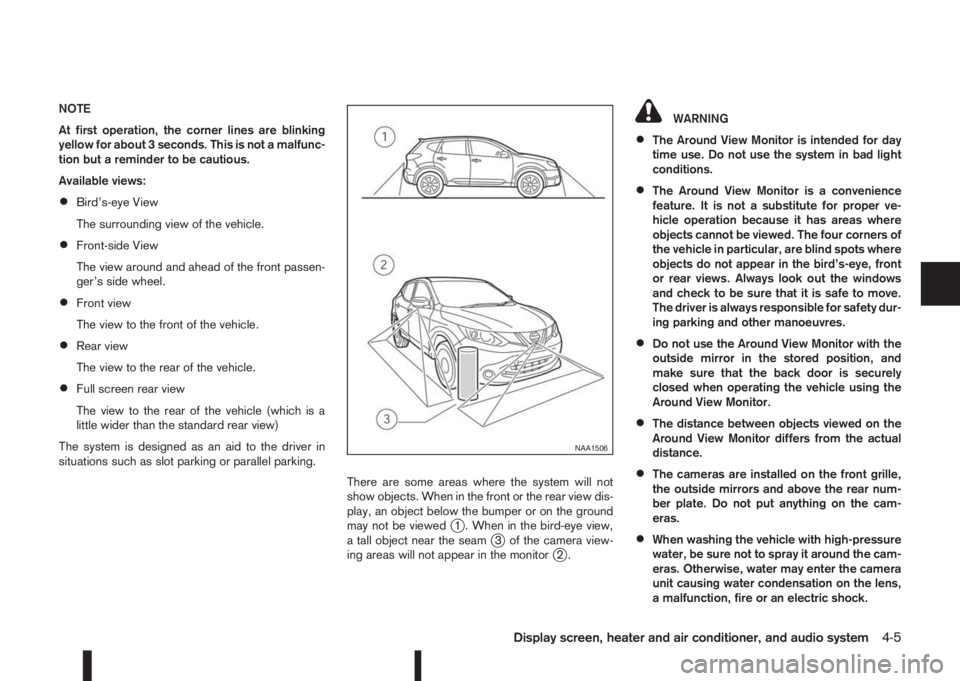
There are some areas where the system will not
show objects. When in the front or the rear view dis-
play, an object below the bumper or on the ground
may not be viewed
j1 . When in the bird-eye view,
a tall object near the seamj3 of the camera view-
ing areas will not appear in the monitorj2.
WARNING
•The Around View Monitor is intended for day
time use. Do not use the system in bad light
conditions.
•The Around View Monitor is a convenience
feature. It is not a substitute for proper ve-
hicle operation because it has areas where
objects cannot be viewed. The four corners of
the vehicle in particular, are blind spots where
objects do not appear in the bird’s-eye, front
or rear views. Always look out the windows
and check to be sure that it is safe to move.
The driver is always responsible for safety dur-
ing parking and other manoeuvres.
•Do not use the Around View Monitor with the
outside mirror in the stored position, and
make sure that the back door is securely
closed when operating the vehicle using the
Around View Monitor.
•The distance between objects viewed on the
Around View Monitor differs from the actual
distance.
•The cameras are installed on the front grille,
the outside mirrors and above the rear num-
ber plate. Do not put anything on the cam-
eras.
•When washing the vehicle with high-pressure
water, be sure not to spray it around the cam-
eras. Otherwise, water may enter the camera
unit causing water condensation on the lens,
a malfunction, fire or an electric shock.
NAA1506
Display screen, heater and air conditioner, and audio system4-5
Page 157 of 338
![NISSAN QASHQAI 2014 Owner´s Manual [Sound] menu:
Submenus in the sound menu:
[Bass] Use this control to enhance or
attenuate bass response sound.
Turn the<MENU>dial clockwise
or anticlockwise to adjust the bass
settings then press<ENTE NISSAN QASHQAI 2014 Owner´s Manual [Sound] menu:
Submenus in the sound menu:
[Bass] Use this control to enhance or
attenuate bass response sound.
Turn the<MENU>dial clockwise
or anticlockwise to adjust the bass
settings then press<ENTE](/manual-img/5/40326/w960_40326-156.png)
[Sound] menu:
Submenus in the sound menu:
[Bass] Use this control to enhance or
attenuate bass response sound.
Turn the
Page 158 of 338
![NISSAN QASHQAI 2014 Owner´s Manual [Format]:
Set the clock display between 24-hour mode and
12-hour clock mode.
[Radio] menu
For activation or deactivation details, see “SETUP
button” later in this section.
Language settings
Select NISSAN QASHQAI 2014 Owner´s Manual [Format]:
Set the clock display between 24-hour mode and
12-hour clock mode.
[Radio] menu
For activation or deactivation details, see “SETUP
button” later in this section.
Language settings
Select](/manual-img/5/40326/w960_40326-157.png)
[Format]:
Set the clock display between 24-hour mode and
12-hour clock mode.
[Radio] menu
For activation or deactivation details, see “SETUP
button” later in this section.
Language settings
Select the appropriate language and press the
automatically adapt the language setting.
•[AUTO]
(Factory preset language connected with the
meter language)
•[Chinese]
•[Chinese Simplified]
•[Deutsch]
•[Español]
•[Français]
•[Italiano]
•[Nederlands]
•[Polski]
•[Português]
•[Türkçe]
•[UK English]
•[русский]
COMPACT DISC (CD) OPERATION
The CD player can play a music CD or an encoded
MP3/WMA CD and while listening to those CD’s
music information tags (track and artist information)
can be displayed (when CD encoded with text is
being used).
Press the
will start to play.
When
source mode is already operating, it will automati-
cally turn off the playing source and the CD play
mode will start.
CAUTION
•Do not force the CD into the slot. This could
damage the player.
•Do not use 8 cm (3.1 in) discs.
CD insert (CD player)
Insert the CD disc into the slot with the label side
facing up. The disc will be guided automatically into
the slot and will start playing. After loading the disc,
track information will be displayed.
NOTE
•The CD player accepts normal audio CD or
CD recorded with MP3/WMA files.
•Inserting a CD recorded with MP3/WMA files,
the audio unit will automatically detect and
[MP3CD] will be indicated.
•An error notification message will be
displayed when inserting a wrong disc type
(e.g. DVD), or the player cannot read the CD
disc. Eject the disc and insert another disc.
MEDIA button
Load a CD disc. After a short loading period the CD
starts playing.
If the disc was already loaded:
Press the
connected audio sources if necessary multiple
times) to select CD. Playing starts from the track
that was being played when the CD play mode was
switched off.
Audio main operation
List view:
While the track is being played, either press the
the available tracks in a listed view mode. To select
a track from the list, or a track to start listening from,
turn the
Press the
button to return to the song.
Fast Forward (Cue), Fast
Reverse (Review) buttons:
When the
(Cue) or(Review) button is
pressed continuously, the track will be played at
high speed. When the button is released, the track
will be played at normal playing speed.
4-28Display screen, heater and air conditioner, and audio system
Page 173 of 338

– Using call history (Call List menu)
•Dialled
•Received
•Missed
Making a call from the phone book:
Once the Bluetooth
®connection has been made,
between the registered mobile phone and the audio
system, phone book data will be transferred auto-
matically to the audio system. The transfer may take
a while before completion.
NOTE
Phone book data will be erased when:
•Switching to another registered mobile
phone.
•Mobile phone is disconnected.
•The registered mobile phone is deleted from
the audio system.
1. Press<
>.
2. Turn the
Book] then press
3. Scroll down through the list, select the appropri-
ate contact name (highlighted), and press
4. A following screen will show the number to be
dialled. If correct, press
the number.If the contact has more numbers assigned for
(home),(mobile), or(office), scroll,
and select the appropriate number to dial.
Alternatively, the quick search mode can be used as
follows:
1. While in the phonebook screen press
2. Turn the
numerical letter of the contact name. Once high-
lighted, press
3. The display will show the corresponding contact
name(s). Where necessary, use the
dial again to scroll further for the appropriate
contact name to call.
4. A following screen will show the number to be
dialled. If correct, press
the number.Manually dialling a phone number:WARNING
Park the vehicle in a safe location, and apply the
parking brake before making a call.
To dial a phone number manually use the audio sys-
tem display (virtual keyboard pad) as follows:
1. Press
, and turn the
light [Call Number].
2. Press
3. Turn the
each number of the phone number. Once high-
lighted, press
lection.
To delete the last number entered scroll to the
[←] (Backspace) symbol, and once highlighted
press
leted. Pressing
each subsequent number.
Display screen, heater and air conditioner, and audio system4-43
Page 177 of 338

Lane Departure Warning (LDW) system (where
fitted) ....................................................................... 5-33
LDW system operation ....................................... 5-34
LDW temporary disabled status .......................... 5-35
LDW automatic deactivation ............................... 5-35
LDW malfunction ................................................ 5-35
Multi-sensing camera unit maintenance ............... 5-35
Cruise control (where fitted) .................................... 5-36
Precautions on cruise control .............................. 5-36
Cruise control system operations ........................ 5-37
Speed limiter (where fitted) ...................................... 5-38
Speed limiter operations ..................................... 5-39
Forward emergency braking system (where fitted) ... 5-40
System operation ................................................ 5-41
Parking .................................................................... 5-43
Ultrasonic Parking Sensors (where fitted)................. 5-45
Operation ........................................................... 5-45
Intelligent Parking Assist (IPA) (where fitted) ............ 5-46
Deactivation of the IPA system ............................ 5-47
Parking procedure using the IPA system ............. 5-48
Operating tips..................................................... 5-52
Trailer towing ........................................................... 5-54
Operating precautions ........................................ 5-54
Maximum load limits (for Australia) ...................... 5-55
Tyre pressure ..................................................... 5-55
Safety chains ...................................................... 5-55
Trailer brakes...................................................... 5-55
Trailer detection (where fitted) ............................ 5-56Installation of coupling device (except for
Australia) ............................................................ 5-56
Vehicle security........................................................ 5-57
Electric power steering system ................................ 5-57
Brake system ........................................................... 5-58
Brake precautions .............................................. 5-58
Anti-lock Braking System (ABS)............................... 5-59
Using system ...................................................... 5-59
Self-test feature .................................................. 5-59
Normal operation ................................................ 5-60
Electronic Stability Programme (ESP) system
(where fitted) ........................................................... 5-60
Electronic Stability Programme (ESP) OFF
switch................................................................. 5-61
Chassis control........................................................ 5-62
Active trace control ............................................. 5-62
Active engine brake (for XTRONIC (CVT)
models only) ....................................................... 5-63
Active ride control ............................................... 5-64
Hill Start Assist (HSA) system .................................. 5-64
ECO mode system (where fitted) ............................. 5-65
Cold weather driving................................................ 5-66
Battery ............................................................... 5-66
Engine coolant .................................................... 5-66
Tyre equipment ................................................... 5-66
Special winter equipment.................................... 5-67
Corrosion protection ........................................... 5-67