2014 NISSAN QASHQAI warning
[x] Cancel search: warningPage 218 of 338

of the front bumper such as ice, snow, stick-
ers, for example. In these cases, the system
may not be able to warn the driver properly.
Be sure that you check, clean and clear the
sensor area of the front bumper regularly
Turning the forward emergency braking
system ON/OFF
Perform the following steps to turn the forward
emergency braking system ON or OFF.
1. Using the
orswitches and the ENTER but-
ton on the left side of the steering wheel, select
the Settings menu in the vehicle information dis-
play. (See “Settings” in the “2. Instruments and
controls” section
2. Using the
orswitches and the ENTER but-
ton, navigate to the [Driver Assistance] menu,
followed by the [Driving Aids] menu.
3. In the [Driving Aids] menu, highlight the [Emer-
gency Brake] item and use the ENTER button to
toggle between ON (enabled) or OFF (disabled).When the forward emergency braking system is
turned off, the forward emergency braking system
warning light (orange) will illuminate.System temporarily unavailable
Condition A:
When the radar picks up interference from another
radar source, making it impossible to detect a ve-
hicle ahead, the forward emergency braking system
is automatically turned off. The forward emergency
braking system warning light (orange) and the for-
ward collision warning light (orange) will illuminate.
Action to take:
When the above conditions no longer exist, the for-
ward emergency braking system will resume auto-
matically.
Condition B:
When the sensor area of the front bumper is cov-
ered with dirt or obstructed, making it impossible to
detect a vehicle ahead, the forward emergency brak-ing system is automatically turned off. The forward
emergency braking system warning light (orange)
and the forward collision warning light (orange) will
illuminate and the “front radar obstruction” warning
message will appear in the vehicle information dis-
play.
Action to take:
If the warning light (orange) comes on, park the
vehicle in a safe location and turn the engine off.
Check to see if the sensor area of the front bumper
is blocked. If the sensor area of the front bumper is
blocked, remove the blocking material. Restart the
engine. If the warning light continues to illuminate,
have the forward emergency braking system
checked by a NISSAN dealer or qualified workshop.System malfunction
If the forward emergency braking system malfunc-
tions, it will be turned off automatically, a chime will
sound, the forward emergency braking system
warning light (orange) and the forward collision
warning light (orange) will illuminate and the warn-
ing message [Malfunction] will appear in the vehicle
information display.
Action to take:
If the warning light (orange) comes on, park the
vehicle in a safe location, turn the engine off and
restart the engine. If the warning light continues to
illuminate, have the forward emergency braking sys-
tem checked by a NISSAN dealer or qualified work-
shop.
JVS0299XZ
5-42Starting and driving
Page 219 of 338

WARNING
•Do not park the vehicle over flammable mate-
rials, such as dry grass, waste paper, or rags.
They may ignite and cause a fire.
•Safe parking procedures require that:
– The parking brake is applied.
– The shift lever is placed in an appropriate
gear for manual transmission models.
– The shift lever is placed in the P (Park)
position for XTRONIC transmission (CVT)
models.
Failure to follow the above recommenda-
tions could cause the vehicle to move un-
expectedly or roll away and result in an
accident.
•Never leave the engine running while the ve-
hicle is unattended.
•Do not leave children or adults who would
normally require the support of others alone
in your vehicle. Pets should also not be left
alone either. On hot, sunny days, tempera-
tures in a closed vehicle could quickly be-
come high enough to cause severe or possi-
bly fatal injuries to people or animals.
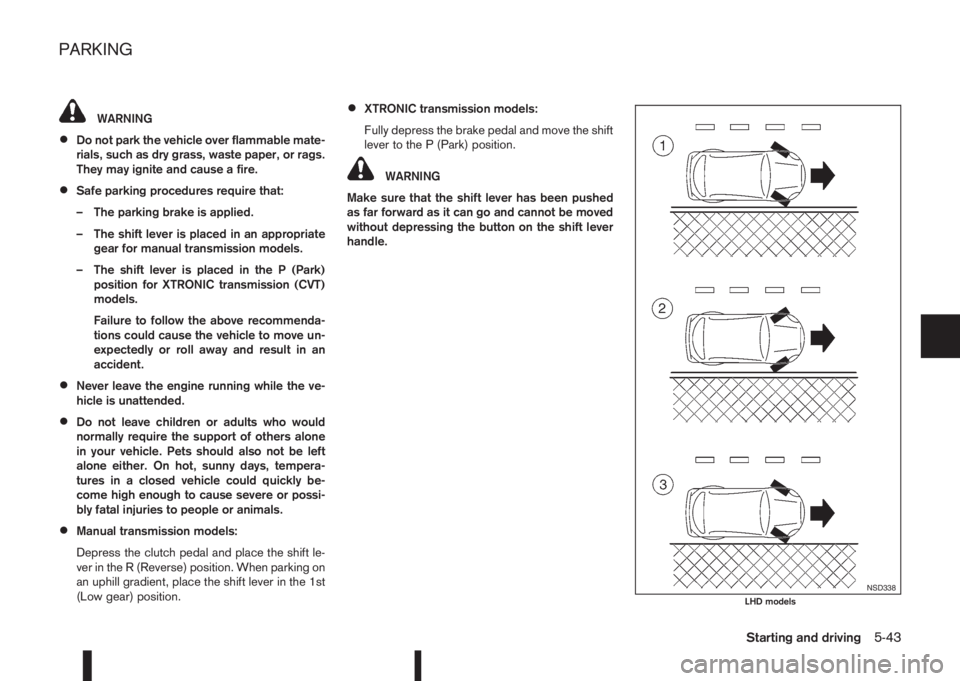
•Manual transmission models:
Depress the clutch pedal and place the shift le-
ver in the R (Reverse) position. When parking on
an uphill gradient, place the shift lever in the 1st
(Low gear) position.
•XTRONIC transmission models:
Fully depress the brake pedal and move the shift
lever to the P (Park) position.
WARNING
Make sure that the shift lever has been pushed
as far forward as it can go and cannot be moved
without depressing the button on the shift lever
handle.
NSD338LHD models
PARKING
Starting and driving5-43
Page 221 of 338

Ultrasonic sensorsj1 andj2 , fitted in the vehicle’s
front and rear bumpers, measure the distances be-
tween the vehicle and an obstacle when reversing.
When reverse gear is engaged a top view of the
vehicle is shown in the vehicle information display.
On the display the distances (1 meter and less) to
objects are shown. If the object(s) get(s) closer to
the vehicle colours change from green over yellow
to red. If the text [STOP] is shown, stop the vehicle
before actually touching the object.
WARNING
If there is any doubt the surroundings in the path
of the parking area and/or the parking area itself
are not free from obstacles immediately stop the
vehicle and check.
NOTE
•This system is intended as an aid to parking,
to be used in conjunction with your rear view
mirror.
•Make sure that the ultrasonic sensors are not
obscured (by dirt, mud, snow, etc.).
OPERATION
Switch the system on or off by pressing the parking
sensor system buttonj2
If the [Display] key in the [Parking Aids] menu is
selected (marked by the green marker) and R (Re-
verse) is engaged, the parking sensor display is
shown automatically without first pressing the but-
ton.
NAA1423
NAA1424
NAA1420
NAA1421
ULTRASONIC PARKING
SENSORS (where fitted)
Starting and driving5-45
Page 222 of 338
![NISSAN QASHQAI 2014 Owner´s Manual Using the settings menu
The settings of the parking sensor system can be
changed.
At ignition on (the [Settings] menu is shown in the
display), select
[Driver Assistance] —> [Parking Aids]
or when t NISSAN QASHQAI 2014 Owner´s Manual Using the settings menu
The settings of the parking sensor system can be
changed.
At ignition on (the [Settings] menu is shown in the
display), select
[Driver Assistance] —> [Parking Aids]
or when t](/manual-img/5/40326/w960_40326-221.png)
Using the settings menu
The settings of the parking sensor system can be
changed.
At ignition on (the [Settings] menu is shown in the
display), select
[Driver Assistance] —> [Parking Aids]
or when the parking sensor screen is displayed,
press the
jB on the steering
wheel. Press the BACK switchjA to return to the
previous item.
The settings menu is shown
Set the following items on or off by selecting (high-
lighted) and pressing the
jB switch on
the steering wheel. When selected a green marker
is shown.
– [Front sensor]:
Switch the front sensors on or off
– [Rear sensor]:
Switch the rear sensors on or off– [Display]:
Switch the parking sensor system automatically
on or off when selecting R (Reverse) gear.
By highlighting the colour of the to be set item:
– Set the volume of the parking sensor system
Select [Volume] and press
•High
•Med.
•Low
– Set the range sensitivity
Select [Range] and press
•Far
•Mid.
•Near
WARNING
Intelligent Parking Assist (IPA) is a guidance sys-
tem for parking procedures. It does not prevent
collisions with objects. Always look through the
windows and check to be sure that it is safe to
move.
The Intelligent Parking Assist (IPA) system controls
steering, guiding the vehicle when parking:
– In a bay
– Parallel to the road
NOTE
The IPA system instructs you to stop, drive for-
wards or drive backwards. Follow the instructions
given by the system.
The IPA system is not able to support parking when
the vehicle speed during the parking manoeuvre is
more than 7 km/h (4 MPH).
CAUTION
Do not use the IPA system under the following
conditions:
•On unpaved roads.
•On snow-covered or frozen roads.
•On uneven roads with slants, bumps, kerb-
stones, wheel tracks, etc.
•At mechanical parking facilities.
•When tyre chains or a spare tyre are installed.
NIC2204
INTELLIGENT PARKING ASSIST
(IPA) (where fitted)
5-46Starting and driving
Page 225 of 338

inform you when it finds a suitable parking space
between the parked vehicles. You will be told to
drive a short distance past the parking space,
and then stop.
3. Slowly move the vehicle forward to the correct
position until the IPA system instructs you to stop.
WARNING
If there is any doubt that the surroundings in
the path of the parking area and/or the park-
ing area itself are not free from obstacles im-
mediately stop the vehicle and check.
NOTE
Make sure the vehicle is stopped completely
before shifting the shift lever to the Reverse
(R) position.
4. Follow the instructions given by the system.
Place the shift lever in the Reverse (R) position.
Gently place your hands on the steering wheel
and slowly reverse towards the parking space.The steering will be operated automatically.
Carefully and slowly accelerate while checking
the surroundings.
Do not turn the steering wheel.
The system indicates when the parking proce-
dure has ended.
NOTE
•Only the steering operates automatically.
•Follow the instructions given by the sys-
tem.
•Carefully and slowly accelerate while
checking the surroundings.
•Use of the steering wheel will cancel the
IPA operation.
5. When the vehicle is in the target parking posi-
tion, check, then depress the brake pedal to stop
the vehicle.
When the vehicle reaches the approximate areaof the target parking space, a chime will sound,
“[Park assist finished]” will appear on the centre
display and the IPA operation will automatically
terminate.
Make any final adjustments that may be neces-
sary manually, after confirming the vehicle’s sur-
roundings.
NOTE
The system can be cancelled at any time:
•By placing the shift lever in the Park (P) posi-
tion for vehicles with XTRONIC transmission.
•By placing the shift lever in the Neutral (N)
position for MT vehicles.
•By overriding the steering manoeuvre.
•By pressing the [Cancel] button on the centre
display.
NAA1485
NAA1486
NAA1487
Starting and driving5-49
Page 227 of 338
![NISSAN QASHQAI 2014 Owner´s Manual Adjust the target parking rectanglej1 (blue) us-
ing the arrow keys on the screen so that the
clearance guidelines do not overlap any
obstacles around the vehicle.
CAUTION
After pressing [Start] the v NISSAN QASHQAI 2014 Owner´s Manual Adjust the target parking rectanglej1 (blue) us-
ing the arrow keys on the screen so that the
clearance guidelines do not overlap any
obstacles around the vehicle.
CAUTION
After pressing [Start] the v](/manual-img/5/40326/w960_40326-226.png)
Adjust the target parking rectanglej1 (blue) us-
ing the arrow keys on the screen so that the
clearance guidelines do not overlap any
obstacles around the vehicle.
CAUTION
After pressing [Start] the vehicle will park within
the blue area. Make sure this area is free of ob-
stacles.
5. Press [Start].
The vehicle starts the parking procedure. The
IPA operation can be started when the following
conditions are met:
•The vehicle is completely stopped.
•The steering wheel is in the straight-ahead
position.
•The shift lever is in the Drive (D) or a forward
shift position.
NOTE
If the vehicle deviates from the parking rect-
angle while following the parking procedure,
stop and adjust the position.
WARNING
If there is any doubt that the surroundings in the
path of the parking area and/or the parking area
itself are not free from obstacles immediately
stop the vehicle and check.6. Gently place hands on the steering wheel and
slowly move forward the vehicle to the correct
position indicated in green in preparation for re-
versing.
Bring the vehicle to a standstill
The steering wheel will operate itself towards the
reverse starting position rectangle (green).
Depress the brake and stop the vehicle when it
approaches another vehicle or object, or when
the vehicle reaches the reverse starting position.
7. Place the shift lever in the Reverse (R) position
Gently place hands on the steering wheel and
slowly back up to the parking space
Steering will be operated automatically.NOTE
•Only the steering operates automatically.
•Follow the instructions given by the sys-
tem.
•Carefully and slowly accelerate while
checking the surroundings.
•Use of the steering wheel will cancel the
IPA operation.
8. When the vehicle is in the target parking posi-
tion, check, then depress the brake pedal to stop
the vehicle.
When the vehicle reaches the approximate area
of the target parking space, a chime will sound,
“[Park assist finished]” will appear on the centre
display and the IPA operation will automatically
terminate.
Make any final adjustments that may be neces-
sary manually, after confirming the vehicle’s sur-
roundings.
NAA1490
NAA1491
Starting and driving5-51
Page 229 of 338

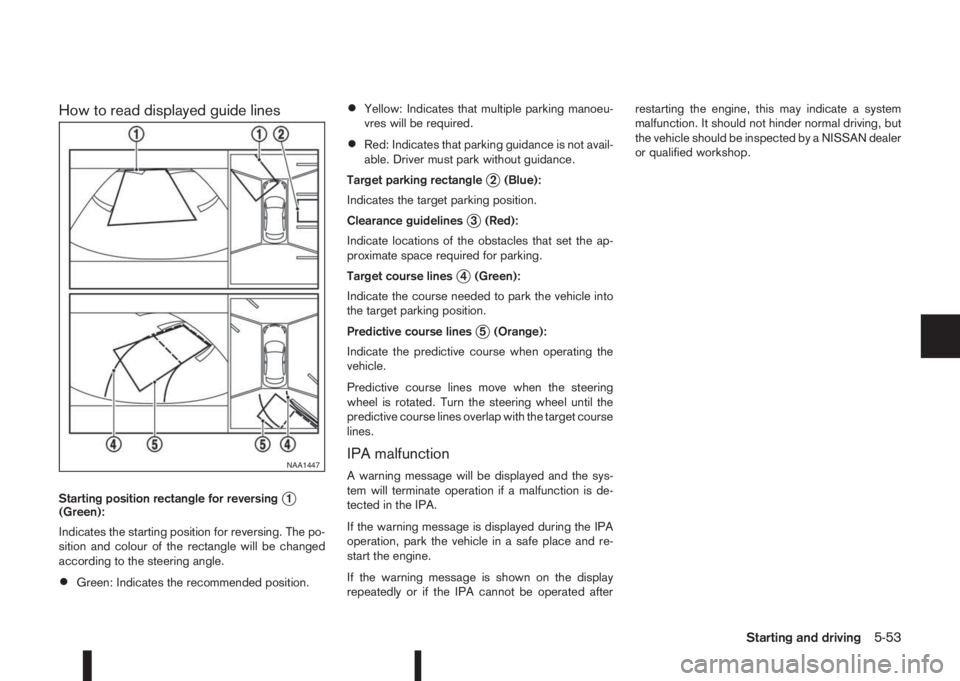
How to read displayed guide lines
Starting position rectangle for reversingj1
(Green):
Indicates the starting position for reversing. The po-
sition and colour of the rectangle will be changed
according to the steering angle.
•Green: Indicates the recommended position.
•Yellow: Indicates that multiple parking manoeu-
vres will be required.
•Red: Indicates that parking guidance is not avail-
able. Driver must park without guidance.
Target parking rectangle
j2 (Blue):
Indicates the target parking position.
Clearance guidelines
j3 (Red):
Indicate locations of the obstacles that set the ap-
proximate space required for parking.
Target course lines
j4 (Green):
Indicate the course needed to park the vehicle into
the target parking position.
Predictive course lines
j5 (Orange):
Indicate the predictive course when operating the
vehicle.
Predictive course lines move when the steering
wheel is rotated. Turn the steering wheel until the
predictive course lines overlap with the target course
lines.
IPA malfunction
A warning message will be displayed and the sys-
tem will terminate operation if a malfunction is de-
tected in the IPA.
If the warning message is displayed during the IPA
operation, park the vehicle in a safe place and re-
start the engine.
If the warning message is shown on the display
repeatedly or if the IPA cannot be operated afterrestarting the engine, this may indicate a system
malfunction. It should not hinder normal driving, but
the vehicle should be inspected by a NISSAN dealer
or qualified workshop.NAA1447
Starting and driving5-53
Page 233 of 338

When leaving your vehicle unoccupied:
•Always remove the ignition key and take it with
you – even in your own garage.
•Always remove the ignition key or Intelligent Key
(where fitted) and take it with you – even in your
own garage.
•Close all windows completely and lock all doors.
•Always park your vehicle where it can be seen.
At night, park in a well lit area.
•If the vehicle is equipped with an alarm or immo-
bilization device, use it – even for short periods.
•Do not leave children and pets in the vehicle
unattended.
•Do not leave valuables on view to tempt a thief.
Always take your valuables with you. If you must
leave something in your vehicle, lock it in the lug-
gage compartment or hide it out of sight.
•Do not leave the vehicle documents in your ve-
hicle. In the unfortunate event of your vehicle
being stolen, the documents will only help a thief
to sell the vehicle.
•Do not leave articles on a roof rack as they are
particularly vulnerable. If possible, remove them
from the rack and lock them inside the vehicle.
•Do not leave the spare key in the vehicle – keep
it in a safe place at home.
•Do not leave the spare key or Intelligent Key in
the vehicle – keep it in a safe place at home.
•Do not leave a note of your vehicle’s key number
in the vehicle. A thief may break into the vehicle,
note the key number and return with a new key
and drive the vehicle.WARNING
•If the engine is not running or is turned off
while driving, the power assistance for the
steering will not work. The steering will be
harder to operate.
•When the electric power steering warning light
illuminates with the engine running, the power
assistance for the steering will cease opera-
tion. You will still have control of the vehicle
but the steering will be harder to operate.
The electric power steering system is designed to
provide power assistance while driving to allow you
to operate the steering wheel with light force.
The steering effort can be set to [Normal] or [Sport]
in the vehicle information display under the heading
[Driver assistance]. (See “[Driver assistance]” in the
“2. Instruments and controls” section.)
NOTE
When the steering wheel is operated repeatedly
or continuously while parking or driving at a very
low speed, the power assistance for the steering
wheel will be reduced. This is to prevent over-
heating of the electric power steering system and
protect it from becoming damaged. While the
power assistance is reduced, steering wheel op-
eration will become heavy. When the tempera-
ture of the electric power steering system de-
creases, the power assistance level will return to
normal. Avoid repeating such steering wheel op-
erations that could cause the electric power
steering system to overheat.
VEHICLE SECURITY ELECTRIC POWER STEERING
SYSTEM
Starting and driving5-57