2014 NISSAN QASHQAI lock
[x] Cancel search: lockPage 9 of 338

1.Bonnet (P. 3-14)
2.Windscreen wipers and washers
— Switch operation (P. 2-32)
— Blade replacement (P. 8-24)
— Window washer fluid (P. 8-15)
— Windscreen deicer (P. 2-35)
— ThermaClear* (P. 2-34)
3.Power windows (P. 2-48)4.Towing eye (P. 6-16)
5.Headlights, front side lights, turn signal lights
(Switch P. 2-36, Location and bulb replace-
ment P. 8-27)
6.Tyres (Tyres and wheels P. 8-33, P. 9-5, Flat
tyre P. 6-3), Tyre Pressure Monitoring System
(TPMS) P. 6-4)7.Outside rear-view mirrors (P. 3-19)
Side turn signal light (P. 2-36, Location and
bulb replacement P. 8-27)
8.Doors (Keys P. 3-2, Door locks P. 3-8,
Remote keyless entry system P. 3-4)
* where fitted
NPA1245
EXTERIOR FRONT
Illustrated table of contents0-3
Page 10 of 338

1.Rear window (Defogger switch, P. 2-35)
2.Rear wiper and washer
— Wiper and washer switch (P. 2-32)
— Wiper replacement (P. 8-24)
— Washer fluid (P. 8-15)
3.High-mounted stop light (P. 8-27)
4.Antenna (P. 8-23).5.Tail light and brake light
— Switch location (P. 2-36)
— Bulb replacement (P. 8-27)
6.Rear turn signal light
— Switch location (P. 2-36)
— Bulb replacement (P. 8-27)
7.Doors
— Keys (P. 3-2)— Door locks (P. 3-8)
— Child safety lock (P. 8-11)
8.Fuel filler cap (P. 3-15)
9.Reversing light (P. 8-27)
10.Rear fog light* (P. 8-27)
11.Towing eye (P. 6-16)
12.Rear view camera*
— Rear-View Monitor* (P. 4-2)
— Around View Monitor* (P. 4-4)
13.Number plate lights (P. 8-27)
14.Back door
— Door locks (P. 3-11)
— Remote keyless entry system (P. 3-4)
* where fitted
NPA1246
EXTERIOR REAR
0-4Illustrated table of contents
Page 11 of 338

1.Inside rear-view mirror (P. 2-18)
2.Map light (P. 2-50)
3.Sun visors (P. 2-50)
4.Inside door handle (P. 2-18)
— Outside mirror folding switch* (P. 3-20)
— Outside mirror remote control (P. 3-19)
5.Door armrest— Power windows controls (P. 2-48)
— Power door lock switch (P. 2-10)
6.Interior (room) light (models without fixed glass
roof)* (P. 2-51)
7.Interior (reading) light (models with fixed glass
roof)* (P. 2-51)
8.Luggage (boot) compartment— Parcel shelf (P. 2-45)
— Luggage floor (P. 2-47)
— Luggage hooks (P. 2-47)
9.Fuse box (P. 8-25)
* where fitted
NPA1247
PASSENGER COMPARTMENT
Illustrated table of contents0-5
Page 22 of 338

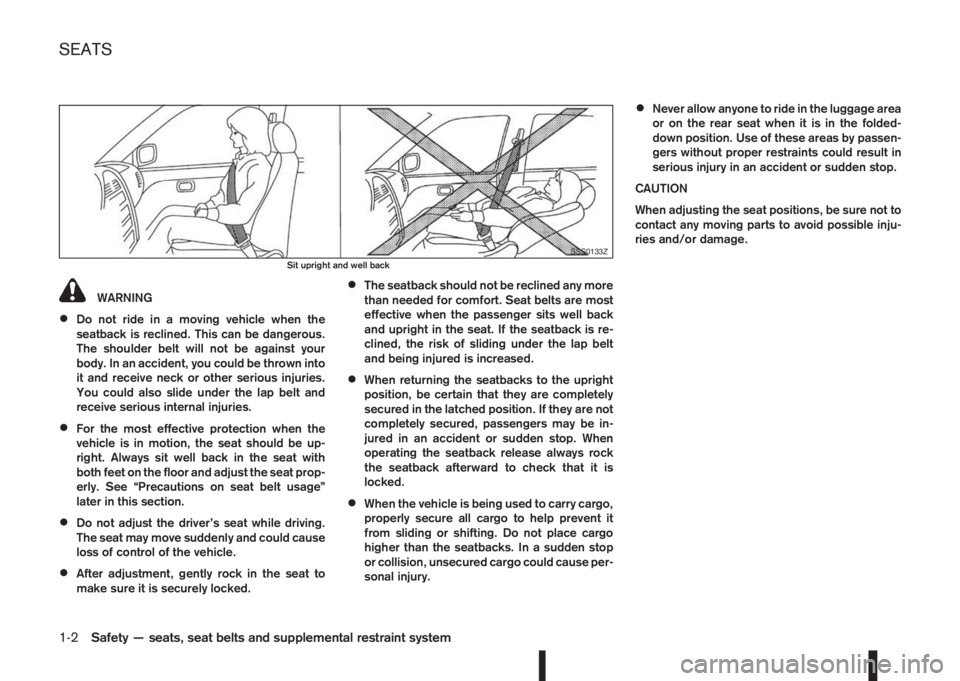
WARNING
•Do not ride in a moving vehicle when the
seatback is reclined. This can be dangerous.
The shoulder belt will not be against your
body. In an accident, you could be thrown into
it and receive neck or other serious injuries.
You could also slide under the lap belt and
receive serious internal injuries.
•For the most effective protection when the
vehicle is in motion, the seat should be up-
right. Always sit well back in the seat with
both feet on the floor and adjust the seat prop-
erly. See “Precautions on seat belt usage”
later in this section.
•Do not adjust the driver’s seat while driving.
The seat may move suddenly and could cause
loss of control of the vehicle.
•After adjustment, gently rock in the seat to
make sure it is securely locked.
•The seatback should not be reclined any more
than needed for comfort. Seat belts are most
effective when the passenger sits well back
and upright in the seat. If the seatback is re-
clined, the risk of sliding under the lap belt
and being injured is increased.
•When returning the seatbacks to the upright
position, be certain that they are completely
secured in the latched position. If they are not
completely secured, passengers may be in-
jured in an accident or sudden stop. When
operating the seatback release always rock
the seatback afterward to check that it is
locked.
•When the vehicle is being used to carry cargo,
properly secure all cargo to help prevent it
from sliding or shifting. Do not place cargo
higher than the seatbacks. In a sudden stop
or collision, unsecured cargo could cause per-
sonal injury.
•Never allow anyone to ride in the luggage area
or on the rear seat when it is in the folded-
down position. Use of these areas by passen-
gers without proper restraints could result in
serious injury in an accident or sudden stop.
CAUTION
When adjusting the seat positions, be sure not to
contact any moving parts to avoid possible inju-
ries and/or damage.
SSS0133ZSit upright and well back
SEATS
1-2Safety — seats, seat belts and supplemental restraint system
Page 23 of 338

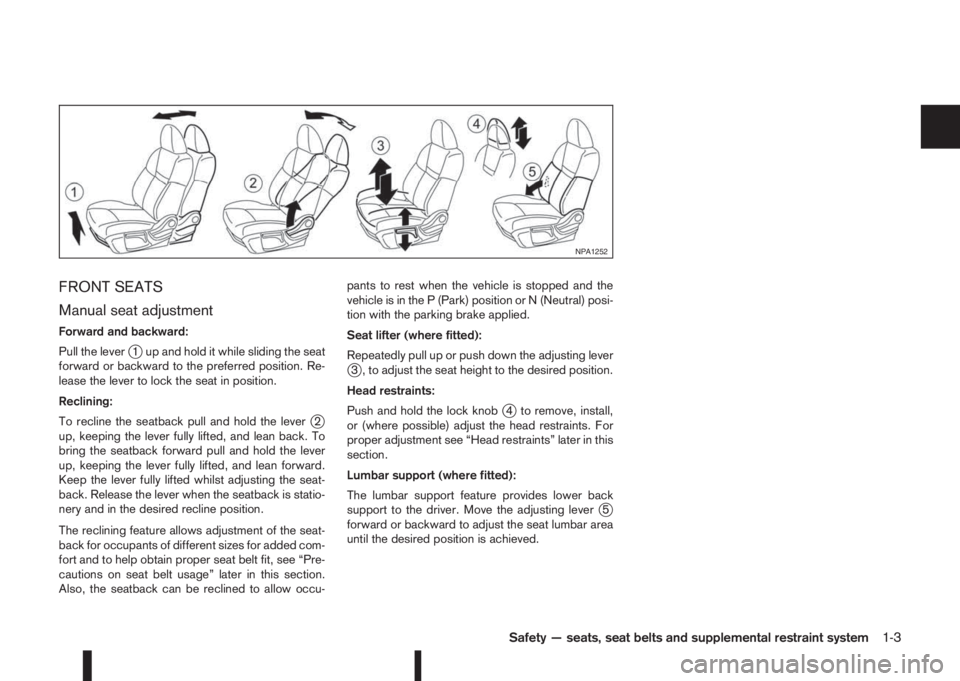
FRONT SEATS
Manual seat adjustment
Forward and backward:
Pull the lever
j1 up and hold it while sliding the seat
forward or backward to the preferred position. Re-
lease the lever to lock the seat in position.
Reclining:
To recline the seatback pull and hold the lever
j2
up, keeping the lever fully lifted, and lean back. To
bring the seatback forward pull and hold the lever
up, keeping the lever fully lifted, and lean forward.
Keep the lever fully lifted whilst adjusting the seat-
back. Release the lever when the seatback is statio-
nery and in the desired recline position.
The reclining feature allows adjustment of the seat-
back for occupants of different sizes for added com-
fort and to help obtain proper seat belt fit, see “Pre-
cautions on seat belt usage” later in this section.
Also, the seatback can be reclined to allow occu-pants to rest when the vehicle is stopped and the
vehicle is in the P (Park) position or N (Neutral) posi-
tion with the parking brake applied.
Seat lifter (where fitted):
Repeatedly pull up or push down the adjusting lever
j3 , to adjust the seat height to the desired position.
Head restraints:
Push and hold the lock knob
j4 to remove, install,
or (where possible) adjust the head restraints. For
proper adjustment see “Head restraints” later in this
section.
Lumbar support (where fitted):
The lumbar support feature provides lower back
support to the driver. Move the adjusting lever
j5
forward or backward to adjust the seat lumbar area
until the desired position is achieved.
NPA1252
Safety — seats, seat belts and supplemental restraint system1-3
Page 25 of 338

•If any malfunctions are found or the seat does
not operate, turn the switch off and have the
system checked by a NISSAN dealer or quali-
fied workshop.
Heated seats
The seats can be warmed by built-in heaters. The
switches are located on the centre console (for front
seats) and can be operated independently of each
other.
1. Start the engine.
2. Select heat range.
•For high heat, push the “HI” (High) side of the
switchj1.
•For low heat, push the “LO” (Low) side of the
switchj2.
•The indicator lightj3 will illuminate when low
or high is selected.
3. To turn off the heater push the “HI” or “LO” side
to return the switch to the level position.
Make sure the indicator light turns off.
The heater is controlled by a thermostat, auto-
matically turning the heater on and off. The indi-
cator light will remain on as long as the switch is
on.
When the vehicle’s interior is warmed, or before
you leave the vehicle, be sure to turn off the
switch.
REAR SEATS
Folding
The luggage compartment loading capacity can be
increased by folding the rear seats forward.
To fold the seat:
1. Ensure head restraints are properly stowed, see
“Head restraints” later in this section.
2. Release the seatback lock by pressing the latch.
3. Fold the seat forward.
To return the seat to an upright position:
1. Make sure the seat belts are clear of the seat
latch mechanism.
2. Lift the seatback up and push firmly to lock.
3. If the red marker is visible then the seat has not
latched properly — release and then re-latch the
seat.CAUTION
Always ensure that the seat belt is not trapped in
the release lever or any other vehicle part.
ARMRESTS (where fitted)
1. Front armrestjA
The console box lid can be used as an armrest.
2. Rear armrest
jB
On the rear seat, pull the top of the armrest and
lay it horizontally.
NPA1293
NPA1289
Safety — seats, seat belts and supplemental restraint system1-5
Page 26 of 338

WARNING
Head restraints supplement the other vehicle
safety systems. They may provide additional pro-
tection against injury in certain rear end colli-
sions. Adjust the head restraints properly, as
specified in this section. Check the adjustment
after someone else uses the seat. Do not attach
anything to the head restraint stalks or remove
the head restraint. Do not use the seat if the
head restraint has been removed. If the head
restraint was removed, reinstall and properly ad-
just the head restraint before an occupant uses
the seating position. Failure to follow these in-
structions can reduce the effectiveness of the
head restraints. This may increase the risk of se-
rious injury or death in a collision.
•Your vehicle is equipped with head restraints.
On the front seats they are adjustable. On the
rear seats, where fitted, they are non-adjustable
but have a lower storage position.
•Adjustable head restraints have multiple notches
along the stalk to lock them in a desired adjust-
ment position.
•The non-adjustable head restraints have a single
locking notch to secure them to the seat frame.
•Proper Adjustment:
– For the adjustable type, align the head re-
straint so the centre of your ear is approxi-
mately level with the centre of the head re-
straint.– If your ear position is still higher than the rec-
ommended alignment, place the head
restraint at the highest position.
– For the non-adjustable type, raise into lock-
ing position before use. The seat should not
be occupied with the head restraint in the
lower storage position.
•If the head restraint has been removed, ensure
that it is reinstalled and locked in place before
riding in that designated seating position.
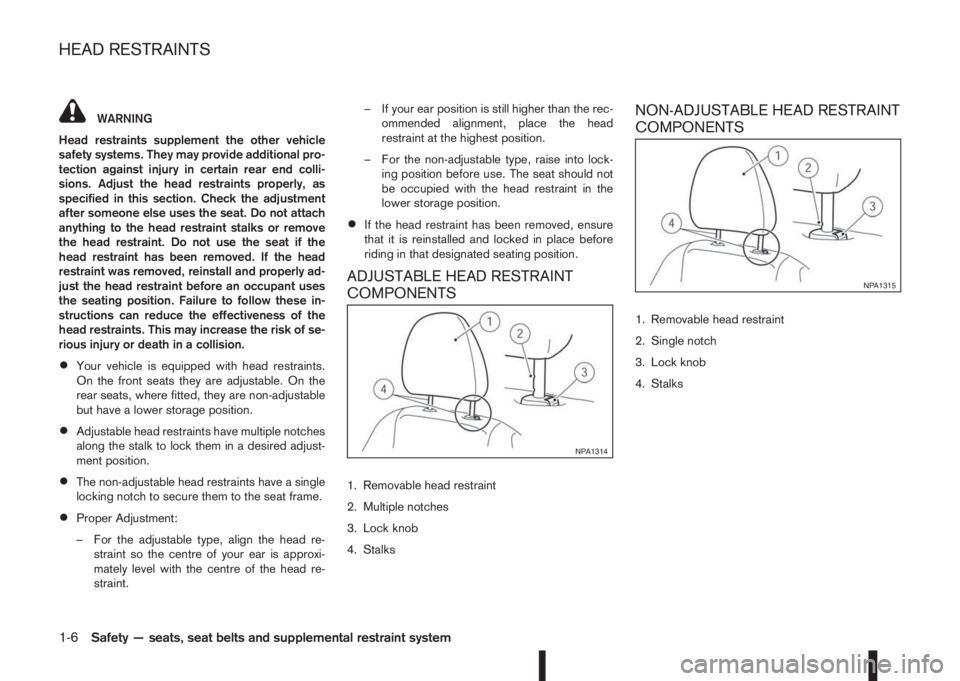
ADJUSTABLE HEAD RESTRAINT
COMPONENTS
1. Removable head restraint
2. Multiple notches
3. Lock knob
4. Stalks
NON-ADJUSTABLE HEAD RESTRAINT
COMPONENTS
1. Removable head restraint
2. Single notch
3. Lock knob
4. Stalks
NPA1314
NPA1315
HEAD RESTRAINTS
1-6Safety — seats, seat belts and supplemental restraint system
Page 27 of 338

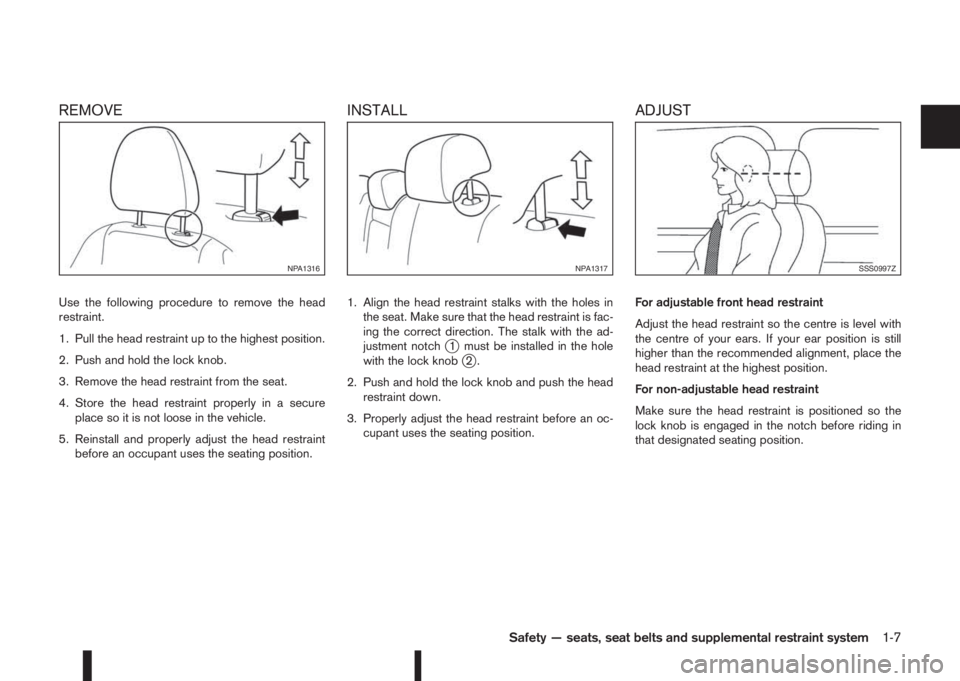
REMOVE
Use the following procedure to remove the head
restraint.
1. Pull the head restraint up to the highest position.
2. Push and hold the lock knob.
3. Remove the head restraint from the seat.
4. Store the head restraint properly in a secure
place so it is not loose in the vehicle.
5. Reinstall and properly adjust the head restraint
before an occupant uses the seating position.
INSTALL
1. Align the head restraint stalks with the holes in
the seat. Make sure that the head restraint is fac-
ing the correct direction. The stalk with the ad-
justment notch
j1 must be installed in the hole
with the lock knobj2.
2. Push and hold the lock knob and push the head
restraint down.
3. Properly adjust the head restraint before an oc-
cupant uses the seating position.
ADJUST
For adjustable front head restraint
Adjust the head restraint so the centre is level with
the centre of your ears. If your ear position is still
higher than the recommended alignment, place the
head restraint at the highest position.
For non-adjustable head restraint
Make sure the head restraint is positioned so the
lock knob is engaged in the notch before riding in
that designated seating position.
NPA1316NPA1317SSS0997Z
Safety — seats, seat belts and supplemental restraint system1-7