2014 NISSAN PATHFINDER HYBRID alarm
[x] Cancel search: alarmPage 10 of 32

8
PANIc ALARM
The Intelligent key can also be used to activate the
panic alarm by pressing and holding the
button
06 for more than 1 second. Once activated, the
panic alarm and headlights will stay on for a period
of time.
INT
e
LLI
G
eNT
ke Y BATT e
R
Y DIS
cHAR
G
e
If the battery of the Intelligent key is disc harged, or environmental conditions interfere with
the Intelligent k
ey operation, st
art the engine according to the following procedure:
1.
Move the shift lever to the
P (PARK) position.
2.
Firmly apply the foot brake.
3.
T
ouch the ignition switch with the Intelligent k
ey and a c
hime will sound.
4.
W
ithin 10 seconds after the chime sounds, push the ignition switch while depressing the
brake pedal and the engine will start.
*Laws in some communities may restrict the use of remote starters. check local regulations before using this feature.
F or more information, refer to the “Pre-driving checks and adjustments (section 3)”, the “Starting and driving
(section 5)” and the “Maintenance and do-it-yourself (section 8)” of your Owner’s Manual.
PoWER liFT GATE (if so equipped)
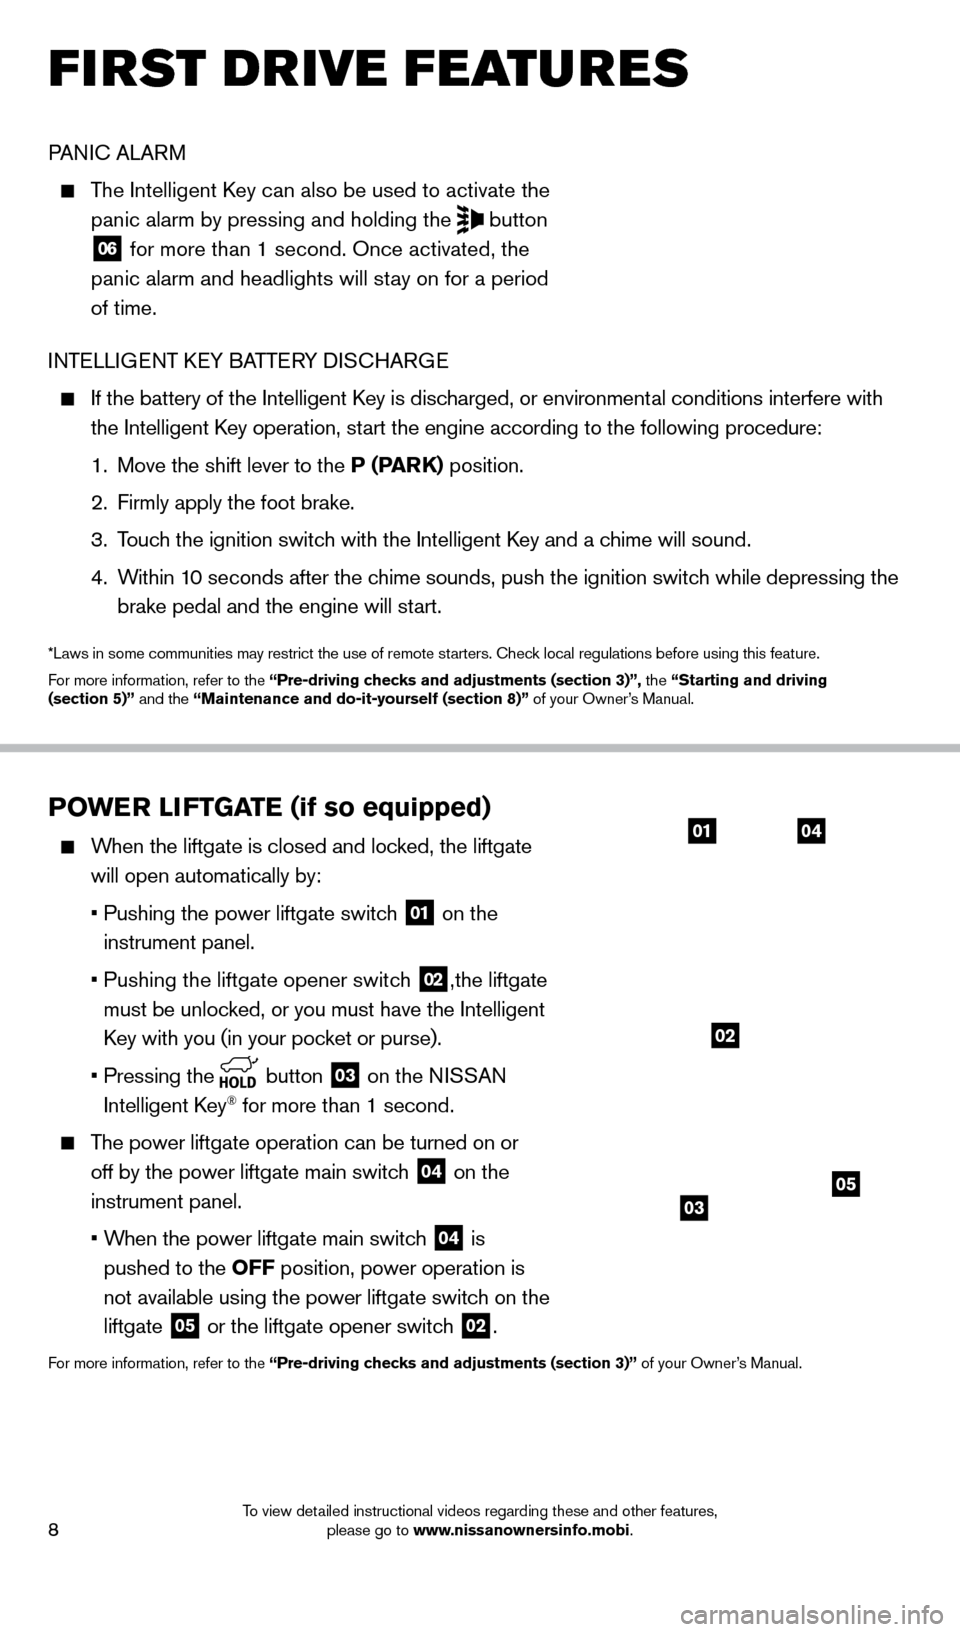
When the liftgate is closed and locked, the liftgate
will open automatically by:
•
Pushing the power liftgate switc
h
01 on the
instrument panel.
•
Pushing the liftgate opener switc
h
02,the liftgate
must be unlocked, or you must have the Intelligent
key with you (in your poc
ket or purse).
•
Pressing the button 03 on the NISSAN
Intelligent
k
ey® for more than 1 second.
The power liftgate operation can be turned on or off by the power liftgate main switch
04 on the
instrument panel.
•
W
hen the power liftgate main switch
04 is
pushed to the
o
FF position, power operation is
not available using the power liftgate switch on the
liftgate
05 or the liftgate opener switch 02.
For more information, refer to the “Pre-driving checks and adjustments (section 3)” of your Owner’s Manual.
0104
0503
02
first drive features
1562941_14b_Pathfinder_HEV_QRG_091913.indd 89/19/13 11:11 AM
To view detailed instructional videos regarding these and other features, please go to www.nissanownersinfo.mobi.
Page 21 of 32

19
vEHiCl E iN Fo RMAT io N DiS P l AY
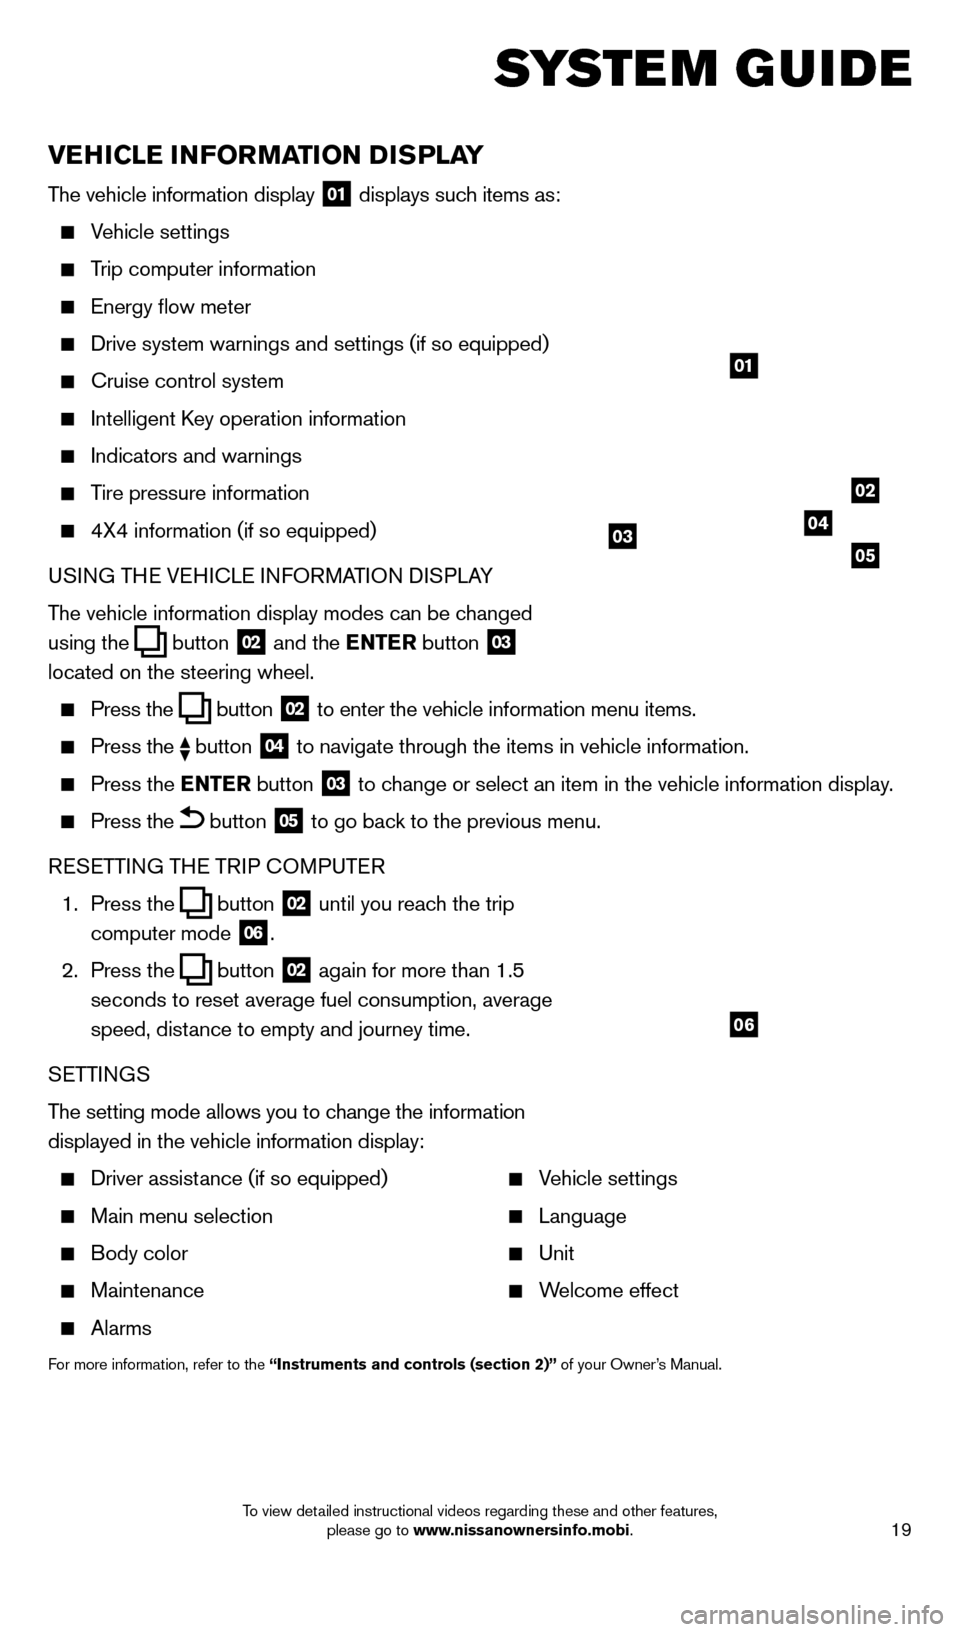
The vehicle information display 01 displays such items as:
Vehicle settings
Trip computer information
energy flow meter
Drive system warnings and settings (if so equipped)
cruise control system
Intelligent key operation information
Indicators and warnings
Tire pressure information
4X4 information (if so equipped)
USI NG TH
e VeH
I c L
e I
NFORMATION DISPLAY
The vehicle information display modes can be changed
using the
button 02 and the ENTER button 03
located on the steering wheel.
Press the button 02 to enter the vehicle information menu items.
Press
the button 04 to navigate through the items in vehicle information.
Press the
E NTER button 03 to change or select an item in the vehicle information display.
Press the button 05 to go back to the previous menu.
R
eSe
TTING TH
e
TRIP
c
O
MPUT e
R
1.
Press the
button 02 until you reach the trip
computer mode 06.
2.
Press the
button 02 again for more than 1.5
seconds to reset average fuel consumption, average
speed, distance to empty and journey time.
S
e
TTINGS
The setting mode allows you to change the information
displayed in the vehicle information display:
Driver assist ance (if so equipped)
Main menu selection
Body color
Maintenance
Alarms
Vehicle settings
Language
Unit
Welcome effect
For more information, refer to the “instruments and controls (section 2)” of your Owner’s Manual.
system guide
01
02
040305
06
1562941_14b_Pathfinder_HEV_QRG_091913.indd 199/19/13 11:12 AM
To view detailed instructional videos regarding these and other features, please go to www.nissanownersinfo.mobi.
Page 28 of 32

26
HoMEli NK® UNiv ERSA l TRANSCEiv ER (if so equipped)
The HomeLink system can learn and consolidate the
functions of up to 3 different hand-held transmitters,
operating items such as garage doors, property gates,
outdoor and indoor lights or alarm systems.
To program the HomeLink Universal Transceiver:
•
P
osition the handheld transceiver 1-3 in
(26-76 mm) away from the HomeLink surface,
keeping the HomeLink indicator light in view.
•
Press and hold the desired HomeLink button and the handheld tra
nsmitter button
simultaneously until the HomeLink indicator light flashes slowly and then ra\
pidly.
•
B
oth buttons may be released when the indicator light flashes rapidly.
To verify the programing is complete, press and hold the HomeLink and obs\
erve the
indicator light:
•
A solid continuous light indicates the programing is complete a
nd the HomeLink button
will activate your device.
•
A blinking light that turns to a solid continuous light after 2
seconds indicates additional
steps are required to complete the programing.
An additional person may make the remaining steps easier . To complete the
programing process:
•
At the receiver of the device that you are programing to the Ho
meLink, press and release
the “learn” or “smart” button (the name may vary by manufac\
turer but it is usually located
near where the hanging antenna wire is attached to the unit). You have approximately
30 seconds to initiate the following step.
•
Press and hold the programmed HomeLink button for 2 seconds and
release.
Repeat the previous 2 steps up to 3 times to complete the programming pr\
ocess. HomeLink
should now activate your device.
For more information, refer to the “Instruments and controls (section 2)” of your Owner’s Manual, the HomeLink website at
www.homelink.com or call 1-800-355-3515.
HoME li NK
05
For optimum performance, select the appropriate headphone channel
05 that corresponds to the headrest display being viewed directly in
front of you.
To watch or control videos on the front display make sure the vehicle is in the P (PARK) position and the parking brake is applied.
To reduce driver distraction, the wireless headphones will not operate while located in the front seats and movies will not be
shown on the front display while the vehicle is in any drive position.
To access standard DVD controls on the front display while playing a DVD on the rear display, press the DISC•AUX button on the audio control panel while the
vehicle is in the P (Park) position and the parking brake is applied.
For more information, refer to the “Monitor, climate, audio, phone and voice recognition systems (section 4)” of your
Owner’s Manual.
system guide
1562941_14b_Pathfinder_HEV_QRG_091913.indd 269/19/13 11:12 AM
To view detailed instructional videos regarding these and other features, please go to www.nissanownersinfo.mobi.