2014 NISSAN MURANO ESP
[x] Cancel search: ESPPage 8 of 28

6
NISSAN INTELLIGENT KEY® SYSTE M
The NISSAN Intelligent Key® system allows you to lock
or unlock your vehicle, open your trunk lid and start the
engine. It is important to make sure the Intelligent Key is
with you (that is, in your pocket or purse).
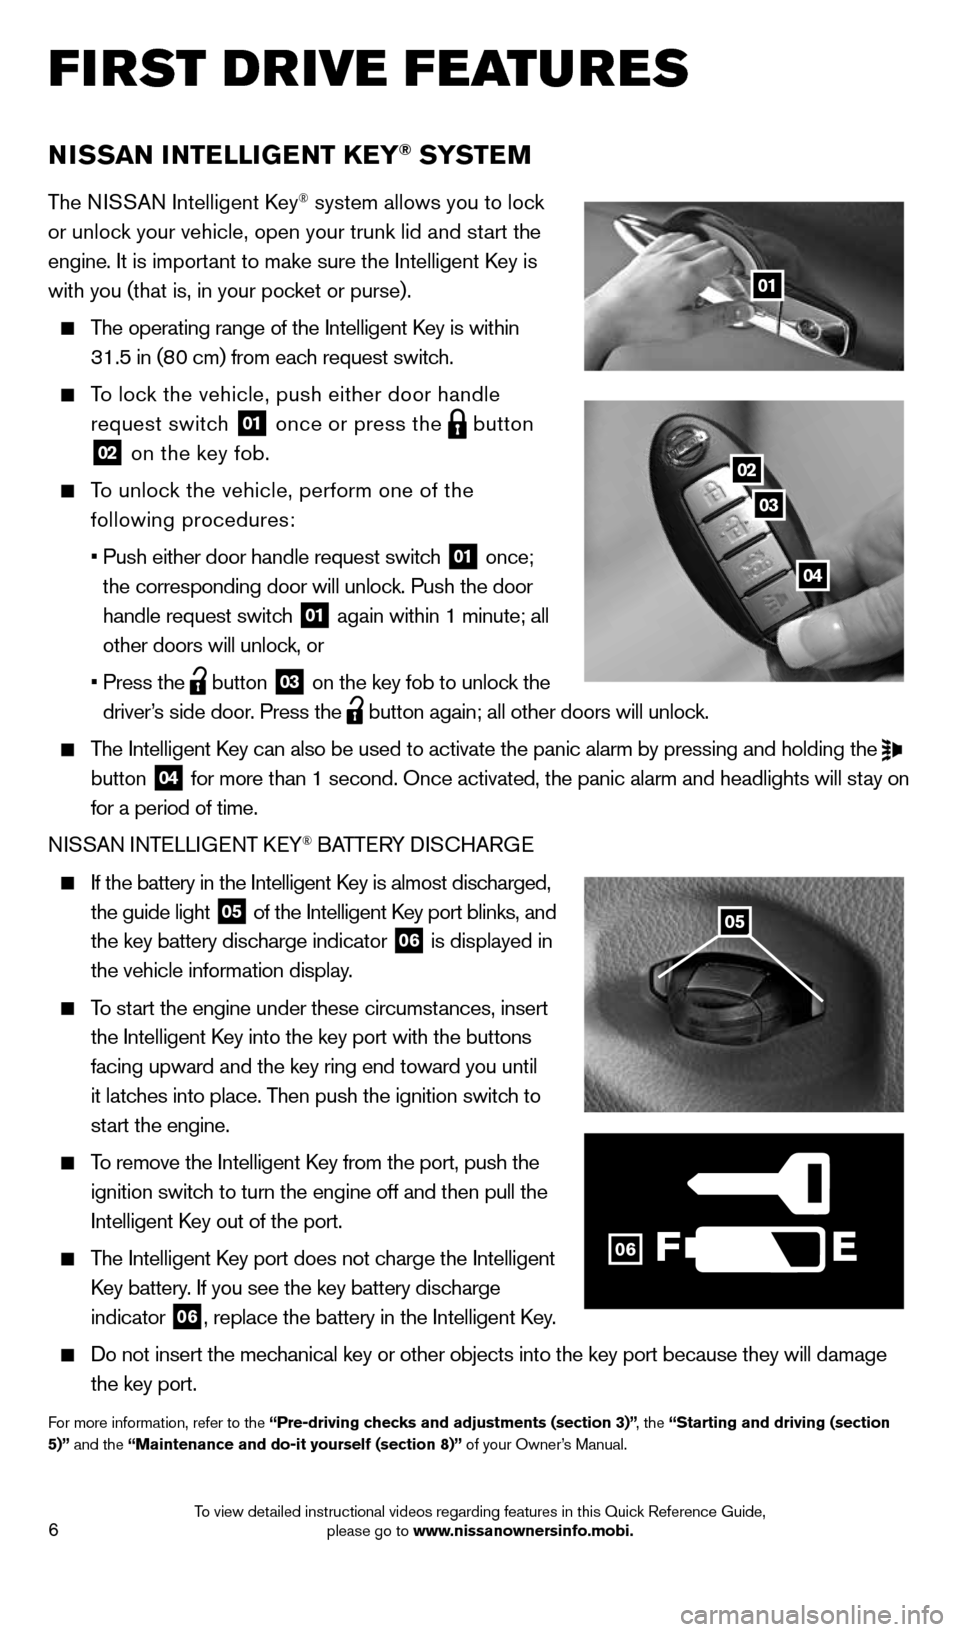
The operating range of the Intelligent Key is within
31.5 in (80 cm) from each request switch.
To lock the vehicle, push either door handle
request switch
01 once or press the
button
02 on the key fob.
To unlock the vehicle, perform one of the
following procedures:
• Push either door handle request switch
01 once;
the corresponding door will unlock. Push the door
handle request switch
01 again within 1 minute; all
other doors will unlock, or
• Press the
button 03 on the key fob to unlock the
driver’s side door. Press the button again; all other doors will unlock.
The Intelligent Key can also be used to activate the panic alarm by pressing and holding \
the
button 04 for more than 1 second. Once activated, the panic alarm and headlights w\
ill stay on
for a period of time.
NISSAN INTELLIGENT KEY
® BATTERY DISCHARGE
If the battery in the Intelligent Key is almost discharged,
the guide light
05 of the Intelligent Key port blinks, and
the key battery discharge indicator 06 is displayed in
the vehicle information display.
To start the engine under these circumstances, insert
the Intelligent Key into the key port with the buttons
facing upward and the key ring end toward you until
it latches into place. Then push the ignition switch to
start the engine.
To remove the Intelligent Key from the port, push the
ignition switch to turn the engine off and then pull the
Intelligent Key out of the port.
The Intelligent Key port does not charge the Intelligent
Key battery. If you see the key battery discharge
indicator
06, replace the battery in the Intelligent Key.
Do not insert the mechanical key or other objects into the key port because they will damage
the key port.
For more information, refer to the “Pre-driving checks and adjustments (section 3)” , the “Starting and driving (section
5)” and the “Maintenance and do-it yourself (section 8)” of your Owner’s Manual.
FIRST DRIVE FEATURES
F
02
03
04
01
06
05
1591421_14d_Murano_QRG_012714b.indd 61/27/14 3:11 PM
To view detailed instructional videos regarding features in this Quick Reference Guide, please go to www.nissanownersinfo.mobi.
Page 12 of 28

10
FIRST DRIVE FEATURES
REAR SEAT ADJUSTMENTS (Hardtop models)
FOLDING DOWN THE REAR SEAT
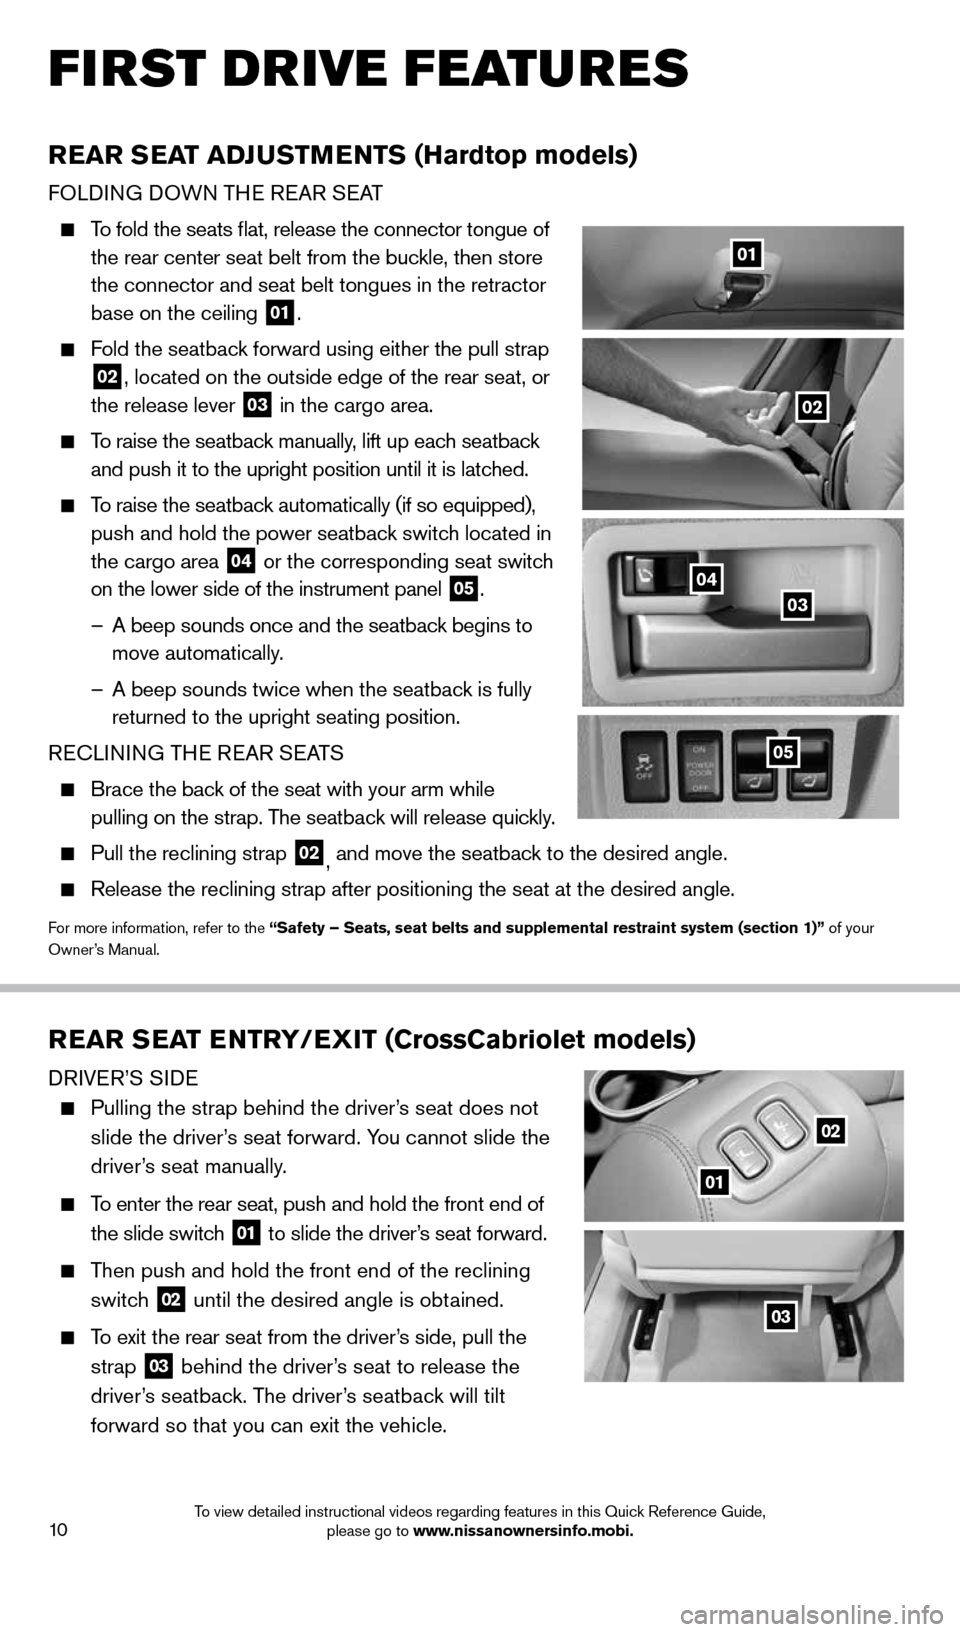
To fold the seats flat, release the connector tongue of
the rear center seat belt from the buckle, then store
the connector and seat belt tongues in the retractor
base on the ceiling
01.
Fold the seatback forward using either the pull strap
02, located on the outside edge of the rear seat, or
the release lever
03 in the cargo area.
To raise the seatback manually, lift up each seatback
and push it to the upright position until it is latched.
To raise the seatback automatically (if so equipped),
push and hold the power seatback switch
located in
the cargo area
04 or the corresponding seat switch
on the lower side of the instrument panel 05.
– A beep sounds once and the seatback begins to
move automatically.
– A beep sounds twice when the seatback is fully
returned to the upright seating position.
RECLINING THE REAR SEATS
Brace the back of the seat with your arm while
pulling on the strap. The seatback will release quickly.
Pull the reclining strap 02, and move the seatback to the desired angle.
Release the reclining strap after positioning the seat at the desired an\
gle.
For more information, refer to the “Safety – Seats, seat belts and supplemental restraint system (se\
ction 1)” of your
Owner’s Manual.
04
02
01
03
05
REAR SEAT ENTRY/EXIT (CrossCabriolet models)
DRIVER’S SIDE
Pulling the strap behind the driver’s seat does not
slide the driver’s seat forward. You cannot slide the
driver’s seat manually.
To enter the rear seat, push and hold the front end of
the slide switch
01 to slide the driver’s seat forward.
Then push and hold the front end of the reclining
switch
02 until the desired angle is obtained.
To exit the rear seat from the driver’s side, pull the
strap
03 behind the driver’s seat to release the
driver’s seatback. The driver’s seatback will tilt
forward so that you can exit the vehicle.
01
02
03
1591421_14d_Murano_QRG_012714b.indd 101/27/14 3:11 PM
To view detailed instructional videos regarding features in this Quick Reference Guide, please go to www.nissanownersinfo.mobi.
Page 18 of 28

16
FIRST DRIVE FEATURES
03
0506
02
01
FM/AM/SiriusXM®* SATELLITE RADIO WITH CD/DVD PLAYER
(if so equipped)
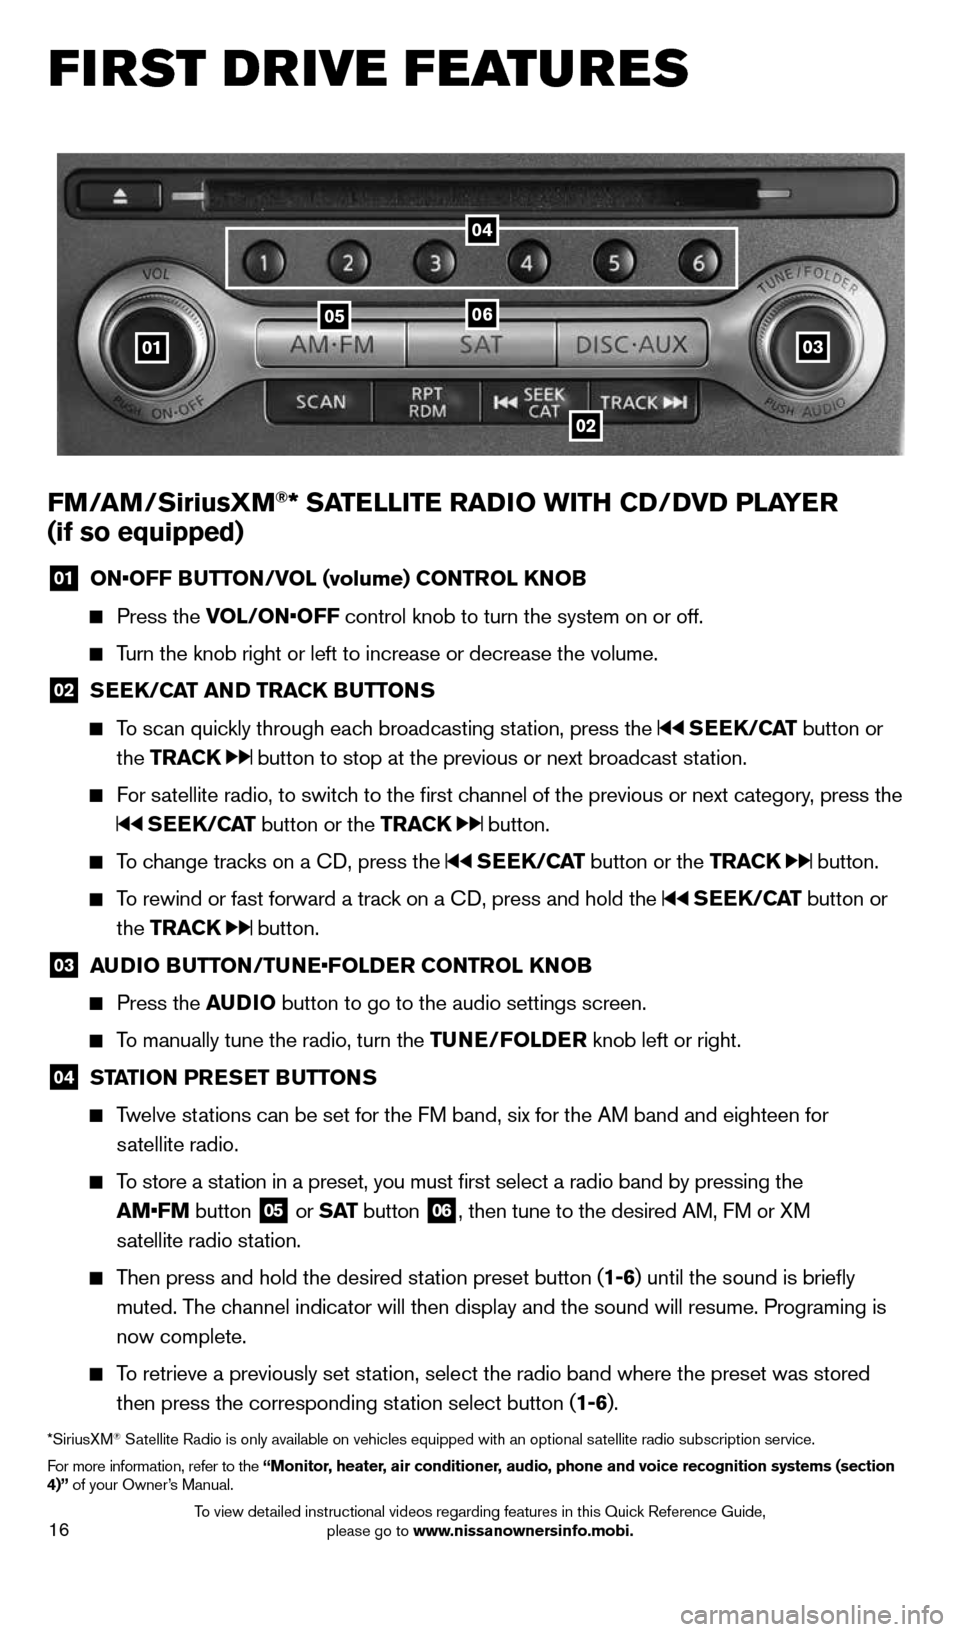
01 ON•OFF BUTTON/VOL (volume) CONTROL KNOB
Press the VOL/ON•OFF control knob to turn the system on or off.
Turn the knob right or left to increase or decrease the volume.
02 SEEK/CAT AND TRACK BUTTONS
To scan quickly through each broadcasting station, press the SEEK/CAT button or
the TRACK
button to stop at the previous or next broadcast station.
For satellite radio, to switch to the first channel of the previous or next category, press the
SEEK/CAT button or the TRACK button.
To change tracks on a CD, press the SEEK/CAT button or the TRACK button.
To rewind or fast forward a track on a CD, press and hold the SEEK/CAT button or
the TRACK
button.
03 AUDIO BUTTON/TUNE•FOLDER CONTROL KNOB
Press the AUDIO button to go to the audio settings screen.
To manually tune the radio, turn the TUNE/FOLDER knob left or right.
04 STATION PRESET BUTTONS
Twelve stations can be set for the FM band, six for the AM band and eighteen for
satellite radio.
To store a station in a preset, you must first select a radio band by pressing the
AM•FM button
05 or
S AT button
06, then tune to the desired AM, FM or XM
satellite radio station.
Then press and hold the desired station preset button (1-6) until the sound is briefly
muted. The channel indicator will then display and the sound will resume. Programing\
is
now complete.
To retrieve a previously set station, select the radio band where the preset was stored
then press the corresponding station select button (1-6).
*SiriusXM® Satellite Radio is only available on vehicles equipped with an optional s\
atellite radio subscription service.
For more information, refer to the “Monitor, heater, air conditioner, audio, phone and voice recognition systems (section
4)” of your Owner’s Manual.
04
1591421_14d_Murano_QRG_012714b.indd 161/27/14 3:11 PM
To view detailed instructional videos regarding features in this Quick Reference Guide, please go to www.nissanownersinfo.mobi.