Page 182 of 432

Menu ItemResult
Select Language Changes the language of the menus on the display screen. If you select the “Francais” key, French language screens will be displayed, s o
please use the French Owner’s Manual. To obtain a French Owner’s Manual, please see “Owner’s Manual/Service Manual Order Informa-
tion” in the “Technical and consumer information” section.
Select Units Changes the units used to “US” (mi, °F, MPG) or “Metric” (km, °C, L/100km) .
Voice Recognition See “NISSAN Voice Recognition system” in this section.
Camera Settings Selecting the Camera key will bring up the Camera settings screen.
Image Viewer See “Image viewer” in this section.
Navi-
gation See the separate Navigation System Owner’s Manual for more information.
Audio See “Audio system” in this section for more information.
Phone See “Bluetooth® Hands-Free Phone System with Navigation System” in this section.
Bluetooth® See “Bluetooth® Hands-Free Phone System with Navigation System” in this section.
Volume & Beeps Adjusts the volume and beep settings.
Navigation volume See the separate Navigation System Owner’s Manual for more information.
Phone Volume See “Bluetooth® Hands-Free Phone System with Navigation System” in this section.
Switch Beeps Toggles on or off the beep sound that is heard when a control panel button is pressed.
OFF BUTTON
To change the display brightness, press
the
OFF button. Pressing the button again
will change the display to the day
or the
night
display. The brightness can then be
adjusted using the NISSAN controller.
If no operation is performed within 5 seconds, the
display will return to the previous display. Press and hold the
OFF button for more
than two seconds to turn the display off. Press
the button again to turn the display on.
Monitor, climate, audio, phone and voice recognition systems4-19
Page 183 of 432

USING THE IMAGE VIEWER
When a compatible portable storage device is
plugged into the USB jack located in the center
console, compatible image files stored on the
device can be viewed on the control panel de-
vice.
Connecting the portable storage
device
To connect a portable storage device to the sys-
tem so that images stored on it can be viewed,
insert the device into the USB jack located in the
center console.
Viewing images
To view an image, press the SETTING
button>Others and then select the “Image
Viewer” key with the NISSAN controller. The Im-
age Viewer screen will be displayed.
A list of compatible images on the storage device
is displayed on the left side of the screen, while
the selected image is displayed on the right side
of the screen. To choose a different picture from
the list, use the NISSAN controller to scroll
through the list once the desired image is high-
lighted.Select the “Full Screen Display” key and press
the ENTER button to view a full screen version of
the image.
Image requirements:
● Image type: JPEG
● File extensions: *.jpg, *.jpeg
● Maximum resolution: 2048 x 1536
● Maximum size: 2 MB
● Colors: 32,768 (15-bit)
● Maximum file name length: 253 bytes (dis-
play only shows first 8 characters)
● Maximum folders: 500
● Maximum images per folder: 1024
LHA1309
IMAGE VIEWER (if so equipped)
4-20Monitor, climate, audio, phone and voice recognition systems
Page 184 of 432

Viewing images in a slideshow
To view all of the images on the device in a
slideshow, first enter the full screen mode while
viewing one of the images. The slideshow control
buttons are located on the right side of the
screen.Select the play key
to begin the slideshow.
The images shown on the screen will periodically
change at a given interval of time. To skip through
the images without waiting for them to change
automatically, select the
key to skip back-
ward or the
key to skip forward. Select the
stop key
to end the slideshow and return
to the full screen display of the image currently on
the screen.
Slideshow settings
While in slideshow mode, the following settings can be accessed:
Settings
Slideshow Speed Changes the frequency at which images are changed during a slideshow. Choose one of the options on the screen or “No Auto Change” to have the images not change automatically.
Slideshow Order Random Changes images in a random order when selected.
Order List Changes images in the order in which they are saved on the USB device.
LHA1310
Monitor, climate, audio, phone and voice recognition systems4-21
Page 185 of 432
 position, the monitor display shows a rear-
ward view from the vehicle.
WARNING
●The system is designed as an aid to the
driver in detecting la")
When the shift lever is shifted into the R (Re-
verse) position, the monitor display shows a rear-
ward view from the vehicle.
WARNING
●The system is designed as an aid to the
driver in detecting large stationary ob-
jects to help avoid damaging the ve-
hicle. The system will not detect small
objects below the bumper and may not
detect objects close to the bumper or
on the ground.
● The rear view camera is a convenience
but it is not a substitute for proper back-
ing up. Always turn and check that it is
safe to do so before backing up. Always
back up slowly.
● Objects viewed in the RearView Moni-
tor differ from actual distance because
a wide-angle lens is used.
● Make sure that the trunk is securely
closed when backing up.
● Underneath the bumper and the corner
areas of the bumper cannot be viewed
on the RearView Monitor because of its
monitoring range limitation. ●
Do not put anything on the rear view
camera. The rear view camera is in-
stalled above the license plate.
● When washing the vehicle with high-
pressure water, be sure not to spray it
around the camera. Otherwise, water
may enter the camera unit causing wa-
ter condensation on the lens, a mal-
function, fire or an electric shock.
● Do not strike the camera. It is a preci-
sion instrument. Otherwise, it may mal-
function or cause damage resulting in a
fire or an electric shock.
CAUTION
Do not scratch the camera lens when
cleaning dirt or snow from the lens.
HOW TO READ THE DISPLAYED
LINES
Guiding lines which indicate the vehicle width
and distances to objects with reference to the
vehicle body line
�Aare displayed on the monitor.
Distance guide lines:
Indicate distances from the vehicle body. ● Red line
�1: approx. 1.5 ft (0.5 m)
● Yellow line
�2: approx. 3 ft (1 m)
● Green line
�3: approx. 7 ft (2 m)
● Green line
�4: approx. 10 ft (3 m)
LHA1196
REARVIEW MONITOR (if so
equipped)
4-22Monitor, climate, audio, phone and voice recognition systems
Page 186 of 432

Vehicle width guide lines�5:
Indicate the vehicle width when backing up.
Predicted course lines
�6:
Indicate the predicted course when backing up.
The predicted course lines will be displayed on
the monitor when the shift selector is in the R
(Reverse) position and the steering wheel is
turned. The predicted course lines will move de-
pending on how much the steering wheel is
turned and will not be displayed while the steer-
ing wheel is in the neutral position.
The vehicle width guide lines and the width of the
predicted course lines are wider than the actual
width and course.
HOW TO PARK WITH PREDICTED
COURSE LINES
WARNING
● Always turn and check that it is safe to
do so before backing up. Always back
up slowly.
● Use the displayed lines as a reference.
The lines are highly affected by the
number of occupants, fuel level, vehicle
position, road conditions and road
grade. ●
If the tires are replaced with different
sized tires, the predicted course lines
may be displayed incorrectly.
● On a snow-covered or slippery road,
there may be a difference between the
predicted course line and the actual
course line.
● If the battery is disconnected or be-
comes discharged, the predicted course
lines may be displayed incorrectly. If
this occurs, please perform the follow-
ing procedures:
– Turn the steering wheel from lock to lock while the engine is running.
– Drive the vehicle on a straight road for more than 5 minutes.
● When the steering wheel is turned with
the ignition switch in the ACC position,
the predicted course lines may be dis-
played incorrectly. ●
The distance guide line and the vehicle
width line should be used as a reference
only when the vehicle is on a level
paved surface. The distance viewed on
the monitor is for reference only and
may be different than the actual dis-
tance between the vehicle and dis-
played objects.
● When backing up the vehicle up a hill,
objects viewed in the monitor are fur-
ther than they appear. When backing up
the vehicle down a hill, objects viewed
in the monitor are closer than they ap-
pear. Use the inside mirror or glance
over your shoulder to properly judge
distances to other objects.
The vehicle width and predicted course
lines are wider than the actual width and
course.
Monitor, climate, audio, phone and voice recognition systems4-23
Page 187 of 432
 position. 3.")
1. Visually check that the parking space is safebefore parking your vehicle.
2. The rear view of the vehicle is displayed on the screen
�Awhen the shift lever is moved
to the R (Reverse) position. 3. Slowly back up the vehicle adjusting the
steering wheel so that the predicted course
lines
�Benter the parking space�C. 4. Maneuver the steering wheel to make the
vehicle width guide lines
�Dparallel to the
parking space
�Cwhile referring to the pre-
dicted course lines.
5. When the vehicle is parked in the space completely, move the shift lever to the P
(Park) position and apply the parking brake.
DIFFERENCE BETWEEN
PREDICTED AND ACTUAL
DISTANCES
The distance guide line and the vehicle width
guide line should be used as a reference only
when the vehicle is on a level, paved surface. The
distance viewed on the monitor is for reference
only and may be different than the actual distance
between the vehicle and displayed objects.
LHA1197LHA1198
4-24Monitor, climate, audio, phone and voice recognition systems
Page 188 of 432
Backing up on a steep uphill
When backing up the vehicle up a hill, the dis-
tance guide lines and the vehicle width guide
lines are shown closer than the actual distance.
For example, the display shows 3 ft (1.0 m) to the
place
�A, but the actual 3 ft (1.0 m) distance onthe hill is the place
�B. Note that any object on
the hill is further than it appears on the monitor.
Backing up on a steep downhill
When backing up the vehicle down a hill, the
distance guide lines and the vehicle width guide
lines are shown farther than the actual distance.
For example, the display shows 3 ft (1.0 m) to the
place
�A, but the actual 3 ft (1.0 m) distance on
WHA1504WHA1505
Monitor, climate, audio, phone and voice recognition systems4-25
Page 189 of 432
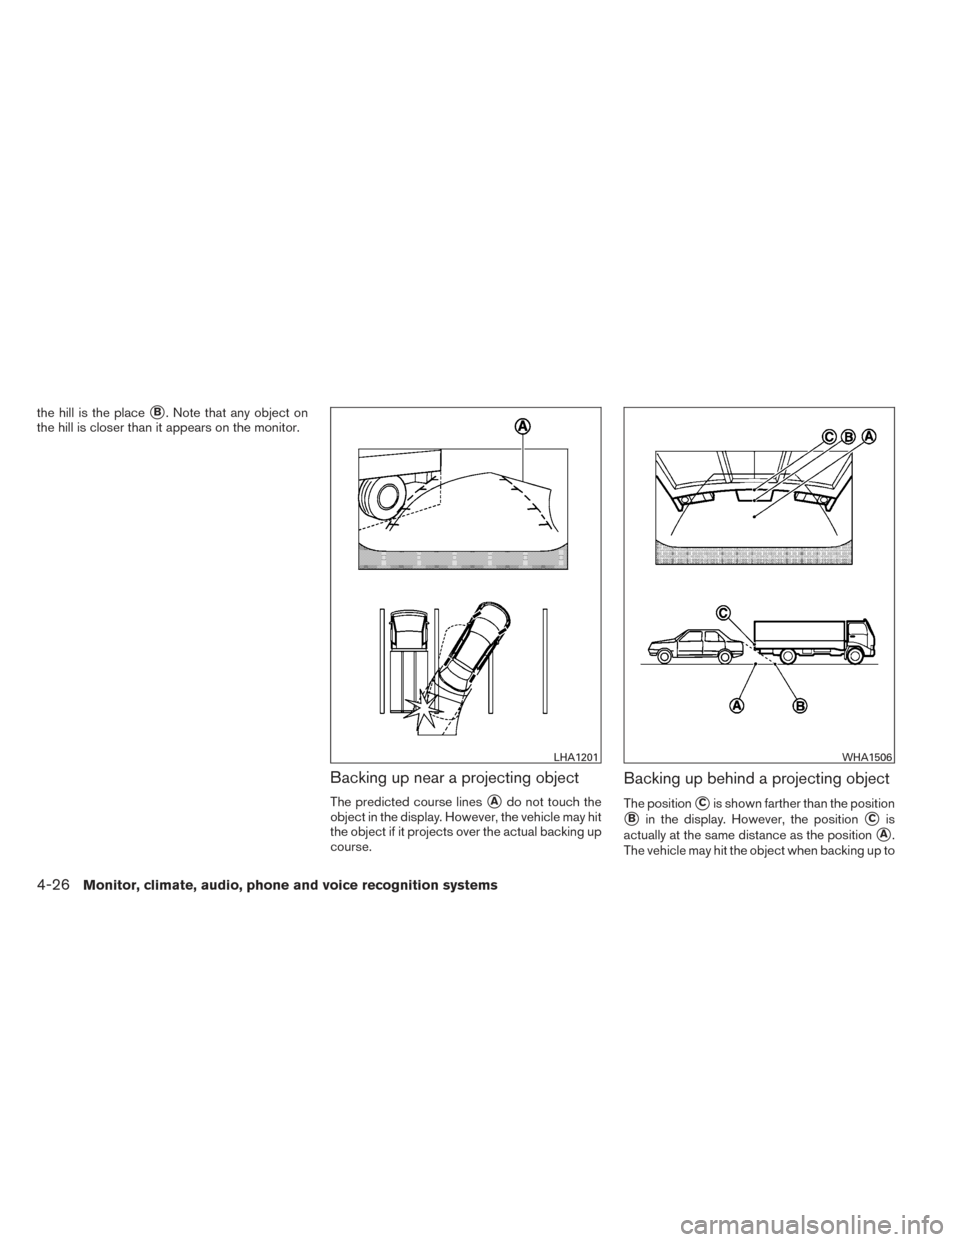
the hill is the place�B. Note that any object on
the hill is closer than it appears on the monitor.
Backing up near a projecting object
The predicted course lines�Ado not touch the
object in the display. However, the vehicle may hit
the object if it projects over the actual backing up
course.
Backing up behind a projecting object
The position�Cis shown farther than the position
�Bin the display. However, the position�Cis
actually at the same distance as the position
�A.
The vehicle may hit the object when backing up to
LHA1201WHA1506
4-26Monitor, climate, audio, phone and voice recognition systems