2014 NISSAN LEAF steering
[x] Cancel search: steeringPage 2 of 27
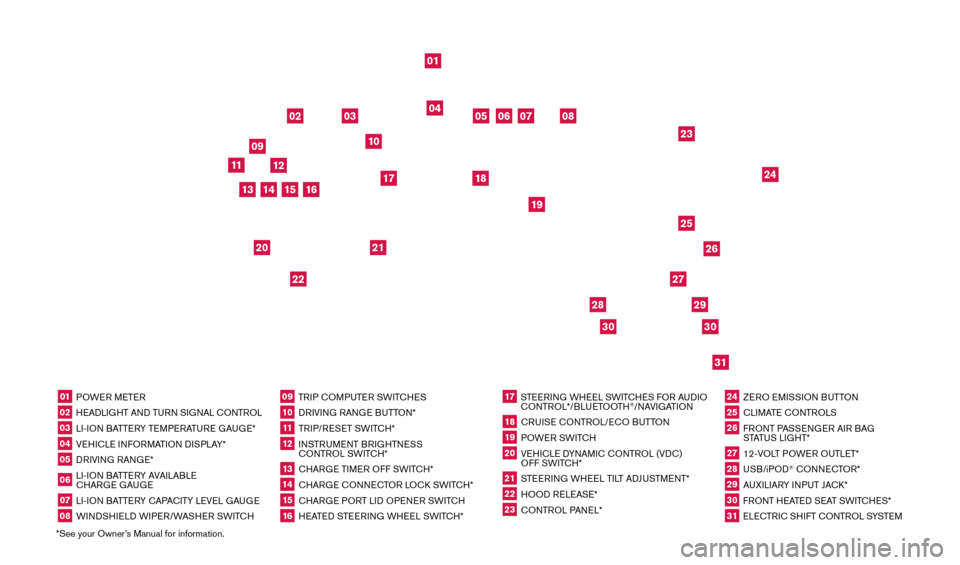
*See your Owner’s Manual for information.01 POWER METER02 HEADLIGHT AND TURN SIGNAL CONTROL03 LI-ION BATTERY TEMPERATURE GAUGE*04 VEHICLE INFORMATION DISPLAY*05 DRIVING RANGE*06 LI-ION BATTERY AVAILABLE
CHARGE GAUGE07 LI-ION BATTERY CAPACITY LEVEL GAUGE08 WINDSHIELD WIPER/WASHER SWITCH
09 TRIP COMPUTER SWITCHES10 DRIVING RANGE BUTTON*11 TRIP/RESET SWITCH*12 INSTRUMENT BRIGHTNESS
CONTROL SWITCH*13 CHARGE TIMER OFF SWITCH*14 CHARGE CONNECTOR LOCK SWITCH*15 CHARGE PORT LID OPENER SWITCH16 HEATED STEERING WHEEL SWITCH*
17 STEERING WHEEL SWITCHES FOR AUDIO CONTROL*/BLUETOOTH
®/NAVIGATION
18 CRUISE CONTROL/ECO BUTTON19 POWER SWITCH20 VEHICLE DYNAMIC CONTROL (VDC) OFF SWITCH*21 STEERING WHEEL TILT ADJUSTMENT*22 HOOD RELEASE*23 CONTROL PANEL*
24 ZERO EMISSION BUTTON25 CLIMATE CONTROLS26 FRONT PASSENGER AIR BAG STATUS LIGHT*27 12-VOLT POWER OUTLET*28 USB/iPOD
® CONNECTOR*
29 AUXILIARY INPUT JACK*30 FRONT HEATED SEAT SWITCHES*31 ELECTRIC SHIFT CONTROL SYSTEM
01
03
04
02
05
13
15
10
11
06
07
23
2629
27
3031
24
25
22
09
12
08
20
21
14
16
19
17
18
2830
1700496_14b_Leaf_QRG_021114.indd 32/11/14 3:47 PM
Page 6 of 27
4
NEW SYSTEM FEATURES
SHIFT CONTROL SYSTEM
This vehicle is equipped with an electric shift control
system, providing smooth and easy shift lever operation.
There are five shift positions for operating the vehicle: P (PARK) , R (REVERSE) , N (NEUTRAL),
D (DRIVE) and B-Mode.
•
P (P
ARK) – Activated by pressing the P (PARK)
button on the shift lever when the car has come to
a complete stop.
•
D (D
RIVE) – For normal driving. Activated by moving the shift lever left and down. The
shift lever will then return to the center position.
•
B-Mode
– Engages the regenerative braking system more aggressively when
decelerating, helping to put energy back into the battery pack. To enter B-MODE the
vehicle must be in D (DRIVE) and then move the shift lever to the D (DRIVE) position
again. The shift lever will then return to the center position.
ECO – Consumes less power and helps extend vehicle range.
•
W
hile in either D (DRIVE) or B-MODE, ECO can be activated by pressing the ECO
button on the right side of the steering wheel.
•
W
hile in ECO, there will be a reduced acceleration response.
For more information, refer to the “EV overview (section EV)” and the “Starting and driving (section 5)” of your
Owner’s Manual.
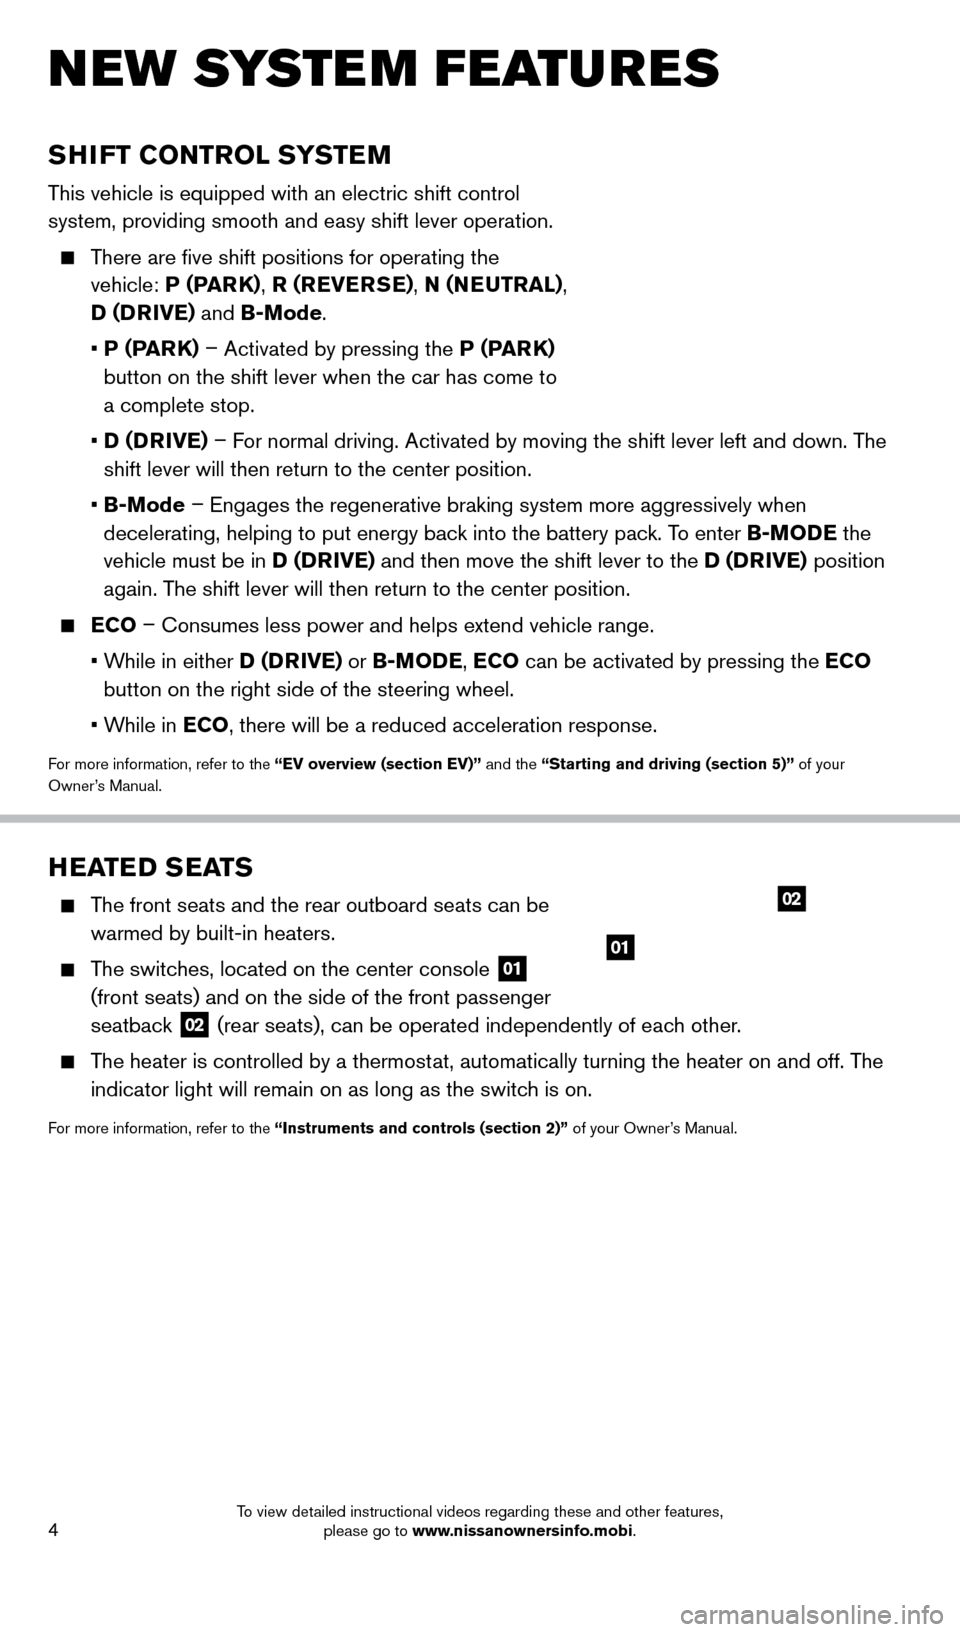
HEATED SEATS
The front seats and the rear outboard seats can be warmed by built-in heaters.
The switches, located on the center console 01
(front seats) and on the side of the front passenger
seatback
02 (rear seats), can be operated independently of each other.
The heater is controlled by a thermostat, automatically turning the heater on and off. The
indicator light will remain on as long as the switch is on.
For more information, refer to the “Instruments and controls (section 2)” of your Owner’s Manual.
01
02
1700496_14b_Leaf_QRG_021114.indd 42/11/14 3:48 PM
To view detailed instructional videos regarding these and other features, please go to www.nissanownersinfo.mobi.
Page 10 of 27
8
LI-ION BATTERY CHARGING
Before charging the Li-ion battery, see your Owner’s Manual for detailed warnings and cautions
when charging your battery.
There are three methods available to perform the charge operation: normal charge, trickle
charge and quick charge (if so equipped).
NORMAL CHARGE
Perform a normal charge using the charger installed
in your home.
It takes approximately 3-4 hours to charge the Li-ion
battery from empty to full with a 6.6 kW
charger (if so equipped).
To charge your vehicle:
• Place the power switc
h in the OFF position.
• Push the c
harge port lid opener switch located below the instrument panel to the left of
the steering wheel.
• Press the c
harge port tab and open the cap.
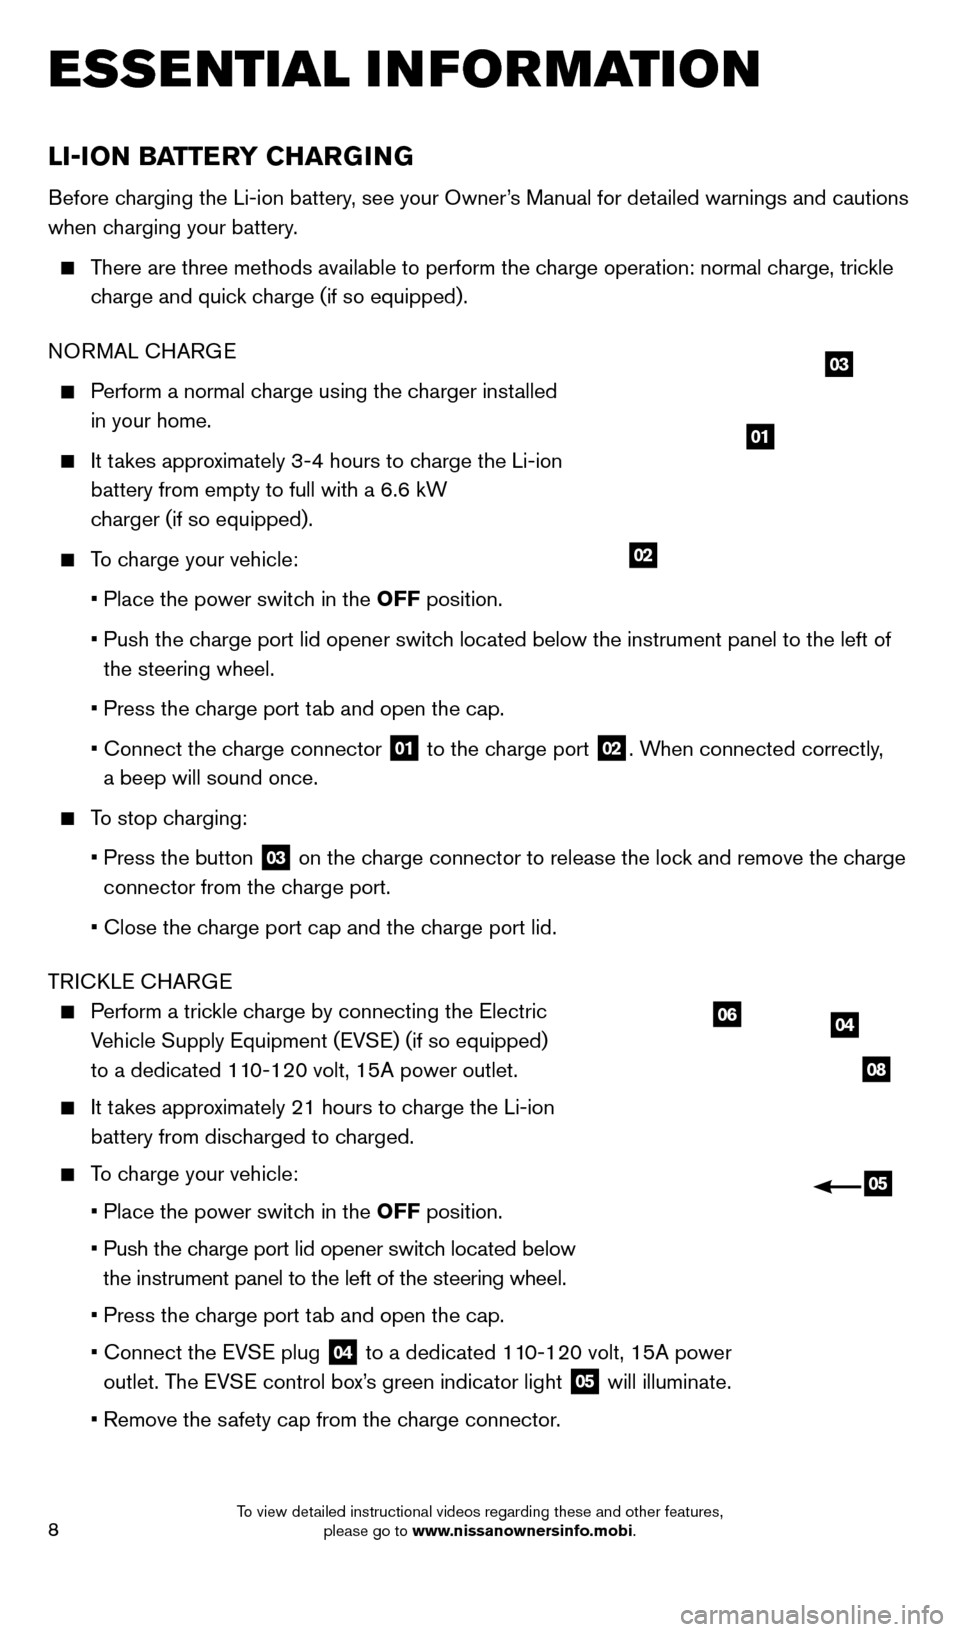
• Connect the c
harge connector
01 to the charge port
02. When connected correctly,
a beep will sound once.
To stop charging:
• Press the button
03 on the charge connector to release the lock and remove the charge
connector from the charge port.
• Close the c
harge port cap and the charge port lid.
TRICKLE CHARGE
Perform a trickle charge by connecting the Electric Vehicle Supply Equipment (EVSE) (if so equipped)
to a dedicated 110-120 volt, 15A power outlet.
It takes approximately 21 hours to charge the Li-ion battery from discharged to charged.
To charge your vehicle:
•
Place the power switc
h in the OFF position.
•
Push the c
harge port lid opener switch located below
the instrument panel to the left of the steering wheel.
•
Press the c
harge port tab and open the cap.
•
Connect the EV
SE plug
04 to a dedicated 110-120 volt, 15A power
outlet. The EVSE control box’s green indicator light 05 will illuminate.
•
Remove the s
afety cap from the charge connector.
04
08
06
05
01
02
03
ESSE NTIAL I N FOR MATION
1700496_14b_Leaf_QRG_021114.indd 82/11/14 3:48 PM
To view detailed instructional videos regarding these and other features, please go to www.nissanownersinfo.mobi.
Page 11 of 27
9
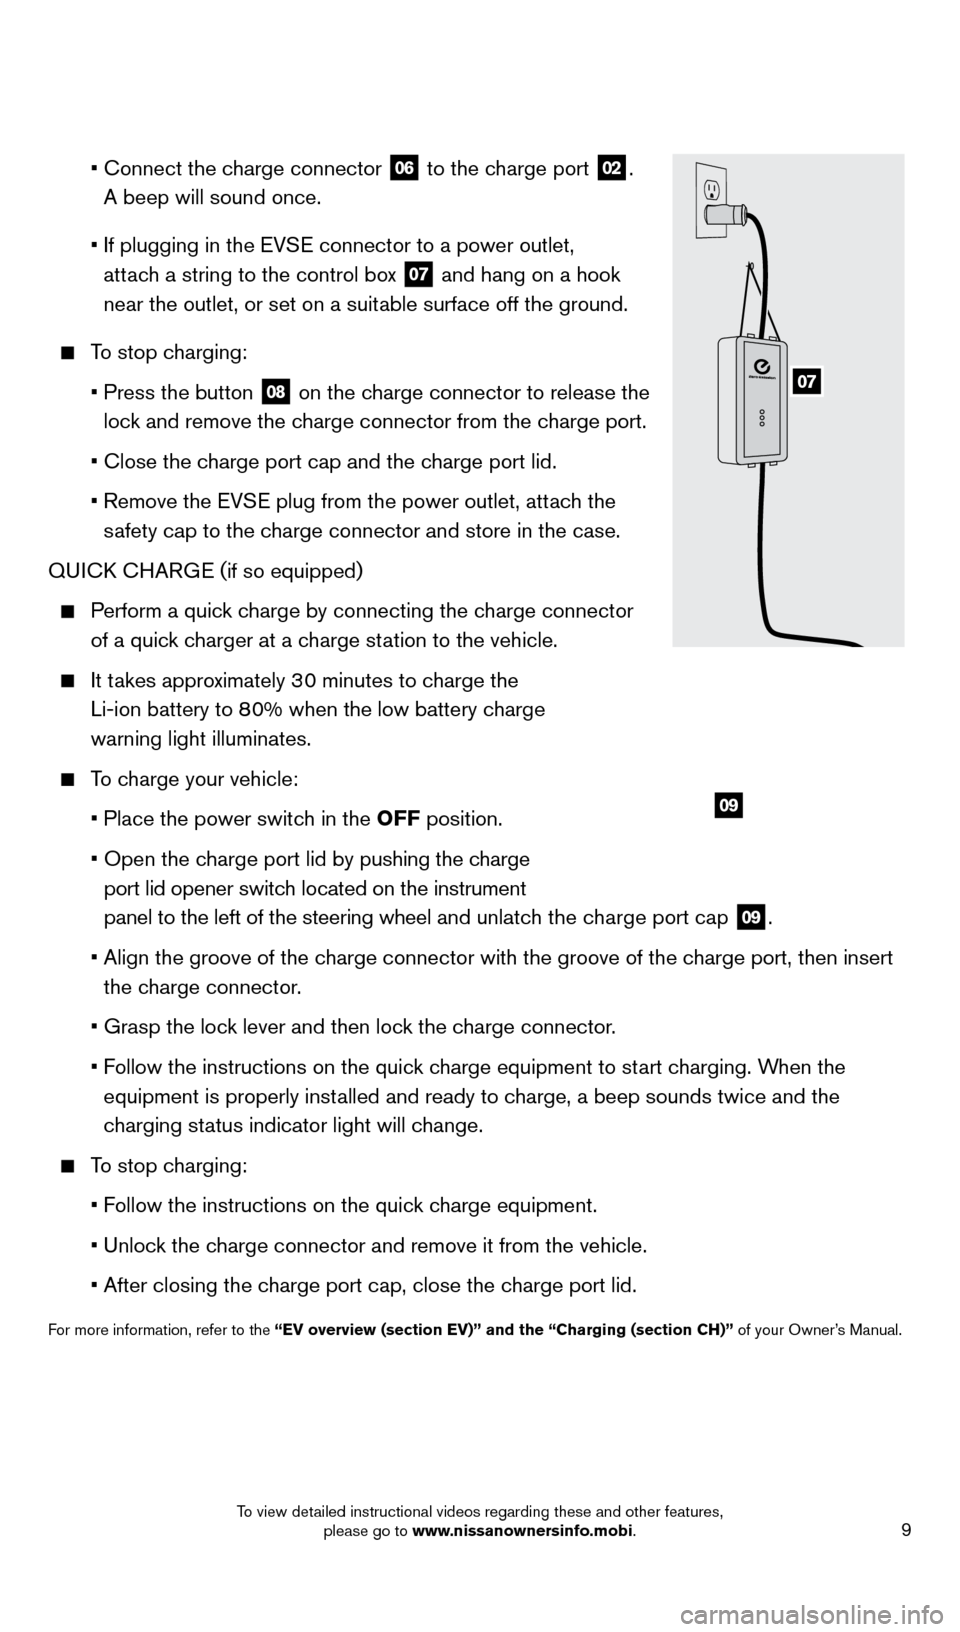
• Connect the c harge connector
06 to the charge port
02.
A beep will sound once.
•
If plugging in the EV
SE connector to a power outlet,
attach a string to the control box
07 and hang on a hook
near the outlet, or set on a suitable surface off the ground.
To stop charging:
•
Press the button 08 on the charge connector to release the
lock and remove the charge connector from the charge port.
•
Close the c
harge port cap and the charge port lid.
• Remove the EV
SE plug from the power outlet, attach the
safety cap to the charge connector and store in the case.
QUICK CHARGE (if so equipped)
Perform a quick charge by connecting the charge connector of a quick charger at a charge station to the vehicle.
It takes approximately 30 minutes to charge the
Li-ion battery to 80% when the low battery charge
warning light illuminates.
To charge your vehicle:
•
Place the power switc
h in the OFF position.
•
Open the c
harge port lid by pushing the charge
port lid opener switch located on the instrument
panel to the left of the steering wheel and unlatch the charge port cap
09.
•
Align the groove of the c
harge connector with the groove of the charge port, then insert
the charge connector.
• Grasp the loc
k lever and then lock the charge connector.
• F
ollow the instructions on the quick charge equipment to start charging. When the
equipment is properly installed and ready to charge, a beep sounds twice and the
charging status indicator light will change.
To stop charging:
•
F
ollow the instructions on the quick charge equipment.
•
Unloc
k the charge connector and remove it from the vehicle.
•
After closing the c
harge port cap, close the charge port lid.
For more information, refer to the “EV overview (section EV)” and the “Charging (section CH)”\
of your Owner’s Manual.
09
07
1700496_14b_Leaf_QRG_021114.indd 92/11/14 3:48 PM
To view detailed instructional videos regarding these and other features, please go to www.nissanownersinfo.mobi.
Page 22 of 27
20
BLUETOOTH® HANDS-FREE PHONE SYSTEM
A cellular telephone should not be used while driving
so full attention may be given to vehicle operation.*
SYSTEM OPERATING TIPS
Press the or button to interrupt the voice
prompts at any time and speak a command after
the tone.
To use the system faster, you may speak the second level commands with the main menu command on
the main menu. For example, press the
or
button and after the tone say, “Call Redial”.
The “Help” command can be used to hear a list of available commands at any time.
Reduce bac kground noise as much as possible by
closing windows and pointing HVAC vents away
from the ceiling.
Speak naturally without long pauses and without raising your voice.
When speaking Phonebook names, please be aware some phones require the la\
st name to be spoken before the first name. For example, “Michael Smith” may be spoken as
“Smith Michael”.
To cancel a voice recognition session, simply wait 5 seconds, say “Cancel” or “Quit”, or press and hold the
button for 5 seconds.
To increase or decrease the volume of the voice prompts, push the volume \
control switches + or - on the steering wheel or turn the control dial on the audio system while\
the
audio system is responding.
If the Voice Recognition system does not recognize your voice commands, train th\
e system using the Voice Adaptation Mode. See your Owner’s Manual for detailed information.
For more detailed information and instructions, see your cellular phone Owner’s Manual and visit www.nissanusa.com/bluetooth.
*Some jurisdictions prohibit the use of cellular telephones while drivin\
g.
BLUETOOTH® SYSTEM WITHOUT
NAVIGATION ( if so equipped)
CONNECTING PROCEDURE
The vehicle must be stationary when connecting
the phone.
1.
Press the
button on the steering wheel. The
system announces the available commands.
2.
S
ay: “Connect phone”. The system
acknowledges the command and announces the next set of available commands.\
3.
S
ay: “Add phone”. The system acknowledges the command and asks you to initiate
connecting from the phone handset.
SYSTEM GUIDE
Bluetooth®
Controls
Microphone
1700496_14b_Leaf_QRG_021114.indd 202/11/14 3:48 PM
To view detailed instructional videos regarding these and other features, please go to www.nissanownersinfo.mobi.
Page 23 of 27

21
4. Initiate connecting from the phone:
• T
he connecting procedure varies according to each cellular phone model.
For detailed connecting instructions and compatible phones, please visit
www.nissanusa.com/bluetooth.
• W
hen prompted for a PIN code, enter “1234” from the handset. (The PIN code is
assigned by NISSAN and cannot be changed.)
5.
S
ay a name for the phone when the system asks you to provide one. You can give the
phone a name of your choice.
PHONEBOOK SETUP
The phonebook stores up to 1,000 names for each phone paired with the system.
Depending on your cellular phone, the system may automatically download \
your cellular
phone’
s entire phonebook to the vehicle’s Bluetooth® system.
If the phonebook does not download automatically , entries can be individually downloaded.
To manually download entries:
1.
Push the button on the steering wheel.
2.
After the tone, s ay “Phonebook”.
3.
After the next tone, s
ay “Transfer Entry”. The system acknowledges the command and
asks you to initiate the transfer from the phone handset. The new contact phone number
will be transferred from the cellular phone to the vehicle.
•
T
he transfer procedure varies according to each cellular phone. See your cellular phone’s
Owner’s Manual for details. You can also visit www.nissanusa.com/bluetooth for
instructions on transferring phone numbers from NISSAN-recommended cellular phones.
4.
T
he system repeats the number and prompts you for the next command. When you
have finished entering numbers or transferring an entry, choose “Store”.
5.
T
he system confirms the name, location and number.
MAKING A CALL FROM THE PHONEBOOK
In some cases, names stored using all U PPERCASE letters may not be recognized by
the voice recognition system.
1.
Press the button.
2.
After waiting for the tone, s ay “Call”.
3.
After the next tone, speak a name of a phonebook entry
. For example, “Michael Smith”.
4.
Once you have confirmed the name and location, the system begins the c\
all.
MAK
ING A CALL BY PHONE NUMBER
1.
Press the button. A tone will sound. 2.
S
ay: “Call”. The system acknowledges the command and announces the next set of
available commands.
3.
S
ay: “Phone Number”. The system acknowledges the command and announces the next
set of available commands.
4.
S
ay the number you wish to call starting with the area code in single digit format.
5.
W
hen you have finished speaking the phone number, the system repeats it back and
announces the available commands.
6.
S
ay: “Dial”. The system acknowledges the command and makes the call.
1700496_14b_Leaf_QRG_021114.indd 212/11/14 3:48 PM
To view detailed instructional videos regarding these and other features, please go to www.nissanownersinfo.mobi.
Page 24 of 27
22
BLUETOOTH® SYSTEM
WITH NAVIGATION (if so equipped)
Bluetooth® Streaming Audio allows you to use a
compatible Bluetooth® phone to play audio files on
your device. Your compatible cellular phone can be
connected to the vehicle’s audio system, allowing
audio files to play through the vehicle’s speakers.
PAIRING PROCEDURE
Make sure the vehicle is st ationary when pairing
the phone.
1.
Press the
button 01, and select the
“Pair Phone” key.
2.
Initiate pairing from the phone.
•
T
he pairing procedure varies according to
each cellular phone model. For detailed pairing
instructions and a list of compatible phones,
please visit www.nissanusa.com/bluetooth.
•
W
hen prompted for a PIN code, enter “1234”
from the handset. (The PIN code is assigned
by NISSAN and cannot be changed.)
3.
W
hen the pairing is complete, the screen will
return to the Phone menu display.
MAKING A CALL
To make a call, follow this procedure:
1.
Press the
button 01 on the steering wheel.
The “Phone” menu will appear on the control
panel display.
2.
Select the “Handset Phonebook”, “V
ehicle
Phonebook”, “Call History” or “Dial Number” key.
3.
Select the desired entry from the list.
4.
Select “Call” to st
art dialing the number.
SYSTEM GUIDE
RECEIVING/ENDING A CALL
When you receive a phone call, a ring tone sounds through the audio syste\
m.
To accept the call, press the button.
To reject the call, press the button.
To hang-up the phone at the end of a call or to disconnect during call pl\
acement,
press the
button.
For more information, refer to the “Heater, air conditioner, audio and phone systems (section 4)” of your Owner’s
Manual or please visit www.nissanusa.com/bluetooth.
01
1700496_14b_Leaf_QRG_021114.indd 222/11/14 3:48 PM
To view detailed instructional videos regarding these and other features, please go to www.nissanownersinfo.mobi.
Page 25 of 27
23
RECEIVING/ENDING A CALL
To accept the call, press the button on the
steering wheel or touch the “Answer” key.
To reject the call, touch the “Reject Call” key.
To hang-up, press the button or touch the
“Hang Up” key.
For more information, refer to the “Bluetooth hands-free phone system
(section 7)” of your Navigation System Owner’s Manual or please visit
www.nissanusa.com/bluetooth.
NAVIGATION SYSTEM (if so equipped)
01 MAP/V OICE Button – Press to view your current location on the map screen. When you
press and hold, the system will repeat voice guidance.
02 MENU Button – Press to view a list of menus.
Destination
– Touch to enter a destination or press the button and when
prompted say “Navigation” then follow the commands to enter a destination.
Route – Touch to access guidance control functions such as guidance cancellation,
route priority or waypoint setting on the route.
Info – Touch to display the vehicle’s energy information, maintenance and charging
station information, current location, traffic information, voice recogn\
ition command list,
GPS position and navigation version.
Settings – Touch to customize the system to make it easier for you to use.
Phone – Touch to set useful functions for the Bluetooth® Hands-free Phone System.
CARWINGS – Touch to display information feeds. Settings for CARWINGS™ can also
be performed.
For more information, refer to your Navigation System Owner’s Manual.
02
01
1700496_14b_Leaf_QRG_021114.indd 232/11/14 3:48 PM
To view detailed instructional videos regarding these and other features, please go to www.nissanownersinfo.mobi.