Page 227 of 397
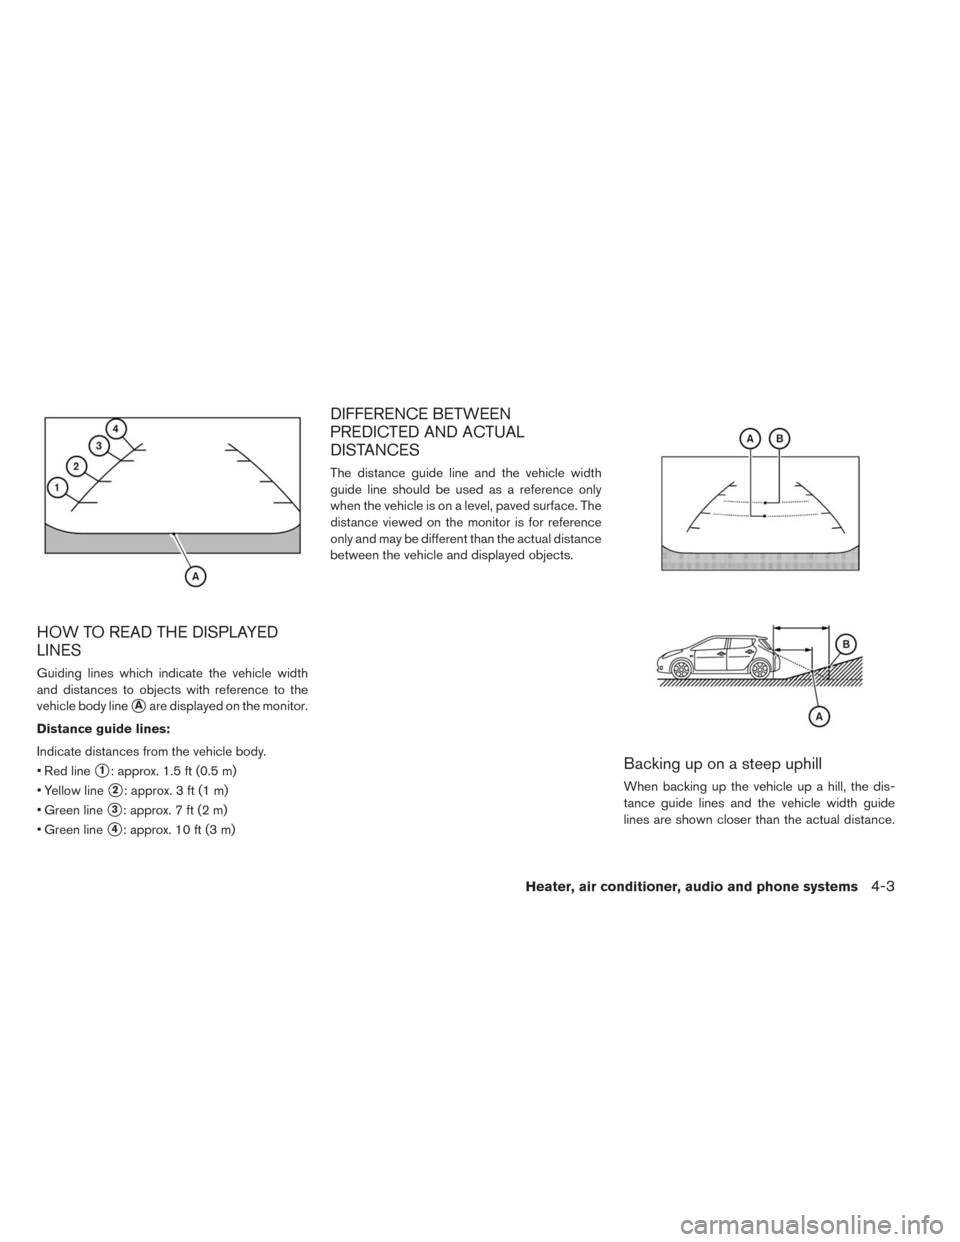
HOW TO READ THE DISPLAYED
LINES
Guiding lines which indicate the vehicle width
and distances to objects with reference to the
vehicle body line
�Aare displayed on the monitor.
Distance guide lines:
Indicate distances from the vehicle body.
• Red line
�1: approx. 1.5 ft (0.5 m)
• Yellow line
�2: approx. 3 ft (1 m)
• Green line
�3: approx. 7 ft (2 m)
• Green line
�4: approx. 10 ft (3 m)
DIFFERENCE BETWEEN
PREDICTED AND ACTUAL
DISTANCES
The distance guide line and the vehicle width
guide line should be used as a reference only
when the vehicle is on a level, paved surface. The
distance viewed on the monitor is for reference
only and may be different than the actual distance
between the vehicle and displayed objects.
Backing up on a steep uphill
When backing up the vehicle up a hill, the dis-
tance guide lines and the vehicle width guide
lines are shown closer than the actual distance.
Heater, air conditioner, audio and phone systems4-3
Page 228 of 397
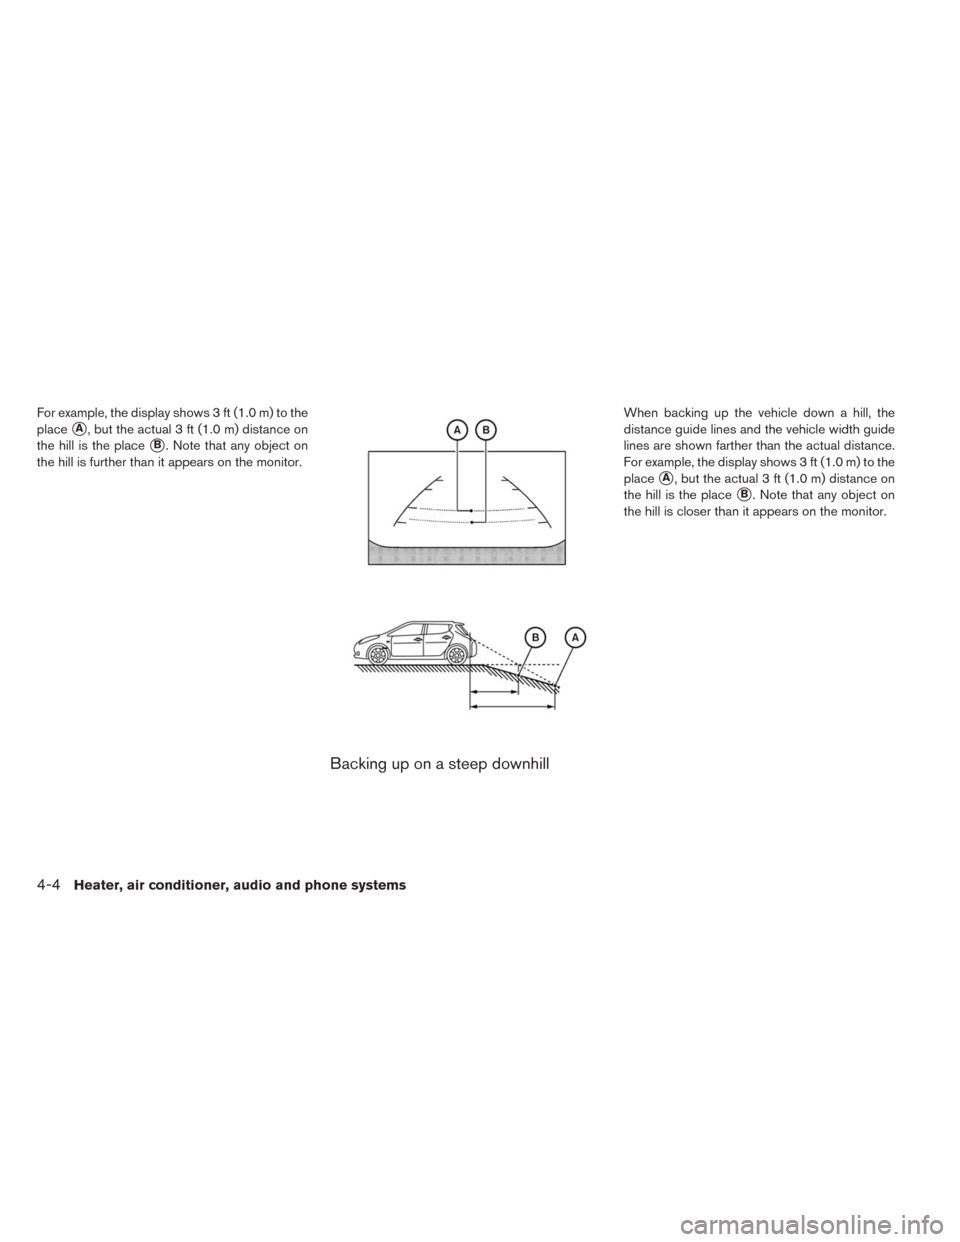
For example, the display shows 3 ft (1.0 m) to the
place
�A, but the actual 3 ft (1.0 m) distance on
the hill is the place
�B. Note that any object on
the hill is further than it appears on the monitor.
Backing up on a steep downhill
When backing up the vehicle down a hill, the
distance guide lines and the vehicle width guide
lines are shown farther than the actual distance.
For example, the display shows 3 ft (1.0 m) to the
place
�A, but the actual 3 ft (1.0 m) distance on
the hill is the place
�B. Note that any object on
the hill is closer than it appears on the monitor.
4-4Heater, air conditioner, audio and phone systems
Page 229 of 397

Backing up behind a projecting object
The position�Cis shown farther than the position
�Bin the display. However, the position�Cis
actually at the same distance as the position
�A.
The vehicle may hit the object when backing up to
the position
�Aif the object projects over the
actual backing up course.
ADJUSTING THE SCREEN
The procedure for adjusting the quality of the
screen differs depending on the type of screen
present on the vehicle.
For vehicles without Navigation System:
1. Press the ENTER/SETTING button.
2. Turn the TUNE-SCROLL knob to highlight the
“Brightness” or “Contrast” key.
3. Press the ENTER/SETTING button.
4. Adjust the level using the TUNE-SCROLL
knob and then press the ENTER/SETTING
button to apply the adjustment.• Do not adjust the Brightness or Contrast of the
RearView Monitor while the vehicle is moving.
OPERATING TIPS
• When the shift lever is shifted to R (Reverse) ,
the monitor screen automatically changes to the
RearView Monitor mode. However, the radio
can be heard.
• It may take some time until the RearView Moni-
tor is displayed after the shift lever has been
shifted to R (Reverse) . Objects may be dis-
torted momentarily until the RearView Monitor
screen is displayed completely. When the shift
lever is returned to a position other than R
(Reverse) , it may take some time until the
screen changes. Objects on the screen may be
distorted until they are completely displayed.
• When the temperature is extremely high or low,
the screen may not clearly display objects. This
is not a malfunction.
• When strong light directly enters the camera,
objects may not be displayed clearly.
• Vertical lines may be seen in objects on the
screen. This is due to strong reflected light from
the bumper. This is not a malfunction.
• The screen may flicker under fluorescent light.
This is not a malfunction.
Heater, air conditioner, audio and phone systems4-5
Page 230 of 397

• The colors of objects on the RearView Monitor
may differ somewhat from those of the actual
object.
• When the contrast of objects is low at night,
pressing the ENTER/SETTING button may not
change the brightness.
• Objects on the monitor may not be clear in a
dark place or at night.
• If dirt, rain or snow attaches to the camera, the
RearView Monitor may not display objects.
Clean the camera.
• Do not use body wax on the camera window. If
body wax does get on the camera window, wipe
off the wax with a clean cloth dampened with
mild detergent diluted with water.
CENTER VENTS
Open/close the vents by moving the control to
either direction.
:This symbol indicates that the vents are
closed. Moving the side control to this
direction will close the vents.
:This symbol indicates that the vents are
open. Moving the side control to this
direction will open the vents.
Adjust the air flow direction of the vents by mov-
ing the knob (up/down) until the desired position
is achieved.
SIDE VENTS
Open/close the vents by moving the control to
either direction.
:This symbol indicates that the vents are
closed. Moving the side control to this
direction will close the vents.
:This symbol indicates that the vents are
open. Moving the side control to this
direction will open the vents.
Driver side
VENTS
4-6Heater, air conditioner, audio and phone systems
Page 231 of 397
 until the desired
position is achieved.
WARNING
• The air conditioning cooling function
operates only when the p")
Adjust the air flow direction of the vents by mov-
ing the knob (up/down, left/right) until the desired
position is achieved.
WARNING
• The air conditioning cooling function
operates only when the power switch
is in the ON position or when the
READY to drive indicator light is ON.
• Do not leave children or adults who
would normally require the support of
others alone in your vehicle. Pets
should not be left alone either. On hot,
sunny days, temperatures in a closed
vehicle could quickly become high
enough to cause severe or possibly
fatal injuries to people or animals.
• Do not use the recirculation mode for
long periods as it may cause the inte-
rior air to become stale and the win-
dows to fog up.
Note:
•Odors from inside and outside the vehicle
can build up in the air conditioner unit.
Odor can enter the passenger compart-
ment through the vents.
•When parking, set the heater and air con-
ditioner controls to turn off air recircula-
tion to allow fresh air into the passenger
compartment. This should help reduce
odors inside the vehicle.The climate control system (air conditioner and
heater functions) can be operated when the
READY to drive indicator light is illuminated.
However, while charging, the climate control sys-
tem can be used when the power switch is in the
ON position.
The fan, heater and air conditioning can be turned
on manually, using the timer function and using
the remote climate control function.
These functions operate in the following condi-
tions.
Passenger side
CLIMATE CONTROL SYSTEM
Heater, air conditioner, audio and phone systems4-7
Page 232 of 397
 Available*1 Available*1 - -
Remote con")
Power switch position LOCK/OFF ACC ON READY to drive
Fan - - Available Available
Heater and air conditioner - - Available*2 Available
Timer (Climate Ctrl. Timer) Available*1 Available*1 - -
Remote control*3 Available Available - -
*1: The EVSE (Electric Vehicle Supply Equip-
ment) must be connected.
*2: The climate control system will only start
when charging is being performed. After
charging is complete, it will continue to op-
erate if the EVSE (Electric Vehicle Supply
Equipment) is connected.
*3: Models with Navigation System.
DISPLAYING CLIMATE CONTROL SYSTEM
STATUS SCREEN (MODELS WITH NAVIGA-
TION SYSTEM)
Push the STATUS button to display the climate
control system status on the navigation system
screen. (See the LEAF Navigation System Own-
er’s Manual.)NOTE:
•If the READY to drive indicator light is
illuminated and the EVSE (Electric Vehicle
Supply Equipment) is connected to the
vehicle, the power switch will change to
the ON position. At the same time, the
climate control system will stop operat-
ing. However, the fan will continue to op-
erate. If you want to turn on climate con-
trol again, place the power switch in the
OFF position and then place it in the ON
position again after confirming that the
vehicle has started charging.
•When the power switch is in the ON posi-
tion, if the power supply from the EVSE
(Electric Vehicle Supply Equipment) is in-
terrupted due to an electrical outage, etc.,
the system will operate in the following
ways.
4-8Heater, air conditioner, audio and phone systems
Page 233 of 397
– If it occurs while charging is being per-
formed:
–The climate control system will stop
once. If the power supply is restored
within approximately 5 minutes, the
climate control system will restart.
However, if more than 5 minutes
have elapsed, the climate control
system will not restart.
– If it occurs after charging has finished:
–The climate control system will stop.
Heater, air conditioner, audio and phone systems4-9
Page 234 of 397

1.(fan speed control) dial
2.
(intake air control) button
3.
(front defroster) button4. Climate Ctrl. display
5.
(rear window defroster) bu")
AUTOMATIC CLIMATE CONTROL
(MODELS WITHOUT NAVIGATION
SYSTEM)
1.(fan speed control) dial
2.
(intake air control) button
3.
(front defroster) button4. Climate Ctrl. display
5.
(rear window defroster) button (See
“Rear window and outside mirror defroster
switch” in the “Instruments and controls”
section.)
6. Temperature control dial
7. AUTO climate control ON button8. A/C (air conditioner) ON·OFF button
9. MODE (manual air flow control) button
10. HEAT button
11. A/C-Heater ON·OFF button
Automatic operation (AUTO)
The AUTO mode may be used year-round as the
system automatically controls constant tempera-
ture, air flow distribution and fan speed.
To turn off the climate control, press the A/C-
Heater ON·OFF button.
The same operating mode (Heater or A/C) that
was active when the system is turned off is active
when system is turned back on.
While operating the climate control in the AUTO
mode, selecting any other climate control button
de-activates the AUTO mode and activates
manual mode.
Cooling and/or dehumidified heating:
The dehumidified heating mode can be used to
keep the windows from fogging. In this mode, the
heat pump compressor is used in A/C mode for
dehumidifying the air instead of heating it. The
PTC heater is also used in conjunction to heat the
air. This mode will increase energy consumption
and therefore reduce range.
4-10Heater, air conditioner, audio and phone systems