2014 NISSAN JUKE instrument panel
[x] Cancel search: instrument panelPage 5 of 25
3To view detailed instructional videos regarding these and other features, please go to www.nissanownersinfo.mobi.
LOOSE FUEL CAP
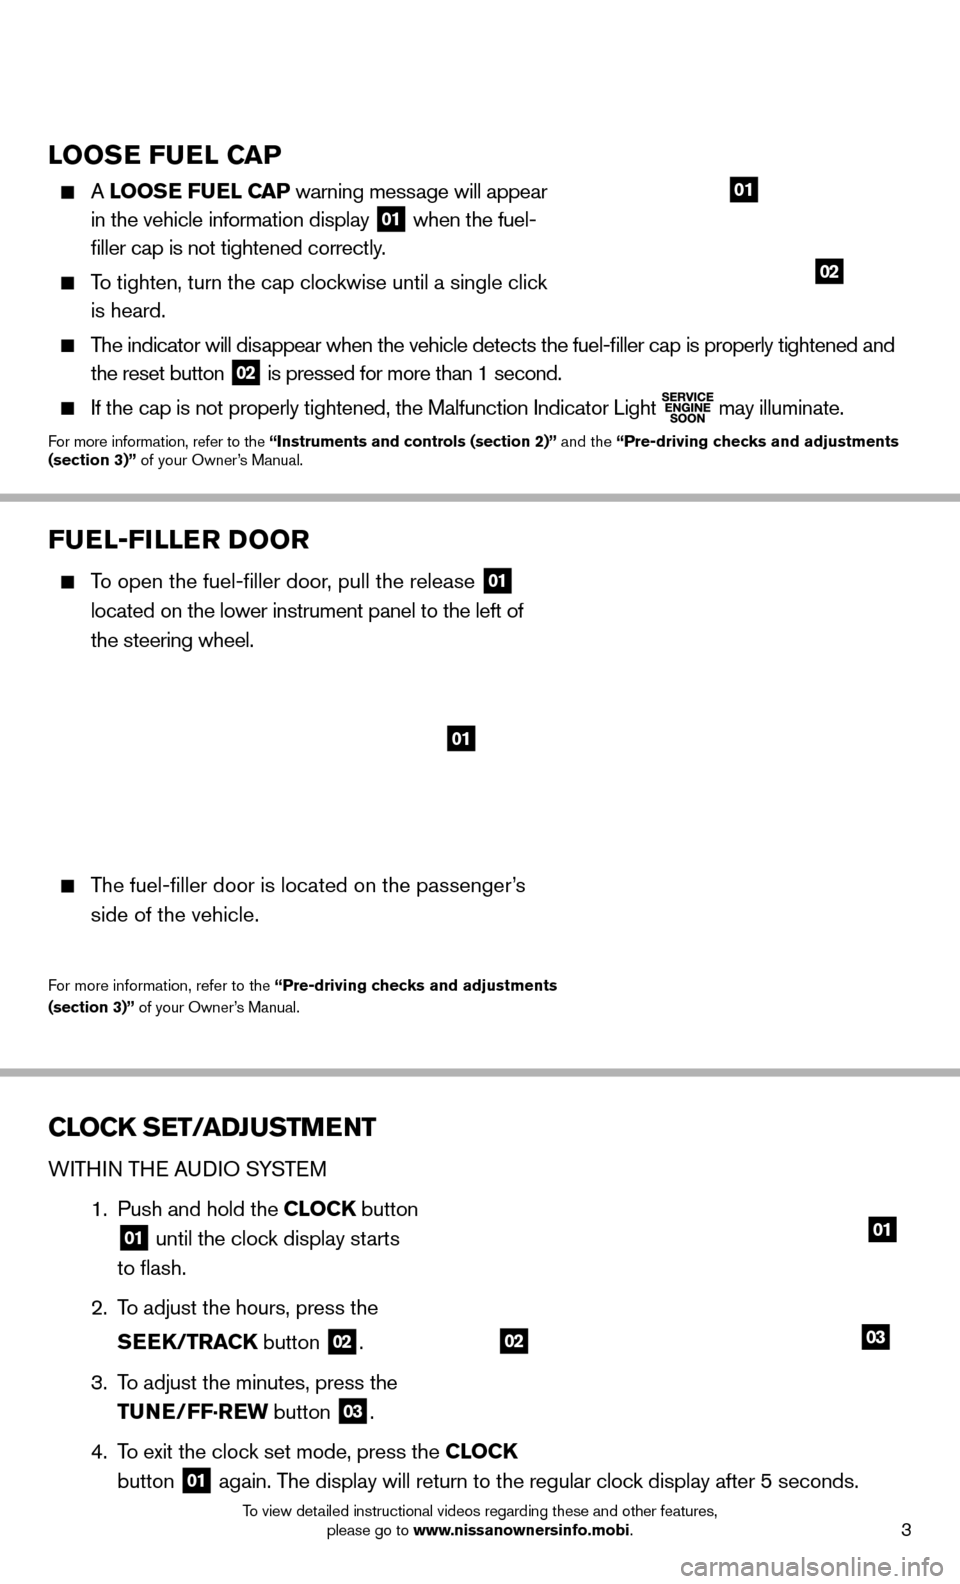
A LOOSE FUEL CAP warning message will appear
in the vehicle information display
01 when the fuel-
fi ller cap is not tightened correctly.
To tighten, turn the cap clockwise until a single click
is heard.
The indicator will disappear when the vehicle detects the fuel-fi ller cap is properly tightened and
the reset button
02 is pressed for more than 1 second.
If the cap is not properly tightened, the Malfunction Indicator Light
may illuminate.For more information, refer to the “Instruments and controls (section 2)”
and the “Pre-driving checks and adjustments
(section 3)” of your Owner’s Manual.
01
02
FUEL-FILLER DOOR
To open the fuel-fi ller door, pull the release 01
located on the lower instrument panel to the left of
the steering wheel.
The fuel-fi ller door is located on the passenger’s
side of the vehicle.
For more information, refer to the “Pre-driving checks and adjustments
(section 3)” of your Owner’s Manual.
01
CLOCK SET/ADJUSTMENT
WITHIN THE AUDIO SYSTEM
1. Push and hold the CLOCK button
01 until the clock display starts
to fl ash.
2. To adjust the hours, press the
SEEK/TRACK button
02.
3. To adjust the minutes, press the
TUNE/FF·REW button
03.
4. To exit the clock set mode, press the CLOCK
button
01 again. The display will return to the regular clock display after 5 seconds.
0302
01
Page 9 of 25
7To view detailed instructional videos regarding these and other features, please go to www.nissanownersinfo.mobi.
STARTING/STOPPING THE EN GINE (NISSAN Intelligent Key®
models only - if so equipped)
CONTINUOUSLY VARIABLE TRANSMISSION
(if so equipped)
It is important to make sure the NISSAN Intelligent
Key® is with you (that is, in your pocket or purse).
Depress the brake pedal.
Move the shift lever to the P (PARK) position.
Push the ignition switch to start the engine.
H EATE D S EATS (if so equipped)
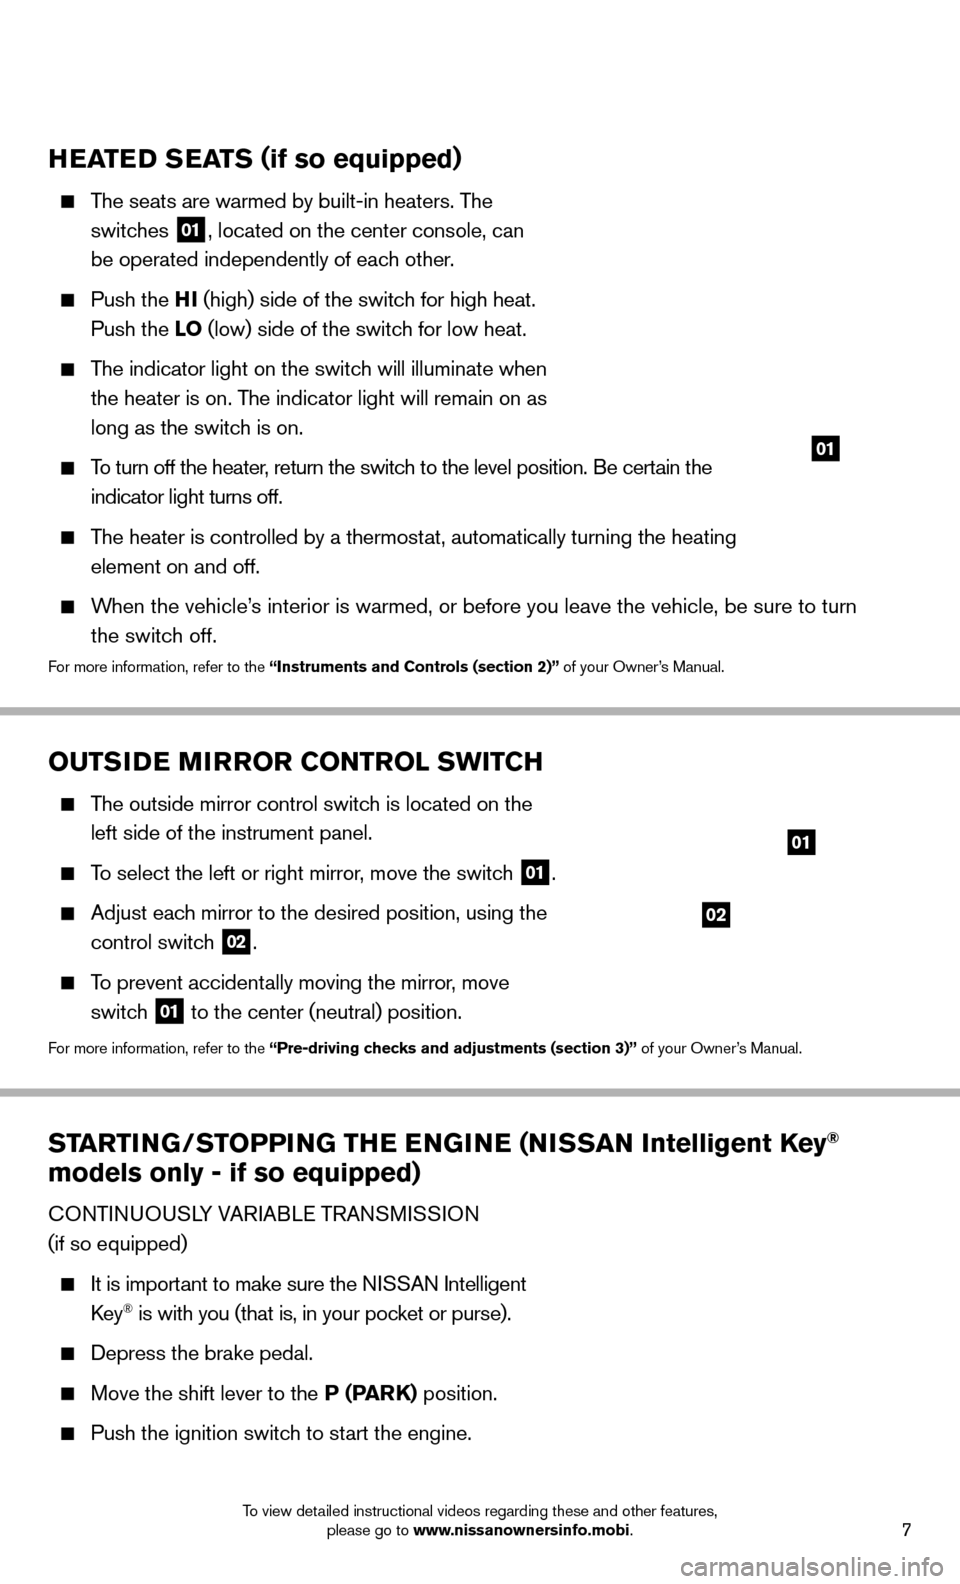
The seats are warmed by built-in heaters. The
switches
01, located on the center console, can
be operated independently of each other.
Push the HI (high) side of the switch for high heat.
Push the LO (low) side of the switch for low heat.
The indicator light on the switch will illuminate when
the heater is on. The indicator light will remain on as
long as the switch is on.
To turn off the heater, return the switch to the level position. Be certain the
indicator light turns off.
The heater is controlled by a thermostat, automatically turning the heating
element on and off.
When the vehicle’s interior is warmed, or before you leave the vehicle, be sure to turn
the switch off.
For more information, refer to the “Instruments and Controls (section 2)” of your Owner’s Manual.
02
01
OUTSIDE MIRROR CONTROL SWITCH
The outside mirror control switch is located on the
left side of the instrument panel.
To select the left or right mirror, move the switch 01.
Adjust each mirror to the desired position, using the
control switch
02.
To prevent accidentally moving the mirror, move
switch
01 to the center (neutral) position.For more information, refer to the “Pre-driving checks and adjustments
(section 3)” of your Owner’s Manual.
01
Page 10 of 25
8To view detailed instructional videos regarding these and other features, please go to www.nissanownersinfo.mobi.
FIRST DRIVE FEATURES
HEADLIGHT CONTROL SWITCH
HEADLIGHT CONTROL
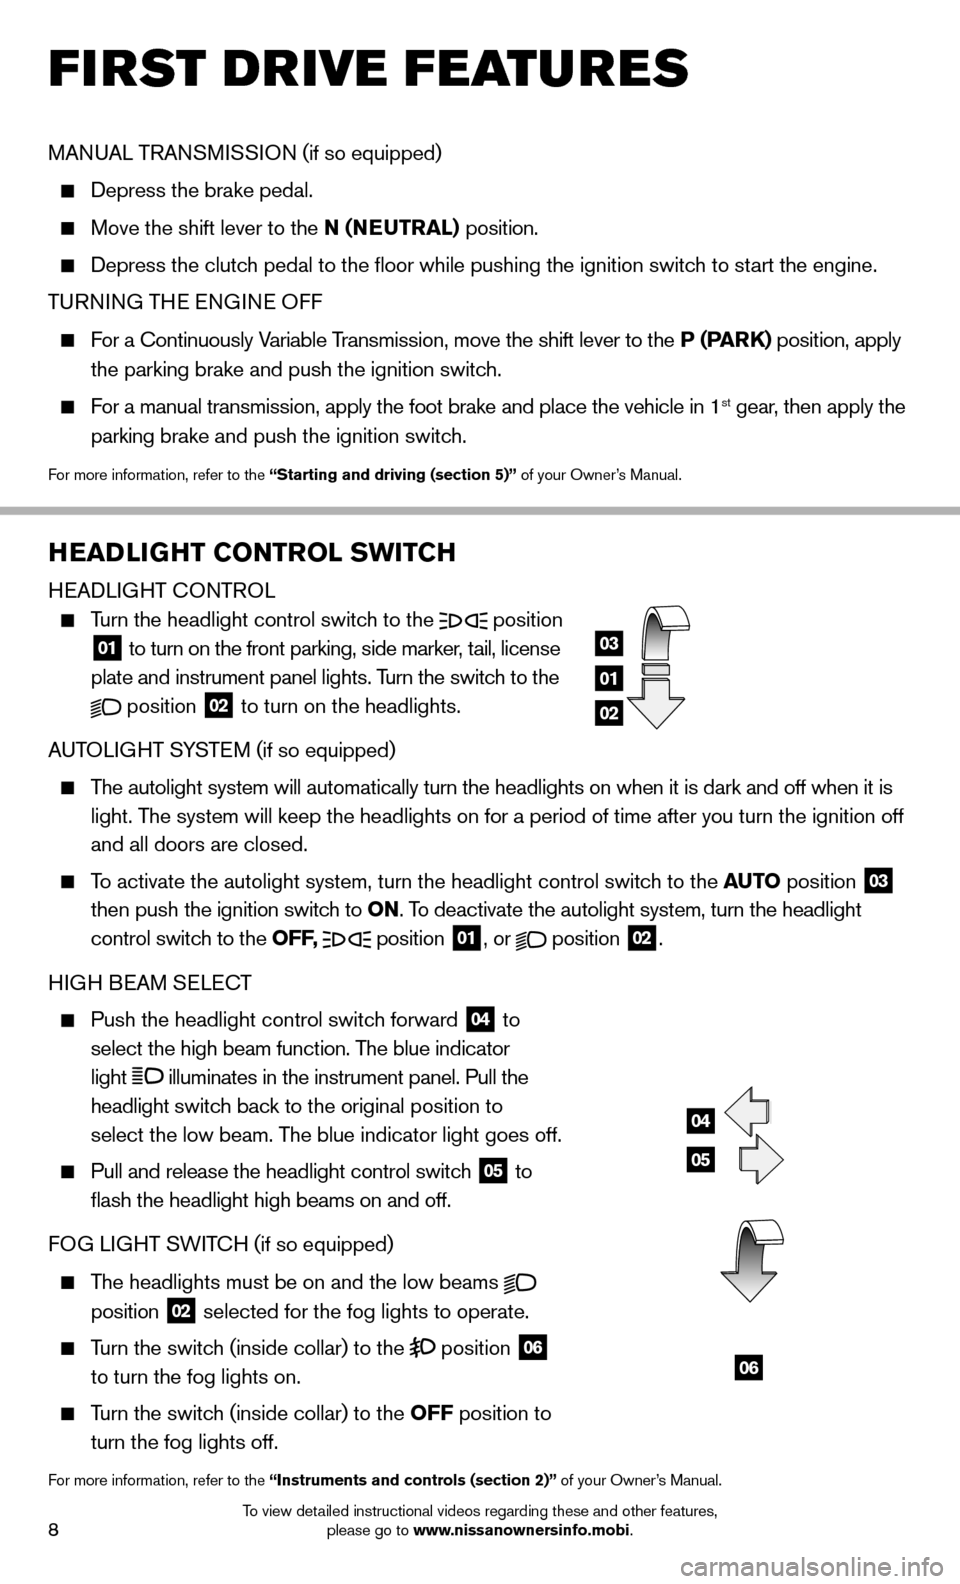
Turn the headlight control switch to the
position
01 to turn on the front parking, side marker, tail, license
plate and instrument panel lights. Turn the switch to the
position
02 to turn on the headlights.
AUTOLIGHT SYSTEM (if so equipped)
The autolight system will automatically turn the headlights on when it is\
dark and off when it is
light. The system will keep the headlights on for a period of time after you tur\
n the ignition off
and all doors are closed.
To activate the autolight system, turn the headlight control switch to the AUTO position
03
then push the ignition switch to ON. To deactivate the autolight system, turn the headlight
control switch to the OFF,
position
01, or
position
02.
HIGH BEAM SELECT
Push the headlight control switch forward
04 to
select the high beam function. The blue indicator
light
illuminates in the instrument panel. Pull the
headlight switch back to the original position to
select the low beam. The blue indicator light goes off.
Pull and release the headlight control switch
05 to
fl ash the headlight high beams on and off.
FOG LIGHT SWITCH (if so equipped)
The headlights must be on and the low beams
position 02 selected for the fog lights to operate.
Turn the switch (inside collar) to the position
06
to turn the fog lights on.
Turn the switch (inside collar)
to the OFF position to
turn the fog lights off.
For more information, refer to the “Instruments and controls (section 2)” of your Owner’s Manual.
03
01
02
04
05
MANUAL TRANSMISSION (if so equipped)
Depress the brake pedal.
Move the shift lever to the N (NEUTRAL) position.
Depress the clutch pedal to the fl oor while pushing the ignition switch to start the engine.
TURNING THE ENGINE OFF
For a Continuously Variable Transmission, move the shift lever to the P (PARK) position, apply
the parking brake and push the ignition switch.
For a manual transmission, apply the foot brake and place the vehicle in \
1st gear, then apply the
parking brake and push the ignition switch.
For more information, refer to the “Starting and driving (section 5)” of your Owner’s Manual.
06
Page 15 of 25
13To view detailed instructional videos regarding these and other features, please go to www.nissanownersinfo.mobi.
CRUISE CONTROL
The cruise control system enables you to set a
constant cruising speed once the vehicle has
reached 25 MPH (40 km/h).
The system will automatically maintain the set
speed until you tap the brake pedal, accelerate,
cancel or turn the system off.
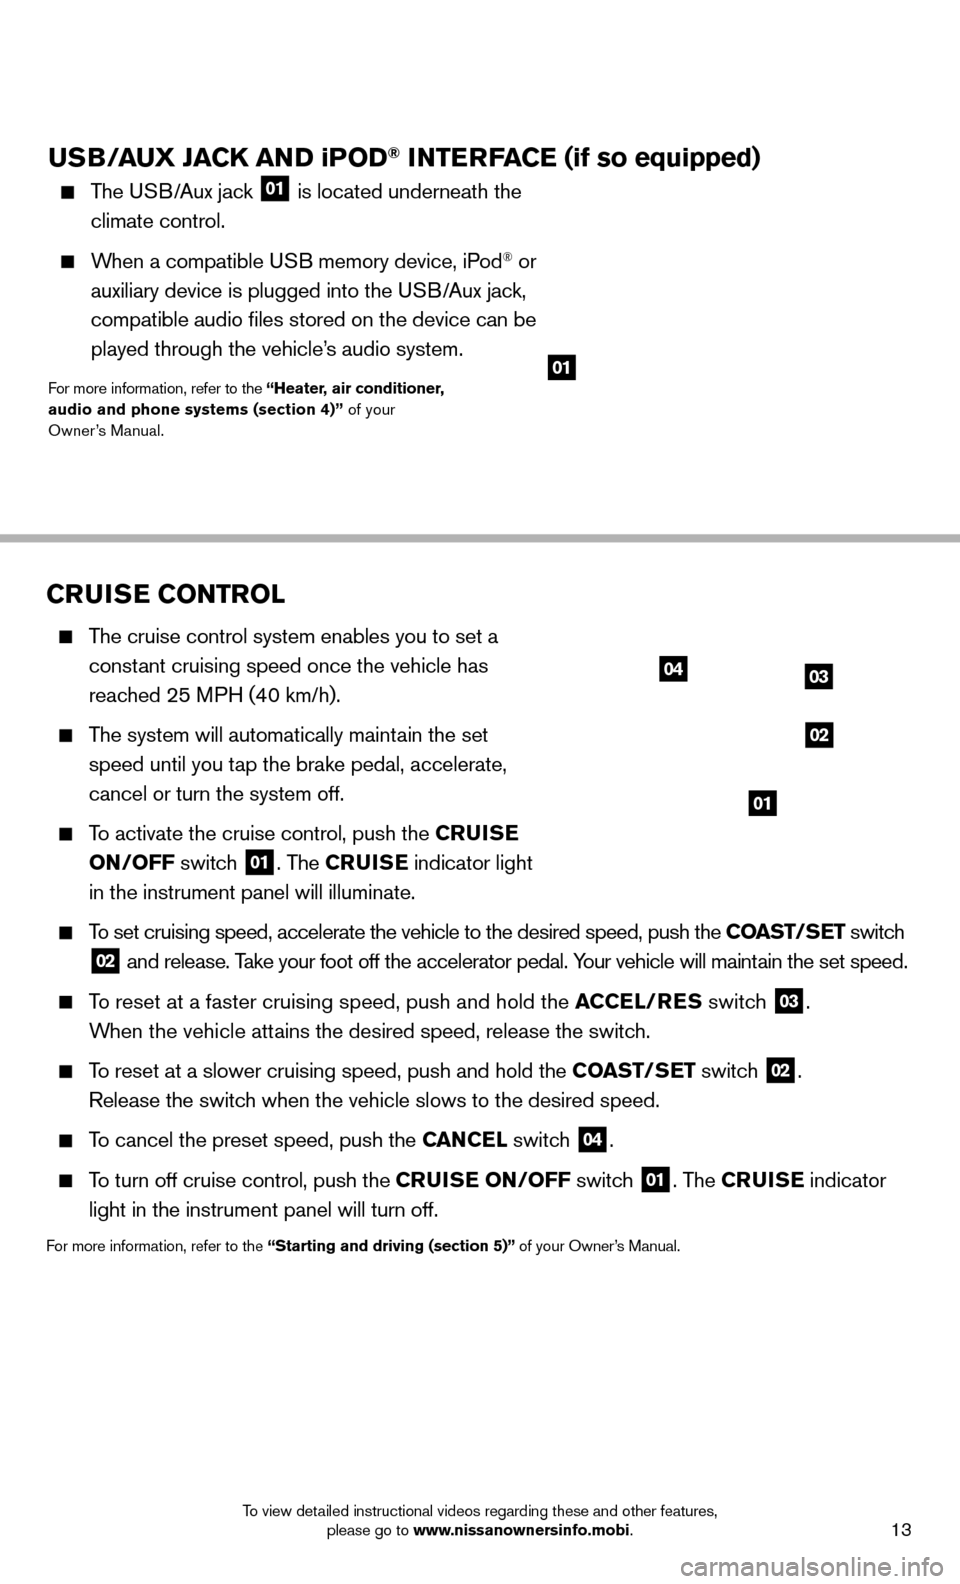
To activate the cruise control, push the CRUISE
ON/OFF switch
01. The CRUISE indicator light
in the instrument panel will illuminate.
To set cruising speed, accelerate the vehicle to the desired speed, push \
the COAST/SET switch
02 and release. Take your foot off the accelerator pedal. Your vehicle will maintain the set speed.
To reset at a faster cruising speed, push and hold the ACCEL/RES switch
03.
When the vehicle attains the desired speed, release the switch.
To reset at a slower cruising speed, push and hold the COAST/SET switch
02.
Release the switch when the vehicle slows to the desired speed.
To cancel the preset speed, push the CAN CE L switch
04.
To turn off cruise control, push the CRUISE ON/OFF switch
01. The CRUISE indicator
light in the instrument panel will turn off.
For more information, refer to the “Starting and driving (section 5)” of your Owner’s Manual.
0403
02
01
USB/AUX JACK AND iPOD® INTERFACE (if so equipped)
The USB/Aux jack
01 is located underneath the
climate control.
When a compatible USB memory device, iPod® or
auxiliary device is plugged into the USB/Aux jack,
compatible audio fi les stored on the device can be
played through the vehicle’s audio system.
For more information, refer to the “Heater, air conditioner,
audio and phone systems (section 4)” of your
Owner’s Manual.01
Page 16 of 25
14To view detailed instructional videos regarding these and other features, please go to www.nissanownersinfo.mobi.
TRIP COMPUTER
With the ignition switch in the ON position, trip computer
01 modes can be selected by pressing the trip computer
mode switch 02 on the instrument panel. The following
modes can be selected in the display:
Trip A – measures the distance of one specifi c trip.
Trip B – measures the distance of a second specifi c trip.
Current Fuel Consumption – displays the current fuel consumption.
Distance to Empty (dte) – displays the estimated distance to empty (dte) the vehicle can
be driven before refueling.
Average Fuel Consumption – displays the average fuel consumption since\
the last reset.
Elapsed Time – displays the time since the last reset.
Torque Vectoring AWD (AWD model) – displays the current amount of torque distributed
to each wheel.
Push the reset switch
02 for approximately 1 second to reset the currently displayed trip
odometer to zero.
For more information, refer to the “Instruments and controls (section 2)” of your Owner’s Manual.
BLUETOOTH® HANDS-FREE PHONE SYSTEM
A cellular telephone should not be used while driving
so full attention may be given to vehicle operation.*
SYSTEM OPERATING TIPS
Press the button to interrupt the voice prompts
at any time and speak a command after the tone.
The “Help” command can be used to hear a list of
available commands at any time.
Reduce background noise as much as possible
by closing windows and pointing HVAC vents away
from the ceiling.
Speak in a clear and natural voice without pausing
between words.
When speaking Phonebook names, please be aware
some phones require the last name to be spoken
before the fi rst name. For example, “Michael Smith”
may be spoken as “Smith Michael”.
To cancel a voice recognition session simply wait 5 seconds, say “Cancel” or “Quit”, or
press and hold the
button for 5 seconds.
To increase or decrease the volume of the voice prompts, push the volume \
control switches
+ or - on the steering wheel or turn the control dial on the audio syste\
m while the audio system
is responding.
02
01
SYSTEM GUIDE