2014 NISSAN JUKE manual radio set
[x] Cancel search: manual radio setPage 156 of 402
4 Heater, air conditioner, audio and phone sys-tems
Safety note ........................................................................\
.......... 4-3
Control panel buttons — color screen (Type A) ............... 4-3
How to use touch screen ................................................. 4-4
How to use the BACK button ......................................... 4-6
How to use brightness control and display
ON/OFF button ................................................................... 4-6
How to use the SETUP button ....................................... 4-6
Control panel buttons — color screen (Type B) ........... 4-10 How to use touch screen .............................................. 4-10
How to use the BACK button ...................................... 4-11
How to use the APPS·i button ..................................... 4-12
How to use brightness control button ........................ 4-15
How to use the ON·OFF button/Volume
control knob ....................................................................... 4-15
How to use the CAMERA button ................................ 4-15
RearView monitor (if so equipped) ................................... 4-15
How to read the displayed lines .................................. 4-16
Difference between predictive and
actual distances ................................................................ 4-17
Adjusting the screen (if so equipped) ........................ 4-19
Operating tips ................................................................... 4-19
Ventilators ........................................................................\
......... 4-19 Center ventilators ............................................................. 4-19
Side ventilators ................................................................. 4-20 Heater and air conditioner .................................................. 4-20
Manual air conditioner (if so equipped) ................... 4-21
Automatic air conditioner (with Integrated
Control System) ............................................................. 4-24
Operating tips (for automatic air conditioner) ........ 4-27
In-cabin microfilter ......................................................... 4-27
Servicing air conditioner .............................................. 4-27
Audio system ........................................................................\
.. 4-28 Audio operation precautions ....................................... 4-28
FM-AM-SAT radio with Compact Disc (CD) player
(Type A) ........................................................................\
.... 4-41
FM-AM-SAT radio with Compact Disc (CD) player
(Type B) ........................................................................\
.... 4-48
FM-AM-SAT radio with Compact Disc (CD) player
(Type C) ........................................................................\
... 4-57
CD/USB memory care and cleaning ........................ 4-68
Steering wheel switch for audio control .................. 4-69
Antenna ........................................................................\
.... 4-70
NissanConnect
TMApp smartphone integration (if
so equipped) ........................................................................\
.. 4-71
Registering with NissanConnect
TMApp .................. 4-71
Connect phone ............................................................... 4-71
Application download ................................................... 4-71
Car phone or CB radio ........................................................ 4-71
Page 162 of 402
to disable the feature entirely.
AUX Level:
Controls the volume level of incoming sound
when an auxiliary device is connected to the
system. Available options are Quiet, Medium
and Loud.
Navigation setup
Refer to the separate Navigation System Own-
er’s Manual for information regarding this item.
XM setup
For SiriusXM Satellite Radio setup, refer to “FM-
AM-SAT radio with Compact Disc (CD) player
(Type B)” (P.4-48).SAA3391
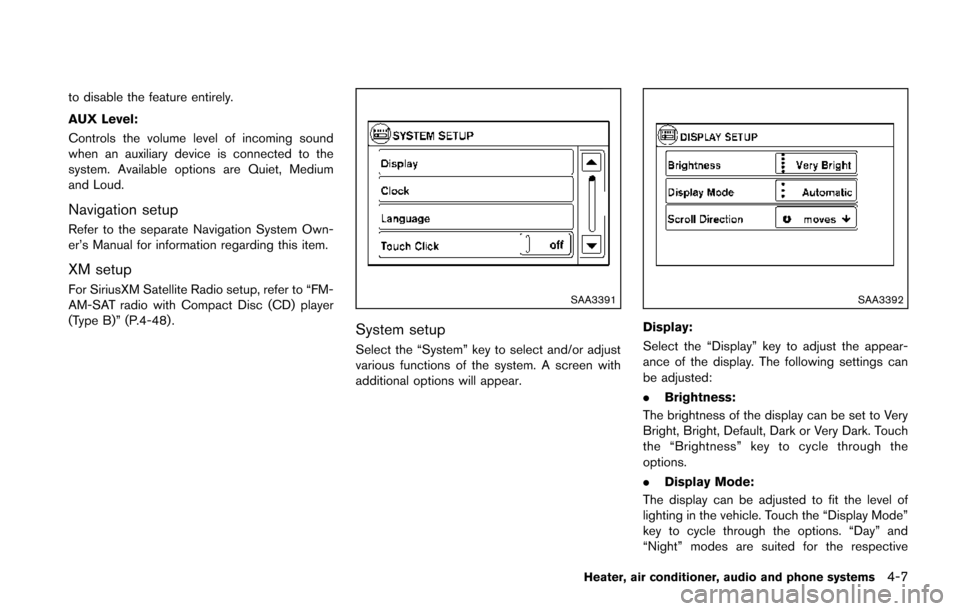
System setup
Select the “System” key to select and/or adjust
various functions of the system. A screen with
additional options will appear.
SAA3392
Display:
Select the “Display” key to adjust the appear-
ance of the display. The following settings can
be adjusted:
.Brightness:
The brightness of the display can be set to Very
Bright, Bright, Default, Dark or Very Dark. Touch
the “Brightness” key to cycle through the
options.
. Display Mode:
The display can be adjusted to fit the level of
lighting in the vehicle. Touch the “Display Mode”
key to cycle through the options. “Day” and
“Night” modes are suited for the respective
Heater, air conditioner, audio and phone systems4-7
Page 168 of 402
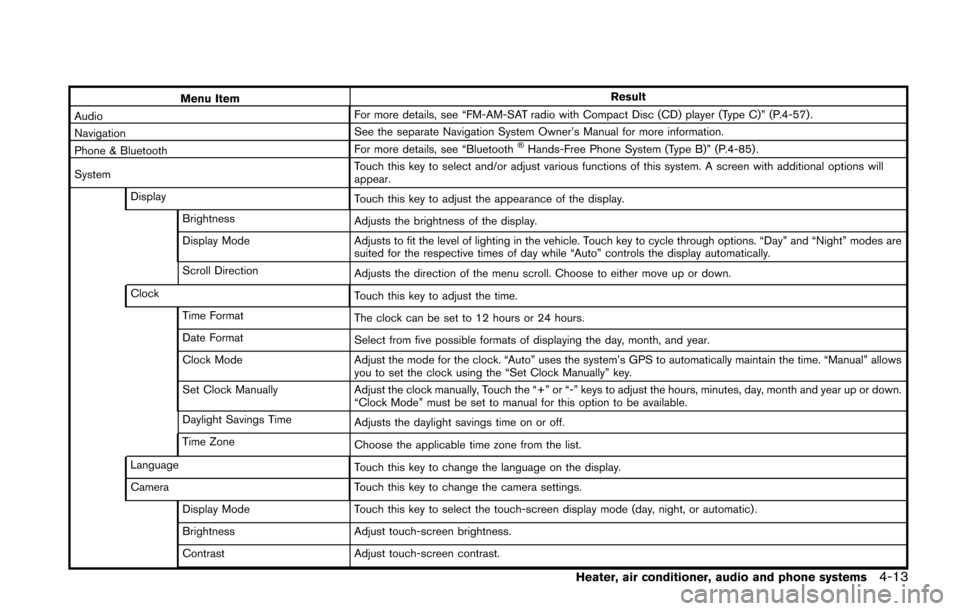
Menu ItemResult
Audio For more details, see “FM-AM-SAT radio with Compact Disc (CD) player (Type C)” (P.4-57) .
Navigation See the separate Navigation System Owner’s Manual for more information.
Phone & Bluetooth For more details, see “Bluetooth
®Hands-Free Phone System (Type B)” (P.4-85) .
System Touch this key to select and/or adjust various functions of this system. A screen with additional options will
appear.
Display Touch this key to adjust the appearance of the display.
Brightness Adjusts the brightness of the display.
Display Mode Adjusts to fit the level of lighting in the vehicle. Touch key to cycle through options. “Day” and “Night” modes are
suited for the respective times of day while “Auto” controls the display automatically.
Scroll Direction Adjusts the direction of the menu scroll. Choose to either move up or down.
Clock Touch this key to adjust the time.
Time Format The clock can be set to 12 hours or 24 hours.
Date Format Select from five possible formats of displaying the day, month, and year.
Clock Mode Adjust the mode for the clock. “Auto” uses the system’s GPS to automatically maintain the time. “Manual” allows
you to set the clock using the “Set Clock Manually” key.
Set Clock Manually Adjust the clock manually, Touch the “+” or “-” keys to adjust the hours, minutes, day, month and year up or down.
“Clock Mode” must be set to manual for this option to be available.
Daylight Savings Time Adjusts the daylight savings time on or off.
Time Zone Choose the applicable time zone from the list.
Language Touch this key to change the language on the display.
Camera Touch this key to change the camera settings.
Display Mode Touch this key to select the touch-screen display mode (day, night, or automatic) .
Brightness Adjust touch-screen brightness.
Contrast Adjust touch-screen contrast.
Heater, air conditioner, audio and phone systems4-13
Page 169 of 402
4-14Heater, air conditioner, audio and phone systems
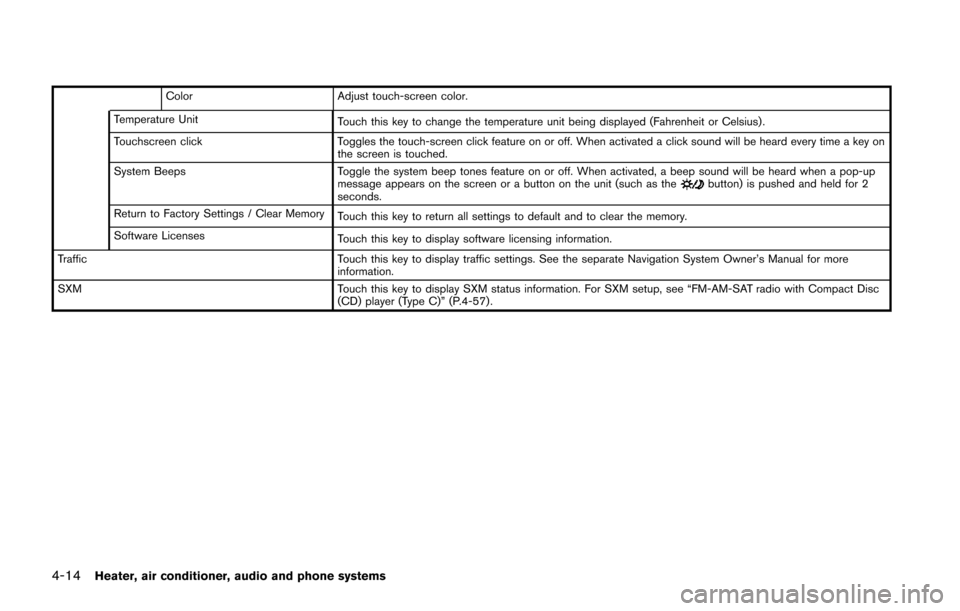
ColorAdjust touch-screen color.
Temperature Unit Touch this key to change the temperature unit being displayed (Fahrenheit or Celsius) .
Touchscreen click Toggles the touch-screen click feature on or off. When activated a click sound will be heard every time a key on
the screen is touched.
System Beeps Toggle the system beep tones feature on or off. When activated, a beep sound will be heard when a pop-up
message appears on the screen or a button on the unit (such as the
button) is pushed and held for 2
seconds.
Return to Factory Settings / Clear Memory Touch this key to return all settings to default and to clear the memory.
Software Licenses Touch this key to display software licensing information.
Traffic Touch this key to display traffic settings. See the separate Navigation System Owner’s Manual for more
information.
SXM Touch this key to display SXM status information. For SXM setup, see “FM-AM-SAT radio with Compact Disc
(CD) player (Type C)” (P.4-57) .
Page 197 of 402
4-42Heater, air conditioner, audio and phone systems
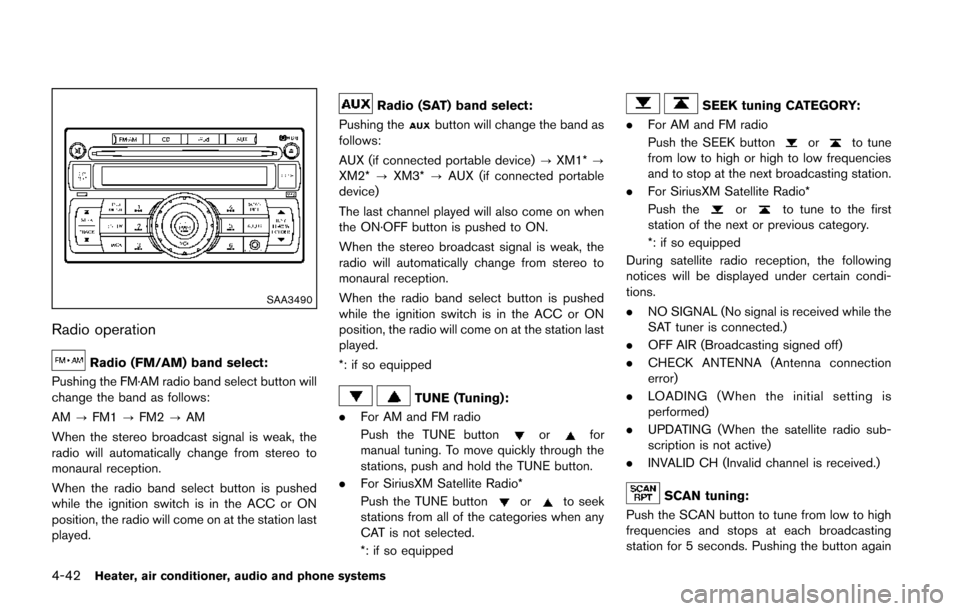
SAA3490
Radio operation
Radio (FM/AM) band select:
Pushing the FM·AM radio band select button will
change the band as follows:
AM ?FM1 ?FM2 ?AM
When the stereo broadcast signal is weak, the
radio will automatically change from stereo to
monaural reception.
When the radio band select button is pushed
while the ignition switch is in the ACC or ON
position, the radio will come on at the station last
played.
Radio (SAT) band select:
Pushing the
button will change the band as
follows:
AUX (if connected portable device) ?XM1* ?
XM2* ?XM3* ?AUX (if connected portable
device)
The last channel played will also come on when
the ON·OFF button is pushed to ON.
When the stereo broadcast signal is weak, the
radio will automatically change from stereo to
monaural reception.
When the radio band select button is pushed
while the ignition switch is in the ACC or ON
position, the radio will come on at the station last
played.
*: if so equipped
TUNE (Tuning):
. For AM and FM radio
Push the TUNE button
orfor
manual tuning. To move quickly through the
stations, push and hold the TUNE button.
. For SiriusXM Satellite Radio*
Push the TUNE button
orto seek
stations from all of the categories when any
CAT is not selected.
*: if so equipped
SEEK tuning CATEGORY:
. For AM and FM radio
Push the SEEK button
orto tune
from low to high or high to low frequencies
and to stop at the next broadcasting station.
. For SiriusXM Satellite Radio*
Push the
orto tune to the first
station of the next or previous category.
*: if so equipped
During satellite radio reception, the following
notices will be displayed under certain condi-
tions.
. NO SIGNAL (No signal is received while the
SAT tuner is connected.)
. OFF AIR (Broadcasting signed off)
. CHECK ANTENNA (Antenna connection
error)
. LOADING (When the initial setting is
performed)
. UPDATING (When the satellite radio sub-
scription is not active)
. INVALID CH (Invalid channel is received.)
SCAN tuning:
Push the SCAN button to tune from low to high
frequencies and stops at each broadcasting
station for 5 seconds. Pushing the button again
Page 204 of 402
on, pushing the ON·OFF button turns the system
off.
Turn the VOL control knob to adjust the volume.
Adjusting tone quality and speaker bal-
ance:
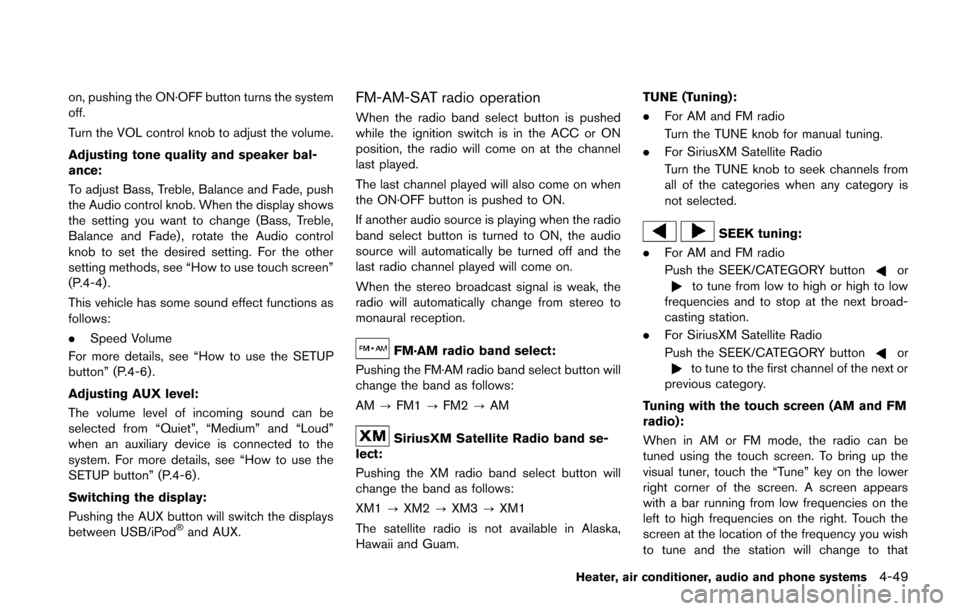
To adjust Bass, Treble, Balance and Fade, push
the Audio control knob. When the display shows
the setting you want to change (Bass, Treble,
Balance and Fade) , rotate the Audio control
knob to set the desired setting. For the other
setting methods, see “How to use touch screen”
(P.4-4) .
This vehicle has some sound effect functions as
follows:
.Speed Volume
For more details, see “How to use the SETUP
button” (P.4-6).
Adjusting AUX level:
The volume level of incoming sound can be
selected from “Quiet”, “Medium” and “Loud”
when an auxiliary device is connected to the
system. For more details, see “How to use the
SETUP button” (P.4-6) .
Switching the display:
Pushing the AUX button will switch the displays
between USB/iPod
®and AUX.
FM-AM-SAT radio operation
When the radio band select button is pushed
while the ignition switch is in the ACC or ON
position, the radio will come on at the channel
last played.
The last channel played will also come on when
the ON·OFF button is pushed to ON.
If another audio source is playing when the radio
band select button is turned to ON, the audio
source will automatically be turned off and the
last radio channel played will come on.
When the stereo broadcast signal is weak, the
radio will automatically change from stereo to
monaural reception.
FM·AM radio band select:
Pushing the FM·AM radio band select button will
change the band as follows:
AM ?FM1 ?FM2 ?AM
SiriusXM Satellite Radio band se-
lect:
Pushing the XM radio band select button will
change the band as follows:
XM1 ?XM2 ?XM3 ?XM1
The satellite radio is not available in Alaska,
Hawaii and Guam. TUNE (Tuning):
. For AM and FM radio
Turn the TUNE knob for manual tuning.
. For SiriusXM Satellite Radio
Turn the TUNE knob to seek channels from
all of the categories when any category is
not selected.
SEEK tuning:
. For AM and FM radio
Push the SEEK/CATEGORY button
orto tune from low to high or high to low
frequencies and to stop at the next broad-
casting station.
. For SiriusXM Satellite Radio
Push the SEEK/CATEGORY button
orto tune to the first channel of the next or
previous category.
Tuning with the touch screen (AM and FM
radio):
When in AM or FM mode, the radio can be
tuned using the touch screen. To bring up the
visual tuner, touch the “Tune” key on the lower
right corner of the screen. A screen appears
with a bar running from low frequencies on the
left to high frequencies on the right. Touch the
screen at the location of the frequency you wish
to tune and the station will change to that
Heater, air conditioner, audio and phone systems4-49
Page 214 of 402
SiriusXM Satellite Radio service subscription is
active. Satellite radio is not available in Alaska,
Hawaii and Guam.
If a compact disc is playing when the SXM
button is pushed, the compact disc will auto-
matically be turned off and the last radio station
played will come on.
While the radio is in SXM mode, the operation
can be controlled through the touch-screen.
Touch the “Channels” key to display a list of
channels. Touch a channel displayed on the list
to change to that channel. Touch the “Cate-
gories” key to display a list of categories. Touch
a category displayed on the list to display
options within that category.
Tuning with the touch-screen:
When in AM or FM mode, the radio can be
tuned using the touch-screen. To bring up the
visual tuner, touch the “Tune” key on the lower
right corner of the screen. A screen appears
with a bar running from low frequencies on the
left to high frequencies on the right. Touch the
screen at the location of the frequency you wish
to tune and the station will change to that
frequency. To return to the regular radio display
screen, touch the “OK” key.
Tuning with the TUNE knob:
The radio can also be manually tuned using theTUNE knob. When in FM or AM mode, turn the
TUNE knob to the left for lower frequencies or to
the right for higher frequencies. When in SXM
mode, turn the TUNE knob to change the
channel.
SEEK tuning:
When in FM or AM mode, push the seek buttons
orto tune from low to high or high to
low frequencies and to stop at the next broad-
casting station.
When in SXM mode, push the seek buttons
orto change the category.JVH0741X
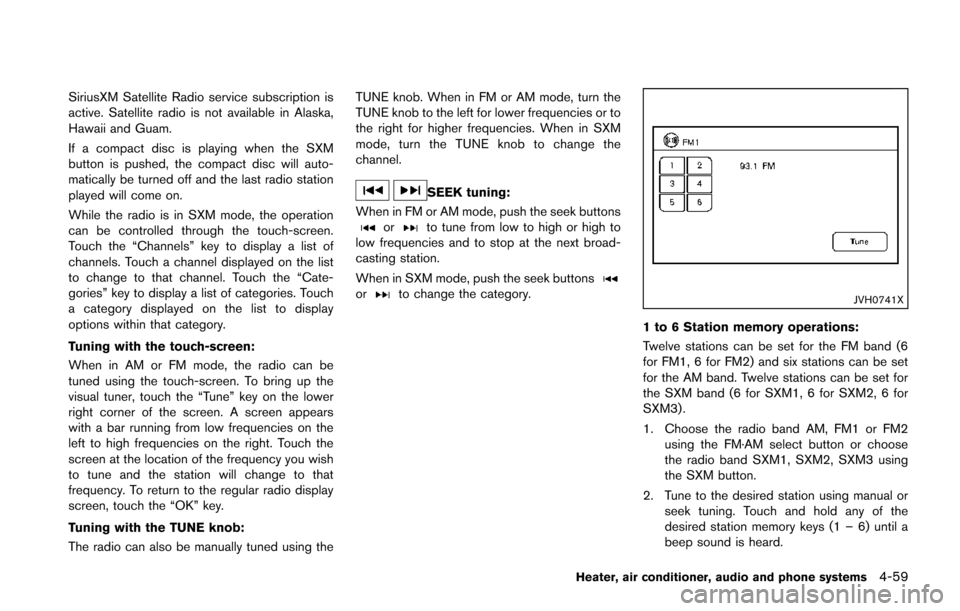
1 to 6 Station memory operations:
Twelve stations can be set for the FM band (6
for FM1, 6 for FM2) and six stations can be set
for the AM band. Twelve stations can be set for
the SXM band (6 for SXM1, 6 for SXM2, 6 for
SXM3) .
1. Choose the radio band AM, FM1 or FM2 using the FM·AM select button or choose
the radio band SXM1, SXM2, SXM3 using
the SXM button.
2. Tune to the desired station using manual or seek tuning. Touch and hold any of the
desired station memory keys (1 – 6) until a
beep sound is heard.
Heater, air conditioner, audio and phone systems4-59
Page 224 of 402
.A new disc may be rough on the inner and
outer edges. Remove the rough edges by
rubbing the inner and outer edges with the
side of a pen or pencil as illustrated.
USB memory
.Do not touch the terminal portion of the USB
memory.
. Do not place heavy objects on the USB
memory.
. Do not store the USB memory in very humid
locations.
. Do not expose the USB memory to direct
sunlight.
. Do not spill any liquids on the USB memory.
Refer to the USB memory Owner’s Manual for
the details.
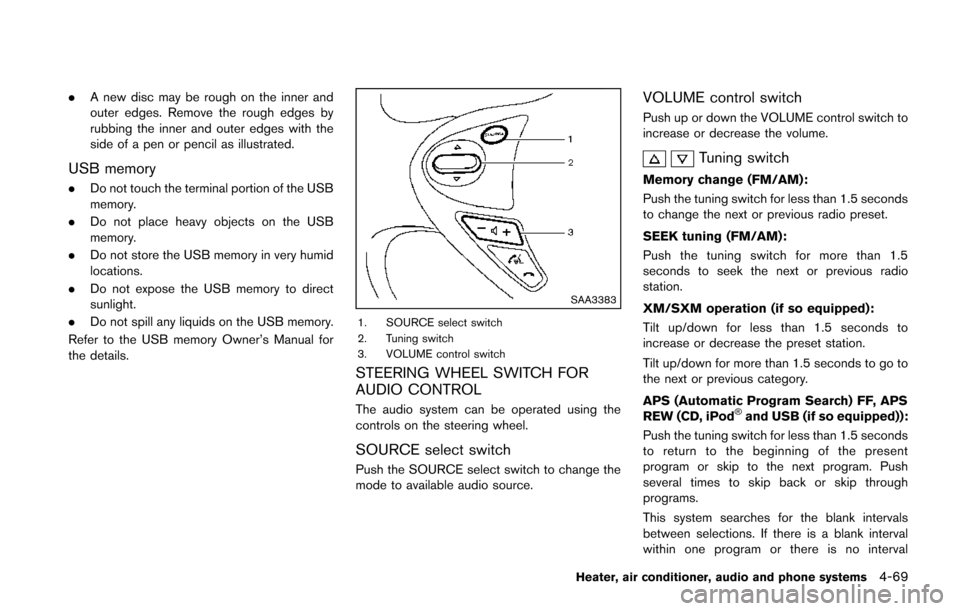
SAA3383
1. SOURCE select switch
2. Tuning switch
3. VOLUME control switch
STEERING WHEEL SWITCH FOR
AUDIO CONTROL
The audio system can be operated using the
controls on the steering wheel.
SOURCE select switch
Push the SOURCE select switch to change the
mode to available audio source.
VOLUME control switch
Push up or down the VOLUME control switch to
increase or decrease the volume.
Tuning switch
Memory change (FM/AM):
Push the tuning switch for less than 1.5 seconds
to change the next or previous radio preset.
SEEK tuning (FM/AM):
Push the tuning switch for more than 1.5
seconds to seek the next or previous radio
station.
XM/SXM operation (if so equipped):
Tilt up/down for less than 1.5 seconds to
increase or decrease the preset station.
Tilt up/down for more than 1.5 seconds to go to
the next or previous category.
APS (Automatic Program Search) FF, APS
REW (CD, iPod
®and USB (if so equipped)):
Push the tuning switch for less than 1.5 seconds
to return to the beginning of the present
program or skip to the next program. Push
several times to skip back or skip through
programs.
This system searches for the blank intervals
between selections. If there is a blank interval
within one program or there is no interval
Heater, air conditioner, audio and phone systems4-69