2014 NISSAN GT-R display
[x] Cancel search: displayPage 209 of 354
5-12Starting and driving
the Intelligent Key out of the port.
NOTICE
Never place anything except the Intelli-
gent Key in the Intelligent Key port.
Doing so may cause damage to the
equipment.
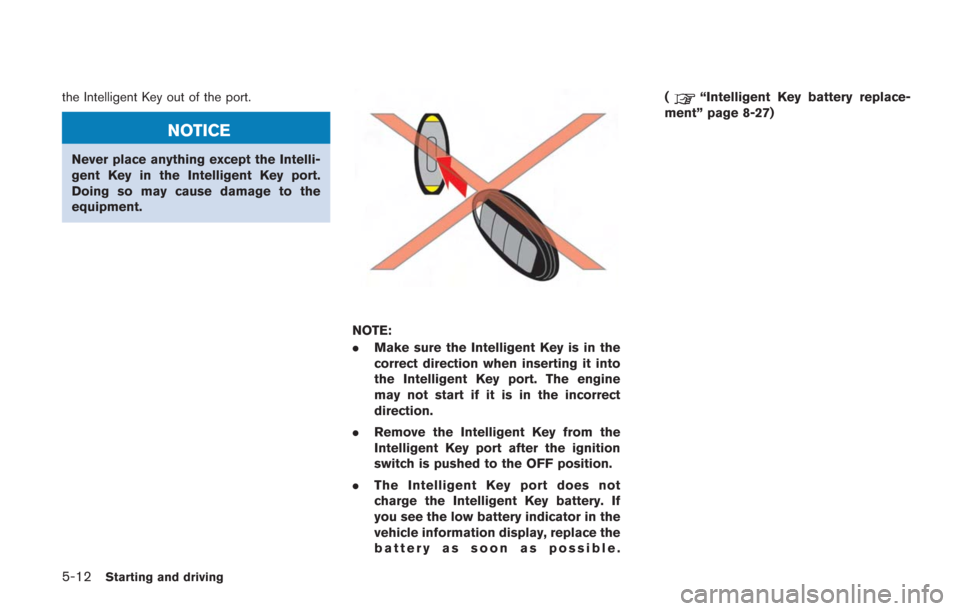
NOTE:
.Make sure the Intelligent Key is in the
correct direction when inserting it into
the Intelligent Key port. The engine
may not start if it is in the incorrect
direction.
. Remove the Intelligent Key from the
Intelligent Key port after the ignition
switch is pushed to the OFF position.
. The Intelligent Key port does not
charge the Intelligent Key battery. If
you see the low battery indicator in the
vehicle information display, replace the
battery as soon as possible. (
“Intelligent Key battery replace-
ment” page 8-27)
Page 211 of 354
5-14Starting and driving
NOTE:
.Care should be taken to avoid situa-
tions that can lead to potential battery
discharge and potential no-start condi-
tions such as:
a. Installation or extended use of elec-
tronic accessories that consume
battery power when the engine is
not running (Phone chargers, GPS,
DVD players, etc.)
b. Vehicle is not driven regularly and/
or only driven short distances.
In these cases, the battery may need to
be charged to maintain battery health.
. If the engine is difficult to start, de-
press the accelerator pedal all the way
to the floor and hold it. Push the
ignition switch with the brake pedal
depressed to start cranking the engine.
After 5 or 6 seconds, stop cranking by
pushing the ignition switch to the OFF
position, and then release the accel-
erator pedal. Then perform steps 1 to 5
to start the engine. If the engine starts,
but fails to run, repeat this procedure.
. Starting and stopping the engine over a
short period of time may make the
vehicle more difficult to start. If this
occurs, wait for more than 3 minutes, and then push the ignition switch again
to start the engine.
. To maintain high performance over a
long period of time, the engine speed is
limited to 5,000 rpm when the engine is
revved with the shift lever in the
&Nor
&Pposition, and to 4,000 rpm when the
engine oil or coolant temperature is
low or higher than normal.
. If the ignition switch is pushed before
the shift lever is moved to the
&P
position, the ignition switch will not
change to the OFF position. If this
occurs, the SHIFT
&Pwarning display
appears on the vehicle information
display. When stopping the engine, be
sure to move the shift lever to the
&P
position and then push the ignition
switch. Failure to do so may result in
discharge of the battery. (
“Shift
“P” warning” page 2-43)
. If the shift lever was in the
&A↔&Mor&R
position when the engine was stopped,
then be sure to move the shift lever to
the
&Pposition before starting the
engine the next time. If the engine is
started with the shift lever in the
&N
position, then it may not be possible to drive the vehicle even when the shift
lever is moved to the
&A↔&Mor&R
position. If this occurs, the SHIFT&P
warning appears on the vehicle infor-
mation display. (“Shift “P” warn-
ing” page 2-43)
CAUTION
If the engine was stopped soon when
the engine is hot, the cooling fan may
operate for approximately 2 minutes
after the engine was stopped to cool
the components in the engine compart-
ment. When the cooling fan is operat-
ing, be sure that hands or other items
do not get caught in it.
Page 215 of 354
5-18Starting and driving
NOTICE
.Be sure to observe the following
precautions. Failure to do so may
result in shift lever malfunction.
— Do not spill water, beverages or
other liquids on the shift lever.
— Do not allow sand or similar substances to contact the shift
lever.
. Develop the habit of performing the
operations marked with “
” with-
out pressing the button. If the
button is pressed at these times,
there is the possibility that the lever
could accidentally enter the
&Por&R
positions.
. When the vehicle is hot, the area
around the shift lever may be hot or
may produce an unusual sound,
however this does not indicate that
there is a malfunction.
. Avoid depressing the brake and
accelerator pedals at the same time.
Depressing both pedals at the same
time could cause the clutch to over-
heat and accelerate deterioration. NOTE:
.
When moving the shift lever out of the
&Pposition, it may not be possible to
move the shift lever if the button is
pressed before the brake pedal is
depressed. Press the button only after
depressing the brake pedal.
. Do not place coins or other small
objects in the area around the shift
lever. These objects may get stuck in
the shift gate and prevent the shift
lever from moving into a position.
Sometimes, you may not be able to
retrieve these objects.
. Immediately after a cold start, while the
transmission system check display (“T/
M SYSTEM CHECK IN PROCESS”)
appears on the vehicle information
display, the shift lever cannot be moved
out of the
&Pposition. This is because a
check of the transmission system is in
progress. This does not indicate that
there is a malfunction. Move the shift
lever after the message on the vehicle
information display turns off.
. The shift lever knob and console-
mounted shift indicator have a genuine
leather finish that requires proper care and maintenance. (
“Cleaning in-
terior” page 7-5)
Page 232 of 354
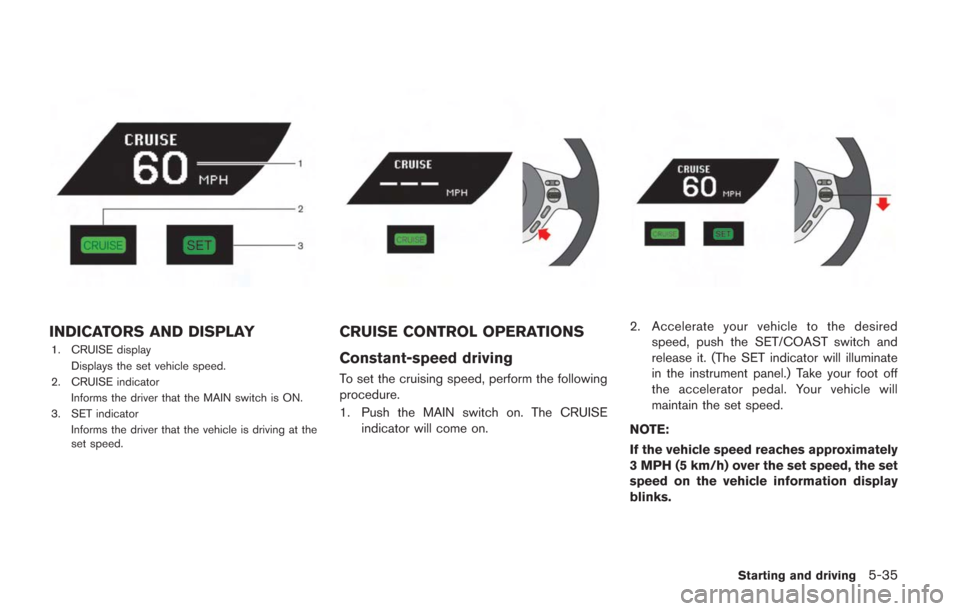
INDICATORS AND DISPLAY
1. CRUISE displayDisplays the set vehicle speed.
2. CRUISE indicator
Informs the driver that the MAIN switch is ON.
3. SET indicator Informs the driver that the vehicle is driving at the
set speed.
CRUISE CONTROL OPERATIONS
Constant-speed driving
To set the cruising speed, perform the following
procedure.
1. Push the MAIN switch on. The CRUISEindicator will come on.
2. Accelerate your vehicle to the desiredspeed, push the SET/COAST switch and
release it. (The SET indicator will illuminate
in the instrument panel.) Take your foot off
the accelerator pedal. Your vehicle will
maintain the set speed.
NOTE:
If the vehicle speed reaches approximately
3 MPH (5 km/h) over the set speed, the set
speed on the vehicle information display
blinks.
Starting and driving5-35
Page 235 of 354
5-38Starting and driving
hill start assist will stop operating completely.
Hill start assist will not operate when the shift
lever is moved to the
&Nor&Pposition or on a
flat and level road.
NOTE:
This system does not function when the
Vehicle Dynamic Control VDC) system
warning appears on the vehicle informa-
tion display located in the tachometer.
(
“Vehicle Dynamic Control (VDC) sys-
tem warning” page 2-37)
NOTICE
Follow these recommendations to ob-
tain maximum engine performance and
ensure the future reliability and econo-
my of your new vehicle. Failure to
follow these recommendations may
result in shortened engine life and
reduced vehicle performance.
Please observe the following types of driving
until the mileage shown below has been
reached.
Until 300 miles (500 km):
. Do not depress the accelerator pedal more
than halfway and avoid rapid acceleration.
. Drive with the engine speed kept at less
than 3,500 RPM.
. Avoid unnecessary quick steering, abrupt
braking and driving on poor roads.
300 to 600 miles (500 to 1,000 km)
. Avoid rapid acceleration in a low gear (1st to
3rd gears) with the accelerator pedal fully
depressed. Depress the pedal slowly.
. Avoid unnecessary quick steering and
abrupt braking. .
Drive with the suspension setup switch in
the COMF mode to allow more suspension
stroke.
600 to 1,200 miles (1,000 to 2,000 km)
. Drive with the engine speed kept relatively
high with the shift lever in the
&Mposition.
Shifting is recommended between 1st and
4th gears.
. Avoid unnecessary quick steering and
abrupt braking.
. Drive with the suspension setup switch in
the COMF mode to allow more suspension
stroke.
Even though the mileage reaches over 1,200
miles (2,000 km) , the clutch may take longer to
properly engage if the vehicle is mainly driven in
town at a low speed. NISSAN recommends
breaking in the clutch at a GT-R certified
NISSAN dealer.
WHEEL ALIGNMENT
Do not adjust the wheel alignment until the
mileage reaches 1,000 miles (1,600 km). Until
then, the suspension may not engage enough
and the height may be higher.
However, make sure to adjust the alignment
after 1,000 miles (1,600 km) .
The wheel alignment can be adjusted by a GT-R
BREAK-IN SCHEDULE
Page 254 of 354
To shut off the engine in an emergency situation
while driving, perform the following procedure:
.Rapidly push the push-button ignition switch
3 consecutive times in less than 1.5
seconds, or
. Push and hold the push-button ignition
switch for more than 2 seconds.TIRE PRESSURE MONITORING
SYSTEM (TPMS)
This vehicle is equipped with the Tire Pressure
Monitoring System (TPMS) . It monitors tire
pressure of all tires. When the low tire pressure
warning light is lit, one or more of your tires is
significantly under-inflated. If the vehicle is being
driven with low tire pressure, the TPMS will
activate and warn you of it by the low tire
pressure warning light (in the instrument panel)
or the LOW PRESSURE information screen (on
the display) . This system will activate only when
the vehicle is driven at speeds above 16 MPH
(25 km/h). (
“Low tire pressure warning
light” page 2-27) (“Tire Pressure Monitor-
ing System (TPMS)” page 5-4)
WARNING
. If the low tire pressure warning light
illuminates or LOW PRESSURE in-
formation is displayed on the moni-
tor screen while driving, avoid
sudden steering maneuvers or
abrupt braking, reduce vehicle
speed, pull off the road to a safe
location and stop the vehicle as
soon as possible. Driving with un-
der-inflated tires may permanently damage the tires and increase the
likelihood of tire failure. Serious
vehicle damage could occur and
may lead to an accident and could
result in serious personal injury.
Check the tire pressure for all four
tires. Adjust the tire pressure to the
recommended COLD tire pressure
shown on the Tire and Loading
Information label to turn the low
tire pressure warning light off. If the
light still illuminates while driving
after adjusting the tire pressure, a
tire may be flat.
. When a wheel is replaced, the TPMS
will not function and the low tire
pressure warning light will flash for
approximately 1 minute. The light
will remain on after 1 minute. Con-
tact a GT-R certified NISSAN dealer
as soon as possible for tire replace-
ment and/or system resetting.
. Replacing tires with those not ori-
ginally specified by NISSAN could
affect the proper operation of the
TPMS.
. Do not inject any tire liquid or
aerosol tire sealant into the tires,
In case of emergency6-3
EMERGENCY ENGINE SHUT OFF FLAT TIRE
Page 255 of 354
6-4In case of emergency
as this may cause a malfunction of
the tire pressure sensors.
NOTE:
. You can check the pressure of all four
tires on the multi function display. See
the separate Multi Function Display
Owner’s Manual.
. The tires of this vehicle are filled with
nitrogen gas. When the tire pressure is
low, fill the tires with nitrogen. Contact
a GT-R certified NISSAN dealer for
information on filling the tires with
nitrogen.
. If nitrogen is not available, compressed
air may be safely used under normal
driving conditions. However, NISSAN
recommends refilling with nitrogen for
maximum tire performance.RUN-FLAT TIRES
Run-flat tires are those tires that can be used
temporarily if they are punctured. (“Run-flat
tires” page 8-38)
Also, see the tire safety information in the
Warranty Information Booklet.
WARNING
. Although you can continue driving
with a punctured run-flat tire, re-
member that vehicle handling sta-
bility is reduced, which could lead to
an accident and personal injury.
Also, driving a long distance at high
speeds may damage the tires.
. Do not drive at speeds above 50
MPH (80 km/h) and do not drive
more than 50 miles (80 km) with a
punctured run-flat tire. The actual
distance the vehicle can be driven
on a flat tire depends on outside
temperature, vehicle load, road con-
ditions and other factors.
. Drive safely at reduced speeds.
Avoid hard cornering or braking,
which may cause you to lose control
of the vehicle.
NOTICE
.Never install tire chains on a punc-
tured run-flat tire, as this could
damage your vehicle.
. Avoid driving over any projection or
pothole, as the clearance between
the vehicle and the ground is smal-
ler than normal.
. Do not enter an automated car wash
with a punctured run-flat tire.
. Have the punctured tire replaced by
your GT-R certified NISSAN dealer
as soon as possible, as the tire’s
performance capability is reduced.
If you have a flat tire and have to stop the
vehicle, follow the instructions below.
1. Safely move the vehicle off the road and away from traffic.
2. Turn on the hazard warning flashers.
3. Park on a level surface and apply the parking brake. Move the shift lever to the
&Pposition.
4. Turn off the engine.
5. Raise the hood to warn other traffic, and to signal professional road assistance person-
nel that you need assistance.
Page 275 of 354
8-4Maintenance and do-it-yourself
During the normal day-to-day operation of the
vehicle, general maintenance should be per-
formed regularly as prescribed in this section. If
you detect any unusual sounds, vibrations or
smell, be sure to check for the cause or have a
GT-R certified NISSAN dealer do it promptly. In
addition, you should notify a GT-R certified
NISSAN dealer if you think that repairs are
required. (
“Maintenance precautions”
page 8-6)
EXPLANATION OF MAINTENANCE
ITEMS
Additional information on the following
items with “*” is found later in this section.
Outside the vehicle
The maintenance items listed here should be
performed from time to time, unless otherwise
specified.
Doors and engine hood: Check that all doors
and the engine hood, operate properly. Also
ensure that all latches lock securely. Lubricate
hinges, latches, latch pins, rollers and links if
necessary. Make sure that the secondary latch
keeps the hood from opening when the primary
latch is released.
When driving in areas using road salt or other
corrosive materials, check lubrication frequently. Lights*:
Clean the headlights on a regular basis.
Make sure that the headlights, stop lights, tail
lights, turn signal lights, and other lights are all
operating properly and installed securely. Also
check headlight aim.
Road wheel nuts (lug nuts)*: When checking
the tires, make sure no wheel nuts are missing,
and check for any loose wheel nuts. Tighten if
necessary.
Tire rotation*: Tires cannot be rotated because
your vehicle is equipped with different sized tires
in the front and rear.
Tires*: Check the pressure with a gauge often
and always prior to long distance trips. If
necessary, adjust the pressure in all tires to the
pressure specified. Check carefully for damage,
cuts or excessive wear.
NOTE:
. You can check the pressure of all four
tires on the multi function display. See
the separate Multi Function Display
Owner’s Manual.
. The tires of this vehicle are filled with
nitrogen gas. When the tire pressure is
low, fill the tires with nitrogen. Contact
a GT-R certified NISSAN dealer for
information on filling the tires with
nitrogen. .
If nitrogen is not available, compressed
air may be safely used under normal
driving conditions. However, NISSAN
recommends refilling with nitrogen for
maximum tire performance.
Tire Pressure Monitoring System (TPMS)
transmitter components: Replace grommet
seal of transmitter in TPMS, when replacing
each tire by reaching the wear limit.
Tire, wheel alignment and balance: If the
vehicle should pull to either side while driving on
a straight and level road, or if you detect uneven
or abnormal tire wear, there may be a need for
wheel alignment.
If the steering wheel or seat vibrates at normal
highway speeds, wheel balancing may be
needed.
For additional information regarding tires, refer
to “Important Tire Safety Information” (US) or
“Tire Safety Information” (Canada) in the War-
ranty Information Booklet.
Windshield: Clean the windshield on a regular
basis. Check the windshield at least every six
months for cracks or other damage. Have a
damaged windshield repaired by a qualified
repair facility.
Windshield wiper blades*: Check for cracks
or wear if they do not wipe properly.
GENERAL MAINTENANCE