2014 NISSAN GT-R key
[x] Cancel search: keyPage 207 of 354
5-10Starting and driving
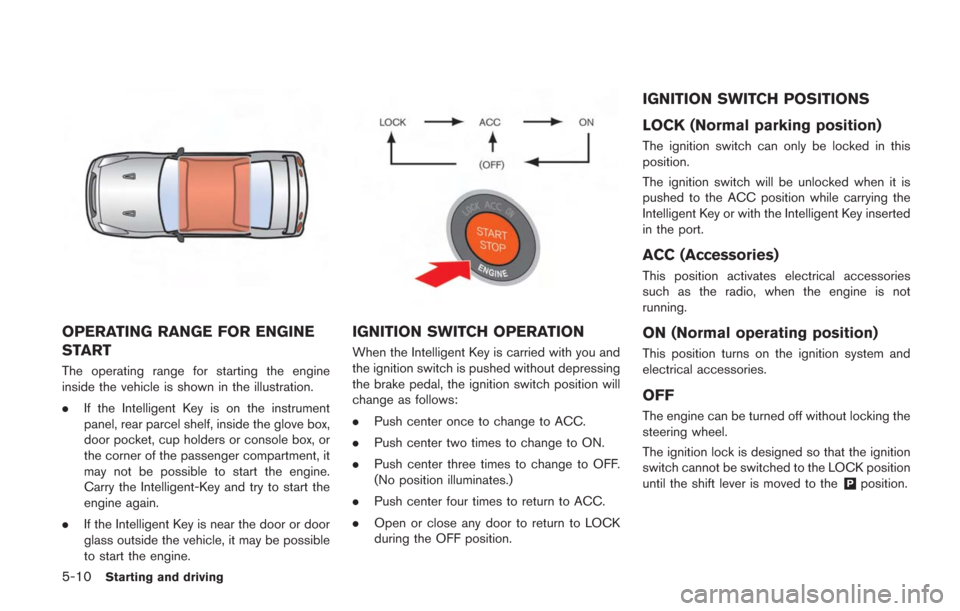
OPERATING RANGE FOR ENGINE
START
The operating range for starting the engine
inside the vehicle is shown in the illustration.
.If the Intelligent Key is on the instrument
panel, rear parcel shelf, inside the glove box,
door pocket, cup holders or console box, or
the corner of the passenger compartment, it
may not be possible to start the engine.
Carry the Intelligent-Key and try to start the
engine again.
. If the Intelligent Key is near the door or door
glass outside the vehicle, it may be possible
to start the engine.
IGNITION SWITCH OPERATION
When the Intelligent Key is carried with you and
the ignition switch is pushed without depressing
the brake pedal, the ignition switch position will
change as follows:
.Push center once to change to ACC.
. Push center two times to change to ON.
. Push center three times to change to OFF.
(No position illuminates.)
. Push center four times to return to ACC.
. Open or close any door to return to LOCK
during the OFF position.
IGNITION SWITCH POSITIONS
LOCK (Normal parking position)
The ignition switch can only be locked in this
position.
The ignition switch will be unlocked when it is
pushed to the ACC position while carrying the
Intelligent Key or with the Intelligent Key inserted
in the port.
ACC (Accessories)
This position activates electrical accessories
such as the radio, when the engine is not
running.
ON (Normal operating position)
This position turns on the ignition system and
electrical accessories.
OFF
The engine can be turned off without locking the
steering wheel.
The ignition lock is designed so that the ignition
switch cannot be switched to the LOCK position
until the shift lever is moved to the
&Pposition.
Page 208 of 354
NOTE:
.If the steering lock release malfunction
indicator appears on the vehicle infor-
mation display when the ignition
switch is pressed, press the ignition
switch again while gently turning the
steering wheel left and right.
(
“Steering lock release malfunc-
tion indicator” page 2-43)
. If the shift
&Pwarning appears on the
vehicle information display when the
ignition switch is pushed, the shift lever
is in any position except the
&Pposi-
tion. Move the shift lever to the&P
position. (“Shift “P” warning”
page 2-43)
. If the Intelligent Key battery discharge
indicator appears on the vehicle infor-
mation display, the Intelligent Key
battery is discharged and the ignition
switch will not operate. Insert the
Intelligent Key into the key port to
operate the ignition switch.
(
“Intelligent Key battery discharge
indicator” page 2-44)
. When all of the following conditions
are met for 60 minutes, the battery
saver system will cut off the power
supply to prevent battery discharge. —
The ignition switch is in the ACC
position, and
— All doors are closed, and
— The shift lever is in the
&Pposition.
. Do not leave the vehicle with the
ignition switch in the ACC or ON
position when the engine is not run-
ning for an extended period of time.
This can discharge the battery.
EMERGENCY ENGINE SHUT OFF
To shut off the engine in an emergency situation
while driving, perform the following procedure:
.Rapidly push the push-button ignition switch
3 consecutive times in less than 1.5
seconds, or
. Push and hold the push button ignition
switch for more than 2 seconds.
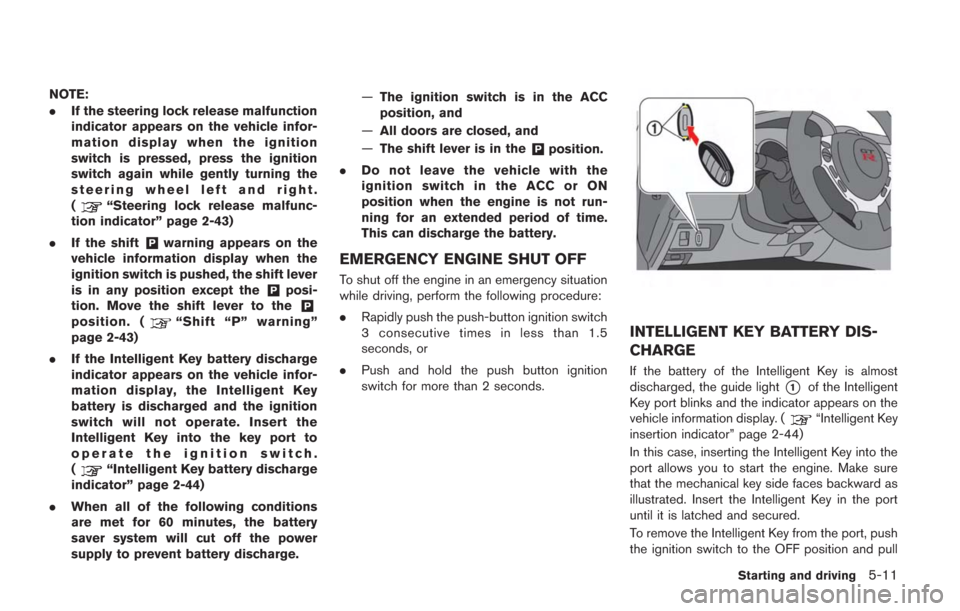
INTELLIGENT KEY BATTERY DIS-
CHARGE
If the battery of the Intelligent Key is almost
discharged, the guide light
*1of the Intelligent
Key port blinks and the indicator appears on the
vehicle information display. (
“Intelligent Key
insertion indicator” page 2-44)
In this case, inserting the Intelligent Key into the
port allows you to start the engine. Make sure
that the mechanical key side faces backward as
illustrated. Insert the Intelligent Key in the port
until it is latched and secured.
To remove the Intelligent Key from the port, push
the ignition switch to the OFF position and pull
Starting and driving5-11
Page 209 of 354
5-12Starting and driving
the Intelligent Key out of the port.
NOTICE
Never place anything except the Intelli-
gent Key in the Intelligent Key port.
Doing so may cause damage to the
equipment.
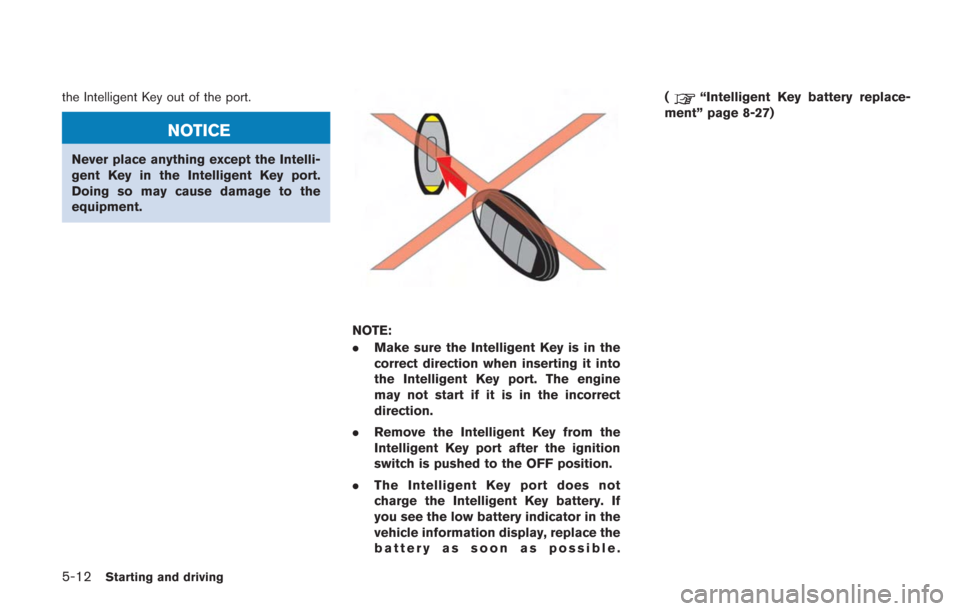
NOTE:
.Make sure the Intelligent Key is in the
correct direction when inserting it into
the Intelligent Key port. The engine
may not start if it is in the incorrect
direction.
. Remove the Intelligent Key from the
Intelligent Key port after the ignition
switch is pushed to the OFF position.
. The Intelligent Key port does not
charge the Intelligent Key battery. If
you see the low battery indicator in the
vehicle information display, replace the
battery as soon as possible. (
“Intelligent Key battery replace-
ment” page 8-27)
Page 248 of 354
See your 2014 Warranty Information Booklet for
important related information and warranty
coverage exclusions. See also section 2 (page
“Transmission warning light” page 2-30)
and section 5 (page“Vehicle Dynamic
Control (VDC) system” page 5-49) of this
Owner’s Manual, “Transmission Clutch Tem-
perature High” and “Vehicle Dynamic Control
(VDC) System” for important additional related
information.
. Except for the emergency cases above,
any issues related to driving stability
(e.g., steering maneuvers and maneu-
vers during acceleration and decelera-
tion) and any damages to drivetrain
components (e.g., transfer, clutch, a
sort of gear, transaxle case) will not
be covered by warranty if there is a
record in the Vehicle Status Data
Recorder (VSDR) that the vehicle was
driven with VDC off.
. When attempting to free the vehicle
from mud or fresh snow, the VDC will
detect the tire slipping, and the engine
speed may not increase even when the
accelerator pedal is depressed. To raise
the engine speed, use the VDC set up
switch to turn the VDC system OFF and
select SAVE mode with the transmis- sion switch. (
“VDC, transmission
and suspension setup switches” page
5-24)
. When the VDC system is turned OFF,
all VDC functions (including traction
control) , except for the ABS functions,
are deactivated.FREEING A FROZEN DOOR LOCK
To prevent a door lock from freezing, apply
deicer through the key hole. If the lock becomes
frozen, heat the key before inserting it into the
key hole or use the Intelligent Key system.
ANTI-FREEZE
In the winter when it is anticipated that the
outside temperature will drop below 328F(0 8C) ,
check antifreeze to assure proper winter protec-
tion. (
“Engine cooling system” page 8-10)
BATTERY
If the battery is not fully charged during
extremely cold weather conditions, the battery
fluid may freeze and damage the battery. To
maintain maximum efficiency, the battery should
be checked regularly. (
“Battery” page 8-
17)
DRAINING OF COOLANT WATER
If the vehicle is to be left outside without
antifreeze, drain the cooling system, including
the engine block. Refill before operating the
vehicle. For details, contact a GT-R certified
NISSAN dealer.
Starting and driving5-51
COLD WEATHER DRIVING
Page 272 of 354
8 Maintenance and do-it-yourself
Maintenance requirement ....................................................... 8-3Scheduled maintenance ................................................... 8-3
General maintenance ........................................................ 8-3
Where to go for service ................................................... 8-3
General maintenance .............................................................. 8-4 Explanation of maintenance items ................................. 8-4
Maintenance precautions ....................................................... 8-6
Engine compartment check locations ................................. 8-8 Removing the cowl top cover ......................................... 8-9
Engine cooling system ......................................................... 8-10
Checking engine coolant level ..................................... 8-11
Changing engine coolant .............................................. 8-12
Engine oil ........................................................................\
........ 8-12
Checking engine oil level .............................................. 8-12
Changing engine oil and filter ...................................... 8-13
Transmission oil ..................................................................... 8-14
Power steering fluid .............................................................. 8-14
Brake fluid ........................................................................\
....... 8-15
Window washer fluid ........................................................... 8-16
Battery ........................................................................\
.............. 8-17
Precautions ....................................................................... 8-17
Fluid level check .............................................................. 8-17
Jump starting .................................................................... 8-19 Drive belts ........................................................................\
...... 8-19
Spark plugs ........................................................................\
.... 8-20
Replacing spark plugs ................................................. 8-20
Air cleaner ........................................................................\
...... 8-20
Windshield wiper blades .................................................... 8-21 Cleaning ........................................................................\
.. 8-21
Replacing the wiper blades ....................................... 8-22
Brakes ........................................................................\
............. 8-23 Self-adjusting brakes ................................................... 8-23
Brake pad wear warning ............................................. 8-23
High performance brake system ............................... 8-23
Replacing the brake pads ........................................... 8-23
Fuses ........................................................................\
............... 8-24
Engine compartment .................................................... 8-24
Passenger compartment ............................................. 8-25
Intelligent Key battery replacement .................................. 8-27
Lights ........................................................................\
............... 8-29 Headlights ....................................................................... 8-30Exterior and interior lights ........................................... 8-30
Wheels and tires .................................................................. 8-32
Tire pressure .................................................................. 8-32
Tire and loading information label ............................ 8-34
Checking the tire pressure ......................................... 8-35
Page 274 of 354
Some day-to-day and regular maintenance is
essential to maintain your vehicle good mechan-
ical condition, as well as its emission and engine
performance.
It is the owner’s responsibility to make sure that
the scheduled maintenance, as well as general
maintenance, is performed.
As the vehicle owner, you are the only one who
can ensure that your vehicle receives the proper
maintenance care. You are a vital link in the
maintenance chain.
SCHEDULED MAINTENANCE
For your convenience, both required and op-
tional scheduled maintenance items are de-
scribed and listed in your NISSAN Service and
Maintenance Guide. You must refer to that guide
to ensure that necessary maintenance is per-
formed on your vehicle at regular intervals.
GENERAL MAINTENANCE
General maintenance includes those items
which should be checked during normal day-
to-day operation. They are essential for proper
vehicle operation. It is your responsibility to
perform these procedures regularly as pre-
scribed.
Performing general maintenance checks re-
quires minimal mechanical skill and only a fewgeneral automotive tools.
These checks or inspections can be done by
yourself, a qualified technician or, if you prefer, a
GT-R certified NISSAN dealer.
WHERE TO GO FOR SERVICE
GT-R certified NISSAN dealers are required to
have additional training and equipment and are
the only NISSAN dealers authorized to perform
warranty work on key vehicle performance
systems such as engine, transmission, suspen-
sion and brakes.
If maintenance service is required or your vehicle
appears to malfunction, have the systems
checked and serviced by a GT-R certified
NISSAN dealer.
NISSAN technicians are well-trained specialists
and are kept up to date with the latest service
information through technical bulletins, service
tips, and in-dealer information systems. They are
completely qualified to work on NISSAN vehi-
cles
before work begins.
You can be confident that a GT-R certified
NISSAN dealer’s service department performs
the best job to meet the maintenance require-
ments on your vehicle.
To find a GT-R certified NISSAN dealer near
you, call 1-866-668-1GTR in the US or 1-800- 387-0122 in Canada, or go to www. gtrnissan.
com/.
Maintenance and do-it-yourself8-3
MAINTENANCE REQUIREMENT
Page 277 of 354
8-6Maintenance and do-it-yourself
air conditioner after use is normal. If you should
notice any leaks or if gasoline fumes are evident,
check for the cause and have it corrected
immediately.
Power steering fluid level* and lines:Check
the level when the fluid is cold, with the engine
off. Check the lines for proper attachment, leaks,
cracks, etc.
Radiator and hoses: Check the front of the
radiator and clean off any dirt, insects, leaves,
etc., that may have accumulated. Make sure the
hoses have no cracks, deformation, rot or loose
connections.
Underbody: The underbody is frequently ex-
posed to corrosive substances such as those
used on icy roads or to control dust. It is very
important to remove these substances, other-
wise rust will form on the floor pan, frame, fuel
lines and around the exhaust system. At the end
of winter, the underbody should be thoroughly
flushed with plain water, being careful to clean
those areas where mud and dirt may accumu-
late. (
“Underbody” page 7-3)
Windshield washer fluid*: Check that there is
adequate fluid in the reservoir.
When performing any inspection or mainte-
nance work on your vehicle, always take care
to prevent serious accidental injury to yourself or
damage to the vehicle. The following are general
precautions which should be closely observed.
WARNING
. Park the vehicle on a level surface,
apply the parking brake securely
and block the wheels to prevent
the vehicle from moving. Move the
shift lever to the
&Pposition.
. Be sure the ignition switch is in the
OFF or LOCK position when per-
forming any parts replacement or
repairs.
. If you must work with the engine
running, keep your hands, clothing,
hair and tools away from moving
fans, belts and any other moving
parts.
. It is advisable to secure or remove
any loose clothing and remove any
jewelry, such as rings, watches, etc.
before working on your vehicle.
. Always wear eye protection when-
ever you work on your vehicle. .
If you must run the engine in an
enclosed space such as a garage, be
sure there is proper ventilation for
exhaust gases to escape.
. Never get under the vehicle while it
is supported only by a jack. If it is
necessary to work under the vehicle,
support it with safety stands.
. Keep smoking materials, flame and
sparks away from fuel tank and the
battery.
. Your vehicle is equipped with an
automatic engine cooling fan. It may
come on at any time without warn-
ing, even if the ignition key is in the
OFF position and the engine is not
running. To avoid injury, always
disconnect the negative battery
cable before working near the fan.
. The fuel filter or fuel lines should be
serviced by a GT-R certified NISSAN
dealer because the fuel lines are
under high pressure even when the
engine is off.
MAINTENANCE PRECAUTIONS
Page 298 of 354
WARNING
Be careful that batteries and other
removed components are not swal-
lowed by children.
NOTICE
There is the possibility that the key may
be damaged when the battery is re-
placed. It is recommended that you
have the battery replaced by a GT-R
certified NISSAN dealer.Recommended battery: Lithium battery CR2032
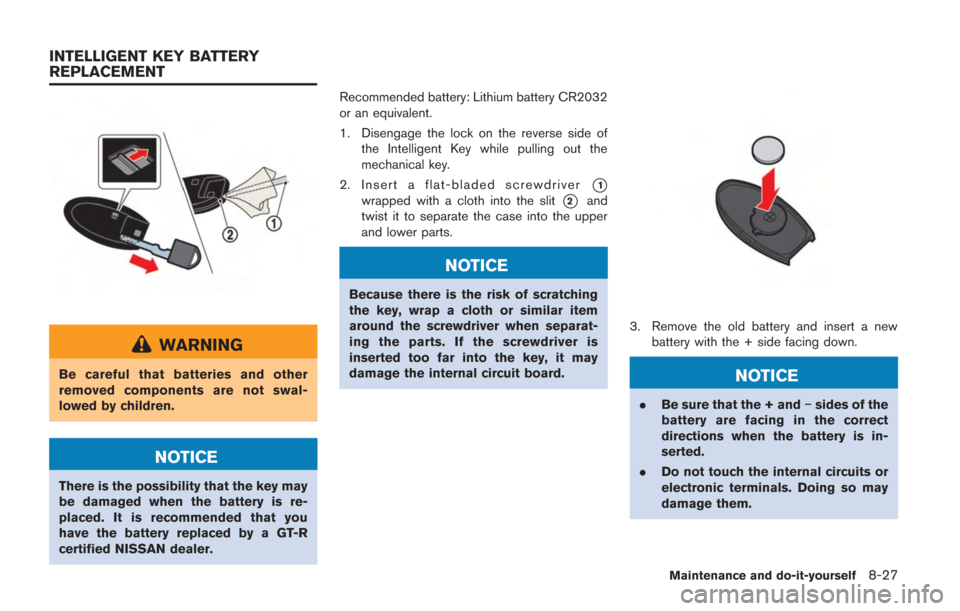
or an equivalent.
1. Disengage the lock on the reverse side of
the Intelligent Key while pulling out the
mechanical key.
2. Insert a flat-bladed screwdriver
*1
wrapped with a cloth into the slit*2and
twist it to separate the case into the upper
and lower parts.
NOTICE
Because there is the risk of scratching
the key, wrap a cloth or similar item
around the screwdriver when separat-
ing the parts. If the screwdriver is
inserted too far into the key, it may
damage the internal circuit board.
3. Remove the old battery and insert a new battery with the + side facing down.
NOTICE
.Be sure that the + and −sides of the
battery are facing in the correct
directions when the battery is in-
serted.
. Do not touch the internal circuits or
electronic terminals. Doing so may
damage them.
Maintenance and do-it-yourself8-27
INTELLIGENT KEY BATTERY
REPLACEMENT