2014 NISSAN GT-R parking
[x] Cancel search: parkingPage 207 of 354
5-10Starting and driving
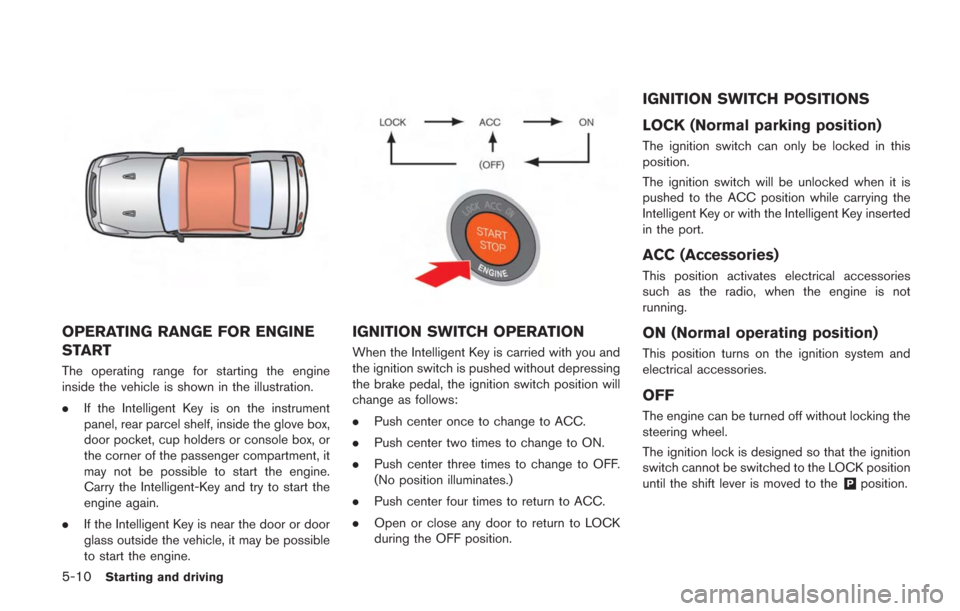
OPERATING RANGE FOR ENGINE
START
The operating range for starting the engine
inside the vehicle is shown in the illustration.
.If the Intelligent Key is on the instrument
panel, rear parcel shelf, inside the glove box,
door pocket, cup holders or console box, or
the corner of the passenger compartment, it
may not be possible to start the engine.
Carry the Intelligent-Key and try to start the
engine again.
. If the Intelligent Key is near the door or door
glass outside the vehicle, it may be possible
to start the engine.
IGNITION SWITCH OPERATION
When the Intelligent Key is carried with you and
the ignition switch is pushed without depressing
the brake pedal, the ignition switch position will
change as follows:
.Push center once to change to ACC.
. Push center two times to change to ON.
. Push center three times to change to OFF.
(No position illuminates.)
. Push center four times to return to ACC.
. Open or close any door to return to LOCK
during the OFF position.
IGNITION SWITCH POSITIONS
LOCK (Normal parking position)
The ignition switch can only be locked in this
position.
The ignition switch will be unlocked when it is
pushed to the ACC position while carrying the
Intelligent Key or with the Intelligent Key inserted
in the port.
ACC (Accessories)
This position activates electrical accessories
such as the radio, when the engine is not
running.
ON (Normal operating position)
This position turns on the ignition system and
electrical accessories.
OFF
The engine can be turned off without locking the
steering wheel.
The ignition lock is designed so that the ignition
switch cannot be switched to the LOCK position
until the shift lever is moved to the
&Pposition.
Page 210 of 354
.Make sure the area around the vehicle is
clear.
. Check fluid levels such as engine oil, cool-
ant, brake fluid and window washer fluid as
frequently as possible, or at least whenever
you refuel.
. Check that all windows and lights are clean.
. Visually inspect tires for their appearance
and condition. Also check tires for proper
inflation.
. Lock all doors.
. Position seat.
. Adjust inside and outside mirrors.
. Fasten seat belts and ask all passengers to
do likewise.
. Check the operation of warning lights when
the ignition switch is pushed to the ON
position. (
“Warning/indicator lights
and audible reminders” page 2-25)
NOTE:
. This vehicle includes spark plugs that
are designed for maximum perfor-
mance. If the start time becomes long-
er, the plugs may be fouled, making the
engine difficult to start. If this occurs,
start the engine using the procedure
described in this section.
. A click sound may be heard when the
brake pedal is depressed and released.
This is normal.
. A low rattling operating sound may
occur when the engine is started or
stopped. This is because of the trans-
mission gear design, light flywheel and
dry sump lubrication system used in
this transmission. This does not indi-
cate that there is a malfunction. This
sound is likely to occur in particular if
the engine is stopped when the tem-
perature of the transmission oil is high.
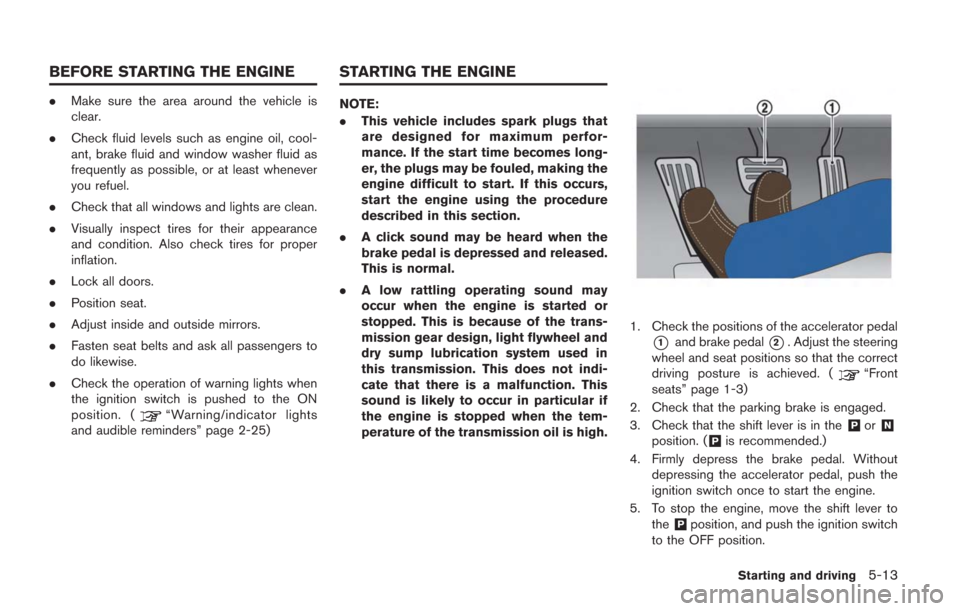
1. Check the positions of the accelerator pedal
*1and brake pedal*2. Adjust the steering
wheel and seat positions so that the correct
driving posture is achieved. (
“Front
seats” page 1-3)
2. Check that the parking brake is engaged.
3. Check that the shift lever is in the
&Por&N
position. (&Pis recommended.)
4. Firmly depress the brake pedal. Without depressing the accelerator pedal, push the
ignition switch once to start the engine.
5. To stop the engine, move the shift lever to the
&Pposition, and push the ignition switch
to the OFF position.
Starting and driving5-13
BEFORE STARTING THE ENGINE STARTING THE ENGINE
Page 214 of 354
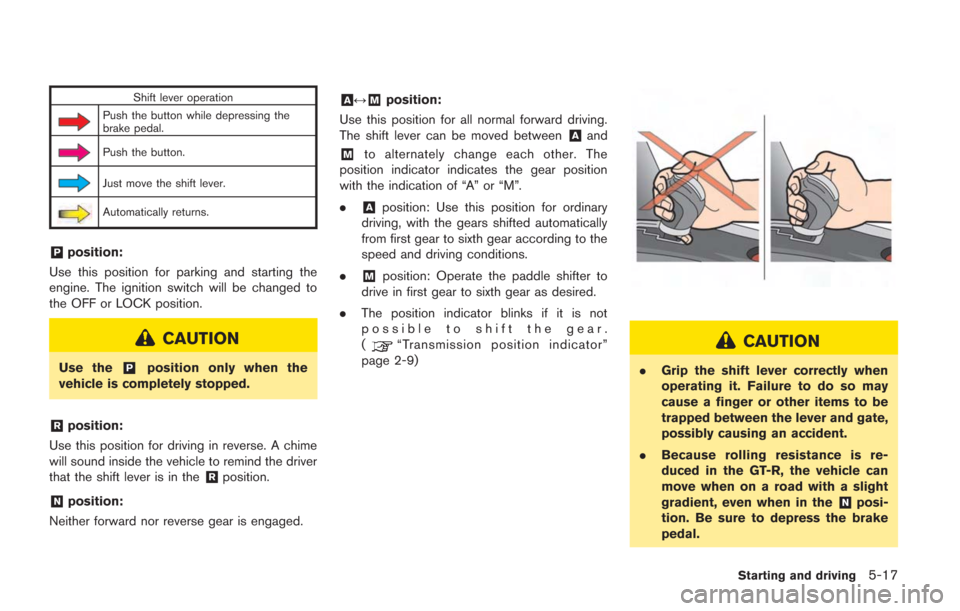
Shift lever operation
Push the button while depressing the
brake pedal.
Push the button.
Just move the shift lever.
Automatically returns.
&Pposition:
Use this position for parking and starting the
engine. The ignition switch will be changed to
the OFF or LOCK position.
CAUTION
Use the&Pposition only when the
vehicle is completely stopped.
&Rposition:
Use this position for driving in reverse. A chime
will sound inside the vehicle to remind the driver
that the shift lever is in the
&Rposition.
&Nposition:
Neither forward nor reverse gear is engaged.
&A↔&Mposition:
Use this position for all normal forward driving.
The shift lever can be moved between
&Aand
&Mto alternately change each other. The
position indicator indicates the gear position
with the indication of “A” or “M”.
.
&Aposition: Use this position for ordinary
driving, with the gears shifted automatically
from first gear to sixth gear according to the
speed and driving conditions.
.
&Mposition: Operate the paddle shifter to
drive in first gear to sixth gear as desired.
. The position indicator blinks if it is not
possible to shift the gear.
(
“Transmission position indicator”
page 2-9)CAUTION
. Grip the shift lever correctly when
operating it. Failure to do so may
cause a finger or other items to be
trapped between the lever and gate,
possibly causing an accident.
. Because rolling resistance is re-
duced in the GT-R, the vehicle can
move when on a road with a slight
gradient, even when in the
&Nposi-
tion. Be sure to depress the brake
pedal.
Starting and driving5-17
Page 216 of 354
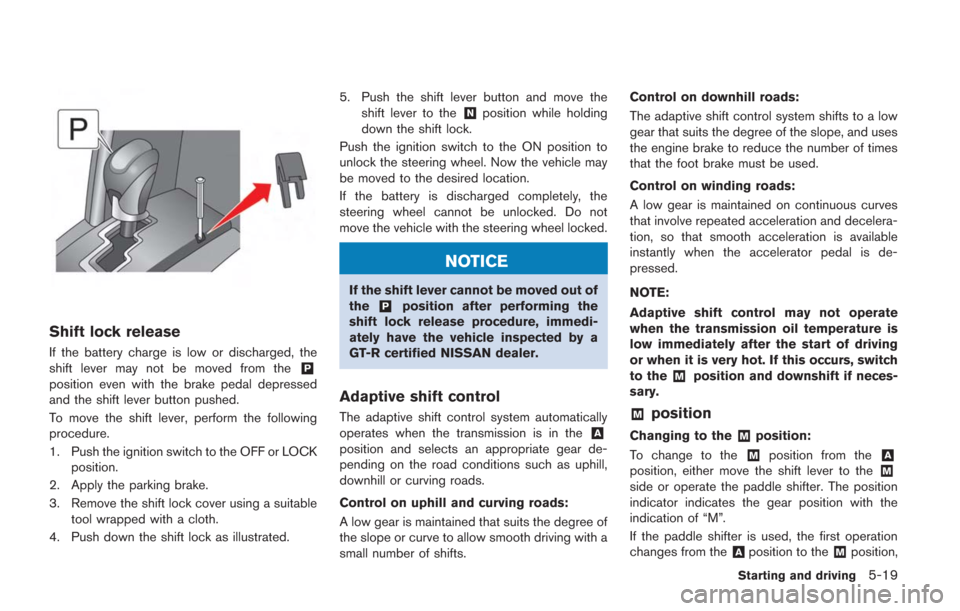
Shift lock release
If the battery charge is low or discharged, the
shift lever may not be moved from the&P
position even with the brake pedal depressed
and the shift lever button pushed.
To move the shift lever, perform the following
procedure.
1. Push the ignition switch to the OFF or LOCKposition.
2. Apply the parking brake.
3. Remove the shift lock cover using a suitable tool wrapped with a cloth.
4. Push down the shift lock as illustrated. 5. Push the shift lever button and move the
shift lever to the
&Nposition while holding
down the shift lock.
Push the ignition switch to the ON position to
unlock the steering wheel. Now the vehicle may
be moved to the desired location.
If the battery is discharged completely, the
steering wheel cannot be unlocked. Do not
move the vehicle with the steering wheel locked.
NOTICE
If the shift lever cannot be moved out of
the&Pposition after performing the
shift lock release procedure, immedi-
ately have the vehicle inspected by a
GT-R certified NISSAN dealer.
Adaptive shift control
The adaptive shift control system automatically
operates when the transmission is in the&A
position and selects an appropriate gear de-
pending on the road conditions such as uphill,
downhill or curving roads.
Control on uphill and curving roads:
A low gear is maintained that suits the degree of
the slope or curve to allow smooth driving with a
small number of shifts. Control on downhill roads:
The adaptive shift control system shifts to a low
gear that suits the degree of the slope, and uses
the engine brake to reduce the number of times
that the foot brake must be used.
Control on winding roads:
A low gear is maintained on continuous curves
that involve repeated acceleration and decelera-
tion, so that smooth acceleration is available
instantly when the accelerator pedal is de-
pressed.
NOTE:
Adaptive shift control may not operate
when the transmission oil temperature is
low immediately after the start of driving
or when it is very hot. If this occurs, switch
to the
&Mposition and downshift if neces-
sary.
&Mposition
Changing to the&Mposition:
To change to the
&Mposition from the&A
position, either move the shift lever to the&M
side or operate the paddle shifter. The position
indicator indicates the gear position with the
indication of “M”.
If the paddle shifter is used, the first operation
changes from the
&Aposition to the&Mposition,
Starting and driving5-19
Page 218 of 354
.Fifth gear:
Use this position for all normal forward
driving at highway speeds. Engine braking
is weaker in this position.
. Sixth gear:
Use this position for all normal forward
driving at highway speeds. Engine braking
is weakest in this position.
Suggested maximum speed in each gear:
Downshift to a lower gear if the engine is not
running smoothly, or if you need to accelerate.
Do not exceed the maximum suggested speed
(shown below) in any gear. For level road
driving, use the highest gear suggested for that
speed. Always observe posted speed limits, and
drive according to the road conditions that will
ensure safe operation. Do not over-rev the
engine when shifting to a lower gear as it may
cause engine damage or loss of vehicle control.
Gear MPH (km/h)
1st 36 (58)
2nd 63 (102)
3rd 91 (148)
4th —
5th —
6th —
NOTE:
The paddle shifters are made from magne-
sium alloy. Only clear coating is applied to
their surfaces to utilize the unique casting
patterns and the texture of the material
itself.
DRIVING TIPS
After starting the engine, fully depress the foot
brake pedal and push the shift lever button
before shifting the shift lever from the
&Pposition
to the&R,&N,or&A↔&Mposition. Be sure the
vehicle is fully stopped before attempting to shift
the shift lever.
The transmission is designed so that the foot
brake pedal must be depressed before shifting
from
&Pto any other position.
The shift lever cannot be moved out of the
&P
position and into any other position with the
ignition switch other in the LOCK, OFF or ACC
position.
When accelerating from a stop
Keep the foot brake pedal depressed and push
the shift lever button to shift into a driving gear
as following:
. To drive forward, move the shift lever to the
&A↔&Mposition. .
To back up, move the shift lever to the
&R
position.
Starting on level ground or an uphill:
1. Check the shift lever position indicator on the instrument panel to confirm that the
driving gear is selected.
2. Release the parking brake.
3. Release the foot brake pedal gradually, then slowly depress the accelerator pedal to start
the vehicle in motion.
(
“R mode start function” page 5-31)
NOTE:
. To prevent the clutch from overheating
when the parking brake is applied,
engine output is limited when the
accelerator pedal is depressed. In par-
ticular, the vehicle may not start
smoothly when the accelerator pedal
is depressed with the parking brake
applied on an uphill grade. To enable
smooth starting, release the parking
brake before moving the vehicle.
. The hill start assist function operates
when the vehicle is accelerating from a
stop on an uphill. (
“Hill Start
Assist” page 5-37)
Starting and driving5-21
Page 220 of 354
19) even on road conditions with con-
tinuous and sudden hills or curves.
However, when the transmission oil
temperature is low immediately after
starting the vehicle or high when enga-
ging in high performance driving, there
may be some cases where the system
cannot control shifting. When this oc-
curs, switch to the
&Mposition and
select a lower gear, depending on the
gradient of the hill.
When stopping the vehicle
Leave the shift lever in the&A↔&Mor&Rposition
and firmly depress the foot brake pedal.
If the vehicle will be stopped for a long period of
time, apply the parking brake and move the shift
lever to the
&Por&Nposition as necessary.
WARNING
. Do not race the engine while the
vehicle is stopped. Doing so may
accelerate the vehicle suddenly and
cause an accident when shifting to a
driving gear.
. While the engine is running, the
propeller shaft that transmits torque from the engine to the transmission
is turning at all times. Crawling or
reaching under the vehicle while the
engine is running may result in
serious injury.
NOTICE
When the vehicle is stopped on a hill,
do not hold the vehicle in place by
depressing the accelerator pedal. Doing
so may cause the clutch to overheat and
result in transmission damage. Use the
brakes to prevent the vehicle from
moving.
When parking the vehicle
WARNING
Follow the instructions below when
parking the vehicle to help prevent the
brake rotor and brake pads from rust-
ing together. Failure to follow the
instructions could cause the rotor and
pads to rust together. If the rotor and
pads rust together, there may be a
popping noise and some vibrationwhen the vehicle is driven, a wheel
may not roll correctly, or the brake pads
could be damaged. If the pads are
damaged, this may reduce the effec-
tiveness of the brake system which
could cause a collision, serious perso-
nal injury or death.
The GT-R uses brake pad materials that have
high metallic content. The brake pad material
helps maintain braking performance in a wide
range of weather and driving conditions.
For the first 3,000 miles (5,000 km) of the
vehicle’s service life, and for the first 3,000 miles
(5,000km) after a brake replacement, the brake
pad to brake rotor clearance is very small. When
parking, apply the parking brake and move the
shift lever to the
&Pposition. Idle the engine for
more than 20 seconds without depressing the
brake pedal. This allows the brake pads to move
away from the rotor so the pad does not contact
the rotor.
Additionally, the brakes must be dry before
parking the vehicle after driving on wet roads or
after washing the vehicle. If the roads are wet,
lightly apply the brakes for a short distance
before parking the vehicle to dry the brakes.
After washing the vehicle, dry the brakes by
driving on a dry road for a few miles and apply
Starting and driving5-23
Page 221 of 354
5-24Starting and driving
the brakes normally based on traffic and road
conditions.
The metallic brake pads and brake disc rotor
may rust together when the brakes are not
applied:
.If the vehicle is not idled for 20 seconds
without the brakes applied, or if the brakes
are applied when the vehicle is shut off, the
rotor and pads can rust together, even when
the brake pads are dry.
. If the brakes are wet when the vehicle is
parked and the parking brake is applied for a
long time.
Contact a GT-R certified NISSAN dealer if the
brake pads and brake rotor have rusted
together.
1. Bring the vehicle to a complete stop.
2. With the foot brake pedal depressed, apply the parking brake.
3. Move the shift lever to the
&Pposition.
4. Check the shift lever position indicator on the instrument panel to confirm that the
&P
position is selected.
5. Push the ignition switch to stop the engine.
WARNING
Before exiting the vehicle, be sure to
move the shift lever to the&Pposition
and stop the engine. If the engine is
running and the shift lever is not in the
&Pposition, the vehicle may start mov-
ing due to partial engagement of the
clutch or to the effects of gravity on a
slope, or the vehicle may suddenly
accelerate due to accidental operation
of the accelerator pedal, possibly caus-
ing an accident.
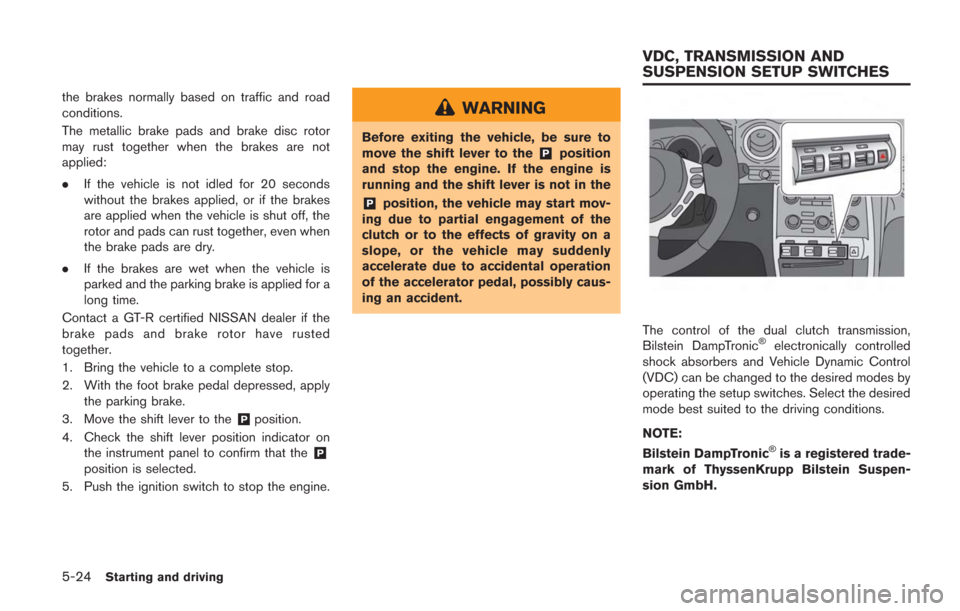
The control of the dual clutch transmission,
Bilstein DampTronic®electronically controlled
shock absorbers and Vehicle Dynamic Control
(VDC) can be changed to the desired modes by
operating the setup switches. Select the desired
mode best suited to the driving conditions.
NOTE:
Bilstein DampTronic
®is a registered trade-
mark of ThyssenKrupp Bilstein Suspen-
sion GmbH.
VDC, TRANSMISSION AND
SUSPENSION SETUP SWITCHES
Page 229 of 354
5-32Starting and driving
abled, the warning light illuminates.
When the warning light illuminates,
perform cool down driving.
(
“Cool down” page GTR-13)
When the warning light turns off,
the function can be used again.
. The performance of start may vary
depending on the amount of wheel
spin ,or increase and decrease of
the engine output in response to the
outside temperature. (This vehicle
was set up according to the road
surface conditions of the straight
sections of the Sendai Highland
Raceway course in Japan at 598F
(158C) .)
. For safety reasons, VDC control may
activate automatically when driving
on a slippery road surface, such as a
wet road, in order to apply the
brakes or limit the engine output.
. Frequent use of the R mode start
function increases the load on the
powertrain related parts such as the
clutch and transmission compared
to normal driving. In particular, the
clutch will wear out more quickly.
HOW TO USE R MODE START
FUNCTION
1. Move the shift lever to the&Aor&Mposition.
2. Select the R mode with the transmission setup switch. (
“VDC, transmission and
suspension setup switches” page 5-24)
3. Select the R mode with the VDC setup switch.
4. Depress the brake pedal firmly with your left foot and keep depressing the brake pedal.
5. Depress the accelerator pedal quickly to the floor with your right foot while the brake
pedal is depressed. The engine speed will
increase to approximately 4,000 rpm and
will be maintained.
6. Within 3 seconds after depressing the accelerator pedal, release the brake pedal.
WARNING
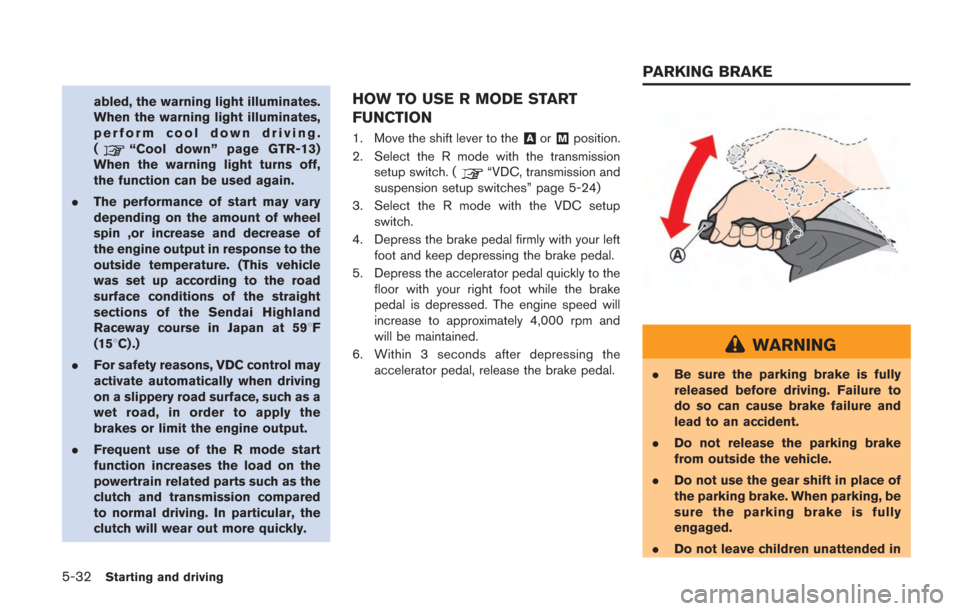
.Be sure the parking brake is fully
released before driving. Failure to
do so can cause brake failure and
lead to an accident.
. Do not release the parking brake
from outside the vehicle.
. Do not use the gear shift in place of
the parking brake. When parking, be
sure the parking brake is fully
engaged.
. Do not leave children unattended in
PARKING BRAKE