2014 NISSAN GT-R air condition
[x] Cancel search: air conditionPage 6 of 354
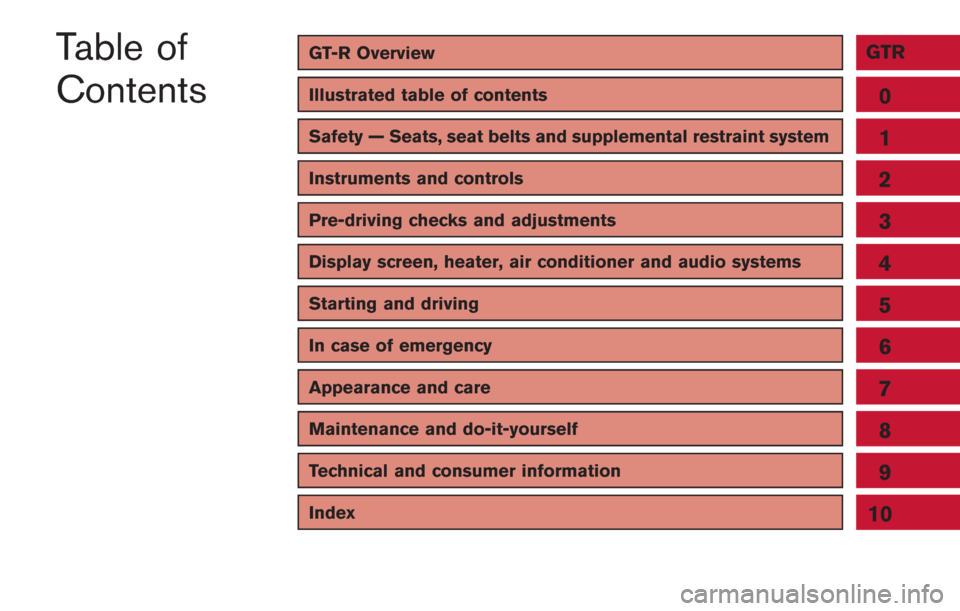
GT-R OverviewGTR
Illustrated table of contents0
Safety — Seats, seat belts and supplemental restraint system
Instruments and controls
Pre-driving checks and adjustments
Display screen, heater, air conditioner and audio systems
Starting and driving
In case of emergency
Appearance and care
Maintenance and do-it-yourself
Technical and consumer information
1
2
3
4
5
6
7
8
9
Table of
Contents
Index10
Page 13 of 354
GTR-6GT-R Overview
SUSPENSION
Genuine GT-R special suspension
Use only genuine GT-R special suspension
components.
Using non-genuine GT-R suspension compo-
nents can affect vehicle performance and may
cause body damage when driving depending on
the road conditions.
GT-R TRACK PACK option Genuine special
suspension (if so equipped)
Models with the TRACK PACK option are
equipped with specially tuned shock absorbers,
springs and suspension that optimizes perfor-
mance driving.
BRAKE PAD AND DISC ROTOR
Genuine GT-R brake pads and disc rotors
Use only genuine GT-R brake pads and disc
rotors.
This vehicle is equipped with cross-drilled
floating rotors and radial-mounted six-piston
monoblock calipers. This helps to achieve
excellent stopping performance and fade-resis-
tance.
Using non-genuine GT-R brake pads or rotors
can affect vehicle braking performance and the
operation of the ABS and VDC system.
Replacement of brake pads and disc
rotors
NISSAN generally recommends to replace all
four sets of brake pads and disc rotors at the
same time to maintain maximum brake perfor-
mance.
However, replacing only the brake pads may be
allowed in some cases (four wheels or only front
wheels depending on the conditions). A GT-R
certified technician must inspect the vehicle and
determine that only the brake pads need to be
replaced. In this case, replacing all brake pads
and disc rotors as a set is not necessary.
Note that the replacement of brake pads and the
disc rotors as a set on all four wheels should be
performed when a GT-R certified technician
determines that this is the correct repair.
If the inside of the disc rotors are cold during the
winter and the surface becomes hot due to a
heavy force being applied repeatedly to the
brakes, cracks may occur near the coolant hole
on the surface of the disc rotor. Cracks may also
occur due to a heavy force being repeatedly
applied to the brakes during high performance
driving. In these cases it may be necessary to
replace the disc rotors or brake pads depending
on the condition of the crack. Contact a GT-R
certified NISSAN dealer for replacement.
EXHAUST MUFFLER AND TRUNK
CARPET
Genuine GT-R special exhaust muffler and
trunk carpet
Use only the genuine GT-R special exhaust
muffler and trunk carpet.
The GT-R exhaust system is designed to provide
the maximum vehicle performance and to
protect the vehicle from high exhaust gas
temperatures.
If non-genuine GT-R specification parts are
used it is possible that the muffler or other
exhaust system parts will deform and cause
damage to the underbody. Non-genuine GT-R
specification parts can also affect vehicle
performance and possibly lead to turbocharger,
engine or power train related parts including
transmission, damage.
Also, do not remove the trunk carpet from the
vehicle for any reason. The carpet insulates the
vehicle interior from the heat of the muffler and
from the noise of the transmission.
Page 16 of 354
ENGINE SETTINGS (balancing right
and left air flow)
Each cylinder bank of this engine operates
independently due to the vehicle’s twin turbo-
charger design. Each side of the engine must
operate at the same level of performance. The air
flow of each bank must be checked and
adjusted as necessary by a GT-R certified
NISSAN dealer.
TRANSMISSION SETTINGS
The design of the clutch and transmission
requires inspection and adjustment of the clutch
and shift forks by a GT-R certified NISSAN
dealer at the recommended intervals. If the
transmission setting is not complete, excessive
loads may be applied to the transmission and
power train system parts during starting and
shifting, which may result in a malfunction or
damage. Depending on the driving conditions,
more frequent adjustments may be necessary to
help maximize vehicle performance.
CHECKING THE EXHAUST FIN-
ISHER AND REAR BUMPER
CLEARANCE
Clearance between the enlarged-diameter ex-
haust finisher and the rear bumper is realized by
using highly rigid exhaust mount rubber tocontrol rear muffler vibration. The clearance
between the exhaust finisher and the rear
bumper may alter as the exhaust mount rubber
changes shape due to vibration, passage of time
and high exhaust temperature during high
performance driving. Therefore, inspection of
the clearance is necessary during the GT-R
special inspection and when engaging in
performance driving.
INCREASE TIGHTENING OF THE
STRUT SUPPORT BAR ATTACH-
MENT SECTION WITH THE SHOCK
ABSORBER
During the first GT-R special inspection (after
1,000 miles) , the strut support bar attachment
bracket and shock absorber (each one on the
left and right sides) must be tightened to the
specified tightening specification. The strut
support bar attachment bracket and shock
absorber (each one on the left and right sides)
must be tightened to the specified tightening
specification 300-600 miles (500-1,000 km)
after the support bar or shock absorber have
been removed or installed.
(
“Engine compartment check locations”
page 8-8)
NOTICE
Follow these recommendations to ob-
tain maximum engine performance and
ensure the future reliability and econo-
my of your new vehicle. Failure to
follow these recommendations may
result in shortened engine life and
reduced vehicle performance.
Please observe the following types of driving
until the mileage shown below has been
reached.
Until 300 miles (500 km):
. Do not depress the accelerator pedal more
than halfway and avoid rapid acceleration.
. Drive with the engine speed kept at less
than 3,500 RPM.
. Avoid unnecessary quick steering, abrupt
braking and driving on poor roads.
300 to 600 miles (500 to 1,000 km):
. Avoid rapid acceleration in a low gear (1st to
3rd gears) with the accelerator pedal fully
depressed. Depress the pedal slowly.
. Avoid unnecessary quick steering and
abrupt braking.
GT-R OverviewGTR-9
BREAK-IN SCHEDULE
Page 19 of 354
GTR-12GT-R Overview
FUEL
NISSAN recommends using fuels that contain
no alcohol. However, fuels containing up to 10%
alcohol may be used, if necessary. Do not use E-
15 or E-85 in your vehicle. (
“Fuel recom-
mendation” page 9-4)
NOTICE
To avoid serious engine damage due to
increased cylinder temperatures, do not
use fuels that contain more alcohol
than indicated in
“Gasoline con-
taining oxygenates” page 9-4. Also, do
not use fuel additives, fuel stabilizers or
fuel deicers that contain alcohol.
BODY REPAIR
The body of the GT-R has been manufactured
on special fixtures utilizing a hybrid structure
with aluminum die cast parts for the frame work.
Special skills, information and equipment are
required to correctly repair the body. Contact a
GT-R certified NISSAN dealer if the vehicle is
damaged, such as in a collision, and they will
recommend an appropriate body shop.
Only certified body shops using CELETTE
®
advanced collision repair equipment are ap- proved by NISSAN for repairing structural body
damage. Contact a GT-R certified NISSAN
dealer or NISSAN Consumer Affairs for a
referral or list of certified body shops.
DRIVING AFTER REPLACING TIRES
Avoid the driving conditions listed under “Addi-
tional maintenance items” in this section for 48
hours after tires are installed on the wheels
(
“Additional maintenance items” page
GTR-13) . The tire may slip on the wheel if the
vehicle is driven in these conditions before 48
hours have passed. If the tire slips on the wheel,
the wheel/tire assembly will be out of balance
and will require rebalancing.
REAR COMPARTMENT (models with
TRACK PACK option)
WARNING
The rear compartment is not equipped
with seats or seat belts.
. Never allow passengers to ride in
the rear compartment.
. Never attempt to install a child
restraint in the rear compartment.
. Doing so may cause a serious injury
or death in the event of a collision or abrupt braking.
. The rear compartment is not
equipped with seats and is not
designed for cargo. Do not touch
the rear compartment floor area:
you may get burned due to higher
surface temperatures.
Page 24 of 354
Wheels and tires
The information and specifications in this
section apply only when engaging in
performance driving.
.Check tire wear and cracking.
. Inspect the tire side wall for damage.
. Check the tire pressure and adjust the
pressure as necessary when the tires are
cold. (
“Wheels and tires” page 8-32)
. Adjust the tire pressure to the specification
shown in the table, in order to make the
balance of rigidity between the front and rear
tires more uniform when the temperature of
the tires increases due to driving at high
speed or engaging in high performance
driving.
Condition Pressure PSI (kPa)
Starting to drive (Tires are cold) Front: 30.5 (210) - 31.9 (220), Rear: 29 (200)
Increasing tire pressure (Tires are hot) Front: Not exceeding 39.2 (270) ,
Rear: Not exceeding 37.7 (260)
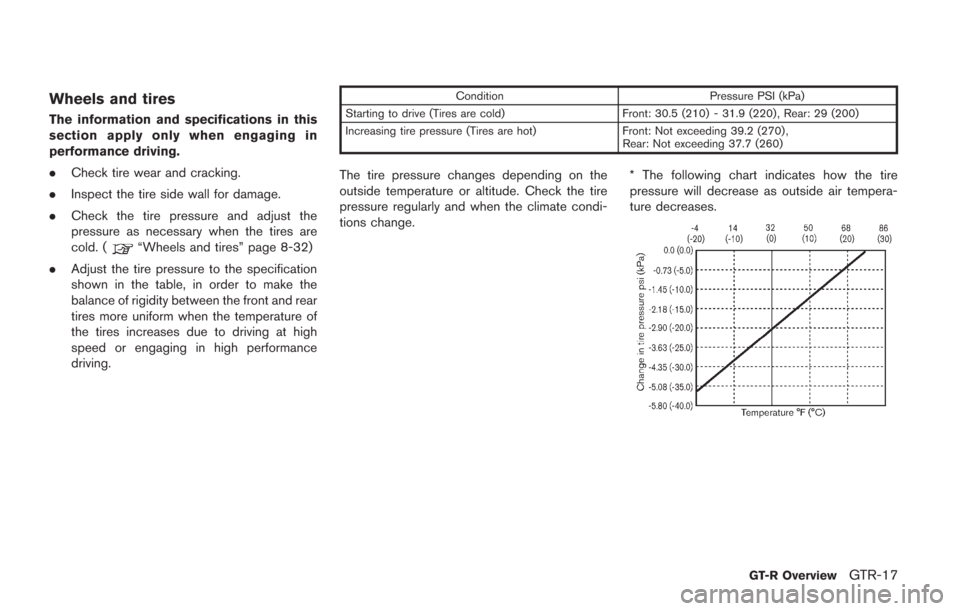
The tire pressure changes depending on the
outside temperature or altitude. Check the tire
pressure regularly and when the climate condi-
tions change. * The following chart indicates how the tire
pressure will decrease as outside air tempera-
ture decreases.
GT-R OverviewGTR-17
Page 25 of 354
GTR-18GT-R Overview
WARNING
Keep your tires inflated to the correct
tire pressure. Driving with low tire
pressure can damage some powertrain
systems and affect the operation of the
ABS and VDC systems. Low Tire pres-
sure may also cause tire failure and
result in serious personal injury or
death.
. Make sure the tire valve stem cap is installed
and that the valve stem is tight. When
installing the cap, make sure to tighten the
cap by hand. If a tool is used to tighten the
cap, the cap may be damaged.
. Make sure the wheel nuts are tight.
(
“Wheels and tires” page 8-32)
. Make sure the drive shaft nuts are tight.
. Make sure to replace the grommet seal, the
valve core and the valve cap of the Tire
Pressure Monitoring System (TPMS) sensor
attached to the wheel every 3 years for
performance driving use. Replace them
every 5 years even when not engaging in
performance driving. A dirty grommet seal
will cause the air leak from the tire. .
Make sure that the nuts and valves that are
attached to the TPMS sensor are tight and
there is no nitrogen leak.
. Use only a NISSAN genuine valve cap or
equivalent.
. Check wheel hub run out and that the wheel
rotates smoothly without any friction. Check
these with the tires removed whenever an
inspection is performed with the vehicle
jacked up.
. Secure road wheel balance weights with
aluminum tape.
. Check that the wheel nuts are not stripped.
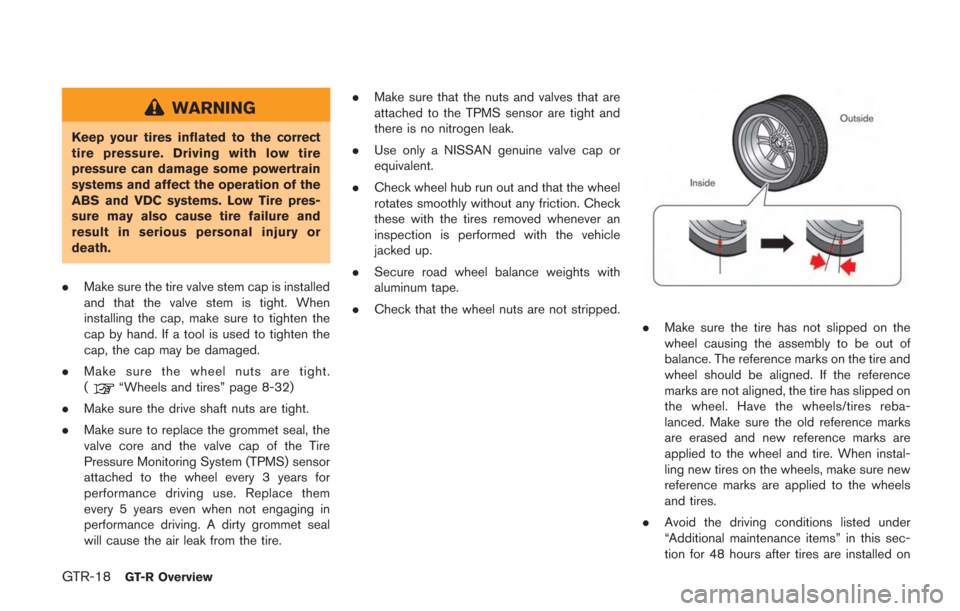
.Make sure the tire has not slipped on the
wheel causing the assembly to be out of
balance. The reference marks on the tire and
wheel should be aligned. If the reference
marks are not aligned, the tire has slipped on
the wheel. Have the wheels/tires reba-
lanced. Make sure the old reference marks
are erased and new reference marks are
applied to the wheel and tire. When instal-
ling new tires on the wheels, make sure new
reference marks are applied to the wheels
and tires.
. Avoid the driving conditions listed under
“Additional maintenance items” in this sec-
tion for 48 hours after tires are installed on
Page 26 of 354
the wheels. The tire may slip on the wheel if
the vehicle is driven in these conditions
before 48 hours have passed. If the tire slips
on the wheel, the wheel/tire assembly will be
out of balance and will require rebalancing.
Brakes
The information and specifications in this
section apply only when engaging in
performance driving.
.Check for the heat deterioration of the
brakes and parts around the brakes.
. It is recommended that you remove air from
the brake system after any of the following:
— When engaging in high performance
driving for the first time after purchasing
a new vehicle.
— After replacing the brake fluid.
— When engaging in high performance driving for a sustained period of time. It
is recommended that bleeding the brake
be performed when the brake calipers
are hot (about 2128F (1008C)) .
Brake pad:
NISSAN recommends adding an additional
cross spring to the front calipers before enga-
ging in performance driving. The additional
spring reduces brake pad movement resulting from cornering forces and will reduce the stroke
of the brake pedal. Contact a GT-R certified
NISSAN dealer to purchase the spring and
arrange installation. If a cross spring is added, a
clattering or squeaking sound may be heard on
rare occasions.
Brake pad break-in procedure:
NISSAN recommends that a special brake pad
break-in procedure be performed before enga-
ging in performance driving. Contact a GT-R
certified NISSAN dealer for details.
INSPECTION AND ADJUSTMENTS
AFTER DRIVING
The information and specifications in this
section apply only when engaging in
performance driving.
NOTICE
At the completion of performance driv-
ing, all fluid and other adjustments
should be returned to the normal fluid
specifications as shown in the “Main-
tenance and do-it-yourself” section of
this manual.
Fluids
The information and specifications in this
section apply only when engaging in
performance driving.
.
Check the engine, transmission, differential
and under the vehicle for oil and coolant
leaks.
. Check the fluid levels and adjust as neces-
sary using the specified fluid as described
under the conditions listed in this section.
(
“Recommended fluids and mainte-
nance interval” page GTR-20) If you do not
drive under the conditions listed, refer to the
2014 NISSAN Service and Maintenance
Guide.
. When changing fluids, be sure to use the
specified fluids as described in this Owner’s
manual. (
“Capacities and recom-
mended fuel/lubricants” page 9-2)
GT-R OverviewGTR-19
Page 45 of 354
0-8Illustrated table of contents
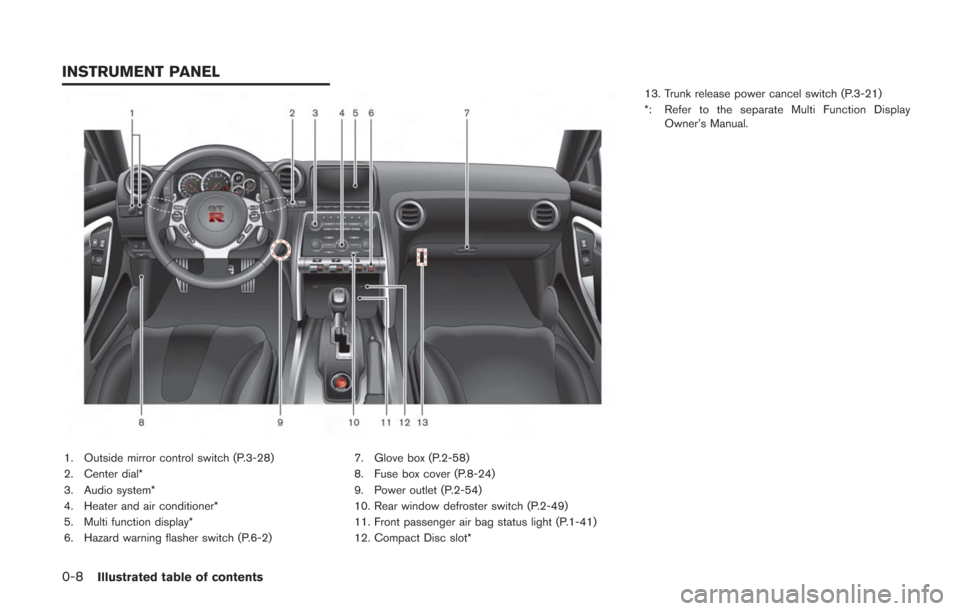
1. Outside mirror control switch (P.3-28)
2. Center dial*
3. Audio system*
4. Heater and air conditioner*
5. Multi function display*
6. Hazard warning flasher switch (P.6-2)7. Glove box (P.2-58)
8. Fuse box cover (P.8-24)
9. Power outlet (P.2-54)
10. Rear window defroster switch (P.2-49)
11. Front passenger air bag status light (P.1-41)
12. Compact Disc slot*13. Trunk release power cancel switch (P.3-21)
*: Refer to the separate Multi Function Display
Owner’s Manual.
INSTRUMENT PANEL