2014 NISSAN CUBE tow
[x] Cancel search: towPage 208 of 332
THREE-WAY CATALYST
The three-way catalyst is an emission control
device installed in the exhaust system. Exhaust
gases in the three-way catalyst are burned at
high temperatures to help reduce pollutants.
WARNING
.The exhaust gas and the exhaust
system are very hot. Keep people,
animals or flammable materials
away from the exhaust system com-
ponents.
. Do not stop or park the vehicle over
flammable materials such as dry
grass, waste paper or rags. They
may ignite and cause a fire.
CAUTION
.Do not use leaded gasoline. Depos-
its from leaded gasoline will ser-
iously reduce the three-way
catalyst’s ability to help reduce ex-
haust pollutants.
. Keep your engine tuned up. Mal-
functions in the ignition, fuel injec- tion, or electrical systems can cause
overrich fuel flow into the three-way
catalyst, causing it to overheat. Do
not keep driving if the engine mis-
fires, or if noticeable loss of perfor-
mance or other unusual operating
conditions are detected. Have the
vehicle inspected promptly by a
NISSAN dealer.
. Avoid driving with an extremely low
fuel level. Running out of fuel could
cause the engine to misfire, dama-
ging the three-way catalyst.
. Do not race the engine while warm-
ing it up.
. Do not push or tow your vehicle to
start the engine.
TIRE PRESSURE MONITORING SYS-
TEM (TPMS)
Each tire, including the spare (if provided) ,
should be checked monthly when cold and
inflated to the inflation pressure recommended
by the vehicle manufacturer on the vehicle
placard or tire inflation pressure label. (If your
vehicle has tires of a different size than the size
indicated on the vehicle placard or tire inflation
pressure label, you should determine the proper
tire inflation pressure for those tires.)
As an added safety feature, your vehicle has
been equipped with a Tire Pressure Monitoring
System (TPMS) that illuminates a low tire
pressure telltale when one or more of your tires
is significantly under-inflated. Accordingly, when
the low tire pressure telltale illuminates, you
should stop and check your tires as soon as
possible, and inflate them to the proper pres-
sure. Driving on a significantly under-inflated tire
causes the tire to overheat and can lead to tire
failure. Under-inflation also reduces fuel effi-
ciency and tire tread life, and may affect the
vehicle’s handling and stopping ability.
Please note that the TPMS is not a substitute for
proper tire maintenance, and it is the driver’s
responsibility to maintain correct tire pressure,
even if under-inflation has not reached the level
to trigger illumination of the TPMS low tire
Starting and driving5-3
Page 215 of 332
5-10Starting and driving
.The cargo room area is not included in the
operating range but the Intelligent Key may
function.
. If the Intelligent Key is placed on the
instrument panel, inside the glove box or
door pocket, the Intelligent Key may not
function.
. If the Intelligent Key is placed near the door
or window outside the vehicle, the Intelligent
Key may function.
SSD0859
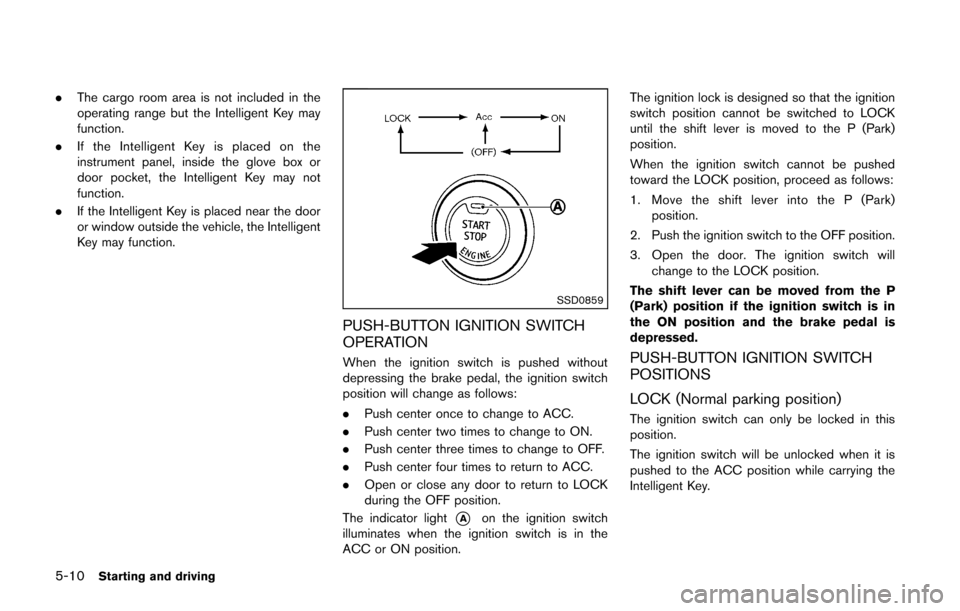
PUSH-BUTTON IGNITION SWITCH
OPERATION
When the ignition switch is pushed without
depressing the brake pedal, the ignition switch
position will change as follows:
.Push center once to change to ACC.
. Push center two times to change to ON.
. Push center three times to change to OFF.
. Push center four times to return to ACC.
. Open or close any door to return to LOCK
during the OFF position.
The indicator light
*Aon the ignition switch
illuminates when the ignition switch is in the
ACC or ON position. The ignition lock is designed so that the ignition
switch position cannot be switched to LOCK
until the shift lever is moved to the P (Park)
position.
When the ignition switch cannot be pushed
toward the LOCK position, proceed as follows:
1. Move the shift lever into the P (Park)
position.
2. Push the ignition switch to the OFF position.
3. Open the door. The ignition switch will change to the LOCK position.
The shift lever can be moved from the P
(Park) position if the ignition switch is in
the ON position and the brake pedal is
depressed.
PUSH-BUTTON IGNITION SWITCH
POSITIONS
LOCK (Normal parking position)
The ignition switch can only be locked in this
position.
The ignition switch will be unlocked when it is
pushed to the ACC position while carrying the
Intelligent Key.
Page 230 of 332
SSD0488
WARNING
.Do not stop or park the vehicle over
flammable materials such as dry
grass, waste paper or rags. They
may ignite and cause a fire.
. Never leave the engine running
while the vehicle is unattended.
. Do not leave children unattended
inside the vehicle. They could un-
knowingly activate switches or con-
trols. Unattended children could
become involved in serious acci- dents.
. Safe parking procedures require
that both the parking brake be
applied and the transmission placed
into P (Park) for Continuously Vari-
able Transmission (CVT) model or in
an appropriate gear for Manual
Transmission (MT) model. Failure
to do so could cause the vehicle to
move unexpectedly or roll away and
result in an accident.
. Make sure the continuously variable
transmission shift lever has been
pushed as far forward as it can go and cannot be moved without de-
pressing the foot brake pedal.
1. Firmly apply the parking brake.
2. Continuously Variable Transmission
(CVT) models:
Move the shift lever to the P (Park) position.
Manual Transmission (MT) models:
Move the shift lever to the R (Reverse) gear.
When parking on an uphill grade, place the
shift lever in the 1st gear.
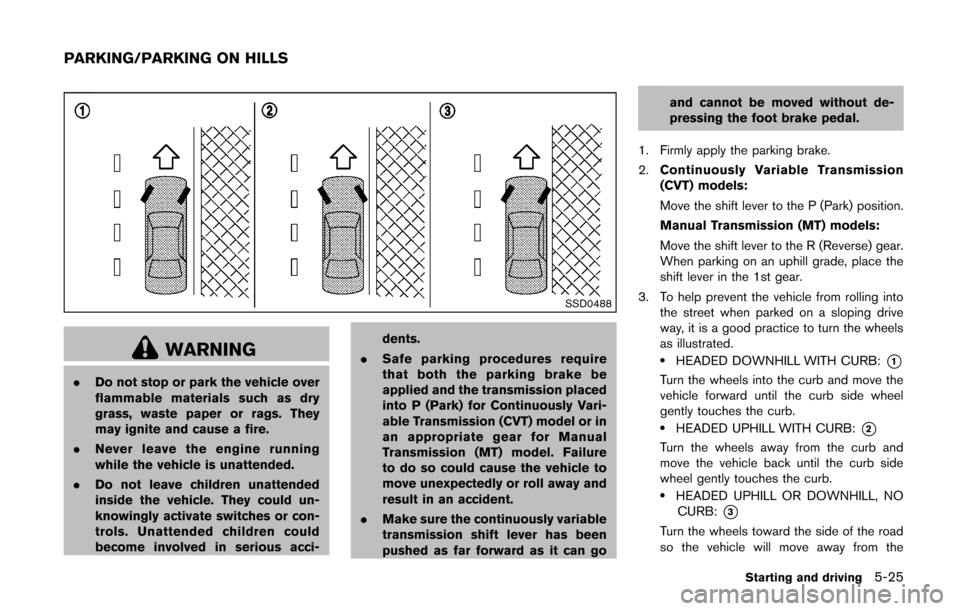
3. To help prevent the vehicle from rolling into the street when parked on a sloping drive
way, it is a good practice to turn the wheels
as illustrated.
.HEADED DOWNHILL WITH CURB:*1
Turn the wheels into the curb and move the
vehicle forward until the curb side wheel
gently touches the curb.
.HEADED UPHILL WITH CURB:*2
Turn the wheels away from the curb and
move the vehicle back until the curb side
wheel gently touches the curb.
.HEADED UPHILL OR DOWNHILL, NOCURB:
*3
Turn the wheels toward the side of the road
so the vehicle will move away from the
Starting and driving5-25
PARKING/PARKING ON HILLS
Page 238 of 332
6 In case of emergency
Hazard warning flasher switch .............................................. 6-2
Emergency engine shut off (models with Intelligent
Key system) ........................................................................\
........ 6-2
Flat tire ........................................................................\
................. 6-3 Tire Pressure Monitoring System (TPMS) .................... 6-3
Changing a flat tire ............................................................. 6-3 Jump starting ........................................................................\
.. 6-10
Push starting ........................................................................\
... 6-12
If your vehicle overheats ...................................................... 6-12
Towing your vehicle .............................................................. 6-14
Towing recommended by NISSAN ........................... 6-15
Vehicle recovery (freeing a stuck vehicle) ............... 6-16
Page 242 of 332
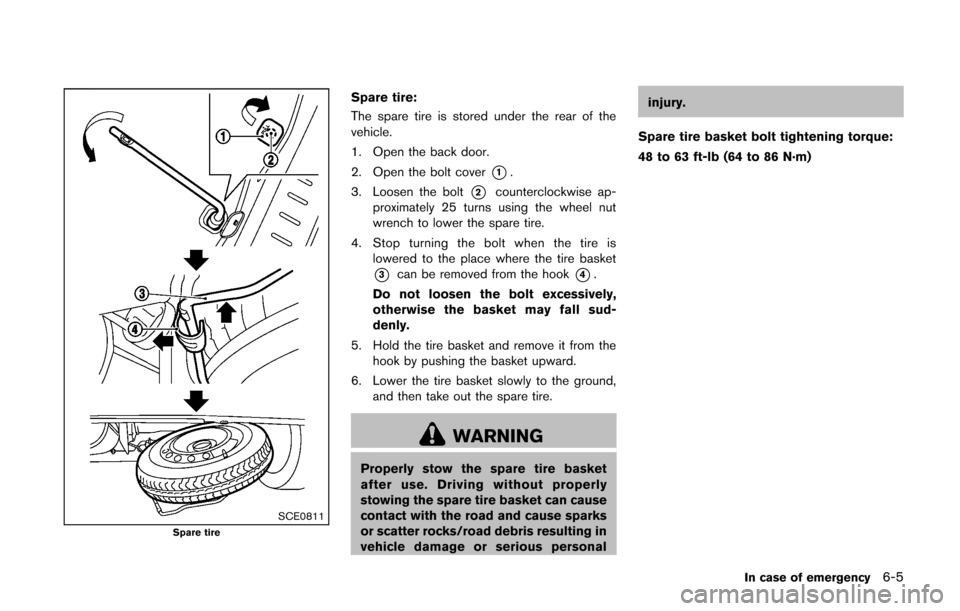
SCE0811Spare tire
Spare tire:
The spare tire is stored under the rear of the
vehicle.
1. Open the back door.
2. Open the bolt cover
*1.
3. Loosen the bolt
*2counterclockwise ap-
proximately 25 turns using the wheel nut
wrench to lower the spare tire.
4. Stop turning the bolt when the tire is lowered to the place where the tire basket
*3can be removed from the hook*4.
Do not loosen the bolt excessively,
otherwise the basket may fall sud-
denly.
5. Hold the tire basket and remove it from the hook by pushing the basket upward.
6. Lower the tire basket slowly to the ground, and then take out the spare tire.
WARNING
Properly stow the spare tire basket
after use. Driving without properly
stowing the spare tire basket can cause
contact with the road and cause sparks
or scatter rocks/road debris resulting in
vehicle damage or serious personal injury.
Spare tire basket bolt tightening torque:
48 to 63 ft-lb (64 to 86 N·m)
In case of emergency6-5
Page 245 of 332
6-8In case of emergency
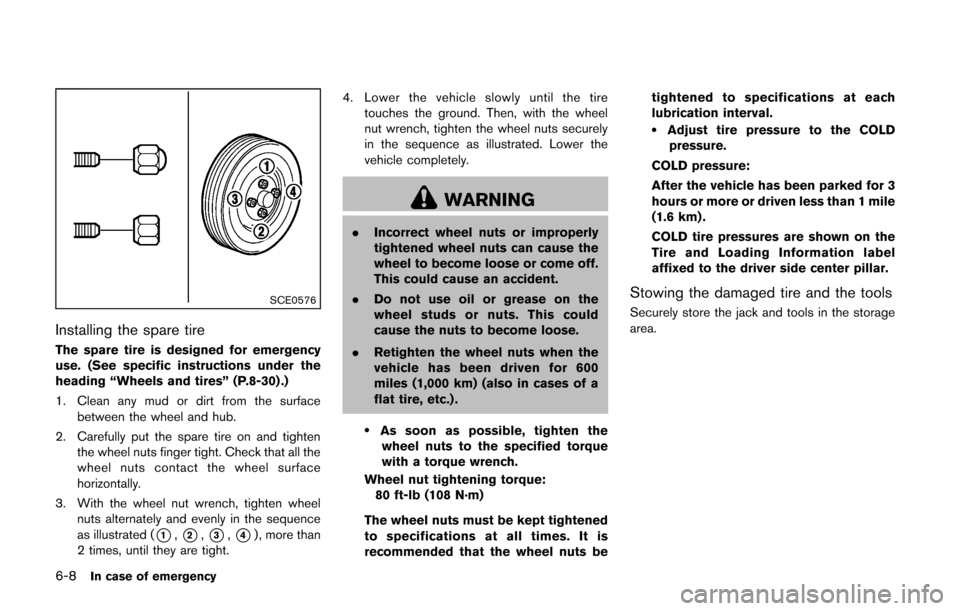
SCE0576
Installing the spare tire
The spare tire is designed for emergency
use. (See specific instructions under the
heading “Wheels and tires” (P.8-30) .)
1. Clean any mud or dirt from the surfacebetween the wheel and hub.
2. Carefully put the spare tire on and tighten the wheel nuts finger tight. Check that all the
wheel nuts contact the wheel surface
horizontally.
3. With the wheel nut wrench, tighten wheel nuts alternately and evenly in the sequence
as illustrated (
*1,*2,*3,*4) , more than
2 times, until they are tight. 4. Lower the vehicle slowly until the tire
touches the ground. Then, with the wheel
nut wrench, tighten the wheel nuts securely
in the sequence as illustrated. Lower the
vehicle completely.
WARNING
.Incorrect wheel nuts or improperly
tightened wheel nuts can cause the
wheel to become loose or come off.
This could cause an accident.
. Do not use oil or grease on the
wheel studs or nuts. This could
cause the nuts to become loose.
. Retighten the wheel nuts when the
vehicle has been driven for 600
miles (1,000 km) (also in cases of a
flat tire, etc.) .
.As soon as possible, tighten the
wheel nuts to the specified torque
with a torque wrench.
Wheel nut tightening torque: 80 ft-lb (108 N·m)
The wheel nuts must be kept tightened
to specifications at all times. It is
recommended that the wheel nuts be tightened to specifications at each
lubrication interval.
.Adjust tire pressure to the COLD
pressure.
COLD pressure:
After the vehicle has been parked for 3
hours or more or driven less than 1 mile
(1.6 km) .
COLD tire pressures are shown on the
Tire and Loading Information label
affixed to the driver side center pillar.
Stowing the damaged tire and the tools
Securely store the jack and tools in the storage
area.
Page 249 of 332
6-12In case of emergency
wait 10 seconds before trying again.
9. After starting your engine, carefully discon- nect the negative cable and then the positive
cable (
*4?*3?*2?*1).
10. Replace the vent caps (if so equipped). Be sure to dispose of the cloth used to cover
the vent holes as it may be contaminated
with corrosive acid. Do not attempt to start the engine by pushing.
CAUTION
.
Continuously Variable Transmission
(CVT) models cannot be push-
started or tow-started. Attempting
to do so may cause transmission
damage.
. Three-way catalyst equipped mod-
els should not be started by pushing
since the three way catalyst may be
damaged.
. Never try to start the vehicle by
towing it; when the engine starts,
the forward surge could cause the
vehicle to collide with the tow
vehicle.
CAUTION
.Do not continue to drive if your
vehicle overheats. Doing so could
cause engine damage or a vehicle
fire.
. To avoid the danger of being
scalded, never remove the radiator
cap while the engine is still hot.
When the radiator cap is removed,
pressurized hot water will spurt out,
possibly causing serious injury.
. Do not open the hood if steam is
coming out.
If your vehicle is overheating (indicated by an
extremely high temperature gauge reading) , or if
you feel a lack of engine power, detect abnormal
noise, etc., take the following steps:
1. Move the vehicle safely off the road and apply the parking brake.
2. Continuously Variable Transmission
(CVT) models:
Move the shift lever to the P (Park) position.
Manual Transmission (MT) models:
Move the shift lever to the N (Neutral)
position.
PUSH STARTING IF YOUR VEHICLE OVERHEATS
Page 251 of 332
6-14In case of emergency
When towing your vehicle, all State and local
regulations for towing must be followed. Incor-
rect towing equipment could damage your
vehicle. Towing instructions are available from
a NISSAN dealer. Local service operators are
familiar with the applicable laws and procedures
for towing. To assure proper towing and to
prevent accidental damage to your vehicle,
NISSAN recommends that you have a service
operator tow your vehicle. It is advisable to have
the service operator carefully read the following
precautions.
WARNING
.Never ride in a vehicle that is being
towed.
. Never get under your vehicle after it
has been lifted by a tow truck.
CAUTION
.When towing, make sure that the
transmission, axles, steering system
and powertrain are in working con-
dition. If any unit is damaged, dol-
lies must be used. .
Always attach safety chains before
towing.
For information about towing your vehicle behind
a recreational vehicle (RV), see “Flat towing”
(P.9-17) of this manual.
TOWING YOUR VEHICLE