2014 NISSAN CUBE headlight
[x] Cancel search: headlightPage 266 of 332
Lights*:Clean the headlights on a regular basis.
Make sure that the headlights, stop lights, tail
lights, turn signal lights, and other lights are all
operating properly and installed securely. Also
check headlight aim.
Road wheel nuts (lug nuts)*: When checking
the tires, make sure no wheel nuts are missing,
and check for any loose wheel nuts. Tighten if
necessary.
Tire rotation*: Tires should be rotated every
5,000 miles (8,000 km) .
Tires*: Check the pressure with a gauge often
and always prior to long distance trips. If
necessary, adjust the pressure in all tires,
including the spare, to the pressure specified.
Check carefully for damage, cuts or excessive
wear.
Tire Pressure Monitoring System (TPMS)
transmitter components: Replace the TPMS
transmitter grommet seal, valve core and cap
when the tires are replaced due to wear or age.
Wheel alignment and balance: If the vehicle
should pull to either side while driving on a
straight and level road, or if you detect uneven or
abnormal tire wear, there may be a need for
wheel alignment.
If the steering wheel or seat vibrates at normal
highway speeds, wheel balancing may be
needed. For additional information regarding tires, refer
to “Important Tire Safety Information” in the
Warranty Information Booklet.
Windshield:
Clean the windshield on a regular
basis. Check the windshield at least every six
months for cracks or other damage. Have a
damaged windshield repaired by a qualified
repair facility.
Windshield wiper blades*: Check for cracks
or wear if they do not wipe properly.
Inside the vehicle
The maintenance items listed here should be
checked on a regular basis, such as when
performing scheduled maintenance, cleaning
the vehicle, etc.
Accelerator pedal: Check the pedal for
smooth operation and make sure the pedal
does not catch or require uneven effort. Keep
the floor mat away from the pedal.
Brake pedal: Check the pedal for smooth
operation. If the brake pedal suddenly goes
down further than normal, the pedal feels
spongy or the vehicle seems to take longer to
stop, see a NISSAN dealer immediately. Keep
the floor mat away from the pedal.
Brakes: Check that the brakes do not pull the
vehicle to one side when applied. Continuously Variable Transmission (CVT)
P (Park) position mechanism:
On a fairly
steep hill, check that the vehicle is held securely
with the shift lever in the P (Park) position
without applying any brakes.
Parking brake: Check the parking brake
operation regularly. The vehicle should be
securely held on a fairly steep hill with only the
parking brake applied. If the parking brake needs
adjusted, see a NISSAN dealer.
Seat belts: Check that all parts of the seat belt
system (for example, buckles, anchors, adjusters
and retractors) operate properly and smoothly,
and are installed securely. Check the belt
webbing for cuts, fraying, wear or damage.
Seats: Check seat position controls such as
seat adjusters, seatback recliners, etc. to ensure
they operate smoothly and that all latches lock
securely in every position. Check that the head
restraints move up and down smoothly and that
the locks (if so equipped) hold securely in all
latched positions.
Steering wheel: Check for changes in the
steering conditions, such as excessive free play,
hard steering or strange noises.
Warning lights and chimes: Make sure that
all warning lights and chimes are operating
properly.
Maintenance and do-it-yourself8-3
Page 283 of 332
8-20Maintenance and do-it-yourself
SDI1959
ENGINE COMPARTMENT
CAUTION
Never use a fuse of a higher or lower
amperage rating than that specified on
the fuse box cover. This could damage
the electrical system or cause a fire.
If any electrical equipment does not operate,
check for an open fuse.
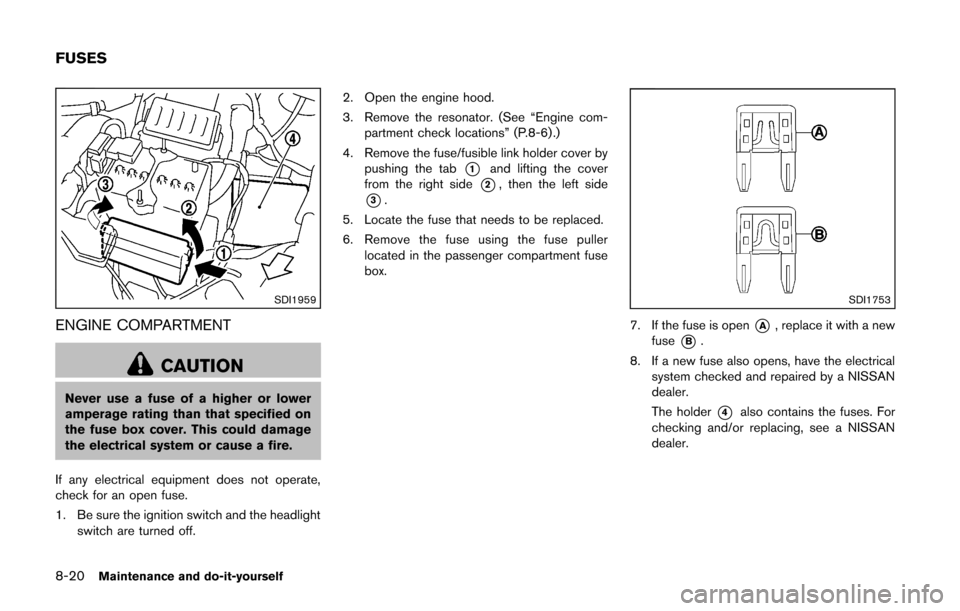
1. Be sure the ignition switch and the headlight switch are turned off. 2. Open the engine hood.
3. Remove the resonator. (See “Engine com-
partment check locations” (P.8-6) .)
4. Remove the fuse/fusible link holder cover by pushing the tab
*1and lifting the cover
from the right side
*2, then the left side
*3.
5. Locate the fuse that needs to be replaced.
6. Remove the fuse using the fuse puller located in the passenger compartment fuse
box.
SDI1753
7. If the fuse is open*A, replace it with a new
fuse
*B.
8. If a new fuse also opens, have the electrical system checked and repaired by a NISSAN
dealer.
The holder
*4also contains the fuses. For
checking and/or replacing, see a NISSAN
dealer.
FUSES
Page 284 of 332
SDI1869
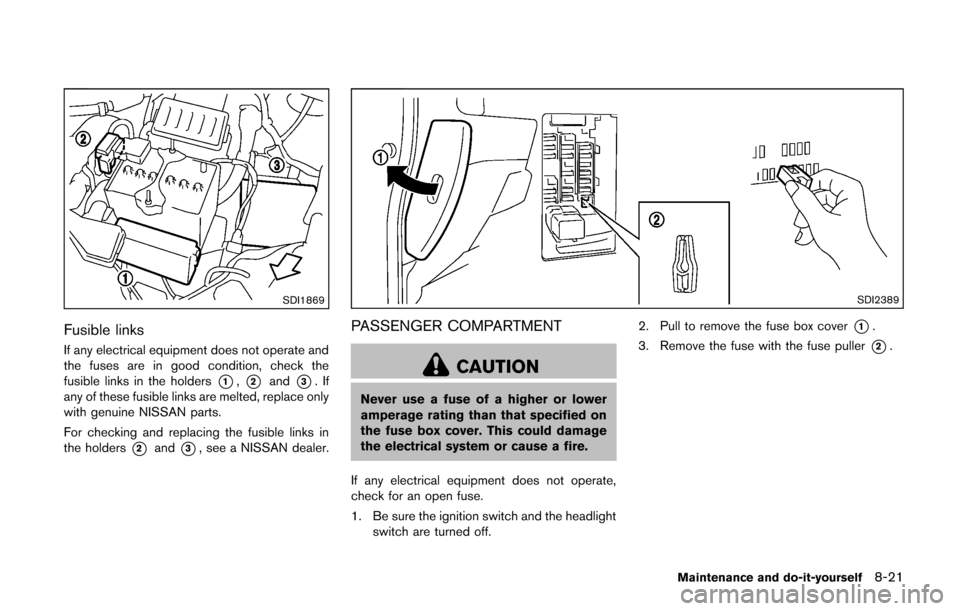
Fusible links
If any electrical equipment does not operate and
the fuses are in good condition, check the
fusible links in the holders
*1,*2and*3.If
any of these fusible links are melted, replace only
with genuine NISSAN parts.
For checking and replacing the fusible links in
the holders
*2and*3, see a NISSAN dealer.
SDI2389
PASSENGER COMPARTMENT
CAUTION
Never use a fuse of a higher or lower
amperage rating than that specified on
the fuse box cover. This could damage
the electrical system or cause a fire.
If any electrical equipment does not operate,
check for an open fuse.
1. Be sure the ignition switch and the headlight switch are turned off. 2. Pull to remove the fuse box cover
*1.
3. Remove the fuse with the fuse puller
*2.
Maintenance and do-it-yourself8-21
Page 285 of 332
8-22Maintenance and do-it-yourself
SDI1753
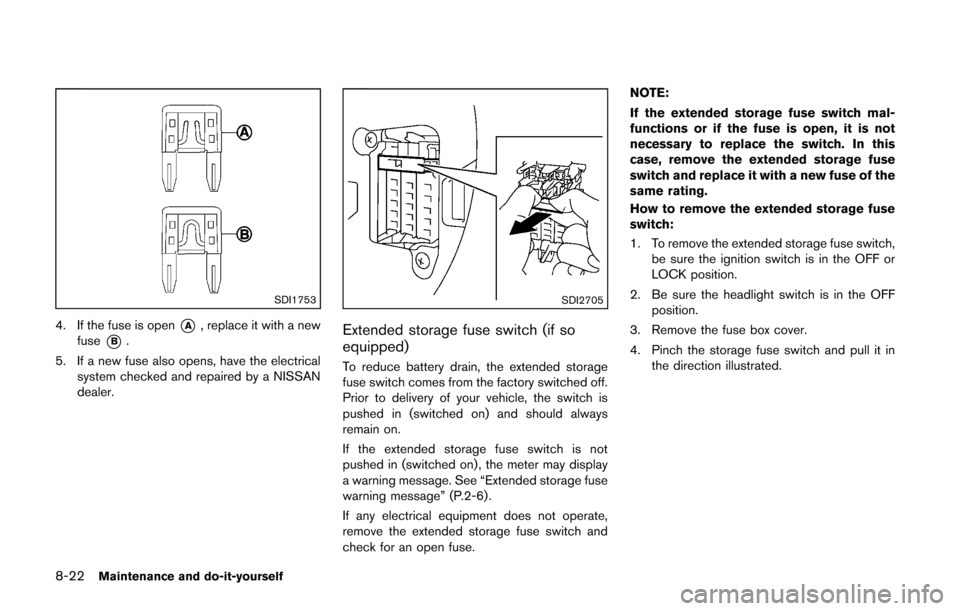
4. If the fuse is open*A, replace it with a new
fuse
*B.
5. If a new fuse also opens, have the electrical system checked and repaired by a NISSAN
dealer.
SDI2705
Extended storage fuse switch (if so
equipped)
To reduce battery drain, the extended storage
fuse switch comes from the factory switched off.
Prior to delivery of your vehicle, the switch is
pushed in (switched on) and should always
remain on.
If the extended storage fuse switch is not
pushed in (switched on) , the meter may display
a warning message. See “Extended storage fuse
warning message” (P.2-6).
If any electrical equipment does not operate,
remove the extended storage fuse switch and
check for an open fuse. NOTE:
If the extended storage fuse switch mal-
functions or if the fuse is open, it is not
necessary to replace the switch. In this
case, remove the extended storage fuse
switch and replace it with a new fuse of the
same rating.
How to remove the extended storage fuse
switch:
1. To remove the extended storage fuse switch,
be sure the ignition switch is in the OFF or
LOCK position.
2. Be sure the headlight switch is in the OFF position.
3. Remove the fuse box cover.
4. Pinch the storage fuse switch and pull it in the direction illustrated.
Page 289 of 332
8-26Maintenance and do-it-yourself
SDI2497
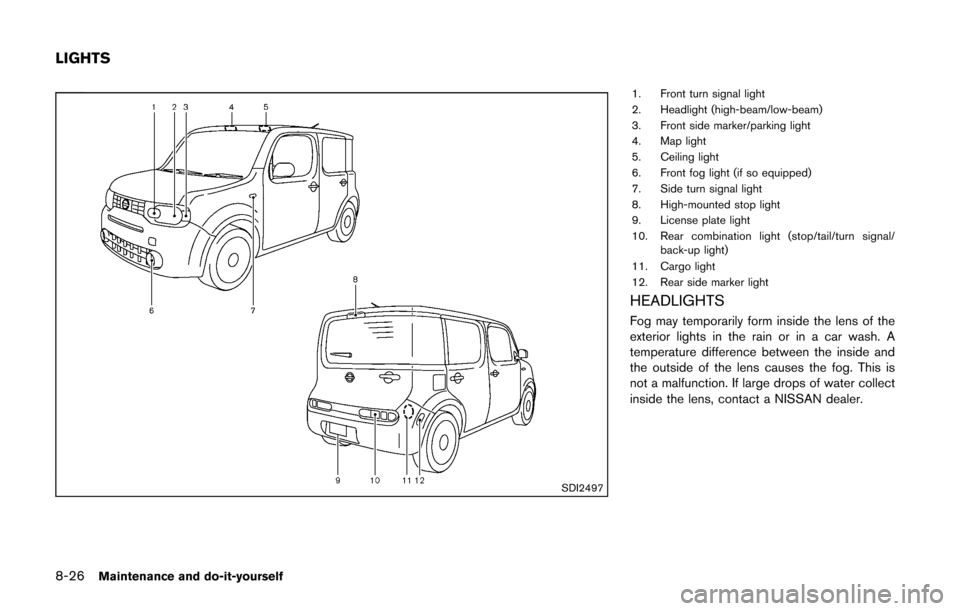
1. Front turn signal light
2. Headlight (high-beam/low-beam)
3. Front side marker/parking light
4. Map light
5. Ceiling light
6. Front fog light (if so equipped)
7. Side turn signal light
8. High-mounted stop light
9. License plate light
10. Rear combination light (stop/tail/turn signal/back-up light)
11. Cargo light
12. Rear side marker light
HEADLIGHTS
Fog may temporarily form inside the lens of the
exterior lights in the rain or in a car wash. A
temperature difference between the inside and
the outside of the lens causes the fog. This is
not a malfunction. If large drops of water collect
inside the lens, contact a NISSAN dealer.
LIGHTS
Page 290 of 332
Replacing
Halogen headlight model:
The headlight is a semi-sealed beam type which
uses a replaceable headlight (halogen) bulb.
CAUTION
.Do not leave the bulb out of the
headlight reflector for a long period
of time. Dust, moisture, smoke, etc.
entering the headlight body may
affect bulb performance.
. High pressure halogen gas is sealed
inside the halogen bulb. The bulb
may break if the glass envelope is
scratched or the bulb is dropped.
. Only touch the base when handling
the bulb. Never touch the glass
envelope. Touching the glass envel-
ope could significantly affect bulb
life and/or headlight performance.
. Aiming is not necessary after repla-
cing the bulb. When aiming adjust-
ment is necessary, contact a
NISSAN dealer.
Use the same number and wattage as originally
installed as shown in the chart.
SDI2396
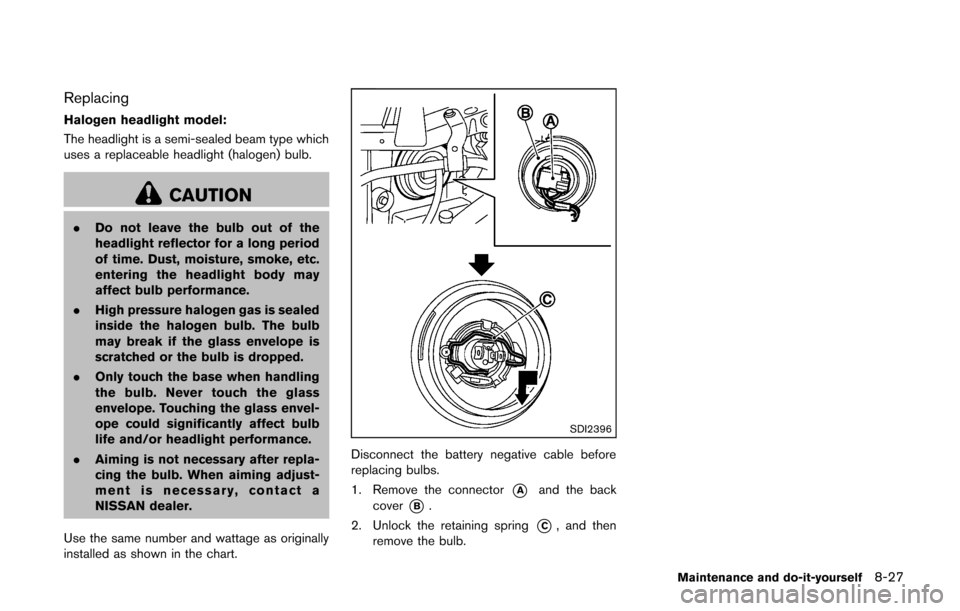
Disconnect the battery negative cable before
replacing bulbs.
1. Remove the connector
*Aand the back
cover
*B.
2. Unlock the retaining spring
*C, and then
remove the bulb.
Maintenance and do-it-yourself8-27
Page 291 of 332
8-28Maintenance and do-it-yourself
EXTERIOR AND INTERIOR LIGHTS
ItemWattage (W)Bulb No.
Headlight high/low beams (Halogen) 60/55HB2
Front turn signal light* 21PY21W
Front fog light (if so equipped)* 35H8
Front side marker/parking light* 5W5W
Side turn signal light* 5WY5W
Rear combination light*
turn signal 21PY21W
stop/tail 21/5W21/5W
back-up 18W16W
Rear side marker light* 5W5W
License plate light* 5W5W
Map light 5—
High-mounted stop light* 18W16W
Ceiling light 8—
Cargo light 8—
*: See a NISSAN dealer for replacement.
NOTE: Always check with the Parts Department at a NISSAN dealer for the latest information about parts.
SDI2306
: REMOVE
: INSTALL
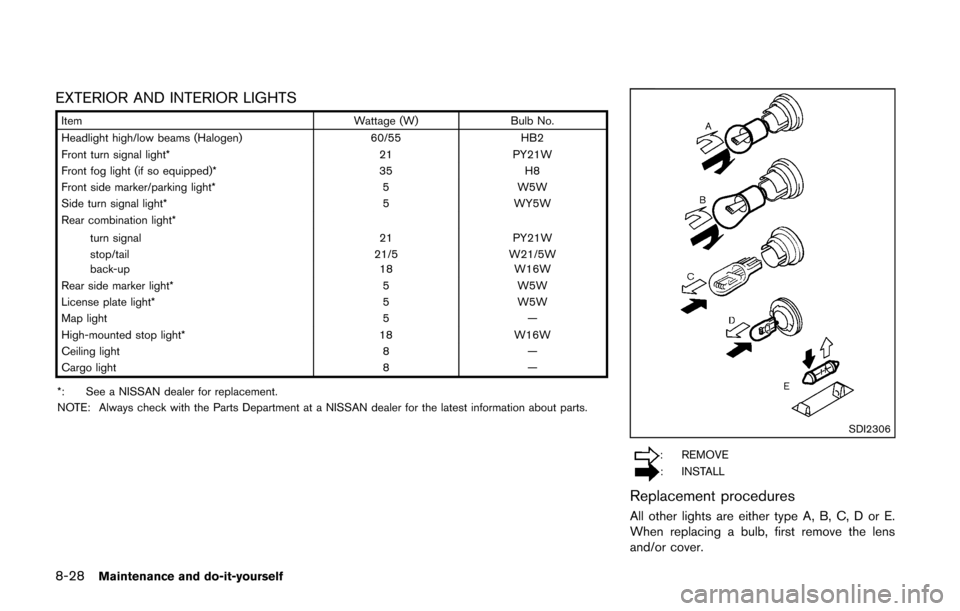
Replacement procedures
All other lights are either type A, B, C, D or E.
When replacing a bulb, first remove the lens
and/or cover.
Page 300 of 332
SDI1663
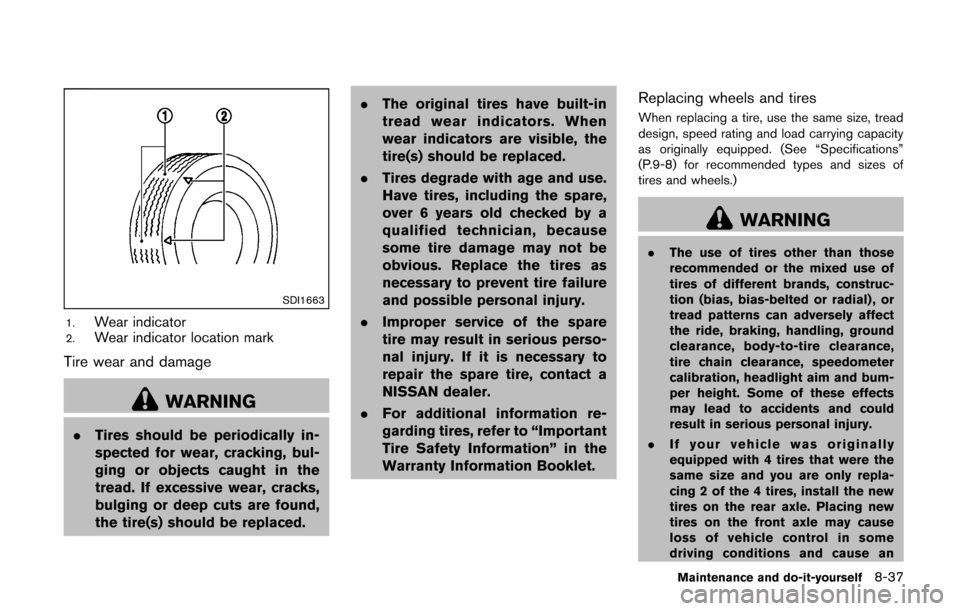
1.Wear indicator2.Wear indicator location mark
Tire wear and damage
WARNING
.Tires should be periodically in-
spected for wear, cracking, bul-
ging or objects caught in the
tread. If excessive wear, cracks,
bulging or deep cuts are found,
the tire(s) should be replaced. .
The original tires have built-in
tread wear indicators. When
wear indicators are visible, the
tire(s) should be replaced.
. Tires degrade with age and use.
Have tires, including the spare,
over 6 years old checked by a
qualified technician, because
some tire damage may not be
obvious. Replace the tires as
necessary to prevent tire failure
and possible personal injury.
. Improper service of the spare
tire may result in serious perso-
nal injury. If it is necessary to
repair the spare tire, contact a
NISSAN dealer.
. For additional information re-
garding tires, refer to “Important
Tire Safety Information” in the
Warranty Information Booklet.
Replacing wheels and tires
When replacing a tire, use the same size, tread
design, speed rating and load carrying capacity
as originally equipped. (See “Specifications”
(P.9-8) for recommended types and sizes of
tires and wheels.)
WARNING
. The use of tires other than those
recommended or the mixed use of
tires of different brands, construc-
tion (bias, bias-belted or radial) , or
tread patterns can adversely affect
the ride, braking, handling, ground
clearance, body-to-tire clearance,
tire chain clearance, speedometer
calibration, headlight aim and bum-
per height. Some of these effects
may lead to accidents and could
result in serious personal injury.
. If your vehicle was originally
equipped with 4 tires that were the
same size and you are only repla-
cing 2 of the 4 tires, install the new
tires on the rear axle. Placing new
tires on the front axle may cause
loss of vehicle control in some
driving conditions and cause an
Maintenance and do-it-yourself8-37