Page 17 of 82
3 Map settings
Map types........................................3-2
2-Dimensional (2D) view ........................3-2
3-Dimensional (3D) view ........................3-2
Screen information (2D or 3D) ...................3-3
Moving a map . . . ..................................3-4
Returning to the current vehicle location ...........3-4
Map options menu screen ..........................3-5
Changing the map scale . . . ........................3-5
Map scale . . . ..................................3-6 Looking at information on the map
...................3-6
Map symbols ...................................3-6
Map settings for the map screen ....................3-7
Map SD-card .....................................3-8
How to handle the SD-card ......................3-8
SD-card replacement . . . ........................3-9
How to order map data updates ..................3-9
About the map data .............................3-9
End-user terms ................................ 3-10
Page 18 of 82
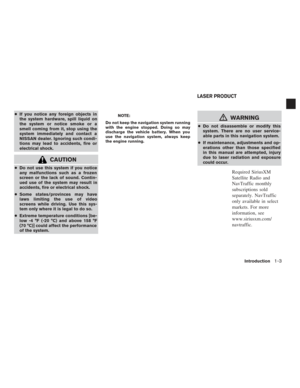
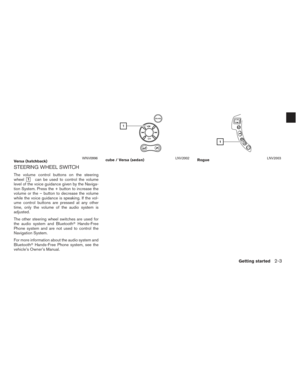
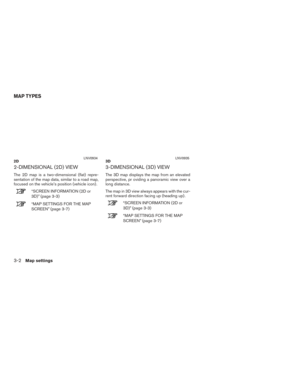
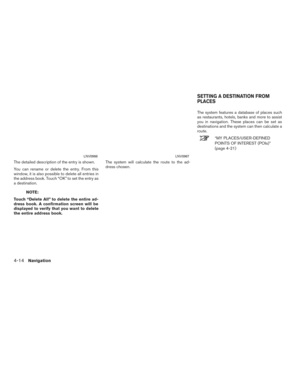
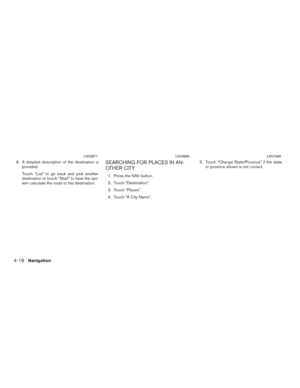
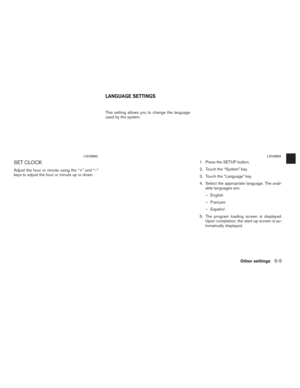
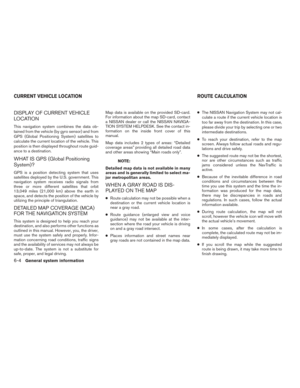
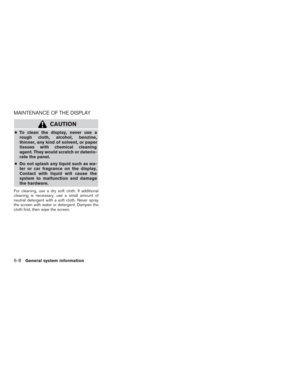
2-DIMENSIONAL (2D) VIEW
The 2D map is a two-dimensional (flat) repre-
sentation of the map data, similar to a road map,
focused on the vehicle’s position (vehicle icon) .
“SCREEN INFORMATION (2D or
3D)” (page 3-3)
“MAP SETTINGS FOR THE MAP
SCREEN” (page 3-7)
3-DIMENSIONAL (3D) VIEW
The 3D map displays the map from an elevated
perspective, pr oviding a panoramic view over a
long distance.
The map in 3D view always appears with the cur-
rent forward direction facing up (heading up) .
“SCREEN INFORMATION (2D or
3D)” (page 3-3)
“MAP SETTINGS FOR THE MAP
SCREEN” (page 3-7)
2DLNV09343DLNV0935
MAP TYPES
3-2Map settings
Page 19 of 82

�1“Voice” keyTouch to repeat the voice guidance while a
route is active. Touch and hold to switch the
voice guidance on and off.
�2Audio informationIndicates the radi")
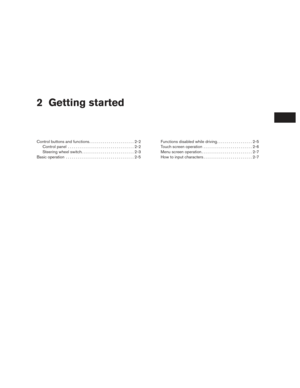
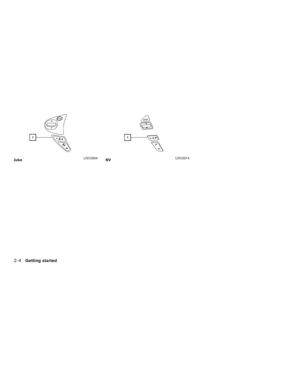
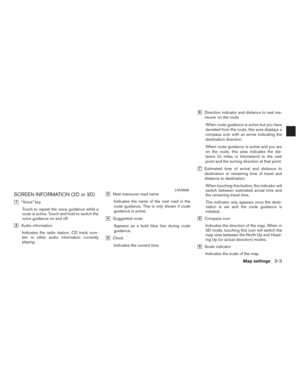
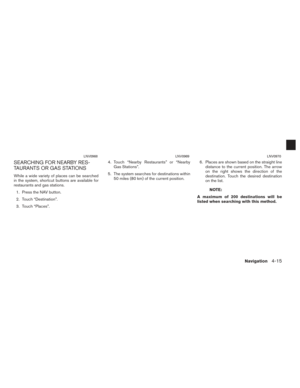
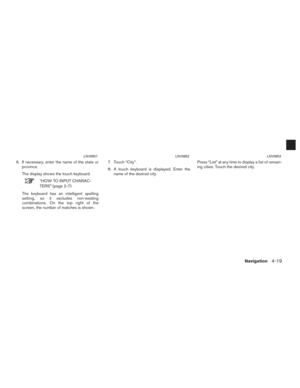
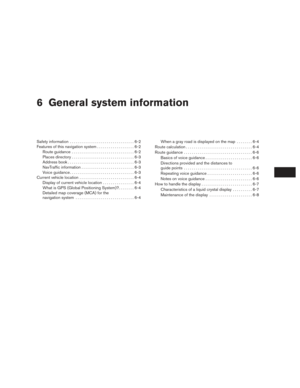
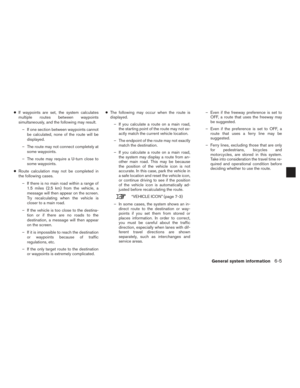
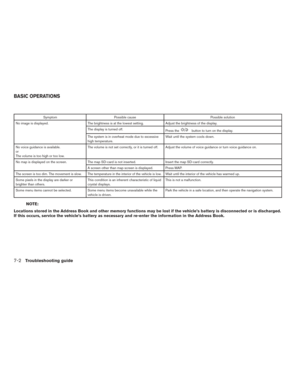
SCREEN INFORMATION (2D or 3D)
�1“Voice” keyTouch to repeat the voice guidance while a
route is active. Touch and hold to switch the
voice guidance on and off.
�2Audio informationIndicates the radio station, CD track num-
ber or other audio information currently
playing.
�3Next maneuver road name
Indicates the name of the next road in the
route guidance. This is only shown if route
guidance is active.
�4Suggested routeAppears as a bold blue line during route
guidance.
�5ClockIndicates the current time.
�6Direction indicator and distance to next ma-
neuver on the route
When route guidance is active but you have
deviated from the route, this area displays a
compass icon with an arrow indicating the
destination direction.
When route guidance is active and you are
on the route, this area indicates the dis-
tance (in miles or kilometers) to the next
point and the turning direction at that point.
�7Estimated time of arrival and distance to
destination or remaining time of travel and
distance to destination.
When touching this button, the indicator will
switch between estimated arrival time and
the remaining travel time.
This indicator only appears once the desti-
nation is set and the route guidance is
initiated.
�8Compass iconIndicates the direction of the map. When in
2D mode, touching this icon will switch the
map view between the North Up and Head-
ing Up (or actual direction) modes.
�9Scale indicatorIndicates the scale of the map.
LNV0936
Map settings3-3
Page 20 of 82

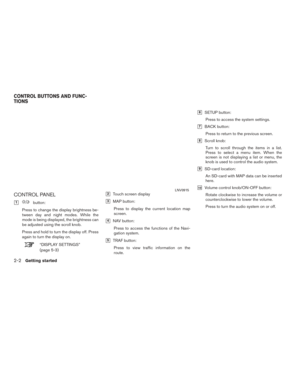
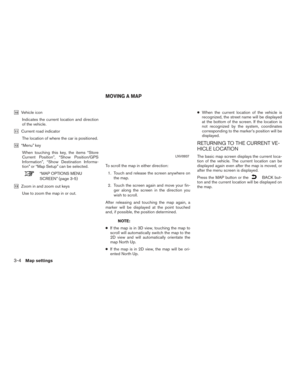
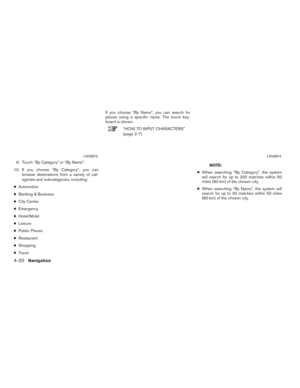
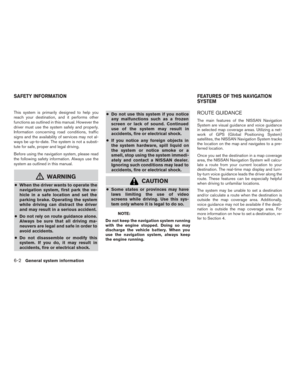
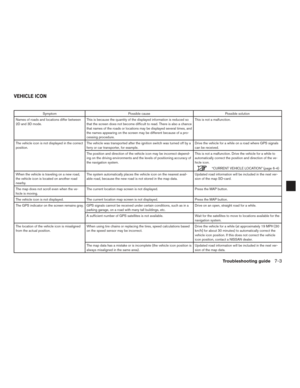
�10Vehicle iconIndicates the current location and direction
of the vehicle.
�11Current road indicatorThe location of where the car is positioned.
�12“Menu” keyWhen touching this key, the items “Store
Current Position”, “Show Position/GPS
Information”, “Show Destination Informa-
tion” or “Map Setup” can be selected.
“MAP OPTIONS MENU
SCREEN” (page 3-5)
�13Zoom in and zoom out keysUse to zoom the map in or out. To scroll the map in either direction:
1. Touch and release the screen anywhere on the map.
2. Touch the screen again and move your fin- ger along the screen in the direction you
wish to scroll.
After releasing and touching the map again, a
marker will be displayed at the point touched
and, if possible, the position determined.
NOTE:
● If the map is in 3D view, touching the map to
scroll will automatically switch the map to the
2D view and will automatically orientate the
map North Up.
● If the map is in 2D view, the map will be ori-
ented North Up. ●
When the current location of the vehicle is
recognized, the street name will be displayed
at the bottom of the screen. If the location is
not recognized by the system, coordinates
corresponding to the marker’s position will be
displayed.
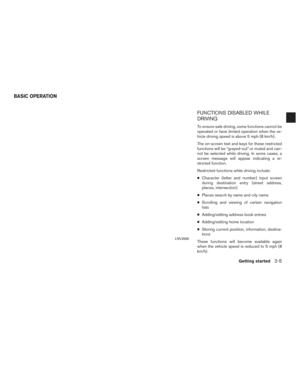
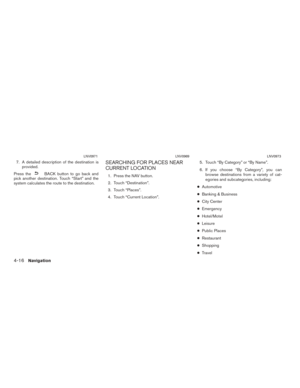
RETURNING TO THE CURRENT VE-
HICLE LOCATION
The basic map screen displays the current loca-
tion of the vehicle. The current location can be
displayed again even after the map is moved, or
after the menu screen is displayed.
Press the MAP button or the
BACK but-
ton and the current location will be displayed on
the map.
LNV0937
MOVING A MAP
3-4Map settings
Page 21 of 82
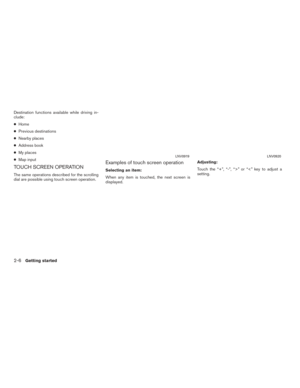
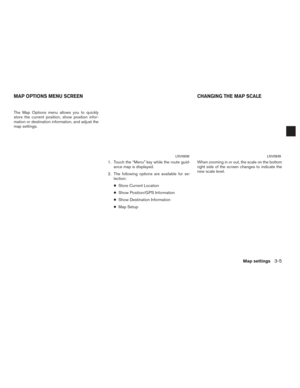
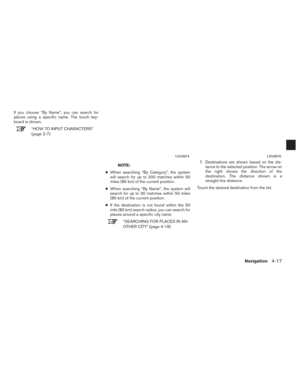
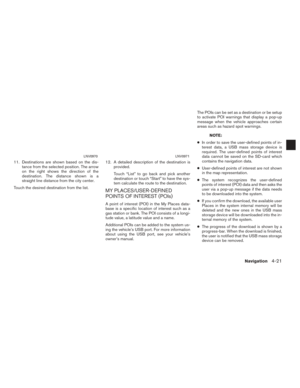
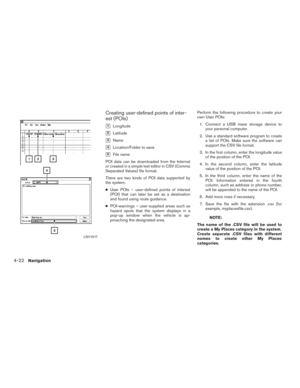
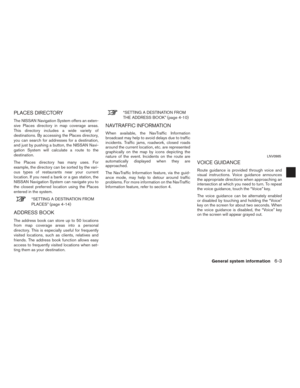
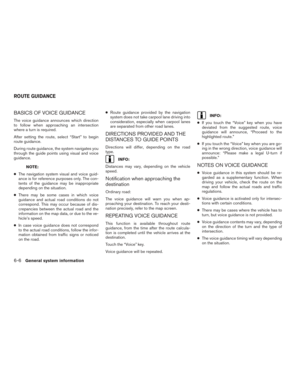
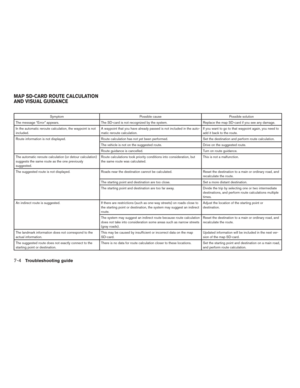
The Map Options menu allows you to quickly
store the current position, show position infor-
mation or destination information, and adjust the
map settings.1. Touch the “Menu” key while the route guid-ance map is displayed.
2. The following options are available for se- lection:
● Store Current Location
● Show Position/GPS Information
● Show Destination Information
● Map Setup When zooming in or out, the scale on the bottom
right side of the screen changes to indicate the
new scale level.
LNV0938LNV0939
MAP OPTIONS MENU SCREEN
CHANGING THE MAP SCALE
Map settings3-5
Page 22 of 82
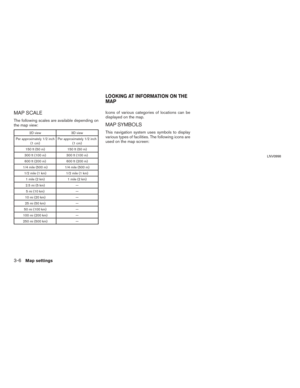
MAP SCALE
The following scales are available depending on
the map view:
2D view3D view
Per approximately 1/2 inch (1 cm) Per approximately 1/2 inch
(1 cm)
150 ft (50 m) 150 ft (50 m)
300 ft (100 m) 300 ft (100 m)
600 ft (200 m) 600 ft (200 m)
1/4 mile (500 m) 1/4 mile (500 m)
1/2 mile (1 km) 1/2 mile (1 km)
1 mile (2 km) 1 mile (2 km)
2.5 mi (5 km) —
5 mi (10 km) —
10 mi (20 km) —
25 mi (50 km) —
50 mi (100 km) —
100 mi (200 km) —
250 mi (500 km) —
Icons of various categories of locations can be
displayed on the map.
MAP SYMBOLS
This navigation system uses symbols to display
various types of facilities. The following icons are
used on the map screen:
LNV0998
LOOKING AT INFORMATION ON THE
MAP
3-6Map settings
Page 23 of 82
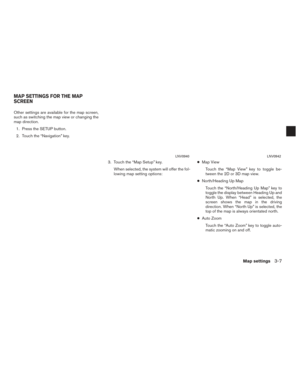
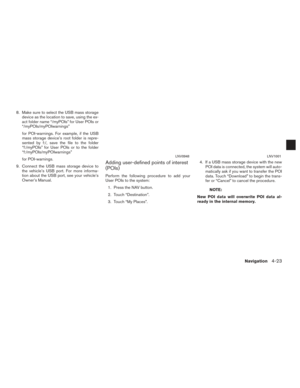
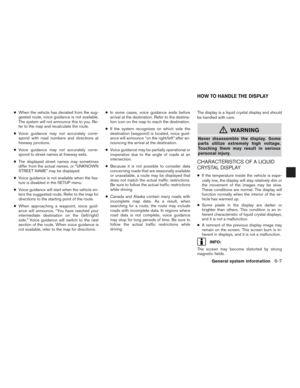
Other settings are available for the map screen,
such as switching the map view or changing the
map direction.1. Press the SETUP button.
2. Touch the “Navigation” key.
3. Touch the “Map Setup” key.When selected, the system will offer the fol-
lowing map setting options: ●
Map View
Touch the “Map View” key to toggle be-
tween the 2D or 3D map view.
● North/Heading Up Map
Touch the “North/Heading Up Map” key to
toggle the display between Heading Up and
North Up. When “Head” is selected, the
screen shows the map in the driving
direction. When “North Up” is selected, the
top of the map is always orientated north.
● Auto Zoom
Touch the “Auto Zoom” key to toggle auto-
matic zooming on and off.
LNV0940LNV0942
MAP SETTINGS FOR THE MAP
SCREEN
Map settings3-7
Page 24 of 82

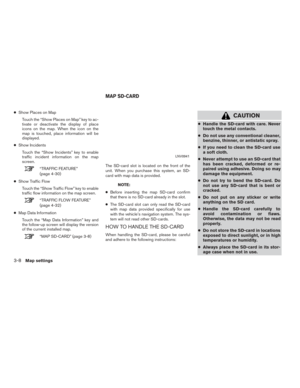
●Show Places on Map
Touch the “Show Places on Map” key to ac-
tivate or deactivate the display of place
icons on the map. When the icon on the
map is touched, place information will be
displayed.
● Show Incidents
Touch the “Show Incidents” key to enable
traffic incident information on the map
screen.
“TRAFFIC FEATURE”
(page 4-30)
● Show Traffic Flow
Touch the “Show Traffic Flow” key to enable
traffic flow information on the map screen.
“TRAFFIC FLOW FEATURE”
(page 4-32)
● Map Data Information
Touch the “Map Data Information” key and
the follow-up screen will display the version
of the current installed map.
“MAP SD-CARD” (page 3-8) The SD-card slot is located on the front of the
unit. When you purchase this system, an SD-
card with map data is provided.
NOTE:
● Before inserting the map SD-card confirm
that there is no SD-card already in the slot.
● The SD-card slot can only read the SD-card
with map data provided specifically for use
with the vehicle’s navigation system. The sys-
tem will not read other SD-cards.
HOW TO HANDLE THE SD-CARD
When handling the SD-card, please be careful
and adhere to the following instructions:
CAUTION
● Handle the SD-card with care. Never
touch the metal contacts.
● Do not use any conventional cleaner,
benzine, thinner, or antistatic spray.
● If you need to clean the SD-card use
a soft cloth.
● Never attempt to use an SD-card that
has been cracked, deformed or re-
paired using adhesive. Doing so may
damage the equipment.
● Do not try to bend the SD-card. Do
not use any SD-card that is bent or
cracked.
● Do not put on any sticker or write
anything on the SD card.
● Handle the SD-card carefully to
avoid contamination or flaws.
Otherwise, the data may not be read
properly.
● Do not store the SD-card in locations
exposed to direct sunlight, or in high
temperatures or humidity.
● Always place the SD-card in its stor-
age case when not in use.
LNV0941
MAP SD-CARD
3-8Map settings


 view ........................3-2
3-Dimensional (3D) view ........................3-2
Screen information (2D or 3D")
 VIEW
The 2D map is a two-dimensional (flat) repre-
sentation of the map data, similar to a road map,
focused on the vehicle’s position (vehicle icon) .
“SCREEN INFORMATION (2D o")

 Per approximately 1/2 inch
(1 cm)
150 ft (50 m) 150 ft (50 m)
300 ft (100 m) 30")
