2014 NISSAN ALTIMA SEDAN CD player
[x] Cancel search: CD playerPage 230 of 428

FM/AM/SAT RADIO WITH
COMPACT DISC (CD) PLAYER (if so
equipped)
For all operation precautions, see “Audio opera-
tion precautions” in this section.
Audio main operation
POWER/VOL. control:
Place the ignition switch in the ACC or ON
position, and then push the POWER/VOL. con-trol knob while the system is off to call up the
mode (radio or CD) which was playing immedi-
ately before the system was turned off.
To turn the system off, press the POWER/VOL.
control knob.
Turn the POWER/VOL. control knob to adjust the
volume.
This vehicle may be equipped with Speed Sen-
sitive Volume (SSV) for audio. The audio volume
changes as the driving speed changes.Audio settings:
1. Press the
button.
2. Select the “Settings” key.
3. Select the “Audio” key.
Use the touchscreen to adjust the following items
to the desired setting:
Audio Bass Adjusts the bass to the desired level.
Treble Adjusts the treble to the desired level.
Balance Adjusts the balance to the desired level. Balance adjusts the sound level between the left and right speakers.
Fade Adjusts the fade to the desired level. Fade adjusts the sound level between the front and rear speakers.
Speed Sensitive Vol. Adjusts the speed sensitive volume function, which increases the volume of the audio system as the speed of the ve-
hicle increases. Set to “OFF” to disable the feature. The higher the setting, the more the volume increases in relation to
vehicle speed.
AUX Volume Level/AUX Level Controls the volume level of incoming sound when an auxiliary device is connected to the system. Available options are
Low (Quiet) , Medium, and High (Loud) .
Bass, treble, balance and fade can also be adjusted by pressing the AUDIO control knob and turning it to select the item to adjust. When the desired item
is shown on the display, turn the tuning to adjust and then press the AUDIO button until the display returns to the main audio screen. If the button is not
pressed for approximately 10 seconds, the radio or CD display will automatically reappear.
Monitor, climate, audio, phone and voice recognition systems4-61
Page 232 of 428
Tuning with the TUNE/SCROLL knob:
The radio can also be manually tuned using the
TUNE/SCROLL knob. When in FM or AM mode,
turn the TUNE/SCROLL knob to the left for lower
frequencies or to the right for higher frequencies.
When in SXM mode, turn the TUNE/SCROLL
knob to change the channel.
SEEK tuning:
When in FM or AM mode, press the seek
buttons
orto tune from low to high
or high to low frequencies and to stop at the next
broadcasting station.
When in SXM mode, press the seek
buttons
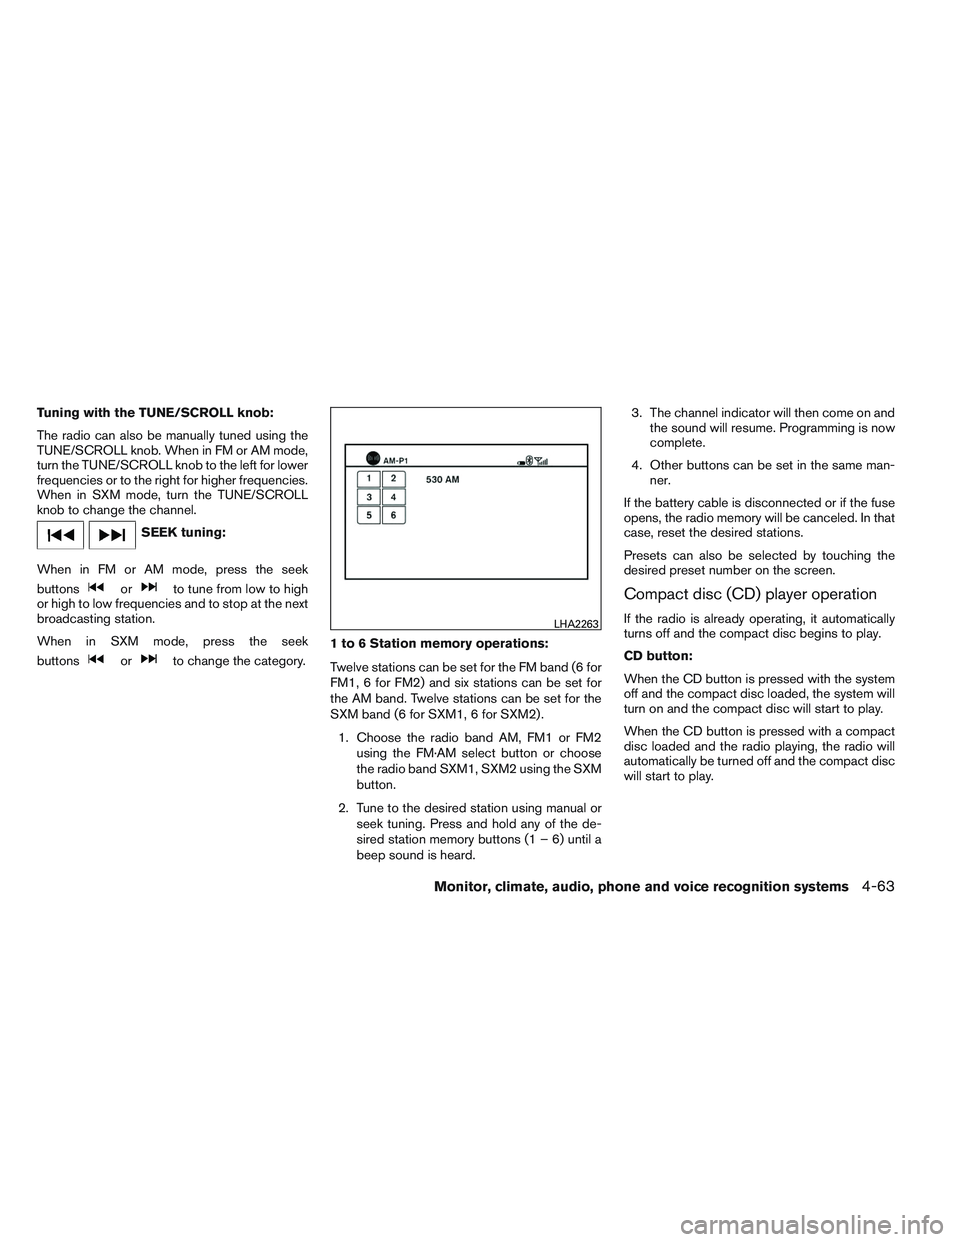
orto change the category. 1 to 6 Station memory operations:
Twelve stations can be set for the FM band (6 for
FM1, 6 for FM2) and six stations can be set for
the AM band. Twelve stations can be set for the
SXM band (6 for SXM1, 6 for SXM2) .
1. Choose the radio band AM, FM1 or FM2 using the FM·AM select button or choose
the radio band SXM1, SXM2 using the SXM
button.
2. Tune to the desired station using manual or seek tuning. Press and hold any of the de-
sired station memory buttons (1 – 6) until a
beep sound is heard. 3. The channel indicator will then come on and
the sound will resume. Programming is now
complete.
4. Other buttons can be set in the same man- ner.
If the battery cable is disconnected or if the fuse
opens, the radio memory will be canceled. In that
case, reset the desired stations.
Presets can also be selected by touching the
desired preset number on the screen.
Compact disc (CD) player operation
If the radio is already operating, it automatically
turns off and the compact disc begins to play.
CD button:
When the CD button is pressed with the system
off and the compact disc loaded, the system will
turn on and the compact disc will start to play.
When the CD button is pressed with a compact
disc loaded and the radio playing, the radio will
automatically be turned off and the compact disc
will start to play.LHA2263
Monitor, climate, audio, phone and voice recognition systems4-63
Page 234 of 428
SEEK (Reverse or FastForward) buttons:
Press and hold the seek buttons
orfor 1.5 seconds while the compact disc is playing
to reverse or fast forward the track being played.
The compact disc plays at an increased speed
while reversing or fast forwarding. When the but-
ton is released, the compact disc returns to nor-
mal play speed.
SEEK buttons:
Press the seek button
while a CD or
MP3/WMA CD is playing to return to the begin-
ning of the current track. Press the seek
button
several times to skip backward sev-
eral tracks.
Press the seek button
while a CD or
MP3/WMA CD is playing to advance one track.
Press the seek button
several times to skip
forward several tracks. If the last track on a CD is
skipped, the first track on the disc is played. If the
last track in a folder of an MP3/WMA CD is
skipped, the first track of the next folder is played. AUX button:
The AUX IN audio input jack accepts any stan-
dard analog audio input such as from a portable
cassette tape/CD player, MP3 player or a laptop
computer. Press the AUX button to play a com-
patible device plugged into the AUX IN jack.
EJECT button:
When the
button is pressed with a com-
pact disc loaded, the compact disc will eject and
the last source will be played.
If the disc is not removed within 10 seconds, the
disc will reload.
Additional features
For more information about the iPod® player
available with this system, see “iPod® player
operation with Navigation System” in this section.
For more information about the USB interface
available with this system, see “USB interface
(models with Navigation System)” in this section.
For more information about the Bluetooth® audio
interface available with this system, see
“Bluetooth® streaming audio with Navigation
System” in this section.
USB INTERFACE (models without
Navigation System) (if so equipped)
Connecting a device to the USB input
jack
WARNING
Do not connect/disconnect or operate the
USB device while driving. Doing so can be
a distraction. If distracted you could lose
control of your vehicle and cause an acci-
dent or serious injury.
LHA2758
Monitor, climate, audio, phone and voice recognition systems4-65
Page 239 of 428

iPod®* PLAYER OPERATION
WITHOUT NAVIGATION SYSTEM (if
so equipped)
Connecting iPod®
WARNING
Do not connect/disconnect or operate the
USB device while driving. Doing so can be
a distraction. If distracted you could lose
control of your vehicle and cause an acci-
dent or serious injury.
CAUTION
●Do not force the USB device into the
USB port. Inserting the USB device
tilted or up-side-down into the port may
damage the port. Make sure that the
USB device is connected correctly into
the USB port.
● Do not grab the USB port cover (if so
equipped) when pulling the USB device
out of the port. This could damage the
port and the cover.
● Do not leave the USB cable in a place
where it can be pulled unintentionally.
Pulling the cable may damage the port.
Refer to your device manufacturer’s owner infor-
mation regarding the proper use and care of the
device.
To connect an iPod® to the vehicle so that the
iPod® can be controlled with the audio system
controls and display screen, use the USB jack
located on the center console below the heater
and air conditioner controls. Connect the iPod®-
specific end of the cable to the iPod® and the
USB end of the cable to the USB jack on the
vehicle. If your iPod® supports charging via a
USB connection, its battery will be charged while
connected to the vehicle with the ignition switch
in the ACC or ON position. While connected to the vehicle, the iPod® can
only be operated by the vehicle audio controls.
To disconnect the iPod® from the vehicle, re-
move the USB end of the cable from the USB
jack on the vehicle, then remove the cable from
the iPod®.
* iPod® is a trademark of Apple Inc., registered in
the U.S. and other countries.
Compatibility
The following models are compatible:
● iPod® 5th Generation (firmware version 1.3
or later)
● iPod® Classic (80GB) (firmware version
1.1.2PC or later)
● iPod® Classic (120GB) (firmware version
2.0.1PC or later)
● iPod® nano - 1st generation (firmware ver-
sion 1.3.1 or later)
● iPod® nano - 2nd generation (firmware ver-
sion 1.1.3 or later)
● iPod® nano - 3rd generation (firmware ver-
sion 1.1.3PC or later)
● iPod® nano - 4th generation (firmware ver-
sion 1.0PC or later)
LHA2758
4-70Monitor, climate, audio, phone and voice recognition systems
Page 241 of 428
Repeat Off: no repeat play pattern is applied.
RANDOM (RDM):
When the RDM button is pressed while a track is
being played, the play pattern can be changed as
follows:
Shuffle Off→Track Shuffle →Album Shuffle →
Shuffle Off
Track Shuffle: the tracks in the current list will be
played randomly.
Album Shuffle: the albums in the current list will
be played randomly.
Shuffle Off: no random play pattern is applied.
BACK button:
When the BACK button is pressed, it returns to
the previous menu.
iPod®* PLAYER OPERATION WITH
NAVIGATION SYSTEM (if so
equipped)
Connecting iPod®
WARNING
Do not connect/disconnect or operate the
USB device while driving. Doing so can be
a distraction. If distracted you could lose
control of your vehicle and cause an acci-
dent or serious injury.
CAUTION
● Do not force the USB device into the
USB port. Inserting the USB device
tilted or up-side-down into the port may
damage the port. Make sure that the
USB device is connected correctly into
the USB port.
● Do not grab the USB port cover (if so
equipped) when pulling the USB device
out of the port. This could damage the
port and the cover.
● Do not leave the USB cable in a place
where it can be pulled unintentionally.
Pulling the cable may damage the port.
Refer to your device manufacturer’s owner infor-
mation regarding the proper use and care of the
device.
To connect an iPod® to the vehicle so that the
iPod® can be controlled with the audio system
controls and display screen, use the USB jack
located on the center console below the heater
and air conditioner controls. Connect the iPod®-
specific end of the cable to the iPod® and the
USB end of the cable to the USB jack on the
vehicle. If your iPod® supports charging via a
USB connection, its battery will be charged while
connected to the vehicle with the ignition switch
in the ACC or ON position.
LHA2758
4-72Monitor, climate, audio, phone and voice recognition systems
Page 301 of 428
1. Apply the parking brake.
2. Move the shift lever to P (Park) or N (Neu-tral) . P (Park) is recommended.
The starter is designed not to operate if
the shift lever is in any of the driving
positions.
3. Push the ignition switch to the ON position. Depress the brake pedal and push the igni-
tion switch to start the engine.
To start the engine immediately, push and
release the ignition switch while depressing
the brake pedal with the ignition switch in
any position.
● If the engine is very hard to start in ex-
tremely cold weather or when restarting,
depress the accelerator pedal a little (ap-
proximately 1/3 to the floor) and while
holding, crank the engine. Release the
accelerator pedal when the engine starts.
● If the engine is very hard to start because
it is flooded, depress the accelerator
pedal all the way to the floor and hold it.
Push the ignition switch to the ON posi-
tion to start cranking the engine. After 5 or
6 seconds, stop cranking by pushing the
ignition switch to LOCK. After cranking
the engine, release the accelerator pedal.
Crank the engine with your foot off the accelerator pedal by depressing the
brake pedal and pushing the push-button
ignition switch to start the engine. If the
engine starts, but fails to run, repeat the
above procedure.
CAUTION
Do not operate the starter for more than
15 seconds at a time. If the engine does
not start, push the ignition switch to the
OFF position and wait 10 seconds before
cranking again, otherwise the starter
could be damaged.
4. Warm-up
Allow the engine to idle for at least 30 sec-
onds after starting. Do not race the engine
while warming it up. Drive at moderate
speed for a short distance first, especially in
cold weather. In cold weather, keep the en-
gine running for a minimum of2-3minutes
before shutting it off. Starting and stopping
the engine over a short period of time may
make the vehicle more difficult to start.
5. To stop the engine, shift the shift lever to the P (Park) position and push the ignition
switch to the OFF position. NOTE:
Care should be taken to avoid situations
that can lead to potential battery discharge
and potential no-start conditions such as:
1. Installation or extended use of electronic accessories that consume battery power
when the engine is not running (Phone char-
gers, GPS, DVD players, etc.)
2. Vehicle is not driven regularly and/or only driven short distances. In these cases, the
battery may need to be charged to maintain
battery health.
REMOTE START (if so equipped)
Vehicles started with the remote start require the
ignition switch to be placed in the ON position
before the shift lever can be moved from the P
(Park) position. To place the ignition switch to the
ON position, follow these steps:
1. Make sure that the Intelligent Key is on you.
2. Apply the brake.
3. Press the ignition switch once to the ON position.
For additional information, see “NISSAN Intelli-
gent Key®” in the “Pre-driving checks and ad-
justments” section of this manual.
STARTING THE ENGINE
5-12Starting and driving
Page 353 of 428
and are installed securely. Check the belt web-
bing for cuts, fraying, wear or damage.
Steering wheelCheck for changes in the steer-
ing system, such as excessive freeplay, hard
steering or strange noises.
Warning lights and chimes Make sure all
warning lights and chimes are operating properly.
Windshield wiper and washer* Check that
the wipers and washer operate properly and that
the wipers do not streak.
Windshield defroster Check that the air
comes out of the defroster outlets properly and in
sufficient quantity when operating the heater or
air conditioner.
Under the hood and vehicle
The maintenance items listed here should be
checked periodically (for example, each time you
check the engine oil or refuel) .
Battery* Check the fluid level in each cell. It
should be between the MAX and MIN lines. Ve-
hicles operated in high temperatures or under
severe conditions require frequent checks of the
battery fluid level. NOTE:
Care should be taken to avoid situations that
can lead to potential battery discharge and
potential no-start conditions such as: 1. In-
stallation or extended use of electronic ac-
cessories that consume battery power when
the engine is not running (Phone chargers,
GPS, DVD players, etc.) 2. Vehicle is not
driven regularly and/or only driven short dis-
tances. In these cases, the battery may need
to be charged to maintain battery health.
Brake fluid levels*
Make sure that the brake
fluid level is between the MIN and MAX lines on
the reservoir.
Engine coolant level* Check the coolant level
when the engine is cold.
Engine drive belts* Make sure the drive belts
are not frayed, worn, cracked or oily.
Engine oil level* Check the level after parking
the vehicle on a level surface with the engine off.
Wait more than 10 minutes for the oil to drain
back into the oil pan.
Exhaust system Make sure there are no loose
supports, cracks or holes. If the sound of the
exhaust seems unusual or there is a smell of
exhaust fumes, immediately have the exhaust
system inspected by a NISSAN dealer. See “Ex- haust gas (carbon monoxide)” in the “Starting
and driving” section of this manual.
Fluid leaks
Check under the vehicle for fuel, oil,
water or other fluid leaks after the vehicle has been
parked for a while. Water dripping from the air
conditioner after use is normal. If you should notice
any leaks or if gasoline fumes are evident, check for
the cause and have it corrected immediately.
Power steering fluid level* and lines Check
the level when the fluid is cold, with the engine
off. Check the lines for proper attachment, leaks,
cracks, etc.
Radiator and hoses Check the front of the
radiator and clean off any dirt, insects, leaves,
etc., that may have accumulated. Make sure the
hoses have no cracks, deformation, rot or loose
connections.
Underbody The underbody is frequently exposed
to corrosive substances such as those used on icy
roads or to control dust. It is very important to
remove these substances from the underbody, oth-
erwise rust may form on the floor pan, frame, fuel
lines and exhaust system. At the end of winter, the
underbody should be thoroughly flushed with plain
water, in those areas where mud and dirt may have
accumulated. See the “Appearance and care” sec-
tion of this manual.
Windshield-washer fluid* Check that there is
adequate fluid in the reservoir.
8-4Maintenance and do-it-yourself
Page 365 of 428
●Pre-mix washer fluid concentrates with
water to the manufacturer’s recom-
mended levels before pouring the fluid
into the windshield-washer fluid reser-
voir. Do not use the windshield-washer
fluid reservoir to mix the washer fluid
concentrate and water. ●
Keep the battery surface clean and dry.
Clean the battery with a solution of baking
soda and water.
● Make certain the terminal connections are
clean and securely tightened.
● If the vehicle is not to be used for 30 days or
longer, disconnect the negative (-) battery
terminal cable to prevent discharge.
NOTE:
Care should be taken to avoid situations
that can lead to potential battery discharge
and potential no-start conditions such as: 1. Installation or extended use of electronic accessories that consume battery power
when the engine is not running (Phone char-
gers, GPS, DVD players, etc.)
2. Vehicle is not driven regularly and/or only driven short distances. In these cases, the
battery may need to be charged to maintain
battery health.WARNING
●Do not expose the battery to flames, an
electrical spark or a cigarette. Hydrogen
gas generated by the battery is explo-
sive. Explosive gases can cause blind-
ness or injury. Do not allow battery fluid
to contact your skin, eyes, fabrics or
painted surfaces. Sulfuric acid can
cause blindness or injury. After touch-
ing a battery or battery cap, do not
touch or rub your eyes. Thoroughly
wash your hands. If the acid contacts
your eyes, skin or clothing, immediately
flush with water for at least 15 minutes
and seek medical attention.
● Do not operate the vehicle if the fluid in
the battery is low. Low battery fluid can
cause a higher load on the battery
which can generate heat, reduce battery
life, and in some cases lead to an
explosion.
● When working on or near a battery, al-
ways wear suitable eye protection and
remove all jewelry.
● Battery posts, terminals and related ac-
cessories contain lead and lead com-
pounds. Wash hands after handling.
BATTERY
8-16Maintenance and do-it-yourself