2014 MITSUBISHI OUTLANDER wheel
[x] Cancel search: wheelPage 378 of 451

How to change a tire 8-12 For emergencies
8
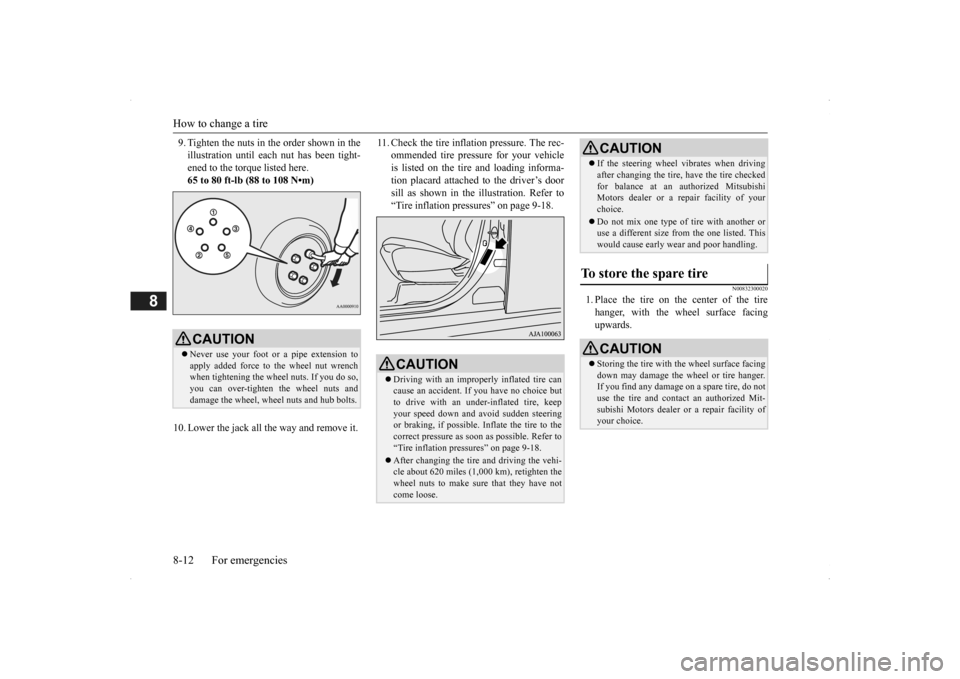
9. Tighten the nuts in the order shown in the illustration until each
nut has been tight-
ened to the torque listed here. 65 to 80 ft-lb (88 to 108 N•m)
10. Lower the jack all th
e way and remove it.
11. Check the tire inflation pressure. The rec-
ommended tire pressure for your vehicleis listed on the tire and loading informa- tion placard attached to the driver’s door sill as shown in the illustration. Refer to“Tire inflation pressures” on page 9-18.
N00832300020
1. Place the tire on the center of the tirehanger, with the wheel surface facing upwards.
CAUTION Never use your foot or a pipe extension to apply added force to the wheel nut wrench when tightening the wheel nuts. If you do so,you can over-tighten the wheel nuts and damage the wheel, wheel nuts and hub bolts.
CAUTION Driving with an improperly inflated tire can cause an accident. If
you have no choice but
to drive with an under-inflated tire, keep your speed down and avoid sudden steering or braking, if possible. Inflate the tire to thecorrect pressure as s
oon as possible. Refer to
“Tire inflation pressures” on page 9-18. After changing the tire
and driving the vehi-
cle about 620 miles (1,000 km), retighten the wheel nuts to make sure that they have notcome loose.
If the steering wheel vibrates when driving after changing th
e tire, have the tire checked
for balance at an authorized MitsubishiMotors dealer or a repair facility of your choice. Do not mix one type of
tire with another or
use a different size from the one listed. This would cause early we
ar and poor handling.
To store the spare tire
CAUTIONStoring the tire with the wheel surface facing down may damage the wheel or tire hanger. If you find any damage
on a spare tire, do not
use the tire and contact an authorized Mit-subishi Motors dealer or a repair facility of your choice.CAUTION
BK0200500US.book 12 ページ 2013年2月12日 火曜日 午前9時46分
Page 379 of 451

How to change a tire
For emergencies 8-13
8
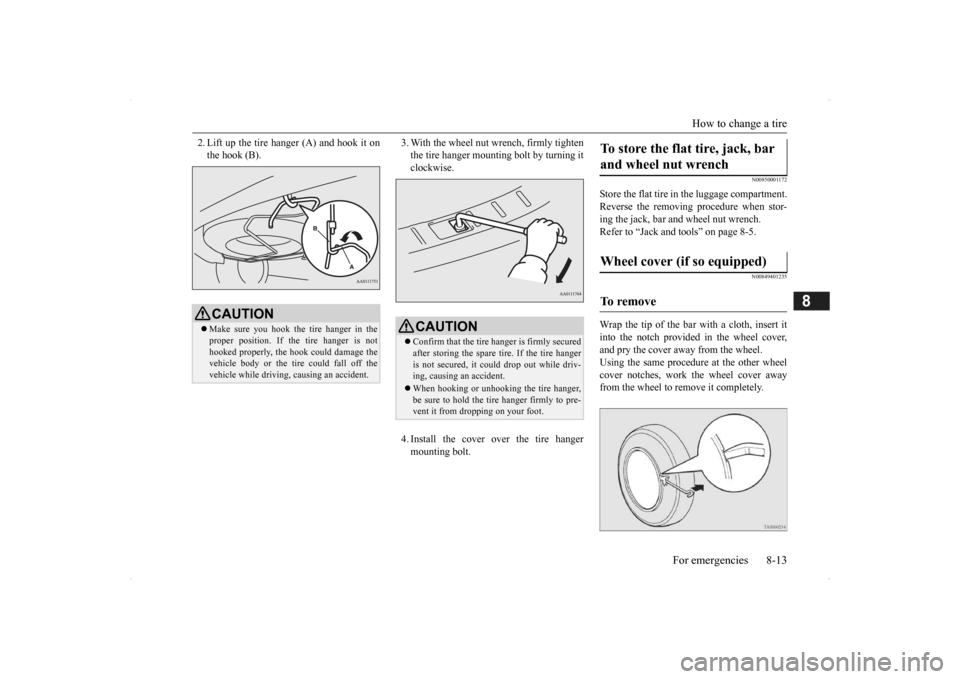
2. Lift up the tire hanger (A) and hook it on the hook (B).
3. With the wheel nut wrench, firmly tighten the tire hanger mounting bolt by turning itclockwise. 4. Install the cover over the tire hanger mounting bolt.
N00850001172
Store the flat tire in the luggage compartment. Reverse the removing procedure when stor-ing the jack, bar and wheel nut wrench. Refer to “Jack and tools” on page 8-5.
N00849401235
Wrap the tip of the bar with a cloth, insert itinto the notch provided in the wheel cover, and pry the cover away from the wheel.Using the same procedur
e at the other wheel
cover notches, work the wheel cover away from the wheel to remove it completely.
CAUTION Make sure you hook the tire hanger in the proper position. If the tire hanger is not hooked properly, the hook could damage the vehicle body or the tire
could fall off the
vehicle while driving,
causing an accident.
CAUTIONConfirm that the tire hanger is firmly secured after storing the spare
tire. If the tire hanger
is not secured, it coul
d drop out while driv-
ing, causing an accident. When hooking or unhooking the tire hanger, be sure to hold the tire hanger firmly to pre- vent it from dropping on your foot.
To store the flat tire, jack, bar and wheel nut wrench Wheel cover (if so equipped) To remove
BK0200500US.book 13 ページ 2013年2月12日 火曜日 午前9時46分
Page 380 of 451

Towing 8-14 For emergencies
8
1. Align the tire air valve (C) and the wheel cover notch (D). 2. Push the bottom (F) of the wheel cover into the wheel. 3. Gently push in both sides (G) of the wheel cover and hold them in place with bothknees.
4. Gently tap the top (H) of the wheel cover around its outer circumference to push itin.
N00837001898
If towing is necessary,
we recommend you to
have it done by a commercial tow truck ser- vice.When towing is required, transport the vehi- cle using a tow truck. Incorect towing equipment could damageyour vehicle.
NOTE
The wheel cover is made
of plastic. Be care-
ful when prying it off.CAUTION Trying to remove the
wheel cover with only
your bare hands can se
riously injure your
fingers.
To install
CAUTION Before installing the wheel cover to the wheel, make sure that the tabs (A) on the back of the wheel cover correctly engage the ring (B) to prevent the wheel cover fromcoming off. Do not install a wheel cover that has broken tabs.
NOTE
The back of the cover has a symbol (E) that shows the position of the notch.
To w i n g If your vehicle needs to be towed
BK0200500US.book 14 ページ 2013年2月12日 火曜日 午前9時46分
Page 381 of 451

Towing
For emergencies 8-15
8
There may be local re
gulations concerning
towing in your area. Obey the regulations of the area where youare driving your vehicle.
CAUTION Do not attempt to be
towed by another vehi-
cle with a rope.NOTE
Your vehicle cannot to
w any other vehicle.
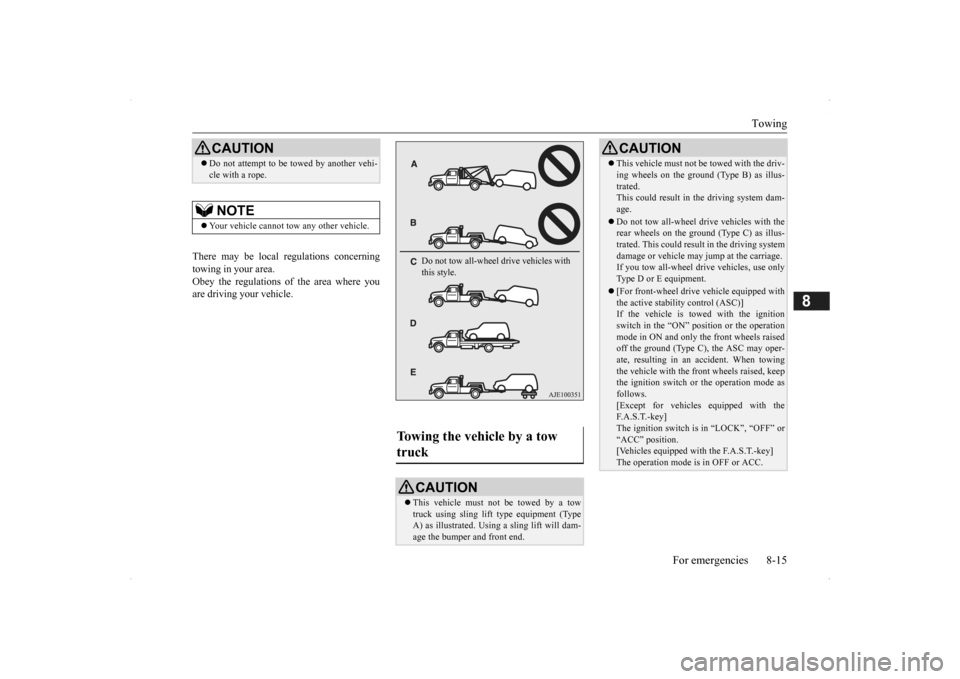
Towing the vehicle by a tow truck
CAUTION This vehicle must not be towed by a tow truck using sling lift
type equipment (Type
A) as illustrated. Usi
ng a sling lift will dam-
age the bumper and front end.Do not tow all-wheel drive vehicles with this style.
This vehicle must not be towed with the driv- ing wheels on the ground (Type B) as illus-trated.This could result in the driving system dam- age. Do not tow all-wheel dr
ive vehicles with the
rear wheels on the ground (Type C) as illus- trated. This could result in the driving systemdamage or vehicle may
jump at the carriage.
If you tow all-wheel drive vehicles, use only Type D or E equipment. [For front-wheel driv
e vehicle equipped with
the active stability control (ASC)]If the vehicle is towed with the ignition switch in the “ON” pos
ition or the operation
mode in ON and only
the front wheels raised
off the ground (Type C), the ASC may oper- ate, resulting in an accident. When towing the vehicle with the front wheels raised, keepthe ignition switch or
the operation mode as
follows. [Except for vehicles equipped with theF. A . S . T. - k e y ] The ignition switch is in “LOCK”, “OFF” or “ACC” position.[Vehicles equipped with the F.A.S.T.-key] The operation mode is in OFF or ACC.CAUTION
BK0200500US.book 15 ページ 2013年2月12日 火曜日 午前9時46分
Page 382 of 451

Operation under adverse driving conditions 8-16 For emergencies
8
Release the parking brake. Set the selector lever to the “N” (NEUTRAL)position.
N00837201760
If your vehicle becomes
stuck in snow, sand,
or mud, it can often be moved by a rockingmotion. Rock your vehicle back and forth to free it. Do not rev the engine or spin the wheels.Constant efforts to free a stuck vehicle can cause overheating and tr
ansaxle failure. Let
the engine idle for a few minutes to cool thetransaxle before trying again. If your vehicle is still
stuck after several rock-
ing attempts, call for a commercial tow truckservice.
When driving on a road covered with snow or ice, use s
now tires. Tire chains
cannot be used on your vehicle. There may be state or local regulations aboutusing snow tires. Always check the regu- lations in your local area before using them. Refer to “Snow tires” on page 9-20and “Tire chains” on page 9-21. Drive slowly. Do not make sudden starts or stops, sharp turns, or slam on the brakes. Allow extra distance between your vehi- cle and the vehicle in front of you, and avoid sudden braking. If a skid occurs when the accelerator pedal is depressed, take your foot off the pedal. Steer gently in the direction of the skid. Your vehicle is equipped with an anti-lock braking system (ABS). Hold the brake pedal down firmly and keep it depressed.Do not pump the brake pedal which will result in reduced braking performance.
Towing a front-wheel drive vehi- cle with front wheels off the ground (Type C) Operation under adverse driving conditions If your vehicle becomes stuck in sand, mud or snow
WA R N I N G When trying to rock
your vehicle out of a
stuck position, make sure that there are nopeople nearby. The
rocking motion can
make your vehicle suddenly lurch forward or backward, and inju
re any bystanders.
On wet roads
CAUTIONAvoid flooded roads. Water is often deeper than it looks, and you could be seriously hurtby driving into flood water. When driving in rain, on water-covered roads, or through a car
wash, water could get
into the brake discs and make them fail tem- porarily. In such cases, lightly press thebrake pedal to see if they are working prop- erly. If they are not, press the pedal lightly several times while driving to dry the brakepads or linings, then check them again. When driving in rain, a layer of water may form between the tires and the road surface (hydroplaning). This loosens your tires’ grip on the road, making it difficult to steer orbrake properly. When driving on a wet road:• Drive your vehicle at a safe speed.• Do not drive on worn tires.• Always keep the tires at the correct infla-tion pressures.
On snowy or icy roads
BK0200500US.book 16 ページ 2013年2月12日 火曜日 午前9時46分
Page 383 of 451

Operation under adverse driving conditions
For emergencies 8-17
8
After parking on snowy or icy roads, it may be difficult to move your vehicle dueto the brake being frozen. Depress the accelerator pedal little by little to move the vehicle when safe to do so. Drive as slow as pos
sible when driving on
bumpy, rutted roads or over potholes.CAUTION Do not depress the acce
lerator pedal rapidly.
The vehicle could start moving when it breaks free from the
ice, possibly resulting in
an accident.
On a bumpy or rutted road
CAUTION Driving on bumpy, rutted roads or over pot- holes can damage th
e tires and wheels.
Wheels with low-profiles tires or under-inflated tires are especially at risk for dam- age.
BK0200500US.book 17 ページ 2013年2月12日 火曜日 午前9時46分
Page 385 of 451

9
Vehicle care and maintenanceService precautions ...........................................................................9-2 Catalytic converter ............................................................................9-2 Engine hood ......................................................................................9-3View of the engine compartment ......................................................9-5 Engine oil and oil filter .....................................................................9-6 Engine coolant ..................................................................................9-8Air cleaner filter................................................................................9-9 Automatic transaxle fluid (if so equipped) .....................................9-10 Continuously variable transmission
(CVT) fluid (if so equipped) . 9-11
Transfer oil (All-wheel drive models) ............................................ 9-11 Rear axle oil (All-wheel drive models) ..........................................9-12 Washer fluid ....................................................................................9-12Brake fluid ......................................................................................9-12 Battery.............................................................................................9-13 Tires ................................................................................................9-14Brake pedal free play ......................................................................9-21 Parking brake .................................................................................9-21 Wiper blades ...................................................................................9-21Emission-control system maintenance ...........................................9-22 General maintenance ......................................................................9-23 For cold and snowy weather ..........................................................9-24Fusible links ....................................................................................9-25 Fuses ...............................................................................................9-25 Replacement of light bulbs .............................................................9-29Vehicle care precautions .................................................................9-39 Cleaning the inside of your
vehicle ............
...........
...........
.........
.....9-40
Cleaning the outside of your vehicle ......
...........
...........
...........
.......9-41
BK0200500US.book 1 ページ 2013年2月12日 火曜日 午前9時46分
Page 395 of 451

Continuously variable transmission (CVT) fluid (if so equipped)
Vehicle care and maintenance 9-11
9
1. With the brake pedal fully depressed and the engine idling,
select each gear
momentarily, ending with the selectorlever in the “P” (PARK) position. 2. The fluid level should be at the HOT mark, but never a
bove the HOT mark
when the engine is warmed up. Add or drain fluid to get to the correct level. 3. Make certain that the dipstick cap is installed properly to
keep dirt and water
out of the transaxle.
Use only “Mitsubishi Motors Genuine ATF- J3” transaxle fluid to
ensure optimum trans-
axle performance. Mitsubishi Motors Cor
poration does not rec-
ommend the addition of
any fluid additives to
the transaxle.
N00938100076
The continuously variable transmission (CVT) should be maintained and serviced byan authorized Mitsubishi Motors dealer or a repair facility of your choice to obtain the best performance and longest life. It is impor-tant that the transmission fluid is kept at the correct level.
Use only “Mitsubish
i Motors Genuine
CVTF-J4” transmission fluid to ensure opti- mum transmission performance. Do not use any fluid additives to the trans- mission.
N00938401281
Whenever the transfer oil level is checked,add oil as necessary to
maintain the proper
level. Fill with the oil according to the table below.
Procedure for checking the fluid level
WA R N I N G Transaxle fluid is extremely flammable and poisonous. Do not spill fluid when adding or draining.
Good (Hot)
Fluid type
CAUTION Using the improper transaxle fluid may dam- age the transaxle.
Special additives
Continuously variable transmission (CVT) fluid
(if
so equipped)
Fluid type
Special additives
Transfer oil (All-wheel drive models) Fluid type Lubricant
Mitsubishi Motors Genuine Super Hypoid Gear Oil API
classification GL-5
Viscosity range
SAE 80
BK0200500US.book 11 ページ 2013年2月12日 火曜日 午前9時46分