Page 9 of 20

7ECO DRIVING
ECO Drive Assist
ECO drive levelLow High
Multi information
display switch
ECO indicatorECO mode switch
ECO Score
ECO drive level
Low High
Momentary fuel consumption display
this indicator will be displayed when fuel
efficient driving is achieved.eco mode is an eco-driving support
system which automatically controls
the engine, air conditioning system,
4
w D system (if equipped) and
s
- awc (if equipped) to improve
fuel efficiency.
to activate, press the
eco mode
switch.
w
hile driving, the momentary fuel
consumption is shown with a bar
graph.
t
he “
” mark in the momentary
fuel gauge shows the average fuel
consumption.
w
hen the momentary fuel consumption surpasses the average fuel
consumption, the momentary fuel consumption is displayed with a green
bar graph.
m
aintaining your fuel consumption above the average fuel consumption
point will help increase your mileage per gallon.
to show
, press the multi information display switch.
t
his function displays how fuel-
efficiently you are driving under
different driving conditions.
to show
, press the multi
information display switch.
eco
score indicates the points
you have scored on fuel-efficient
driving by the number of leaves.
to show
, press the multi
information display switch.
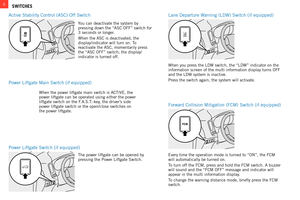
tire Pressure m onitoring s ystem ( t P ms )
the tire Pressure m onitoring s ystem light illuminates
when one or more of your tires is significantly under
inflated. Please note that changes in the outside
temperature may decrease tire pressure causing the
t
P ms light to turn on. i f the t P ms
light remains illuminated, check your
tire pressure.
i
f the warning light illuminates, take the necessary
measures referring to the owner’s manual.
Page 10 of 20

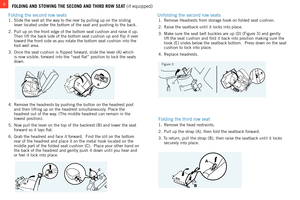
8
1. slide the seat all the way to the rear by pulling up on the sliding
lever located under the bottom of the seat and pushing to the back.
2.
Pull up on the front edge of the bottom seat cushion and raise it up.
t
hen lift the back side of the bottom seat cushion up and flip it over \
toward the front side as you rotate the bottom seat cushion into the
foot well area.
3.
o nce the seat cushion is flipped forward, slide the lever ( a ) which
is now visible, forward into the “seat flat” position to lock th\
e seats
down. 1.
Remove h eadrests from storage hook on folded seat cushion.
2.
Raise the seatback until it locks into place.
3.
m ake sure the seat belt buckles are up (D) ( f igure 3) and gently
lift the seat cushion and fold it back into position making sure the
hook (
e ) slides below the seatback bottom. Press down on the seat
cushion to lock into place.
4.
Replace headrests.
1.
Remove the head restraints.
2.
Pull up the strap (
a ), then fold the seatback forward.
3.
t
o return, pull the strap (
b ), then raise the seatback until it locks
securely into place.
FOLDING AND STOWING THE SECOND AND THIRD ROW SEAT (if equipped)
f
olding the second row seats Unfolding the second row seats
f
olding the third row seat
A
BC
A
B
4. Remove the headrests by pushing the button on the headrest post
and then lifting up on the headrest simultaneously
. Place the
headrest out of the way. (
t he middle headrest can remain in the
lowest position).
5.
n ow pull the lever on the top of the backrest ( b ) and lower the seat
forward so it lays flat.
6.
g rab the headrest and face it forward. f ind the slit on the bottom
rear of the headrest and place it on the metal hook located on the
middle part of the folded seat cushion (
c ). Place your other hand on
the back of the headrest and gently push it down until you hear and
or feel it lock into place.
D
E
figure 3
Page 11 of 20

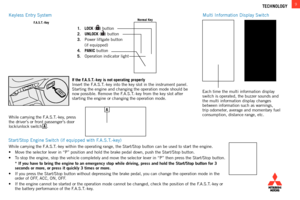
F.A.S.T.-Key Normal Key
1. LOCK () button
2.
U")
9TECHNOLOGY
m
ulti
i
nformation Display
s
witch
k
eyless
e
ntry
s
ystem
s
tart/
s
top
e
ngine
s
witch (if equipped with
f
.
a
.
s
.
t
.-key)
F.A.S.T.-Key Normal Key
1. LOCK () button
2.
UNLOCK (
) button
3.
Power liftgate button
(if equipped)
4.
PANIC button
5.
o
peration indicator light
If the F.A.S.T.-key is not operating properly
i
nsert the
f
.
a
.
s
.
t
.-key into the key slot in the instrument panel. s
tarting the engine and changing the operation mode should be
now possible. Remove the
f
.
a . s . t
.-key from the key slot after
starting the engine or changing the operation mode.e
ach time the multi information display
switch is operated, the buzzer sounds and
the multi information display changes
between information such as warnings,
trip odometer, average and momentary fuel
consumption, distance range, etc.
while carrying the f. a . s . t.-key , press
the driver’s or front passenger’s door
lock/unlock switch A .
A
while carrying the f. a . s . t.-key within the operating range, the s tart/ s top button can be used to start the engine.
•
m
ove the selector lever in “P” position and hold the brake pedal do\
wn, push the s tart/ s top button.
•
to stop the engine, stop the vehicle completely and move the selector lev\
er in “P” then press the
s tart/ s top button.
* If you have to bring the engine to an emergency stop while driving, pr\
ess and hold the Start/Stop button for 3
seconds or more, or press it quickly 3 times or more.
•
i
f you press the s tart/ s top button without depressing the brake pedal, you can change the operat\
ion mode in the
order of
off
,
acc , on , off
.
•
i
f the engine cannot be started or the operation mode cannot be changed, \
check the position of the f
.
a . s . t
.-key or
the battery performance of the
f
.
a . s . t
.-key
.
Page 12 of 20
 to the
U
sb
memory device
or the Dock")
1. Park your vehicle in a safe place and turn the ignition switch to
lock
position.
2.
c onnect the cable
(cable is not included with the vehicle) to the
U
sb
memory device
or the Dock connector to the iPod .
3.
o
pen the cover
in the floor console box. connect the cable to
the U
sb
input terminal
.
4.
t
urn the ignition switch to the “
acc ” position. t
urn on the audio
system.
5.
Press E
several times to switch to the U sb mode. t he input mode
changes as follows:
CD USB Bluetooth® (if equipped)
6.
Depending on your U
sb
device, it may take longer for playback to
start.
7.
o
nce the device is selected, playback starts.
With Display Audio System, follow steps 1 through 4 above
5.
Press MENU
on the touch screen.
6.
t
ouch USB.
7.
t
ouch
then select a track and begin playback.
10AUDIO SYSTEM
NOTE: Please refer to your o wner’s m anual for more detailed information on
how to use your audio system.
Usb and iPod input (if equipped)
audio Remote
c
ontrol b utton
(if equipped)
VOLUME UP
VOLUME Down
SEEK
c
hange
station or
track MODE
c
hange the
audio source
C
D
B
E
A
To enter frequencies into the memory (AM/FM/SAT)
1.
Press A
to turn on the audio system.
2.
Press B
to select the desired band ( am / fm / sat ).
3.
Press C
to s eek s tation
4.
h old down one of the m emory select buttons D (1-6) until it
beeps in order to save that station to memory.
Page 13 of 20

system settings
system related settings, such as the operation sound and the
time, can be made.
1.
Press the
MENU key. t he top menu is displayed.
2.
t
o")
11DISPLAY AUDIO SYSTEM (if equipped)
system settings
system related settings, such as the operation sound and the
time, can be made.
1.
Press the
MENU key. t he top menu is displayed.
2.
t
ouch
Setting, and then System Setting.
listening to the Radio
this explains how to listen to am and fm radio broadcasts. hD Radiotm
broadcast or analog broadcast can be received.
1.
Press the
MENU key.
t
he top menu is displayed.
2.
t
ouch
AM or FM.
t
he radio broadcast information screen is displayed.
3.
t
ouch
TUNE to tune in a station.
t
he station at the selected frequency is
played.
PSD
Program
s
ervice Data:
c
ontributes to the superior user
experience of
h
D Radio
t
echnology
. Presents song name, artist,
station
i
Ds,
h
D2/
h
D3
c
hannel
g
uide, and other relevant data
streams.
HD2/HD3
a
djacent to traditional main stations are extra local
fm
channels.
t
hese
h
D2/
h
D3
c
hannels provide new, original music
as well as deep cuts into traditional genre.
Digital Sound
Digital,
c
D-quality sound.
h
D Radio
t
echnology enables local
radio stations to broadcast a clean digital signal.
am
sounds like
today’s
fm
and
fm
sounds like a
c
D.
The system setting screen is displayed.
This is a setting item displayed by touching Time Setting.
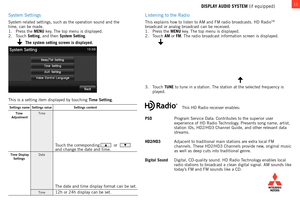
Settings name Settings value Settings content
Time
Adjustmen tTime
Touch the corresponding � or �and change the date and time.
Time Display
Settings Date
The date and time display format can be set.
Time12h or 24h display can be set.
this hD Radio receiver enables:
Page 14 of 20
 AND HD WEATHER AND FUEL (navigation only)
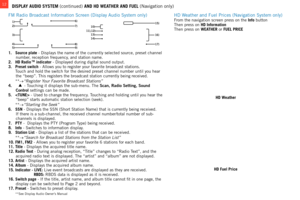
1. Source plate - Displays the name of the currently selected source, preset channel
number, reception frequency, and stat")
12DISPLAY AUDIO SYSTEM (continued) AND HD WEATHER AND FUEL (navigation only)
1. Source plate - Displays the name of the currently selected source, preset channel
number, reception frequency, and station name.
2.
HD Radio TM indicator - Displayed during digital sound output.
3.
Preset switch - a llows you to register your favorite broadcast stations.
t
ouch and hold the switch for the desired preset channel number until you\
hear
the “beep”.
t his registers the broadcast station currently being received.
**
→“Register Your Favorite Broadcast Stations”
4.
- touching it displays the sub-menu. t he Scan, Radio Setting, Sound
Control settings can be made.
5.
- Used to change the frequency. t
ouching and holding until you hear the
“beep” starts automatic station selection (seek).
**
→“Starting the Seek”
6.
SSN - Displays the ssn ( s hort s tation n ame) that is currently being received.
i
f there is a sub-channel, the received channel number/total number of su\
b-
channels is displayed.
7.
PTY - Displays the P t Y (Program t
ype) being received.
8.
Info - s witches to information display.
9.
Station List
- Displays a list of the stations that can be received.
**
→“Search for Broadcast Stations from the Station List”
10.
FM1, FM2 - a llows you to register your favorite 6 stations for each band.
11.
Title - Displays the acquired title name.
12.
Radio Text - During analog reception, “ t
itle” changes to “Radio
t
ext”, and the
acquired radio text is displayed.
t he “artist” and “album” are not displayed.
13.
Artist - Displays the acquired artist name.
14.
Album - Displays the acquired album name.
15.
Indicator - LIVE:
l ive event broadcasts are displayed as they are received.
RBDS:
R b D s data is displayed as it is received.
16.
Switch page - i f the title, artist name, and album title cannot fit in one page, the \
display can be switched to Page 2 and beyond.
17.
Preset - s witches to preset display.
** s ee Display a udio o wner’s m anual
from the navigation screen press on the Info buttont
hen press on HD Information
t
hen press on WEATHER or FUEL PRICE
fm Radio broadcast information screen (Display audio system only)h D weather and f uel Prices ( n avigation s ystem only)
3)
4) 1)
8)
6)
5)
2)
9)7)10) 16)11),12)13)14)
17)
15)
HD Weather
HD Fuel Price
12
Page 15 of 20

c
alling by e ntering a t
elephone
n umber
1. on the mobile phone screen, enter the telephone number.
2. touch the")
13BLUETOOTH® OPERATION WITH DISPLAY AUDIO AND NAVIGATION SYSTEM (if equipped)
c
alling by e ntering a t
elephone
n umber
1. on the mobile phone screen, enter the telephone number.
2. touch the “OFF HOOK” key.
making a call from a Phonebook
1. Display the vehicle phonebook screen
or the mobile phonebook screen.
**
→ “Display the Phonebook”
2.
s elect and touch the person to call.
incoming calls
the audio guide sounds and the
incoming call screen is displayed.
Registering a bluetooth® Device
Register a bluetooth® device with this product.
1.
Press the
MENU key. t he top menu is displayed.
2.
t
ouch Setting
, and then Bluetooth
® Setting.
3.
touch Register Device
.
4.
Enter the pass key displayed on the screen into the Bluetooth® device.
f
or a list of compatible
b
luetooth
® devices please go to
http://www.mitsubishicars.com/owners
SPEECH button:
c
hange to voice
recognition
PICK-UP button:
a
nswer an
incoming call
HANG-UP button
e
nd a call or voice
recognition
A
B
C
when the connection is complete, a screen is displayed for selecting
the b luetooth® device. for details, refer to the user manual for the b
luetooth® device.
“off hook” key
3. touch the telephone number to call.
4. touch Ye
s.
**see Display audio owner’s manual
ABC
bluetooth® controls
Page 16 of 20

Way Points – once you have set a destination, you can enter additional stops along the\
way called way Points. f or details on how to set wa")
search for a location
14NAVIGATION SYSTEM (if equipped)
Way Points – once you have set a destination, you can enter additional stops along the\
way called way Points. f or details on how to set way Points refer
to your n avigation o wner’s m anual.
Saving Addresses -
t
o save an address, first enter the address into the system.
t hen touch Address Book and confirm location to be stored.
touch
Set to Address Book to complete.
Set Your Home as the Destination
You can set your pre-registered home as the destination.
1.
Press the
key.
t his displays the destination menu.
2.
T
ouch Go Home. t his displays the guidance start screen.
Search from Addresss
earches for a location from an address.
1.
Press the
key.
t his displays the destination menu.
2.
T
ouch Address/Intersection.
3.
T
ouch the item, then input the address.
To Activate the Navigation Voice Command:
1. Push and hold the SPEAK button down on the steering wheel
for a couple of seconds.
2.
t
o activate the navigation voice command, touch the
SPEAK
button on the steering wheel and you will engage only that
system.
4.
T
ouch Set.
t
his displays the guidance start screen.
ADVICE
• Touching Last 5 allows you to select from among the last
5 searches.
•
All Intersections can be selected when the street is input.
• Depending on the state of the information recorded in the
map data, representative locations for that area may be
displayed.
3.
T
ouch Start.
the search for the route with your home as the
destination is complete and route guidance
starts.
NOTE
•
If a route using the HOV lane is in the
search result with set conditions, a
message confirms the use of the
ho V
lane is displayed.
Y
es: s earch for a ho V lane route.
No:
s earch for a non- ho V lane route.