Page 420 of 460
7-46 Vehicle care and maintenance
7
Headlights/Daytime running lights
(if so equipped)
N00901800121
1. Pull out the connector (A), and then remove the sealing
cover (B).2. Unhook the spring (C), which secures the bulb, and then
remove the bulb (D).
3. To install the bulb, perform the removal steps in reverse.
Headlight aim adjustment
N00943200352
The alignment of the headlights should be checked by an
authorized Mitsubishi Motors dealer or a repair facility of your
choice.
*- Front of the vehicle
BK0162600US.book 46 ページ 2013年3月22日 金曜日 午後2時41分
Page 421 of 460
Vehicle care and maintenance
7-47
7
Front side-marker lights
N00917300554
1. Turn the socket (A) counterclockwise to remove it.2. Pull the bulb out of the socket.
3. To install the bulb, perform the removal steps in reverse.*- Front of the vehicle
BK0162600US.book 47 ページ 2013年3月22日 金曜日 午後2時41分
Page 422 of 460
7-48 Vehicle care and maintenance
7
Front turn signal lights
N00943400370
1. Turn the socket (A) counterclockwise to remove it.2. Remove the bulb from the socket by turning it counter-
clockwise while pressing in.
3. To install the bulb, perform the removal steps in reverse.*- Front of the vehicle
BK0162600US.book 48 ページ 2013年3月22日 金曜日 午後2時41分
Page 423 of 460
Vehicle care and maintenance
7-49
7
Parking lights
N00917300567
1. Turn the socket (A) counterclockwise to remove it.2. Pull the bulb out of the socket.
3. To install the bulb, perform the removal steps in reverse.*- Front of the vehicle
BK0162600US.book 49 ページ 2013年3月22日 金曜日 午後2時41分
Page 424 of 460
7-50 Vehicle care and maintenance
7
Front fog lights
(if so equipped)
N00943600763
1. To create enough work space, turn the steering wheel all
the way in the direction opposite to the side you wish to
replace.
2. Remove the clips/bolts (A) to turn up the cover (B).3. While pressing the tab (C), pull out the connector (D).
4. Turn the bulb (E) counterclockwise to remove it.
BK0162600US.book 50 ページ 2013年3月22日 金曜日 午後2時41分
Page 425 of 460
Vehicle care and maintenance
7-51
7
5. To install the bulb, perform the removal steps in reverse.NOTE�When refitting each of the clips, first insert part (F) of the
clip into the hole and then press part (G) into it.
Rear combination lights
N00943700490
1. Open the liftgate.
(Refer to “Liftgate” on page 3-41.)
2. Remove the screws (A) that hold the light unit.
BK0162600US.book 51 ページ 2013年3月22日 金曜日 午後2時41分
Page 426 of 460
7-52 Vehicle care and maintenance
7
3. Move the light unit toward the rear of the vehicle to unfix
the notch (B) and pin (C).4. Turn the socket counterclockwise to remove it.
D- Back-up light
E- Rear turn signal light
F- Rear side-marker light, and tail and stop light
BK0162600US.book 52 ページ 2013年3月22日 金曜日 午後2時41分
Page 427 of 460
Vehicle care and maintenance
7-53
7
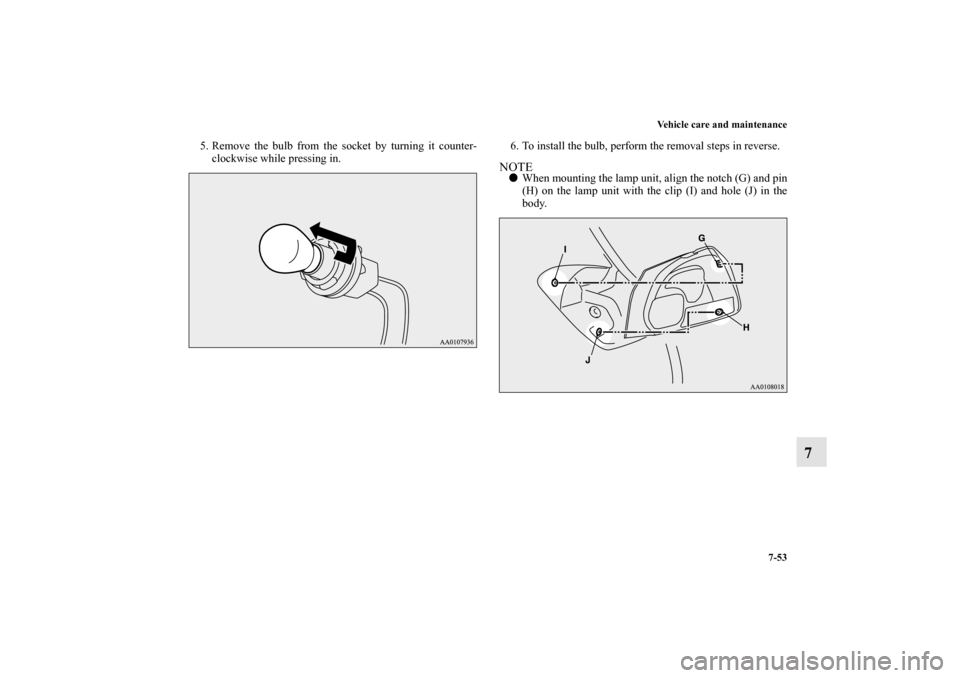
5. Remove the bulb from the socket by turning it counter-
clockwise while pressing in.6. To install the bulb, perform the removal steps in reverse.
NOTE�When mounting the lamp unit, align the notch (G) and pin
(H) on the lamp unit with the clip (I) and hole (J) in the
body.
BK0162600US.book 53 ページ 2013年3月22日 金曜日 午後2時41分

N00901800121
1. Pull out the connector (A), and then remove the sealing
cover (B).2. Unhook the spring (C), whic")
 counterclockwise to remove it.2. Pull the bulb out of the socket.
3. To install the bulb, perform the r")
 counterclockwise to remove it.2. Remove the bulb from the socket by turning it counter-
clockwise while")
 counterclockwise to remove it.2. Pull the bulb out of the socket.
3. To install the bulb, perform the removal ste")

N00943600763
1. To create enough work space, turn the steering wheel all
the way in the direction opposite to the side you wish t")

 and pin (C).4. Turn the socket counterclockwise to remove it.
D- Back-up light
E- Rear")