Page 266 of 460

4-8 Driving safety
4Parking
N00629600333
Parking on a hillWhen parking on a hill, set the parking brake, and turn the
front wheels toward the curb on a downhill, or away from the
curb on an uphill.
If necessary, apply chocks to the wheels.For vehicles equipped with manual transaxlePlace the gearshift lever into the “R” (Reverse) position when
parking on a downhill slope, into the 1st position when parking
on an uphill slope.For vehicles equipped with continuously variable trans-
mission (CVT)Be sure that the parking brake is firmly set when parked and
that the selector lever is in the “P” (PARK) position.
When parking on a hill, it is important to set the parking brake
before moving the selector lever to the “P” (PARK) position.
This prevents loading the parking brake against the transaxle.
When this happens, it is difficult to move the selector lever out
of the “P” (PARK) position.Parking with the engine runningNever leave the engine running while you take a short nap or
rest. Also, never leave the engine running in a closed or poorly
ventilated place.
Where you parkYour front bumper can be damaged if you scrape it over curbs
or parking stop blocks. Be careful when traveling up or down
steep slopes where your bumper can scrape the road.Do not keep the steering wheel fully turned for a
long timeMore effort could be required to turn the steering wheel.
Refer to “Electric power steering system (EPS)” on page 3-75.When leaving the vehicleAlways carry the key and lock all doors and the liftgate when
leaving the vehicle unattended.
Always try to park your vehicle in a well lit area.
WA R N I N G
!�Leaving the engine running risks injury or death
from accidentally moving the gearshift lever (man-
ual transaxle) or the selector lever (CVT) or from
the accumulation of toxic exhaust fumes in the pas-
senger compartment.
WA R N I N G
!�Do not park your vehicle in areas where combustible
materials such as dry grass or leaves can come in
contact with a hot exhaust, since a fire could occur.
BK0162600US.book 8 ページ 2013年3月22日 金曜日 午後2時41分
Page 273 of 460

5
Comfort controls
Vents. . . . . . . . . . . . . . . . . . . . . . . . . . . . . . . . . . . .5- 2
Heater without air conditioning function (if so
equipped) . . . . . . . . . . . . . . . . . . . . . . . . . . . . . .5- 6
Manual air conditioning (if so equipped). . . . . . . .5- 11
Automatic air conditioning (if so equipped) . . . . .5- 17
Important air conditioning operating tips . . . . . . .5- 28
Air purifier (if so equipped) . . . . . . . . . . . . . . . . . .5- 29
AM/FM electronically tuned radio with
CD player (if so equipped) . . . . . . . . . . . . . . . . .5- 30
To play tracks from USB device (if so equipped) .5- 43
To play tracks from a Bluetooth
® device
(vehicles with Bluetooth
® 2.0 interface) . . . . . .5- 56
Steering wheel audio remote control switches
(if so equipped) . . . . . . . . . . . . . . . . . . . . . . . . . .5- 59
Error codes . . . . . . . . . . . . . . . . . . . . . . . . . . . . . . .5- 60
Handling of compact discs . . . . . . . . . . . . . . . . . . .5- 62
Antenna . . . . . . . . . . . . . . . . . . . . . . . . . . . . . . . . .5- 64
General information about your radio . . . . . . . . . .5- 65
BK0162600US.book 1 ページ 2013年3月22日 金曜日 午後2時41分
Page 331 of 460
Comfort controls
5-59
5 Steering wheel audio remote control
switches
(if so equipped)
N00714800484
The remote control switches are located on the left side of the
steering wheel.
These switches can be used when the ignition switch or the
operation mode is in ON or ACC.1- Vol + key, - key
Adjust audio functions and the mobile phone function vol-
ume.
2-
CH key, key
Select CD and other audio source tracks and radio stations.
Hold down to skip up and down through tracks.
3- MODE key
Hold down to turn the audio function ON/OFF. Additionally,
each time this is pressed, this switches the audio source.
The order of switching is as shown below.
*1:An iPod cable (available separately) is required.
*2:Requires a separately-purchased Bluetooth-capable audio
device (vehicles with a Bluetooth
® 2.0 interface).
BK0162600US.book 59 ページ 2013年3月22日 金曜日 午後2時41分
Page 342 of 460

6-2 For emergencies
6If the vehicle breaks down
N00836300233
If your vehicle breaks down on the road, move to the shoulder
and turn on the hazard warning flashers. If there is no shoulder,
or the shoulder is not safe, drive in the right lane slowly with
the hazard lights flashing until you come to a safe stopping
place. Keep the flashers flashing.If the engine stops/failsIf the engine stops, there will be no power assist to the steering
and brakes, making these difficult to use.
�The brake booster will not work, so the brakes will not
grip well. The brake pedal will be harder to press than
usual.
�Since there is no power steering assist, the steering wheel
will be hard to turn.When the engine fails at the intersectionGet help from your passengers, bystanders, etc. to push the
vehicle and move it to a safe area.
Jump-starting the engine
N00836400768
If the engine cannot be started because the battery is weak or
dead, you can start it with the battery from another vehicle
using jumper cables.NOTE�Do not use jumper cables if they have damage or corro-
sion.
1. Take off any metal jewelry such as watch bands or brace-
lets that might create an accidental electrical contact.
2. Position the vehicles close enough together so that the
jumper cables can reach, but be sure the vehicles aren’t
touching each other.
WA R N I N G
!�To reduce the risk of igniting flammable gas that
may be emitted from the battery, carefully read this
section before jump-starting the vehicle.�Do not try to start your vehicle by pushing or tow-
ing. This can cause an accident resulting in serious
injury or death and can damage the vehicle.
CAUTION
!�Check the other vehicle. It must have a 12-volt bat-
tery. If the other system isn’t 12-volt, both systems
can be damaged.
BK0162600US.book 2 ページ 2013年3月22日 金曜日 午後2時41分
Page 347 of 460
For emergencies
6-7
6 Jack and tools
N00836600379
StorageThe tools are stored beneath the floor board of the cargo area.
The jack (if so equipped) is stored under the driver’s seat.
Tools
1- Tools
2- Jack (if so equipped)Ty p e A
Ty p e B
1- Tools bag
2- Wheel nut wrench
3- Jack bar
4- Towing hook
BK0162600US.book 7 ページ 2013年3月22日 金曜日 午後2時41分
Page 349 of 460

For emergencies
6-9
6 Tire repair kit
(if so equipped)
N00800400015
The tire repair kit can be used to temporarily repair a minor
puncture in tread area caused by a nail, screw or similar object.
Therefore, a spare tire is not provided.
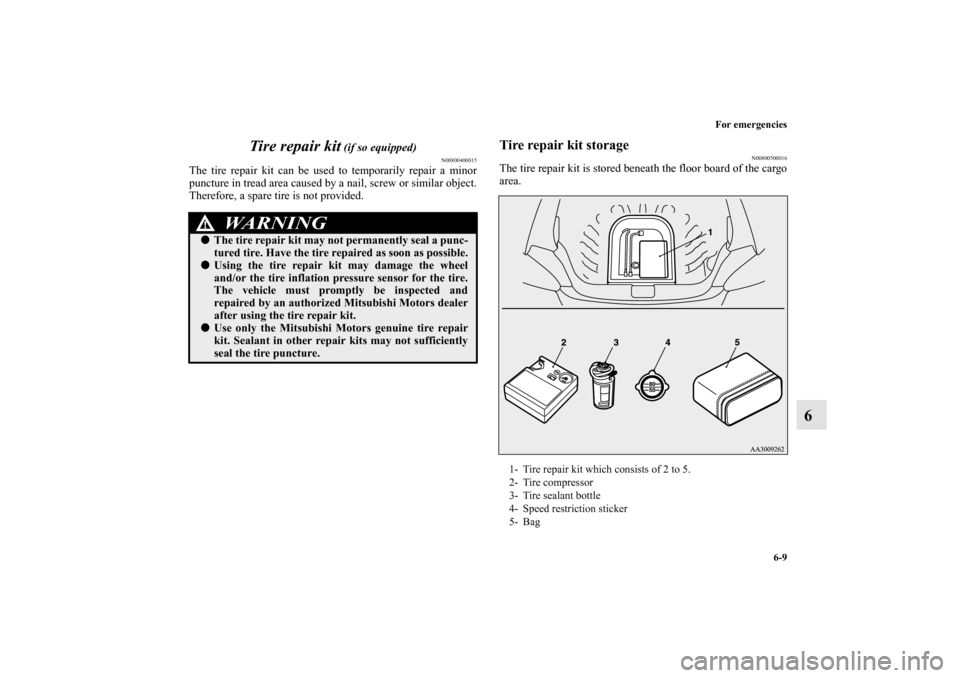
Tire repair kit storage
N00800500016
The tire repair kit is stored beneath the floor board of the cargo
area.
WA R N I N G
!�The tire repair kit may not permanently seal a punc-
tured tire. Have the tire repaired as soon as possible.�Using the tire repair kit may damage the wheel
and/or the tire inflation pressure sensor for the tire.
The vehicle must promptly be inspected and
repaired by an authorized Mitsubishi Motors dealer
after using the tire repair kit.�Use only the Mitsubishi Motors genuine tire repair
kit. Sealant in other repair kits may not sufficiently
seal the tire puncture.
1- Tire repair kit which consists of 2 to 5.
2- Tire compressor
3- Tire sealant bottle
4- Speed restriction sticker
5- Bag
BK0162600US.book 9 ページ 2013年3月22日 金曜日 午後2時41分
Page 350 of 460

6-10 For emergencies
6
How to use the tire repair kit
N00800600017
WA R N I N G
!�Never use the tire repair kit under in any of the situ-
ations listed below. The tire cannot be repaired by
the tire repair kit. If any of these situations occurs,
please contact an authorized Mitsubishi Motors
dealer or a repair facility of your choice.
• More than one tire is punctured.
• The puncture hole has a length or width of 1/7 inch
(4 mm) or greater.
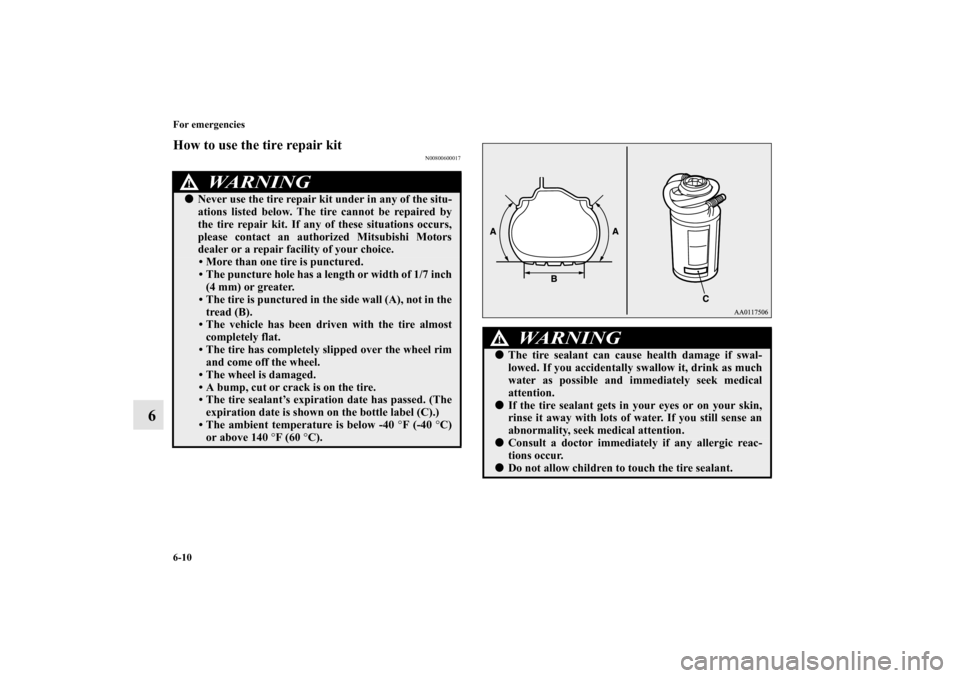
• The tire is punctured in the side wall (A), not in the
tread (B).
• The vehicle has been driven with the tire almost
completely flat.
• The tire has completely slipped over the wheel rim
and come off the wheel.
• The wheel is damaged.
• A bump, cut or crack is on the tire.
• The tire sealant’s expiration date has passed. (The
expiration date is shown on the bottle label (C).)
• The ambient temperature is below -40 °F (-40 °C)
or above 140 °F (60 °C).
WA R N I N G
!�The tire sealant can cause health damage if swal-
lowed. If you accidentally swallow it, drink as much
water as possible and immediately seek medical
attention.�If the tire sealant gets in your eyes or on your skin,
rinse it away with lots of water. If you still sense an
abnormality, seek medical attention.�Consult a doctor immediately if any allergic reac-
tions occur.�Do not allow children to touch the tire sealant.
BK0162600US.book 10 ページ 2013年3月22日 金曜日 午後2時41分
Page 354 of 460

6-14 For emergencies
6
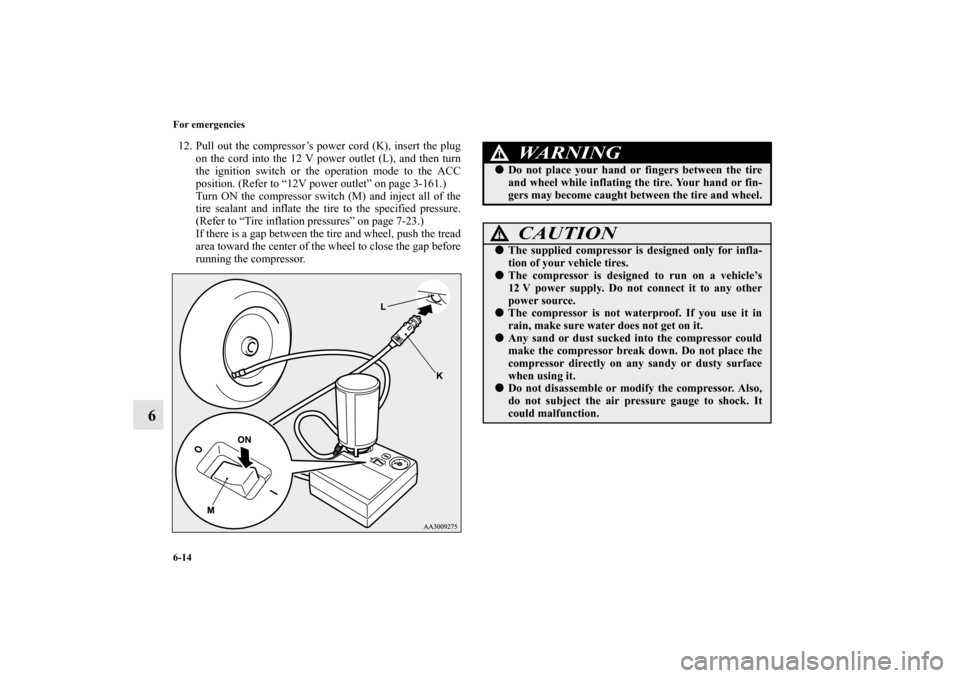
12. Pull out the compressor’s power cord (K), insert the plug
on the cord into the 12 V power outlet (L), and then turn
the ignition switch or the operation mode to the ACC
position. (Refer to “12V power outlet” on page 3-161.)
Turn ON the compressor switch (M) and inject all of the
tire sealant and inflate the tire to the specified pressure.
(Refer to “Tire inflation pressures” on page 7-23.)
If there is a gap between the tire and wheel, push the tread
area toward the center of the wheel to close the gap before
running the compressor.
WA R N I N G
!�Do not place your hand or fingers between the tire
and wheel while inflating the tire. Your hand or fin-
gers may become caught between the tire and wheel.
CAUTION
!�The supplied compressor is designed only for infla-
tion of your vehicle tires.�The compressor is designed to run on a vehicle’s
12 V power supply. Do not connect it to any other
power source.�The compressor is not waterproof. If you use it in
rain, make sure water does not get on it.�Any sand or dust sucked into the compressor could
make the compressor break down. Do not place the
compressor directly on any sandy or dusty surface
when using it.�Do not disassemble or modify the compressor. Also,
do not subject the air pressure gauge to shock. It
could malfunction.
BK0162600US.book 14 ページ 2013年3月22日 金曜日 午後2時41分