2014 MITSUBISHI LANCER SPORTBACK inflation pressure
[x] Cancel search: inflation pressurePage 266 of 422
Loading information Driving safety 6-7
6
It is important to fami
liarize yourself with the
following terms before loading your vehicle: Vehicle maximum load on the tire: load on an individual tire that is determined by distributing to each axle its share of the maximum loaded vehicle weight anddividing by two. Vehicle normal load on the tire: load on an individual tire that is determined by dis-tributing to each axle its share of the curb weight, accessory weight, and normal occupant weight and dividing by two. Maximum loaded vehicle weight: the sum of - (a) Curb weight;(b) Accessory weight; (c) Vehicle capacity weight; and (d) Production options weight. Curb weight: the weight of a motor vehi- cle with standard equipment including the maximum capacity of fuel, oil, and cool-ant.
Accessory weight: the combined weight (in excess of those standard items which may be replaced) of automatic transmis- sion, power steering, power brakes, powerwindows, power seats, radio, and heater, to the extent that these items are available as factory- installed equipment (whetherinstalled or not). Vehicle capacity weight: the rated cargo and luggage load plus 150 lbs (68 kg)
*
times the vehicle’s designated seatingcapacity. Production options weight: the combined weight of those installed regular produc-tion options weighing over 5 lbs (2.3 kg) in excess of those standard items which they replace, not previously considered incurb weight or accessory weight, includ- ing heavy duty brakes, ride levelers, roof rack, heavy duty battery, and special trim. Normal occupant weight: 150 lbs (68 kg)
*
times the number of specified occupants. (In your vehicle the number is 3) Occupant distribution: distribution of occupants in a vehicle as specified. (In your vehicle the distribution is 2 in front,1 in second row seat)
N00630100341
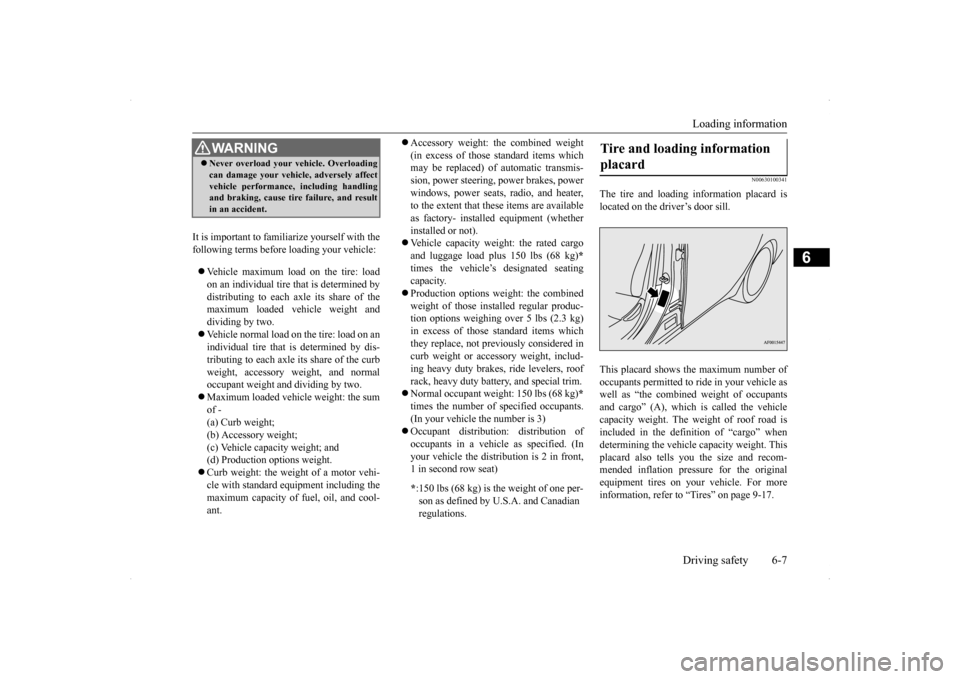
The tire and loading information placard islocated on the driver’s door sill. This placard shows the maximum number of occupants permitted to ride in your vehicle aswell as “the combined weight of occupants and cargo” (A), which is called the vehicle capacity weight. The weight of roof road isincluded in the definition of “cargo” when determining the vehicle capacity weight. This placard also tells you the size and recom-mended inflation pressure for the original equipment tires on your vehicle. For more information, refer to “Tires” on page 9-17.
WA R N I N G Never overload your vehicle. Overloading can damage your vehicle, adversely affect vehicle performance, including handling and braking, cause tire failure, and result in an accident.
* :150 lbs (68 kg) is th
e weight of one per-
son as defined by U.S.A. and Canadian regulations.
Tire and loading information placard
BK0200700US.bo
ok 7 ページ 2013年2月15日 金曜日 午後12時17分
Page 340 of 422
How to change a tire
For emergencies 8-7
8
6. Get the jack, bar and wheel nut wrench ready.Refer to “Tools and jack” on page 8-5.
N00849600302
The compact spare tire is designed to savespace in the luggage compartment. Its lighter weight makes it easier to use if a flat tire occurs.
N00849701313
1. Lift up the board.
WA R N I N G Be sure to apply chocks or blocks to the correct tire when jacking up the vehicle. If the vehicle moves while jacked up, the jack could slip out of position, leading to an accident.NOTE
The chocks shown in the illustration do not come with your vehicle. It is recommended that you purchase chocks or blocks and keepthem in the vehicle for use if needed. If chocks or blocks are not available, use stones or any other objects that are large enough to hold the wheel in position.
Spare tire information Compact spare tire
WA R N I N G Tires, including spare tire, degrade over time with age even when they are not being used. It is recommended that tires over 6 years generally be replaced even if damage is not obvious.CAUTION While the compact spare tire is stowed, the inflation pressure should be checked at least once a month to assure that it remains at therecommended inflation pressure. See the tire and loading information placard attached to the driver’s door sill.Refer to “Tire and loading information plac- ard” on page 11-3. Driving with an improperly inflated tire can cause an accident. If you have no choice but to drive with an under-inflated tire, keepyour speed down and avoid sudden steering or braking, if possible
. Inflate the tire to the
correct pressure as soon as possible. Refer to“Tire inflation pressures” on page 9-21. The compact spare tire should be used only temporarily. While the compact spare tire is being used, the tire pressure monitoring sys- tem will not function properly. Have the tire replaced or repaired at an authorized Mit- subishi Motors dealer or a repair facility ofyour choice as soon as possible. You can use the same wheel nuts on the com- pact spare tire wheel.
Do not go over 50 mph (80 km/h) when driv- ing with the compact spare tire. Avoid fast starting and braking when driving with the compact spare tire. Do not drive through automatic car washes and over obstacles that could possibly dam-age the underside of your vehicle. Because the compact spare tire is smaller than the original tire, there is less clearance betweenthe ground and your vehicle. Because the compact spare tire is designed only for your vehicle, do not use it on any other vehicle. Do not put the compact spare tire on a differ- ent wheel, and do not put standard tires, snow tires, wheel covers or trim rings on thecompact spare wheel. Otherwise, you could damage these parts or other parts on your vehicle. Do not use snow chain with your compact spare tire. Using a chain could cause damageto your vehicle and loss of the chains.
To remove the compact spare tire
CAUTION
BK0200700US.bo
ok 7 ページ 2013年2月15日 金曜日 午後12時17分
Page 344 of 422
How to change a tire
For emergencies 8-11
8
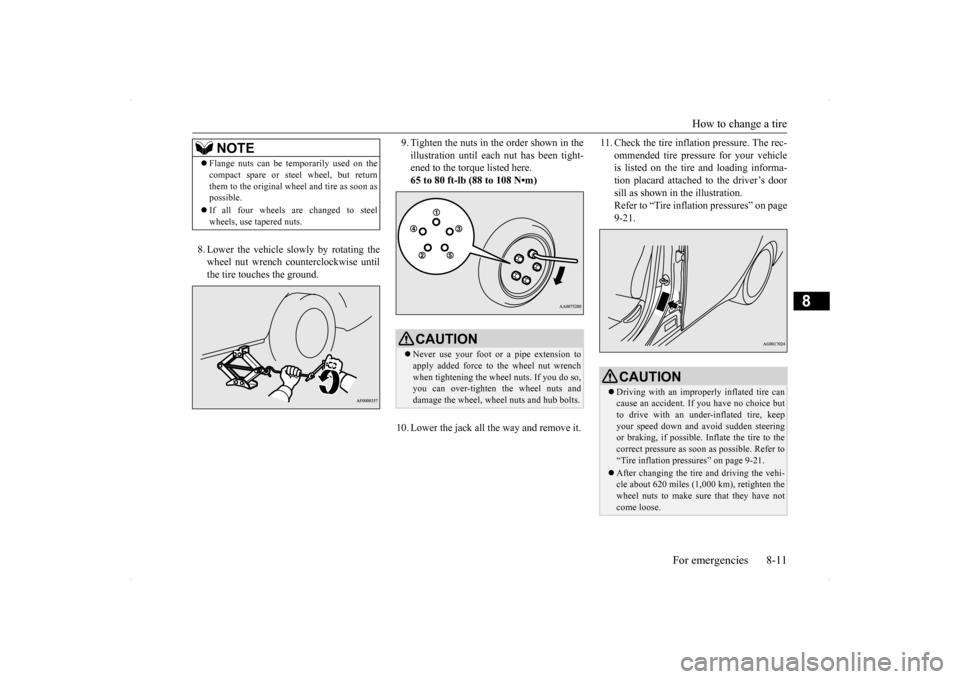
8. Lower the vehicle slowly by rotating the wheel nut wrench counterclockwise until the tire touches the ground.
9. Tighten the nuts in the order shown in the illustration until each nut has been tight- ened to the torque listed here. 65 to 80 ft-lb (88 to 108 N•m)
10. Lower the jack all the way and remove it.
11. Check the tire inflat
ion pressure. The rec-
ommended tire pressure for your vehicle is listed on the tire and loading informa- tion placard attached to the driver’s doorsill as shown in the illustration. Refer to “Tire inflation pressures” on page 9-21.
NOTE
Flange nuts can be temporarily used on the compact spare or steel wheel, but return them to the original wheel and tire as soon as possible. If all four wheels are changed to steel wheels, use tapered nuts.
CAUTION Never use your foot or a pipe extension to apply added force to the wheel nut wrench when tightening the wheel nuts. If you do so, you can over-tighten the wheel nuts anddamage the wheel, wheel nuts and hub bolts.
CAUTION Driving with an improperly inflated tire can cause an accident. If you have no choice but to drive with an under-inflated tire, keep your speed down and avoid sudden steeringor braking, if possible. Inflate the tire to the correct pressure as soon as possible. Refer to “Tire inflation pressures” on page 9-21. After changing the tire and driving the vehi- cle about 620 miles (1,000 km), retighten thewheel nuts to make sure that they have not come loose.
BK0200700US.bo
ok 11 ページ 2013年2月15日 金曜日 午後12時17分
Page 366 of 422
Tires
Vehicle care and maintenance 9-17
9
N00939201563
It is important to fami
liarize yourself with the
following terms: Cold tire pressure: • The measured pressure after the vehiclehas been parked for at least three hours, or • The measured pressure when the vehicleis driven less than 1 mile (1.6 km) after having been parked for three hours.
Maximum inflation pressure: the maxi- mum permissible cold tire inflation pres- sure for this tire.
Recommended inflation pressure: the inflation pressure for optimum tire perfor- mance. Intended outboard sidewall: • The sidewall that contains a whitewall, bears white lettering or bears manufac- turer, brand, and/or model name moldingthat is higher or deeper than the same molding on the other sidewall of the tire, or• The outward facing sidewall of an asym-metrical tire that has a particular side that must always face outward when mounted on a vehicle.
Passenger car tire: a tire intended for use on passenger cars, multipurpose passen- ger vehicles, and trucks, that have a grossvehicle weight rating (GVWR) of 10,000 pounds or less. Light truck (LT) tire: a tire designated by its manufacturer as primarily intended for use on lightweight trucks or multipurpose passenger vehicles. Tread: portion of a tire that comes into contact with the road. Tread rib: a tread section running circum- ferentially around a tire. Tread separation: pulling away of the tread from the tire carcass. Carcass: the tire structure, except tread and sidewall rubber which, when inflated, bears the load.
Battery terminals and related accessories contain lead and lead compounds. Wash hands after handling. NOTE
Check each battery terminal for corrosion. You can stop more corrosion by washing with a solution of baking soda and water.Grease the posts and clamps after cleaning or tightening them. Check to see that the battery is securely installed and cannot be moved. Also check each terminal for tightness. If you will not be driving your vehicle for a long period of time, remove the battery andstore it in a place where the battery fluid will not freeze. Memory data for settings made by the user may be erased when the battery isremoved. If this happens, reset the settings again using the relevant procedures. The bat- tery only should be stored with a full charge. Before cleaning the battery, tighten all the filler port caps to keep dirt and moisture out.WA R N I N G
Tires
WA R N I N G Driving with tires that are worn, damaged or improperly inflated is dangerous. These type tire conditions will adversely affect vehicle performance.These type tire conditions can also cause a tread separation or blowout which may result in an accident causing seriousinjury or death. Tires, including spare tire, degrade over time with age even when they are not being used. It is recommended that tires over 6 years generally be replaced even ifdamage is not obvious.
BK0200700US.bo
ok 17 ページ 2013年2月15日 金曜日 午後12時17分
Page 370 of 422
Tires
Vehicle care and maintenance 9-21
9
N00939301900
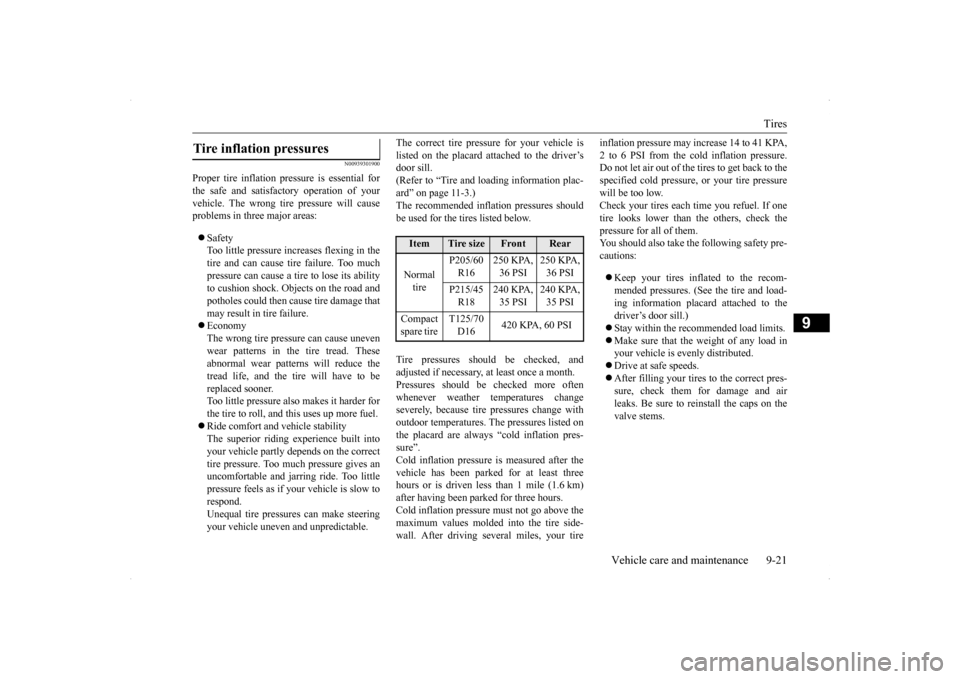
Proper tire inflation pressure is essential for the safe and satisfactory operation of yourvehicle. The wrong tire pressure will cause problems in three major areas: Safety Too little pressure increases flexing in thetire and can cause tire failure. Too muchpressure can cause a tire to lose its ability to cushion shock. Objects on the road and potholes could then cause tire damage thatmay result in tire failure. Economy The wrong tire pressure can cause unevenwear patterns in the tire tread. These abnormal wear patterns will reduce the tread life, and the tire will have to bereplaced sooner. Too little pressure also makes it harder for the tire to roll, and this uses up more fuel. Ride comfort and vehicle stability The superior riding experience built into your vehicle partly depends on the correcttire pressure. Too much pressure gives an uncomfortable and jarring ride. Too little pressure feels as if your vehicle is slow torespond. Unequal tire pressures can make steering your vehicle uneven and unpredictable.
The correct tire pressure for your vehicle is listed on the placard attached to the driver’s door sill. (Refer to “Tire and loading information plac-ard” on page 11-3.) The recommended inflation pressures should be used for the tires listed below. Tire pressures should be checked, and adjusted if necessary, at least once a month. Pressures should be checked more oftenwhenever weather temperatures change severely, because tire pressures change with outdoor temperatures. The pressures listed onthe placard are always “cold inflation pres- sure”. Cold inflation pressure is measured after thevehicle has been parked for at least three hours or is driven less than 1 mile (1.6 km) after having been parked for three hours.Cold inflation pressure must not go above the maximum values molded into the tire side- wall. After driving several miles, your tire
inflation pressure may increase 14 to 41 KPA, 2 to 6 PSI from the cold inflation pressure. Do not let air out of the tires to get back to the specified cold pressure, or your tire pressurewill be too low. Check your tires each time you refuel. If one tire looks lower than the others, check thepressure for all of them. You should also take the following safety pre- cautions: Keep your tires inflated to the recom- mended pressures. (See the tire and load-ing information placard attached to the driver’s door sill.) Stay within the recommended load limits. Make sure that the weight of any load in your vehicle is evenly distributed. Drive at safe speeds. After filling your tires to the correct pres- sure, check them for damage and air leaks. Be sure to reinstall the caps on thevalve stems.
Tire inflation pressures
Item
Tire size
Front
Rear
Normal tire
P205/60 R16
250 KPA, 36 PSI
250 KPA, 36 PSI
P215/45 R18
240 KPA, 35 PSI
240 KPA, 35 PSI
Compact spare tire
T125/70 D16
420 KPA, 60 PSI
BK0200700US.bo
ok 21 ページ 2013年2月15日 金曜日 午後12時17分
Page 420 of 422
Alphabetical index
12-5
12
T
Tail and stop lights
Bulb capacity
................
.................
9-33
Replacement
.................
.................
9-43
Tank capacity
..............................
3-4
, 11-6
Theft-alarm system
System
......................
.....................
5-41
Time Setting
..................
.....................
7-56
Tire pressure monitoring system
.........
5-100
Warning light/display
....................
5-101
Tires
..........................
........................
9-17
How to change a tire
.........................
8-6
Inflation pressure
............................
9-21
Maintenance
..................
.................
9-22
Quality grading
...............................
10-2
Replacing tires and wheels
...............
9-22
Rotation
....................
.....................
9-22
Size (tire and wheel)
.......................
11-5
Snow tires
.....................
.................
9-23
Tire and loading information placard
.6-7
,
11-3 Tire chains
....................
.................
9-24
Tread wear indicators
......................
9-22
Tissue holder
.....................
...............
5-189
Tools
.........................
..........................
8-6
Storage
.........................
...................
8-5
Towing
......................
........................
8-13
Trailer towing
....................
.................
6-11
Turbocharger operation
.......................
5-59
Turn signal lights
Bulb capacity
..................
...............
9-33
Indicators
....................
.................
5-141
Lever
......................
.....................
5-150
Replacement
...................
...............
9-40
Twin Clutch SST
Fluid
....................
.................
9-11
, 11-6
Gearshift lever operation
.................
5-70
Gearshift lever position display
........
5-72
Manual shift
....................
...............
5-76
Manual shift display
.......................
5-79
Twin Clutch SST control mode display
....
5-76Twin Clutch SST control mode switch
.....
5-76 Warning display
.............................
5-73
Twin Clutch SST (Sportronic Shift Transmission)
...................
...............
5-70
U
USB input terminal
............................
5-180
How to connect an iPod
.................
5-181
USB input terminal device
How to connect a USB memory
......
5-180
V
Vanity mirror
...................
.................
5-183
Vehicle care precautions
.....................
9-48
Vehicle dimensions
.............................
11-4
Vehicle labeling
.................
.................
11-2
Vehicle preparation before driving
..........
6-3
Vehicle weights
.................
.................
11-4
Vents
............................
.......................
7-2
W
Warning lights
...................
...............
5-142
Washer
Fluid
..................
...................
9-12
, 11-6
Rear window washer
.....................
5-156
Switch
......................
...................
5-155
Waxing
......................
........................
9-50
Weights
........................
.....................
11-4
Wheel
Covers
......................
.....................
8-12
Specification
.................
.................
11-5
Wiper
Rain sensor
.............
5-153
, 5-154
, 5-155
Rear window wiper
.......................
5-156
Switch
......................
...................
5-152
Wiper blades
.................
.................
9-25
BK0200700US.bo
ok 5 ページ 2013年2月15日 金曜日 午後12時17分