2014 MITSUBISHI LANCER reset
[x] Cancel search: resetPage 101 of 226
Listen to Satellite Radio 101
AVRadio
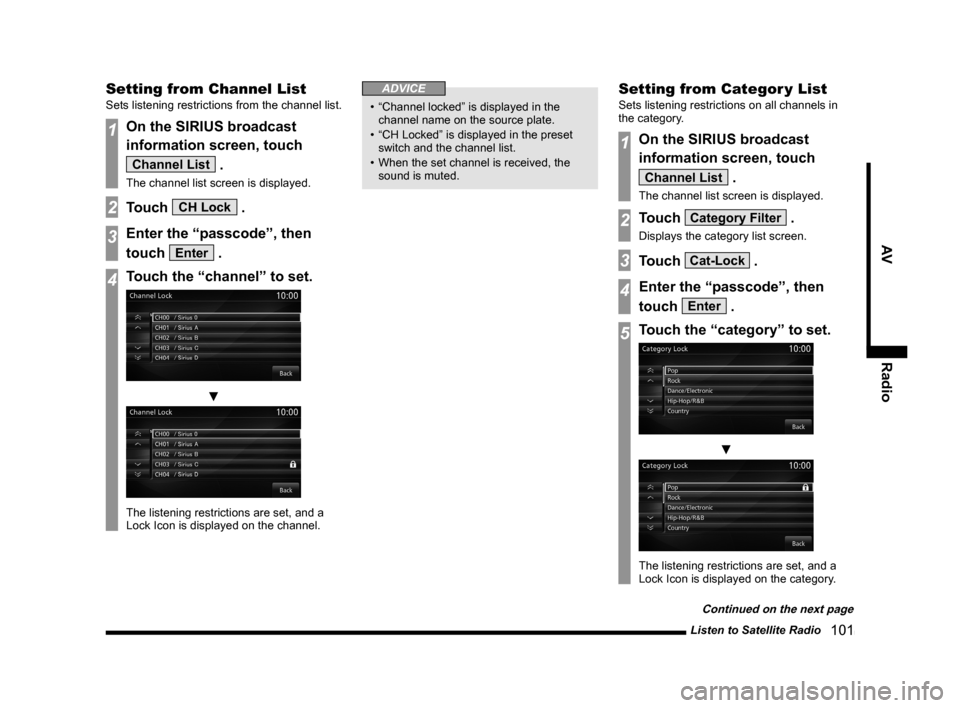
Setting from Channel List
Sets listening restrictions from the channel list.
1On the SIRIUS broadcast
information screen, touch
Channel List .
The channel list screen is displayed.
2Touch CH Lock .
3Enter the “passcode”, then
touch
Enter .
4Touch the “channel” to set.
▼
The listening restrictions are set, and a
Lock Icon is displayed on the channel.
ADVICE
• “Channel locked” is displayed in the
channel name on the source plate.
• “CH Locked” is displayed in the preset
switch and the channel list.
• When the set channel is received, the
sound is muted.
Setting from Categor y List
Sets listening restrictions on all channels in
the category.
1On the SIRIUS broadcast
information screen, touch
Channel List .
The channel list screen is displayed.
2Touch Category Filter .
Displays the category list screen.
3Touch Cat-Lock .
4Enter the “passcode”, then
touch
Enter .
5Touch the “category” to set.
▼
The listening restrictions are set, and a
Lock Icon is displayed on the category.
Continued on the next page
Page 102 of 226
102 Listen to Satellite Radio
ADVICE
• “Channel locked” is displayed in the
channel name on the source plate.
• “CH Locked” is displayed in the preset
switch and the channel list.
• When the set channel is received, the
sound is muted.
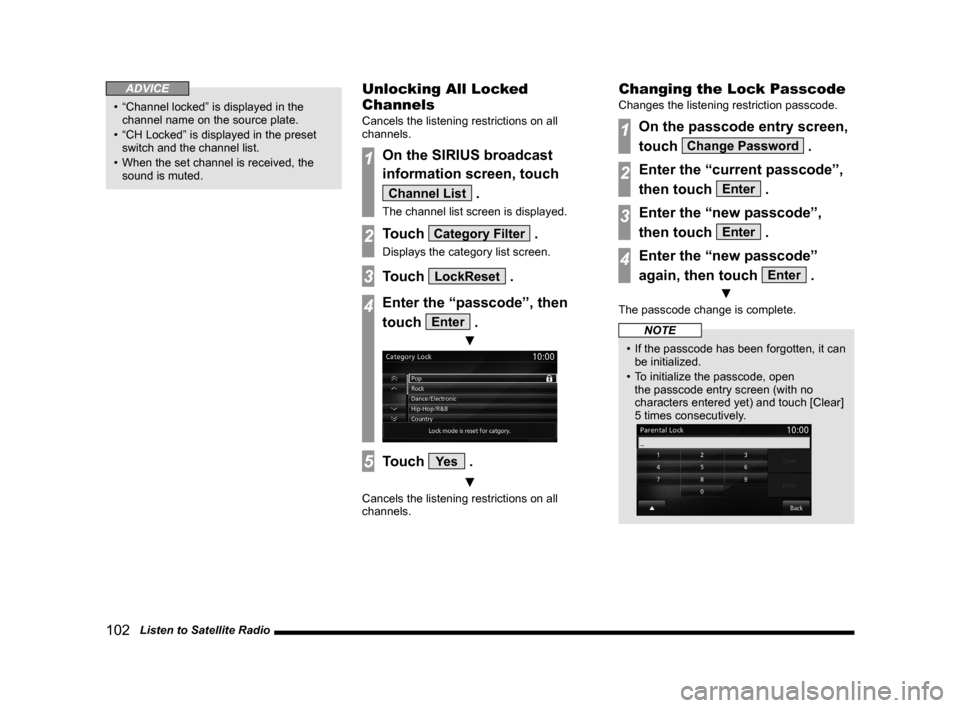
Unlocking All Locked
Channels
Cancels the listening restrictions on all
channels.
1On the SIRIUS broadcast
information screen, touch
Channel List .
The channel list screen is displayed.
2Touch Category Filter .
Displays the category list screen.
3Touch LockReset .
4Enter the “passcode”, then
touch
Enter .
▼
5Touch Ye s .
▼
Cancels the listening restrictions on all
channels.
Changing the Lock Passcode
Changes the listening restriction passcode.
1On the passcode entry screen,
touch
Change Password .
2Enter the “current passcode”,
then touch
Enter .
3Enter the “new passcode”,
then touch
Enter .
4Enter the “new passcode”
again, then touch
Enter .
▼
The passcode change is complete.
NOTE
• If the passcode has been forgotten, it can
be initialized.
• To initialize the passcode, open
the passcode entry screen (with no
characters entered yet) and touch [Clear]
5 times consecutively.
Page 103 of 226
Listen to Satellite Radio 103
AVRadio
Set the channel skip.
You can set Skip on channels and categories.
Channels in which Skip is set will be skipped
and not received when cycling up and down
through channels and during scans.
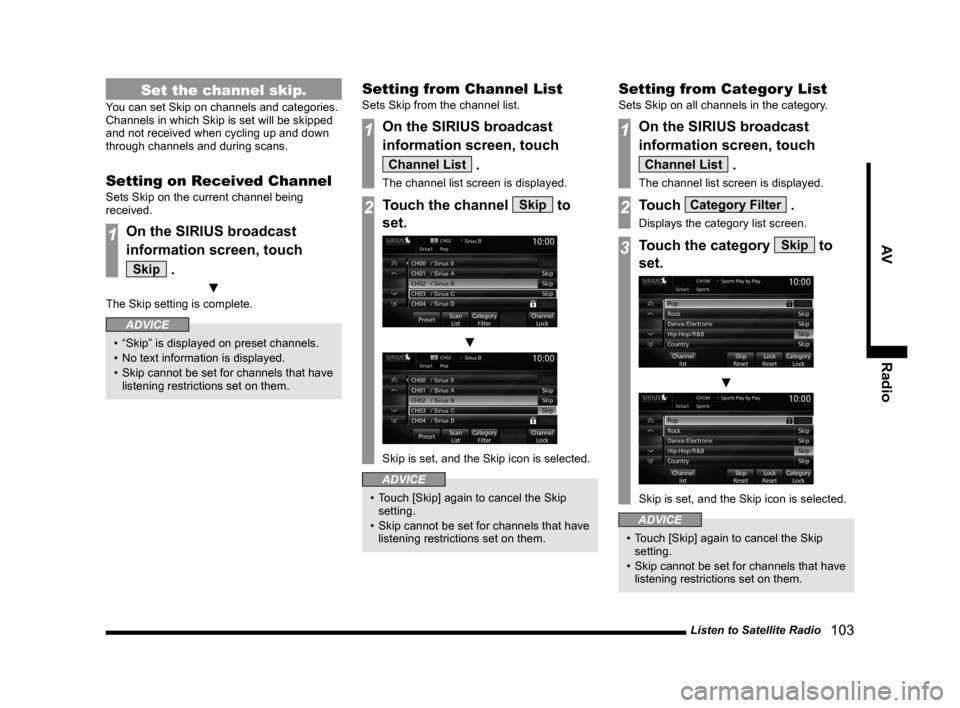
Setting on Received Channel
Sets Skip on the current channel being
received.
1On the SIRIUS broadcast
information screen, touch
Skip .
▼
The Skip setting is complete.
ADVICE
• “Skip” is displayed on preset channels.
• No text information is displayed.
• Skip cannot be set for channels that have
listening restrictions set on them.
Setting from Channel List
Sets Skip from the channel list.
1On the SIRIUS broadcast
information screen, touch
Channel List .
The channel list screen is displayed.
2Touch the channel Skip to
set.
▼
Skip is set, and the Skip icon is selected.
ADVICE
• Touch [Skip] again to cancel the Skip
setting.
• Skip cannot be set for channels that have
listening restrictions set on them.
Setting from Categor y List
Sets Skip on all channels in the category.
1On the SIRIUS broadcast
information screen, touch
Channel List .
The channel list screen is displayed.
2Touch Category Filter .
Displays the category list screen.
3Touch the category Skip to
set.
▼
Skip is set, and the Skip icon is selected.
ADVICE
• Touch [Skip] again to cancel the Skip
setting.
• Skip cannot be set for channels that have
listening restrictions set on them.
Page 104 of 226
104 Listen to Satellite Radio
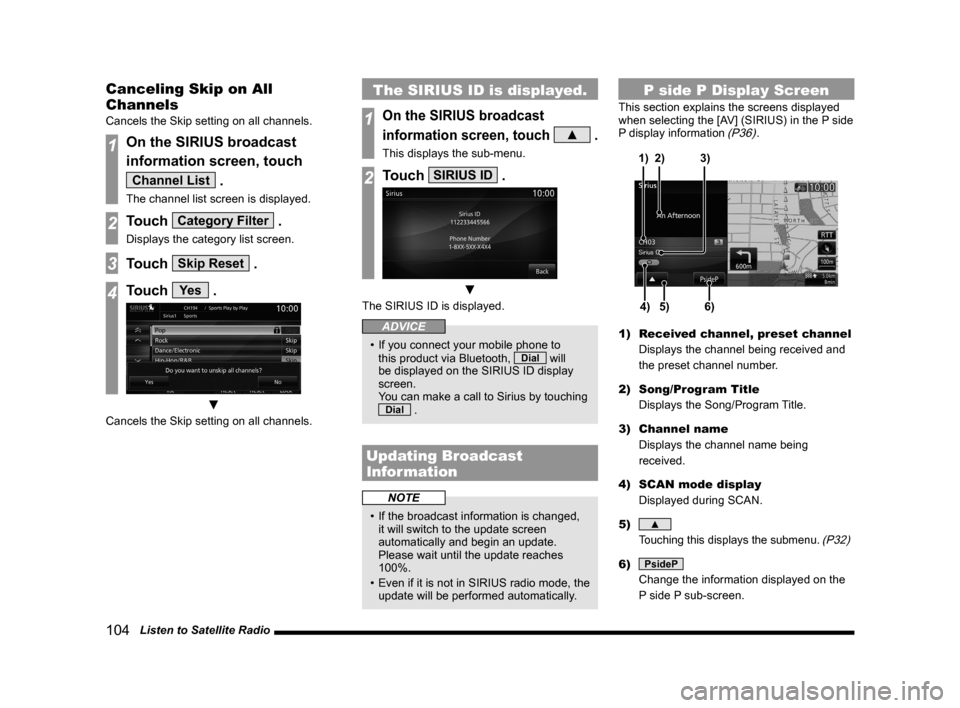
Canceling Skip on All
Channels
Cancels the Skip setting on all channels.
1On the SIRIUS broadcast
information screen, touch
Channel List .
The channel list screen is displayed.
2Touch Category Filter .
Displays the category list screen.
3Touch Skip Reset .
4Touch Ye s .
▼
Cancels the Skip setting on all channels.
The SIRIUS ID is displayed.
1On the SIRIUS broadcast
information screen, touch
▲ .
This displays the sub-menu.
2Touch SIRIUS ID .
▼
The SIRIUS ID is displayed.
ADVICE
• If you connect your mobile phone to
this product via Bluetooth, Dial will
be displayed on the SIRIUS ID display
screen.
You can make a call to Sirius by touching
Dial .
Updating Broadcast
Information
NOTE
• If the broadcast information is changed,
it will switch to the update screen
automatically and begin an update.
Please wait until the update reaches
100%.
• Even if it is not in SIRIUS radio mode, the
update will be performed automatically.
P side P Display Screen
This section explains the screens displayed
when selecting the [AV] (SIRIUS) in the P side
P display information
(P36).
5)4)6)
3)
2)
1)
1) Received channel, preset channel
Displays the channel being received and
the preset channel number.
2) Song/Program Title
Displays the Song/Program Title.
3) Channel name
Displays the channel name being
received.
4) SCAN mode display
Displayed during SCAN.
5)
▲
Touching this displays the submenu. (P32)
6) PsideP
Change the information displayed on the
P side P sub-screen.
Page 112 of 226
11 2 Play iPod
iPod/USB/SD
Equipment by type
Play iPod
By connecting commercially-available iPod/
iPhone devices to this product, you can play
back tracks on these through the product.
CAUTION
• Never hold an iPod/iPhone in your hand
and operate it while driving, as this is
dangerous.
• Do not leave the iPod/iPhone unattended
in the vehicle.
• No indemnification for data loss resulting
when the iPod/iPhone is connected to the
product will be possible.
• Depending on how the devices are
handled, audio files being damaged or
lost, therefore it is recommended that
data be backed up.
NOTE
• This function can only be used in vehicles
that have a USB port.
• Please refer to your vehicle's user
manual regarding how to connect the
iPod/iPhone.
NOTE
• For information regarding details such
as types of iPod/iPhone that can be
connected to and types of files that can
be played back, if your car is equipped
with a Bluetooth
® 2.0 interface, refer to
the vehicle's user manual; if your car
is not equipped with a Bluetooth
® 2.0
interface, refer to this manual (→ P8).
Also, sometimes playback as explained
in this document may not be possible.
• Usage of iPod/iPhone hardware with the
latest software version is recommended.
• Updating your software sometimes
changes the functions that can be used
connected with this product.
• Operate the iPod/iPhone while connected
to this product.
• Depending on the generation, model,
or software version of the iPod/iPhone,
playback on this product may not be
possible.
(→P8)Additionally, playback as
explained in this document may not be
possible.
• If the iPod/iPhone is connected via
Bluetooth as a Bluetooth-capable audio
device, then do not connect the iPod/
iPhone using an iPod cable. Connection
using both methods will result in
erroneous operation.
• If an iPod/iPhone does not operate
correctly, then remove the iPod/iPhone
from the product, reset, then reconnect.
• This product does not support video
playback.
NOTE
• When connecting an iPod/iPhone, use
the connection cable included in the iPod/
iPhone.
• Set up the device in order that no
unsafe actions, such as plugging in the
connection cable are taken while driving.
• When inserting and removing the iPod/
iPhone, for safety's sake first stop the
vehicle.
• Depending on the status of the iPod/
iPhone, it may take some time until the
device is recognized, or playback starts.
• Buttons on the product will not operate
while iPod/iPhone is connected.
• iPod/iPhone specifications and settings
may mean that connection is not
possible, or result in differences in
operation or display.
• Depending on audio data in the iPod/
iPhone, track information may not be
displayed correctly.
• Depending on the status of the vehicle
and device, the iPod/iPhone may not play
back after starting the engine.
• Data containing copyright information
may not play back.
• It is recommended that the iPod/iPhone
equalizer settings be set to flat.
Page 136 of 226
136 Trip
Equipment by type
Trip
You can check and set trip information.
Displaying
1Press the INFO key.
This displays the info menu.
2Touch Trip .
▼
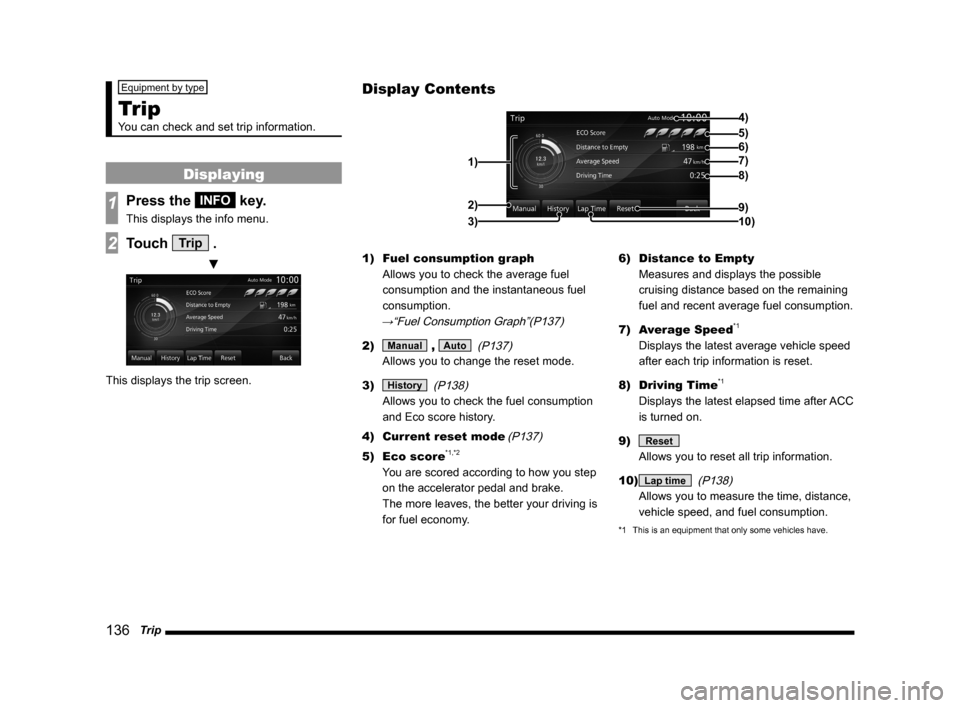
This displays the trip screen. 1)
Fuel consumption graph
Allows you to check the average fuel
consumption and the instantaneous fuel
consumption.
→“Fuel Consumption Graph”(P137)
2) Manual , Auto (P137)
Allows you to change the reset mode.
3)
History (P138)
Allows you to check the fuel consumption
and Eco score history.
4) Current reset mode
(P137)
5) Eco score*1,*2
You are scored according to how you step
on the accelerator pedal and brake.
The more leaves, the better your driving is
for fuel economy. 6)
Distance to Empty
Measures and displays the possible
cruising distance based on the remaining
fuel and recent average fuel consumption.
7) Average Speed
*1
Displays the latest average vehicle speed
after each trip information is reset.
8) Driving Time
*1
Displays the latest elapsed time after ACC
is turned on.
9)
Reset
Allows you to reset all trip information.
10)
Lap time (P138)
Allows you to measure the time, distance,
vehicle speed, and fuel consumption.
*1 This is an equipment that only some vehicles have.
Display Contents
4)
6)5)
7)
8)
9)
10)
1)2)
3)
Page 137 of 226

Trip 137
INFO/SETTINGS INFO
Fuel Consumption Graph
1)2)3)4)
1) Average fuel consumption
2) Average fuel consumption graph
Displays the fuel consumption with 16
levels.
3) Instantaneous fuel consumption
graph
Displays the fuel consumption with 16
levels.
4) Scale
Shows the scales of the average fuel
consumption and instantaneous fuel
consumption graphs. The values may vary
depending on the units.
Unit Value
km/l 0~60
l/100km 0~20
mpg(US) 0~150
mpg(UK) 0~180
Changing the Reset Mode
1On the trip screen,
touch
Manual .
▼
This switches from auto mode to manual
mode.
2Touch Auto .
This switches from manual mode to auto
mode.
Auto modeAll trip information will be reset 4
hours after turning off the engine
switch.
Manual mode The trip information is reset when
Reset on the Trip screen is
touched.
Reset Trip Information
Standard vehicle Average Fuel Economy
Average Speed
Page 139 of 226

Trip 139
INFO/SETTINGS INFO
3Touch Lap .
▼
The current measurement results are
recorded in “A”.
4Touch Stop .
▼
The measurement is stopped and the
measurement results are recorded in the
totals list.
ADVICE
• In Step 3, if you touch [Lap] again, the
measurement results in “A” are recorded
in “B”, and the previous measurement
results are recorded in “A”. In this
way, each time you touch “Lap”, the
measurement results are moved down
“A”, “B”, “C”, and “D”.
• After stopping in Step 4, if you touch
[Start], measurement resumes.
NOTE
• During measurement, if you switch
the ignition key to OFF, measurement
is stopped. At this time, if you return
the ignition key to ON, measurement
resumes.
Delete Lap Times
This deletes the recorded measurement
results.
1On the lap time screen, touch
Reset .
▼
Deletion of the recorded measurement results
is complete.