Page 209 of 226

System Settings   209
INFO/SETTINGS SETTINGS
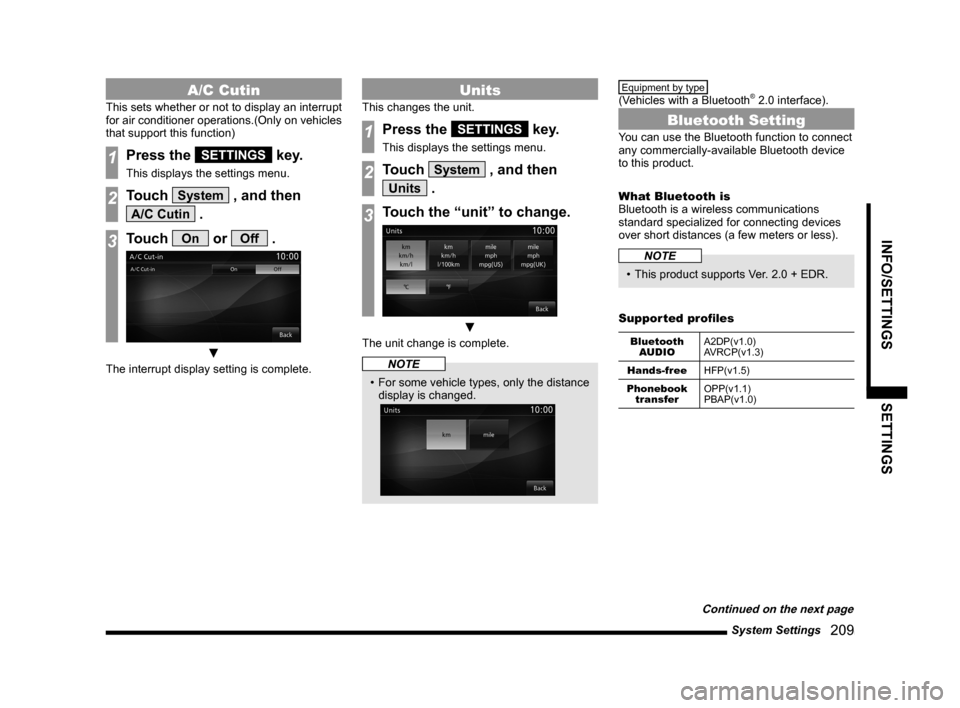
A/C Cutin
This sets whether or not to display an interrupt 
for air conditioner operations.(Only on vehicles 
that support this function)
1Press the SETTINGS key.
This displays the settings menu.
2Touch System , and then 
A/C Cutin .
3Touch On or Off .
 ▼
The interrupt display setting is complete.
Units
This changes the unit.
1Press the SETTINGS key.
This displays the settings menu.
2Touch System , and then 
Units .
3Touch the “unit” to change.
 ▼
The unit change is complete.
NOTE
• For some vehicle types, only the distance 
display is changed.
 
Equipment by type   
(Vehicles with a Bluetooth® 2.0 interface). 
Bluetooth Setting
You can use the Bluetooth function to connect 
any commercially-available Bluetooth device 
to this product.
What Bluetooth is
Bluetooth is a wireless communications 
standard specialized for connecting devices 
over short distances (a few meters or less).
NOTE
•  This product supports Ver. 2.0 + EDR.
Supported profiles
Bluetooth  AUDIO A2DP(v1.0)
AVRCP(v1.3)
Hands-free HFP(v1.5)
Phonebook  transfer OPP(v1.1)
PBAP(v1.0)
Continued on the next page  


        Page 210 of 226

210   System Settings
NOTE
• This function can be used on vehicles 
equipped with a Bluetooth® 2.0 interface.
•  Cancel functions such as the mobile 
phone “dial lock”, and connect while on 
the standby screen.
•  While connected, operations on the 
Bluetooth device (receiving calls, etc.) 
may not function correctly.
•  For details on how to enter the passkey 
for your Bluetooth device, refer to its user 
manual.
•  The connection fails sometimes. Register 
again.
•  Depending on the distance between this 
product and your Bluetooth device, the 
conditions within the vehicle, and types 
of screening, connection may not be 
possible. In this case, put your Bluetooth 
as close as possible to this product.
•  Even though a device is Bluetooth-
capable, its characteristics and 
specifications may mean that correct 
operation is not possible.
•  Some Bluetooth devices cannot be 
connected.
•  Depending on the Bluetooth device, 
connecting may take some time.
•  Up to 7 Bluetooth devices can be 
registered. 
If 7 devices are already registered, you 
must delete one before you can register 
a new Bluetooth device.
Registering a Bluetooth 
Device
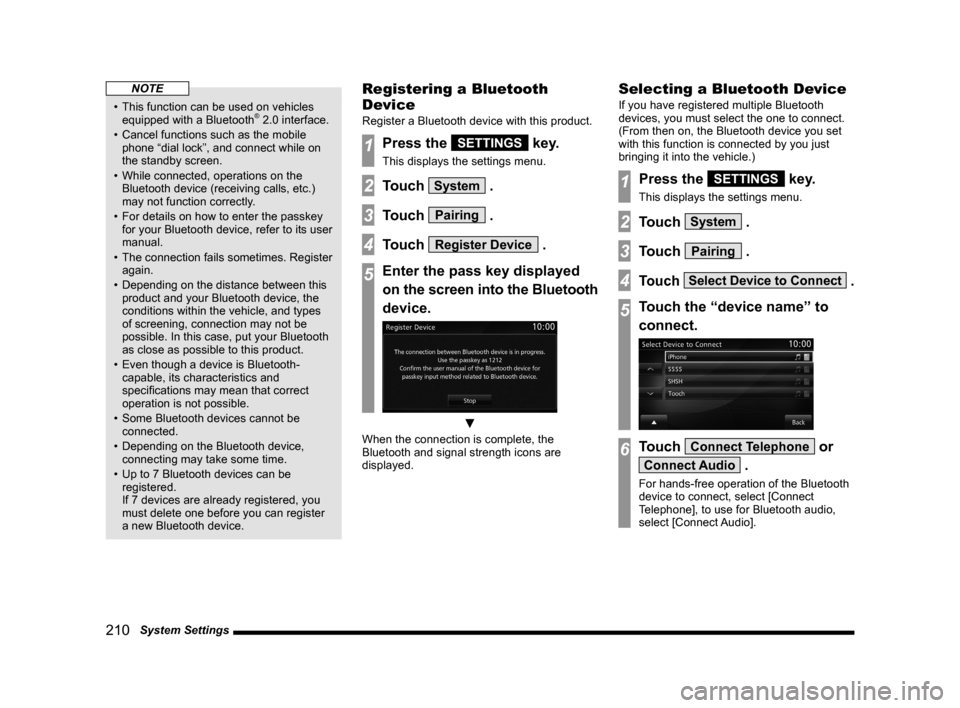
Register a Bluetooth device with this product.
1Press the SETTINGS key.
This displays the settings menu.
2Touch System .
3Touch Pairing .
4Touch Register Device .
5Enter the pass key displayed 
on the screen into the Bluetooth 
device.
 ▼
When the connection is complete, the 
Bluetooth and signal strength icons are 
displayed.
Selecting a Bluetooth Device
If you have registered multiple Bluetooth 
devices, you must select the one to connect.
(From then on, the Bluetooth device you set 
with this function is connected by you just 
bringing it into the vehicle.)
1Press the SETTINGS key.
This displays the settings menu.
2Touch System .
3Touch Pairing .
4Touch Select Device to Connect .
5Touch the “device name” to 
connect.
6Touch Connect Telephone or 
Connect Audio .
For hands-free operation of the Bluetooth 
device to connect, select [Connect 
Telephone], to use for Bluetooth audio, 
select  [Connect Audio].  


        Page 211 of 226

System Settings   2 11
INFO/SETTINGS SETTINGS
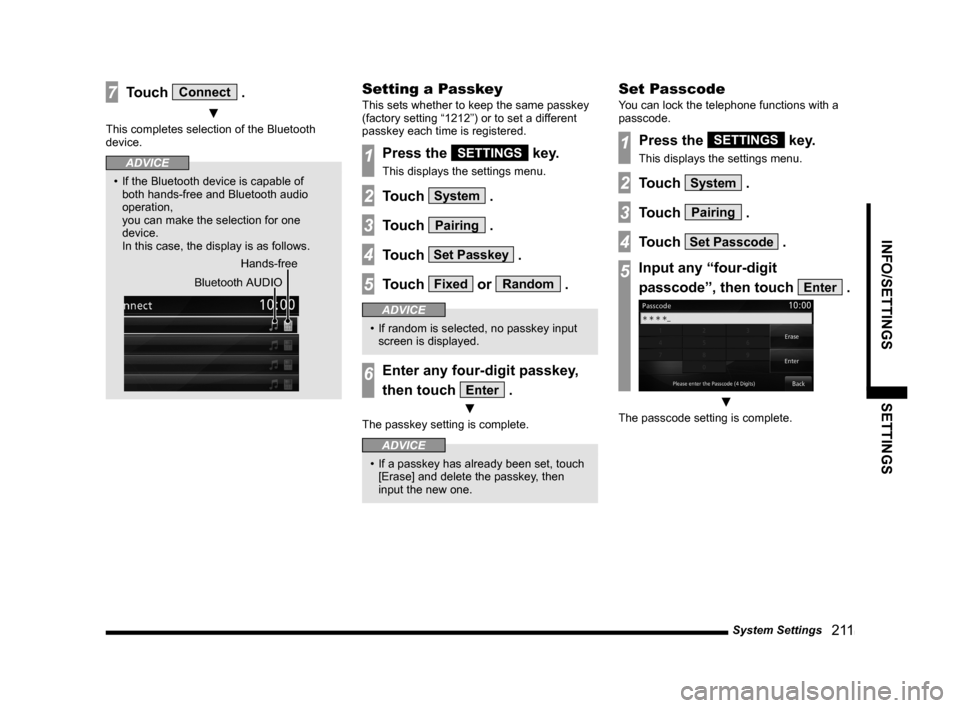
7Touch Connect .
 ▼
This completes selection of the Bluetooth 
device.
ADVICE
• If the Bluetooth device is capable of 
both hands-free and Bluetooth audio 
operation,   
you can make the selection for one 
device. 
In this case, the display is as follows.
 
Hands-free
Bluetooth AUDIO
Setting a Passkey
This sets whether to keep the same passkey 
(factory setting “1212”) or to set a different 
passkey each time is registered.
1Press the SETTINGS key.
This displays the settings menu.
2Touch System .
3Touch Pairing .
4Touch Set Passkey .
5Touch Fixed or Random .
ADVICE
•  If random is selected, no passkey input 
screen is displayed.
6Enter any four-digit passkey, 
then touch 
Enter .
 ▼
The passkey setting is complete.
ADVICE
• If a passkey has already been set, touch 
[Erase] and delete the passkey, then 
input the new one.
Set Passcode
You can lock the telephone functions with a 
passcode.
1Press the SETTINGS key.
This displays the settings menu.
2Touch System .
3Touch Pairing .
4Touch Set Passcode .
5Input any “four-digit 
passcode”, then touch 
Enter .
 ▼
The passcode setting is complete.  


        Page 212 of 226
212   System Settings
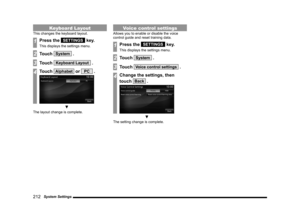
Keyboard Layout
This changes the keyboard layout.
1Press the SETTINGS key.
This displays the settings menu.
2Touch System .
3Touch Keyboard Layout .
4Touch Alphabet or PC .
 ▼
The layout change is complete.
Voice control settings
Allows you to enable or disable the voice 
control guide and reset training data.
1Press the SETTINGS key.
This displays the settings menu.
2Touch System .
3Touch Voice control settings .
4Change the settings, then 
touch 
Back .
 ▼
The setting change is complete.  


        Page 213 of 226

Other Settings   213
INFO/SETTINGS SETTINGS
Other Settings
You can make the settings concerning the 
screen and sound volume.
Display Off
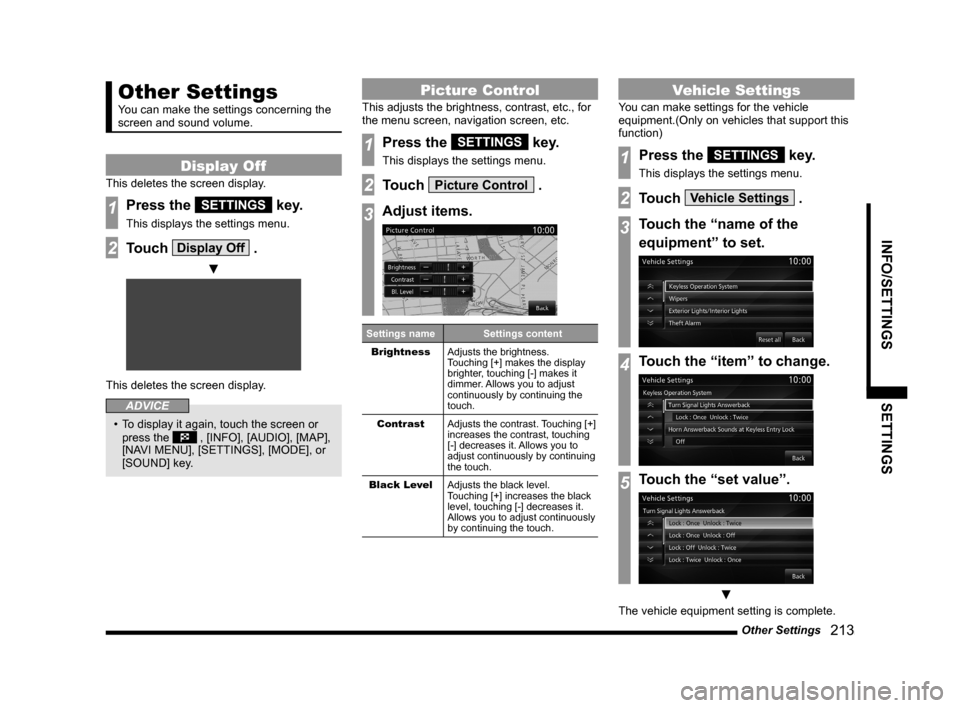
This deletes the screen display.
1Press the SETTINGS key.
This displays the settings menu.
2Touch Display Off .
 ▼
This deletes the screen display.
ADVICE
• To display it again, touch the screen or 
press the  , [INFO], [AUDIO], [MAP], 
[NAVI MENU], [SETTINGS], [MODE], or 
[SOUND] key.
Picture Control
This adjusts the brightness, contrast, etc., for 
the menu screen, navigation screen, etc.
1Press the SETTINGS key.
This displays the settings menu.
2Touch Picture Control .
3Adjust items.
Settings name Settings content
Brightness Adjusts the brightness.
Touching [+] makes the display 
brighter, touching [-] makes it 
dimmer. Allows you to adjust 
continuously by continuing the 
touch.
Contrast Adjusts the contrast. Touching [+] 
increases the contrast, touching 
[-] decreases it. Allows you to 
adjust continuously by continuing 
the touch.
Black Level Adjusts the black level.
Touching [+] increases the black 
level, touching [-] decreases it. 
Allows you to adjust continuously 
by continuing the touch.
Vehicle Settings
You can make settings for the vehicle 
equipment.(Only on vehicles that support this 
function)
1Press the SETTINGS key.
This displays the settings menu.
2Touch Vehicle Settings .
3Touch the “name of the 
equipment” to set.
4Touch the “item” to change.
5Touch the “set value”.
 ▼
The vehicle equipment setting is complete.  


        Page 214 of 226

214   Other Settings
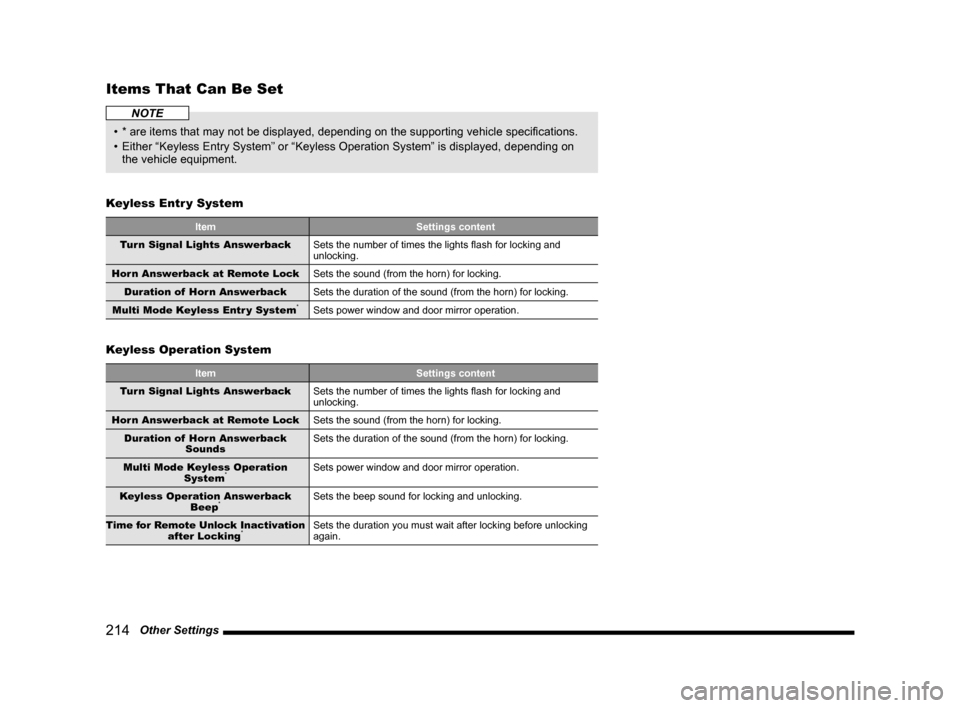
Items That Can Be Set
NOTE
• * are items that may not be displayed, depending on the supporting vehicle specifications.
•  Either “Keyless Entry System” or “Keyless Operation System” is displayed, depending on 
the vehicle equipment.
Keyless Entr y System
Item Settings content
Turn Signal Lights Answerback Sets the number of times the lights flash for locking and 
unlocking.
Horn Answerback at Remote Lock Sets the sound (from the horn) for locking.
Duration of  Horn Answerback Sets the duration of the sound (from the horn) for locking.
Multi Mode Keyless Entr y System
*Sets power window and door mirror operation.
Keyless Operation System
Item Settings content
Turn Signal Lights Answerback Sets the number of times the lights flash for locking and 
unlocking.
Horn Answerback at Remote Lock Sets the sound (from the horn) for locking.
Duration of  Horn Answerback  Sounds Sets the duration of the sound (from the horn) for locking.
Multi Mode Keyless Operation  System
*Sets power window and door mirror operation.
Keyless Operation Answerback  Beep
*Sets the beep sound for locking and unlocking.
Time for Remote Unlock Inactivation  after Locking
*Sets the duration you must wait after locking before unlocking 
again.  


        Page 215 of 226

Other Settings   215
INFO/SETTINGS SETTINGS
Wipers
Item Settings content
Windshield Wipers Intermittent  Operation Sets the operation interval for the windshield wipers.
* Some setting items are disabled for certain grades and vehicle 
models.
Wipers Linked to Washer Sets automatic operation of the windshield wipers when the 
washer fluid is sprayed.
Intelligent Washer Enables/disables the automatic cleaning function, which 
automatically operates the windshield wipers while spraying the 
washer fluid intermittently for a certain period of time.
Rear Wiper Intermittent Inter val Sets the operation interval for the rear wipers.
Rear Wiper Activated when in  Rever se Sets automatic operation of the rear wipers when the selector 
lever is moved to the R (reverse) position.
Exterior Lights/Interior Lights
Item
Settings content
Headlight Auto-Off Sets the function that automatically puts out the headlights if 
they are ON and the driver switches OFF the engine and opens 
the locked door in order to exit the vehicle.
Sensitivity for Auto Headlight On  Timing
*Sets the function that automatically switches ON the headlights 
when it becomes dark outside.
Headlight Timeout when exiting  Vehicle Sets the duration the headlights stay ON after the driver exits 
the vehicle.
Exterior Lights ON with Remote  Unlock Sets the function that switches ON the lights when the remote 
control Unlock button is pressed.
Interior Light Timeout Sets the duration the passenger compartment lights stays 
ON when the engine is switched OFF with the passenger 
compartment lights ON.
Interior Light Timeout after Door is  Closed Sets duration the passenger compartment stays ON after the 
doors are closed.
Charging Lid Light Auto cut-out
*Sets the lighting duration for the charging lid light.  


        Page 216 of 226

216   Other Settings
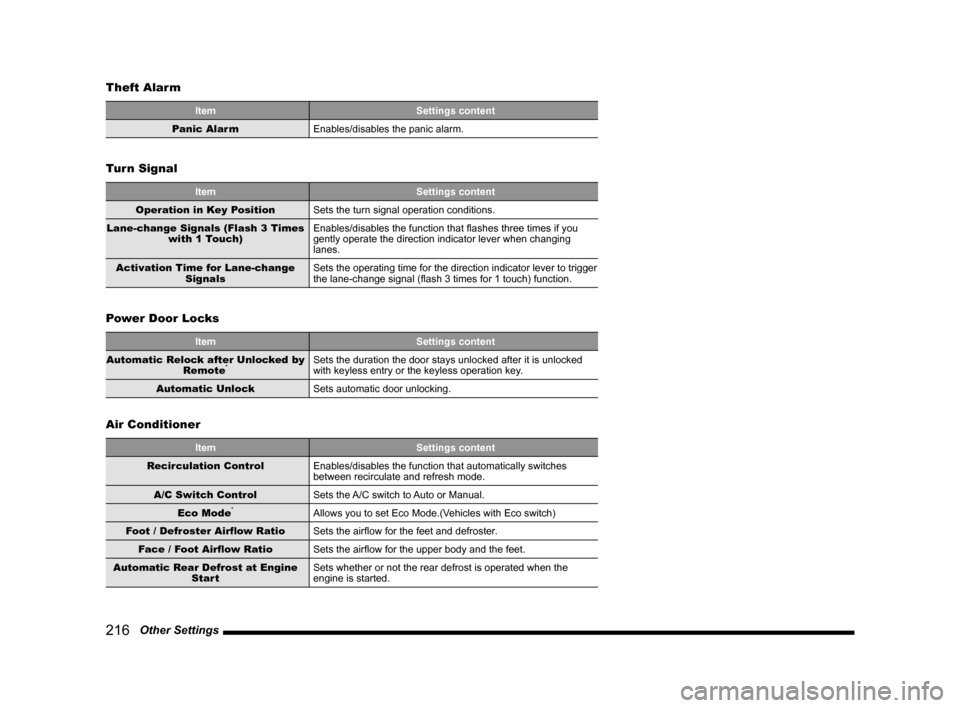
Theft Alarm
Item
Settings content
Panic Alarm Enables/disables the panic alarm.
Turn Signal
Item Settings content
Operation in Key Position Sets the turn signal operation conditions.
Lane-change Signals (Flash 3 Times  with 1 Touch)  Enables/disables the function that flashes three times if you 
gently operate the direction indicator lever when changing 
lanes.
Activation Time for Lane-change  Signals Sets the operating time for the direction indicator lever to trigger 
the lane-change signal (flash 3 times for 1 touch) function.
Power Door Locks
Item
Settings content
Automatic Relock after Unlocked by  Remote
*Sets the duration the door stays unlocked after it is unlocked 
with keyless entry or the keyless operation key.
Automatic Unlock Sets automatic door unlocking.
Air Conditioner
Item Settings content
Recirculation Control Enables/disables the function that automatically switches 
between recirculate and refresh mode.
A/C Switch Control Sets the A/C switch to Auto or Manual.
Eco Mode
*Allows you to set Eco Mode.(Vehicles with Eco switch)
Foot / Defroster Airflow Ratio Sets the airflow for the feet and defroster.
Face / Foot Airflow Ratio Sets the airflow for the upper body and the feet.
Automatic Rear Defrost at Engine  Start Sets whether or not the rear defrost is operated when the 
engine is started.