Page 65 of 88

Use AUX 65
AVExternal Input Devices
Equipment by type
Use AUX
By connecting external input cables and
AUX devices to this product, you can play
back tracks on these devices through the
product.
CAUTION
• Connect an audio device with external
sound input mode cancelled, or with the
sound turned down.
• Even when no device is connected, the product will switch to AUX, therefore take
care with volume levels when no device
is connected.
• Video from AUX devices cannot be
viewed.
• If this is used with the engine stopped, it may run down the battery and make it
impossible to start the engine.
NOTE
• Depending on the audio device to be connected, background noise may be
emitted.
• For power, use the battery power source included in the audio device. Using the
connected audio device while charging
through the cigarette lighter socket in the
vehicle may lead to background noise
being emitted through the speakers.
• If no audio devices are connected, then do not select the external sound input
mode. If external sound input mode is
selected while no audio devices are
connected, then sound may be emitted
through the speakers.
• Please refer to your vehicle's user manual regarding how to connect AUX
devices.
Displaying
1Press the MENU key.
The top menu is displayed.
2Touch AUX .
▼
This outputs the audio from the AUX device.
NOTE
• The [AUX] touch switch is displayed even if no AUX device is connected to this
product.
ADVICE
• Touching ▲ then [Sound Control] lets
you adjust the sound quality.
→“Adjust the Sound Quality” (P73)
13MY_AVC(NAS).indb 652013/02/14 10:57:59
Page 66 of 88
.
Mobile Phone
Connecting your mobile phone to this
product with Bluetooth lets you use the
hands")
66 Mobile Phone
INFO/SETTINGS
INFO
Equipment by type
(Vehicles with a Bluetooth® 2.0 interface).
Mobile Phone
Connecting your mobile phone to this
product with Bluetooth lets you use the
hands-free function.
WARNING
• For safety's sake, do not operate the
mobile phone while driving. When
operating the mobile phone, first stop the
vehicle in a safe location.
• Do not leave your mobile phone unattended in the vehicle. If your mobile
phone rolls underfoot when you stop
the vehicle or when you go around a
curve and it get under the brake pedal,
it can interfere with driving and cause an
accident.
NOTE
• Cancel functions such as the mobile phone “dial lock”, and connect while on
the standby screen.
• While connected, mobile phone (receiving
calls, etc.) operations may not function
correctly.
• Depending on the distance between the product and the mobile phone, the
conditions within the vehicle, and types
of screening, connection may not be
possible. In these cases, situate the
mobile phone as close as possible to the
product.
• This product allows you to register a total of 7 Bluetooth devices, including
Bluetooth-capable mobile phones and
audio devices.
• Even though a mobile phone is Bluetooth capable, characteristics and
specifications may mean that correct
operation may not be possible.
• Even though a mobile phone is Bluetooth capable, phone specifications and
settings may result in differences in
display, or prevent correct operation.
• Some models may not be confirmed as connected, or may not connect.
Connect Your Mobile Phone
This product and your mobile phone use the
Bluetooth function to connect.
For details on how to connect, refer to
“Bluetooth Setting” (P81).
Operation methods below describe situations
once connection has been completed.
NOTE
• This requires a mobile phone that can be connected to the Bluetooth.
13MY_AVC(NAS).indb 662013/02/14 10:57:59
Page 67 of 88

Mobile Phone 67
INFO/SETTINGSINFO
Display the Phonebook
There is the vehicle phonebook registered in
this product and the mobile phonebook that
can receive the data in your mobile phone.
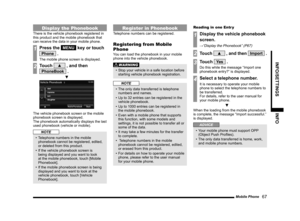
1Press the MENU key or touch
Phone .
The mobile phone screen is displayed.
2Touch ▲ , and then
PhoneBook .
▼
The vehicle phonebook screen or the mobile
phonebook screen is displayed.
The phonebook automatically displays the last
used phonebook (vehicle or mobile).
NOTE
• Telephone numbers in the mobile
phonebook cannot be registered, edited,
or deleted from this product.
• If the vehicle phonebook screen is being displayed and you want to look
at the mobile phonebook, touch [Mobile
Phonebook].
• If the mobile phonebook screen is being displayed and you want to look at the
vehicle phonebook, touch [Vehicle
Phonebook].
Register in Phonebook
Telephone numbers can be registered.
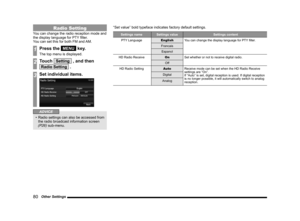
Registering from Mobile
Phone
You can load the phonebook in your mobile
phone into the vehicle phonebook.
WARNING
• Stop your vehicle in a safe location before
starting vehicle phonebook registration.
NOTE
• The only data transferred is telephone numbers and names.
• Up to 32 entries can be registered in the vehicle phonebook.
• Up to 1000 entries can be registered in the mobile phonebook.
• Even with a mobile phone that supports this function, with some models and
settings, it is not possible to transfer all or
some of the data.
• It may take a few minutes for the transfer to complete.
• Telephone numbers in the mobile
phonebook cannot be registered, edited,
or erased from this product.
• For details on how to operate your mobile
phone, please refer to the user manual
for your mobile phone. Reading in one Entr y
1Display the vehicle phonebook
screen.
→“Display the Phonebook” (P67)
2Touch ▲ , and then Import .
3Touch Ye s .
Do this while the message “Import one
phonebook entry?” is displayed.
4Select a telephone number.
It is necessary to operate your mobile
phone to select the telephone numbers to
be transferred.
For details, refer to the user manual for
your mobile phone.
▼
When the loading from the mobile phonebook
is complete, the message “Import successful.”
is displayed.
ADVICE
• Your mobile phone must support OPP
(Object Push Profiles).
• The only data transferred is home, work, and mobile phone numbers.
13MY_AVC(NAS).indb 672013/02/14 10:58:00
Page 68 of 88

2Touch ▲ , and then Import .
3Touch Ye s .
Do this while the message “Import en")
68 Mobile Phone
Reading in All Entries
1Display the mobile phonebook
screen.
→“Display the Phonebook” (P67)
2Touch ▲ , and then Import .
3Touch Ye s .
Do this while the message “Import entire
phonebook from this phone?” is displayed.
▼
When the loading from the mobile phonebook
is complete, the message “Import successful.”
is displayed.
ADVICE
• If there is already a vehicle phonebook
registered in this product, the phonebook
registration overwrites it.
• The only data transferred is home, work, and mobile phone numbers.
• Up to 32 entries can be registered in the vehicle phonebook.
• Your mobile phone must support PBAP
(Phone Book Access Profiles).
Edit a Phonebook
You can edit a phonebook that has been
registered.
WARNING
• Stop your vehicle in a safe location
before editing vehicle phonebook.
1Display the vehicle phonebook
screen.
→“Display the Phonebook” (P67)
2Select and touch the
“phonebook” to edit.
3Touch Edit .
4Touch the “category” to edit.
5Enter the telephone number,
then touch
Enter .
ADVICE
• Touching [Back] discards the contents of editing.
• On the edit screen, if you touch [Voice Tag], you can edit the voice tag.
13MY_AVC(NAS).indb 682013/02/14 10:58:00
Page 69 of 88

Mobile Phone 69
INFO/SETTINGSINFO
Deleting a Phonebook
You can delete a phonebook that has been
registered.
WARNING
• Stop your vehicle in a safe location
before deleting vehicle phonebook.
Deleting Only One Entr y
1Display the vehicle phonebook
screen.
→“Display the Phonebook” (P67)
2Select and touch the
“phonebook” to delete.
3Touch Delete .
4Touch Ye s .
▼
The phonebook deletion is complete. Deleting Multiple Phonebooks
1Display the vehicle phonebook
screen.
→“Display the Phonebook” (P67)
2Touch ▲ .
3Touch any of the “deletion
methods”.
Delete
Selected Item Select multiple phonebooks,
then touch [Delete] to delete
them.
Clear All Deletes all the registered
phonebooks.
4Touch Ye s .
▼
The phonebook deletion is complete.
Dial a Telephone
There are a number of ways to make a call.
CAUTION
• As much as possible, refrain from phone
calls while driving. First stop your vehicle
in a safe location.
• Some mobile phones restrict calls to the same number to no more than 3 times in
3 minutes.
Calling by Entering a
Telephone Number
1On the mobile phone screen,
enter the telephone number.
“OFF HOOK” ke y
ADVICE
• If you make a mistake, touch [Clear] to
clear one digit.
2Touch the “OFF HOOK” key.
▼
A call is started to the telephone number you
entered.
13MY_AVC(NAS).indb 692013/02/14 10:58:01
Page 70 of 88

70 Mobile Phone
Calling the Person You Were
Just Talking with
1On the mobile phone screen,
touch
Redial .
▼
A call is started to the telephone number you
were just talking with.
Making a Call from a
Phonebook
1Display the vehicle phonebook
screen or the mobile
phonebook screen.
→“Display the Phonebook” (P67)
2Select and touch the “person
to call”.
3Touch the “telephone number
to call”.
4Touch Ye s .
▼
A call is started to the telephone number you
selected.
Incoming Calls
The audio guide sounds and the incoming call
screen is displayed.
ADVICE
• Touching [Mute] switches off the function for the mic connected to this product.
Touching [Mute Off] switches ON the mic
function.
• Touching [Transfer Call] switches the speaker and mic functions to the mobile
phone side. Touching [Cancel transfer]
switches the speaker and mic functions
to this product.
• The call volume is switched to the volume
from the last call. The volume during this
call will be the volume for the next call.
13MY_AVC(NAS).indb 702013/02/14 10:58:02
Page 71 of 88

▼
You can now talk with")
Mobile Phone 71
INFO/SETTINGSINFO
Answering an Incoming Call
1Press the “OFF HOOK” key on
the steering wheel.
→“Steering Remote Control Switch
Operation” (P16)
▼
You can now talk with the calling party.
ADVICE
• You can also talk with the calling party by touching [Call].
Ending a Telephone Call
1Press the “ON HOOK” key on
the steering wheel.
→“Steering Remote Control Switch Operation” (P16)
▼
This ends the incoming call.
ADVICE
• You can also end a call by touching [End].
Setting Passcode
You can lock the telephone function with a
passcode to prevent any third party from using
the telephone function without your approval.
1On the mobile phone screen,
touch
▲ then Lock .
2Enter a four-digit “passcode”,
then touch
Enter .
▼
The passcode setting is complete.
CAUTION
• Do not forget this passcode. You will
need to enter it the next time you use the
telephone function.
ADVICE
• This takes effect after the next startup.
• After turning the ignition switch to LOCK/ OFF, wait at least 30 seconds, then turn
the ignition switch to ACC or ON. If you
turn the ignition switch to ACC or ON too
quickly, the new setting may not be set
properly.
• If you have set a passcode, after turning the ignition switch ON, check that the
passcode is set correctly.
• If you forget your passcode, consult an authorized Mitsubishi Motors dealer.
Unlocking the Lock
Use the passcode to unlock the lock. The next
time you use the telephone function, it is no
longer necessary to enter a passcode.
1Press the MENU key or touch
Phone .
2Enter the set a “passcode”,
then touch
Enter .
3Touch ▲ , and then Unlock .
▼
The unlocking of the passcode lock is
complete.
13MY_AVC(NAS).indb 712013/02/14 10:58:03
Page 72 of 88
72 Other Info
Other Info
Camera
When a rear view camera, available
separately, is connected, the picture from this
rear view camera can be displayed on the
display.
For details, refer to the user manual for the
vehicle.
1Move the gear shift position to
“R”.
▼
Displays the picture from the rear view
camera.
Version Info
Serial Number
You can check the serial number.
1Press the MENU key,
and touch
Setting
then
Version Info .
▼
Displays the Version Info screen.
Equipment by type
(Vehicles with a Bluetooth® 2.0 interface).
Gracenote Version
Allows you to check the Gracenote version.
1On the USB device playback
information screen or on the
list display, touch
▲ .
This displays the sub-menu.
2Touch Database .
▼
Displays the Gracenote Database version
screen.
13MY_AVC(NAS).indb 722013/02/14 10:58:03