2014 MITSUBISHI L200 change time
[x] Cancel search: change timePage 107 of 362

NOTEl The “Completed the calibration”. message
may be displayed even if you terminate the
turn before it is complete and return to the ve-
hicle’s original direction. The compass may
not be properly calibrated in this case, so you
must turn the vehicle through at least
360 degrees.
4. The compass setting will finish automatical-
ly and the words “COMPASS CALIBRA-
TION COMPLETE” will appear on the
screen.Changing the calendar setting E00519500065
The date and the calendar indication patterns can
be changed.
Date setting
1.Press the “ADJ” button to select the calendar
setting display.
2. Press the “←” or “→” function button to se-
lect “CALENDAR ADJUST”. Then press
the “SELECT” function button.
3. Use the function buttons to set the calendar.
“→”-Select “YEAR”, “MONTH”, “DAY”
you wish to change.
“ YEAR”, “MONTH”, and “DAY” are
changed over by turns every time you
lightly press the “→” function button.“+”-Change “YEAR”, “MONTH”, “DAY”
you have selected.
The indication is changed to your de-
sired date every time you lightly press
the “+” function button.
If you continue pressing the button for
about 2 seconds or more, the indication
is forwarded.“SET”-Determine the date.
Press the “SET” function button. Then
the display flashes twice and the setting
is changed.
NOTE
l The year changes in the following sequence:
2012 → 2013 → … 2099 → 2012.
l You can return to the previous display by
pressing the “BACK” function button.
Instruments and controls
3-23
OKTE14E2
3
Page 109 of 362

Selecting the item to set1. Press the “ADJ” button to select the user cus-tomization display.
2.Press the function button “←” or “→” to se-
lect the item you wish to set.
l “UNIT”: Changing the unit
l “LANGUAGE”: Changing the language
l “12h ↔ 24h”: Changing the time format
l “
DEFAULT”: Resetting to factory settings
Push the function button “SELECT”. The set-
ting display for your selected item will appear.
Changing display units
It is possible to change the display units for the fuel
consumption, driving range, average speed, outside
temperature, elevation, and atmospheric pressure
as shown below.FUEL ECONOMYkm/L → L/100 km → mpg
(UK GALLON) → mpg
(US GALLON)RANGEkm → milesSPEEDkm/h → mphOUTSIDE TEM-
PERATURE°C → °FELEVATIONm → ftBAROMETERhPa → mb → kPa → inHg
l Changing the display unit for fuel consump-
tion
1. Press the “←” or “→” function button to se-
lect “FUEL ECONOMY”. Then press the
“SELECT” function button.
2. Press the “←” or “→” function button to se-
lect “km/L”. Then press the “SET” function
button. The display will flash twice, and the
display unit will be updated to the selected
one.
NOTE
l You can return to the previous display by
pressing the “BACK” function button.
3. After setting, press the “INFO” button to re-
turn to the information display.
Instruments and controls
3-25
OKTE14E2
3
Page 110 of 362
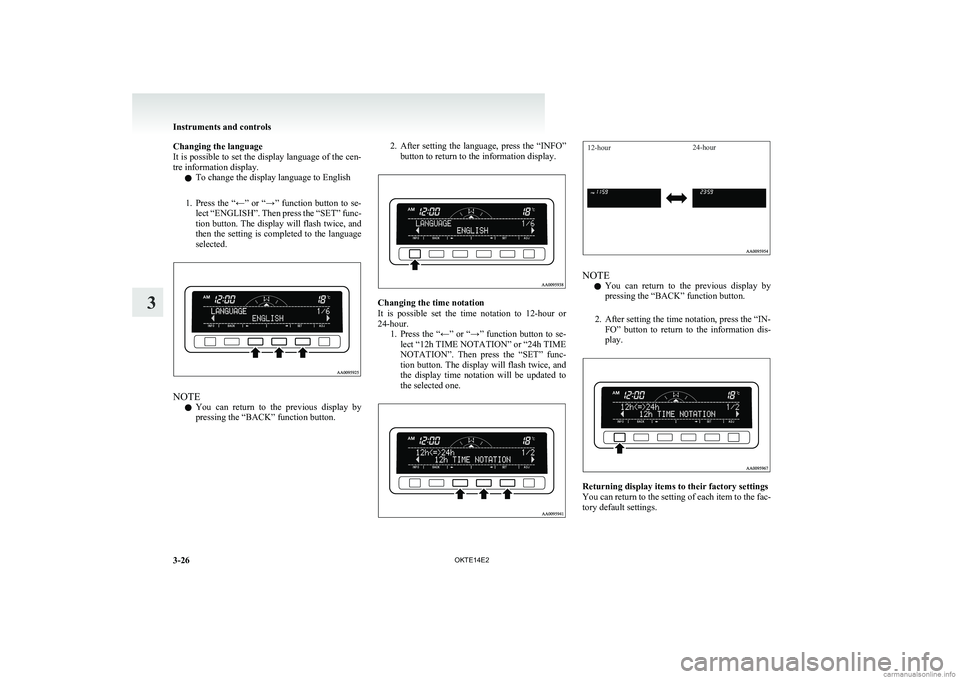
Changing the language
It is possible to set the display language of the cen-
tre information display.
l To change the display language to English
1. Press the “←” or “→” function button to se-
lect “ENGLISH”. Then press the “SET” func-
tion button. The display will flash twice, and
then the setting is completed to the language
selected.
NOTE
l You can return to the previous display by
pressing the “BACK” function button.
2. After setting the language, press the “INFO”
button to return to the information display.
Changing the time notation
It is possible set the time notation to 12-hour or
24-hour. 1.Press the “←” or “→” function button to se-
lect “12h TIME NOTATION” or “24h TIME
NOTATION”. Then press the “SET” func-
tion button. The display will flash twice, and
the display time notation will be updated to
the selected one.
12-hour24-hour
NOTE
l You can return to the previous display by
pressing the “BACK” function button.
2. After setting the time notation, press the “IN- FO” button to return to the information dis-
play.
Returning display items to their factory settings
You can return to the setting of each item to the fac-
tory default settings.
Instruments and controls
3-26 OKTE14E2
3
Page 115 of 362

lIf the lamps do not turn on or off with the
switch in the “AUTO” position, manually op-
erate the switch and we recommend you to
have your vehicle checked.
[Vehicles with Daytime Running Lamp]
When the ignition switch is in the “ON” position
and the lamp switch is set to the “OFF” position,
the low beam of the headlamps, tail lamps, etc.,
will illuminate.
Lamps (headlamps, fog lamp, etc.) au-
to-cutout function
l If the ignition key is turned to “LOCK” or
“ACC” position or removed from the igni-
tion switch and the lamps will stay on for
about 3 minutes without opening the driver’s
door while the lamp switch in the “
” posi-
tion, the lamps automatically turn off.
l If the ignition key is turned to “LOCK” or
“ACC” position or removed from the igni-
tion switch and the driver’s door is opened
within 3 minutes while the lamp switch in
the “
” position, a buzzer will sound to
warn the driver that the lamps have not been
turned off, and these lamps will automatical-
ly turn off.
NOTE l The lamp auto-cutout will not function when
the lamp switch is in the “
” position.
l When the ignition key has been turned either
to the “LOCK” or “ACC” position or re-
moved from the ignition switch with the
lamp switch in the “
” position, and the
lamp switch is returned to the “OFF” posi-
tion within approximately 3 minutes, the auto-
cutout function will not be activated.
When you want to keep the lamps on l Turn the lamp switch in the “OFF” position
to switch off all lamps while the ignition key
is in the “LOCK” or “ACC” position or re-
move it from the ignition switch.
l Turn on the lamps with the switch in the
“
” or “” position again, then the
lamps will remain on.
NOTE l It is possible to alter the auto-cutout function
such that: • Auto-cutout function is never activated.
For details, we recommend you to consult a
MITSUBISHI MOTORS Authorized Service
Point.
Lamp monitor buzzer E00506100184
If the driver’s door is opened when the ignition key
is in the “LOCK” or “ACC” position or removed
from the ignition switch while the lamps are on, a
buzzer will sound to remind the driver to turn off
the lamps. When the lamp auto-cutout function
acts, the buzzer will stop automatically. When this
function does not act, turn off the lamp switch to
stop the buzzer.Dipper (High/Low beam change) E00506200286
When the lamp switch is in the “” position, the
beam changes from high to low (or low to high)
each time the lever is pulled to (1). While the high-
beam is on, the high-beam indication lamp in the in-
strument cluster will also illuminate.
Headlamp flasher E00506300157
The high-beams flash when the lever is pulled slight-
ly (2), and will go off when it is released.
When the high-beam is on, the high-beam indica-
tion lamp in the instrument cluster will also illumi-
nate.
Instruments and controls
3-31
OKTE14E2
3
Page 117 of 362

Switch position 4-Driver + Full luggage load-
ing
{ Vehicles without heavy du-
ty suspension}
Double cab
Vehicle condi- tionSwitch position“0”“2” or “3” or“4”●:1 person:Full luggage loadingSwitch position 0-Driver onlySwitch position 2-Driver + Full luggage load-
ing
{ Vehicles with heavy duty
suspension for Russia, Ka-
zakhstan and Ukraine}Switch position 3-Driver + Full luggage load-
ing
{ Vehicles with heavy duty
suspension except for Rus-
sia, Kazakhstan and Uk-
raine}
{ Vehicles with headlamp -
type 2* and without heavy
duty suspension}Switch position 4-Driver + Full luggage load-
ing
{ Vehicles with headlamp -
type 1* and without heavy
duty suspension}
*: Refer to “Outside” on page 8-24
Turn-signals lever E00506501273
The turn-signal lamps flash when the lever is oper-
ated (with the ignition switch in the “ON” posi-
tion). At the same time, the turn-signal indication
lamps flash.
1- Turn-signals When making a normal turn, use position
(1). The lever will return automatically when
cornering is completed.
There are times when the lever will not re-
turn after cornering. This occurs when the
steering wheel is turned only slightly.
In such cases, return the lever by hand.
2- Lane-change signals When changing lanes, use position (2). It
will return to the neutral position when re-
leased.
NOTE l If the lamp flashes unusually quickly, the
bulb in a turn-signal lamp may have burned
out. We recommend you to have the vehicle
inspected.
Instruments and controls
3-33
OKTE14E2
3
Page 122 of 362

To adjust the sensitivity of the rain sensor
With the lever in the “AUTO” (rain sensor) posi-
tion, it is possible to adjust the sensitivity of the
rain sensor by turning the knob (A)."+"-Higher sensitivity to rain"-"-Lower sensitivity to rain
NOTE
l It is possible to activate the following func-
tions. For further information, we recom-
mend you to consult a MITSUBISHI
MOTORS Authorized Service Point. •Automatic operation (rain droplet sensi-
tive) can be changed to intermittent oper-
ation (vehicle-speed sensitive).
• Automatic operation (rain droplet sensi-
tive) can be changed to intermittent oper-
ation (except vehicle-speed sensitive).
Misting function
Move the lever in the direction of the arrow and re-
lease, to operate the wipers once.
Use this function when you are driving in mist or
drizzle.
If the lever is held in the upward position (MIST),
the wipers continue operating until the lever is re-
leased.
The wipers will operate once if the lever is moved
to the “AUTO” position and the knob (A) is turned
in the “+” direction when the ignition switch is
“ON” position.
Windscreen washer E00507200805
The windscreen washer can be operated with the ig-
nition switch in the “ON” or “ACC” position.
The washer fluid will be sprayed onto the wind-
screen by pulling the lever towards you. The wip-
ers operate automatically several times while the
washer fluid is being sprayed.
On a vehicle equipped with a headlamp washer, the
headlamp washer operates together with the wind-
screen washer the first time the windscreen washer
is used if the headlamps are on.CAUTIONl If the washer is used in cold weather, the
washer fluid sprayed against the glass
may freeze resulting in poor visibility.
Heat the glass with the defroster or demis-
ter before using the washer.
NOTE
l It is possible to spray washer fluid without ac-
tivating the wipers. To do so, hold the lever
in the pulled position and turn the ignition
switch to the “ON” or “ACC” position.
Instruments and controls
3-38 OKTE14E2
3
Page 137 of 362

On vehicles with automatic transmission,
make sure the selector lever in the “P”
(PARK) position.
NOTE
l On vehicles with automatic transmission, the
engine will not start if the selector lever is in
any position other than “P” (PARK) or “N”
(NEUTRAL) position.
For safety, start the engine with the selector
lever in the “P” (PARK) position because in
this position the rear wheels are locked in
place.
5. Turn the ignition key to the “ON” position. The diesel preheat indication lamp will first
illuminate, and then after a short time go out,
indicating that preheating is completed.
NOTE l If the engine is cold, the diesel preheat indi-
cation lamp is on for a longer time.
l When the engine has not been started within
about 5 seconds after the diesel preheat indi-
cation lamp went out, return the ignition key
to the “LOCK” position. Then, turn the key
to the “ON” position to preheat the engine
again.
l When the engine is warm, the diesel preheat
indication lamp does not come on even if the
ignition key is placed in the “ON” position.
Start the engine by turning the ignition key
right to the “START” position.
6. Operate the accelerator pedal as described be-
low in accordance with the atmospheric tem-
perature and/or engine condition and then
start the engine.
l When the atmospheric temperature is
moderate or the engine is warm, start the
engine without depressing the accelerator
pedal.
l When the atmospheric temperature is low
and the engine is cold, start the engine
while depressing the accelerator pedal.Fuel injection amount learning process E00616000028
To keep exhaust emissions and engine noise low,
the engine very occasionally performs a learning
process for the fuel injection amount.
The engine sounds slightly different from usual
while the learning process is taking place. The
change in the engine sound does not indicate a fault.
Diesel particulate filter (DPF)* E00619800232
The diesel particulate filter (DPF) is a device that
captures most of the particulate matter (PM) in the
exhaust emissions of the diesel engine. The DPF au-
tomatically burns away trapped PM during vehicle
operation. Under certain driving conditions, howev-
er, the DPF is not able to burn away all of the trap-
ped PM and, as a result, an excessive amount of
PM accumulates inside it.WARNINGl The DPF reaches very high temperatures.
Do not park your vehicle in areas where
combustible materials such as dry grass
or leaves can come in contact with a hot
exhaust system since a fire could occur.CAUTIONl Do not use any type of fuel or engine oil
that is not specified for your vehicle. Al-
so, do not use any moisture-removing
agent or other fuel additive. Such substan-
ces could have a detrimental effect on the
DPF.
Refer to “Fuel selection” on page 02 and
“Engine oil” on page 8-04.
NOTE
l To minimize the likelihood of excessive ac-
cumulation of PM, try to avoid driving for
long periods at low speeds and repeatedly
driving short distances.
Starting and driving
4-13
OKTE14E2
4Vehicles with manual transmissionVehicles with automatictransmission
Page 153 of 362

“4H” ↔ “4HLc”Transfer shift lever posi-tion2WD/4WD operationindication lamp
4H
Drive mode switching in progress
4HLc
: Blink: Illuminate: Remain off
“4HLc” ↔ “4LLc”Transfer shift lever posi- tion2WD/4WD operationindication lamp
4HLc
Drive mode switching in progress
4LLc
: Blink: Illuminate: Remain off
NOTE l The 2WD/4WD operation indication lamp
blinks while the selection is in process. Take
the following precautions when the indica-
tion lamp is blinking or remains off. •Keep the steering wheel in the straight
ahead position while making range selec-
tions. If you attempt to drive forward
with the steering wheel turned, gear rat-
tling may occur and the desired range
may not actually be selected.
• If you move the transfer shift lever from
“4H” to “4HLc” while the vehicle is sta-
tionary, keep your speed initially very
low when you subsequently make a stand-
ing start. Before driving at normal
speeds, confirm that the centre differen-
tial lock lamp has changed from blinking
to steady illumination.
• If you move the transfer shift lever from
“4HLc” to “4H” and the centre differen-
tial lock lamp does not stop blinking,
place the steering wheel in the straight
ahead position and slowly depress the ac-
celerator pedal several times.
• If you move the transfer shift lever from
“4H” to “2H” and the front wheel lamp
does not stop blinking, confirm safety
around the vehicle then accelerate, decel-
erate, and reverse until the front wheel
lamp goes off. When the front wheel
lamp goes off, you can then proceed to
drive the vehicle.
If you accelerate, decelerate, and reverse
but the front wheel lamp still does not
stop blinking, return the transfer shift lev-
er to “4H” then have your vehicle inspec-
ted.
Starting and driving
4-29
OKTE14E2
4