Page 233 of 262

Replacement of light bulbs 9-22 Vehicle care and maintenance
9
N00942900336
Before replacing a bulb,
be sure the light is
off. Do not touch the glass part of the newbulb with your bare fingers; the oil from your skin will stay on the glass and dim or destroy the bulb when it gets hot.
N00943000099
The bulb should only be replaced with a newbulb with the same rating and type. The typeand rating are listed on the base of the bulb.
N00950301916
If the replacement fuse blows again after a short time, have the electrical systemchecked by a certified i-
MiEV dealer to find
and correct the cause.
Replacement of light bulbs
CAUTION Bulbs are extremely hot immediately after being turned off. When replacing a bulb, wait for it to coolsufficiently before t
ouching it. You could
otherwise be burned.NOTE
If you are unsure of how to carry out the work as required, it is recommended that these procedures be ca
rried out by
a certified
i-MiEV dealer. Be careful not to scratch the vehicle body when removing a light and lens.CAUTION
When it rains, or wh
en the vehicle has been
washed, the inside of the lens sometimesbecomes temporarily foggy. This is the samephenomenon as when window glass mists up on a humid day, and does not indicate a func- tional problem.When the light is switched on, the heat will remove the fog. However, if water collects inside the light, please
have it checked by a
certified i-MiEV dealer.
Bulb capacity Outside
NOTE
Front
Description
Wattage
ANSI Tr a d e N o . or Bulb type
1- Headlight, low
beam
55 W H11
2- Head light,
high beam
60 W 9005 HB3
3- Front fog light 35 W H8 4- Daytime run-
ning light
13 W P13W
5- Front turn sig-
nal light
21 W W21W
6- Parking light 5 W W5W 7- Front side-
marker light
5 W W5W
NOTE
Check with a certified i-MiEV dealer when the headlight and the parking light need to be repaired or replaced.
BK0209800US.book 22 ページ 2014年1月14日 火曜日 午前9時26分
Page 234 of 262

Replacement of light bulbs
Vehicle care and maintenance 9-23
9
N00950400617
N00943200349
The alignment of the headlights should be checked by a certifie
d i-MiEV dealer.
N00915501184
1. Insert a flat blade screwdriver into the end of the light nearer the rear of the body and pry gently to remove the light.
Description
Wattage
ANSI Tr a d e N o . or Bulb type
8- High-mounted
stop light
5 W W5W
9- Tail and stop
light
——
10- Rear turn sig-
nal light
21 W WY21W
11- Back-up light 21 W W21W 12- License plate
light
5 W W5W
13- Rear side-
marker light
5 W W5W
14- Regular charge
port light
——
Rear
NOTE
The tail and stop lights along with the regu- lar charge port light use LEDs rather thanbulbs.For repair and replacement, contact a certi- fied i-MiEV dealer.
Inside
Description
Wattage
1- Dome light (Rear) 8 W 2- Dome light
(Front)/Reading lights
8 W
Adjustment of headlight aim Front side-marker lights * : Front of the vehicleNOTE
Wrap a cloth around the tip of the screw- driver to keep from scratching the lens.
*
BK0209800US.book 23 ページ 2014年1月14日 火曜日 午前9時26分
Page 235 of 262
Replacement of light bulbs 9-24 Vehicle care and maintenance
9
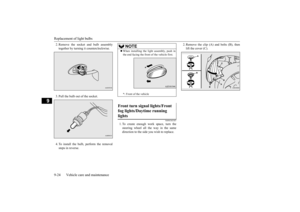
2. Remove the socket and bulb assembly together by turning it counterclockwise. 3. Pull the bulb out of the socket.4. To install the bulb, perform the removal steps in reverse.
N00943401407
1. To create enough work space, turn the steering wheel all the way in the same direction to the side
you wish to replace.
2. Remove the clip (A) and bolts (B), then lift the cover (C).
NOTE
When installing the light assembly, push in the end facing the front
of the vehicle first.
* : Front of the vehicle
Front turn signal lights/Front fog lights/Daytime running lights
BK0209800US.book 24 ページ 2014年1月14日 火曜日 午前9時26分
Page 236 of 262
![MITSUBISHI iMiEV 2014 1.G Owners Manual Replacement of light bulbs
Vehicle care and maintenance 9-25
9
3. Turn the socket counterclockwise to remove it.
4. Remove the bulb as follows. [Front turn signal light]Pull the bulb out of the sock MITSUBISHI iMiEV 2014 1.G Owners Manual Replacement of light bulbs
Vehicle care and maintenance 9-25
9
3. Turn the socket counterclockwise to remove it.
4. Remove the bulb as follows. [Front turn signal light]Pull the bulb out of the sock](/manual-img/19/7555/w960_7555-235.png)
Replacement of light bulbs
Vehicle care and maintenance 9-25
9
3. Turn the socket counterclockwise to remove it.
4. Remove the bulb as follows. [Front turn signal light]Pull the bulb out of the socket. [Front fog light
and daytime running
light]While holding down the tab (G), pull out the bulb assembly (H).
5. To install the bulb, perform the removal steps in reverse.
N00943700487
1. Open the liftgate. (Refer to “Liftgate” on page 5-11.)
D- Front turn signal light E- Front fog light F- Daytime running light
Front turn signal light Front fog light Daytime running light
CAUTION Handle halogen light bul
b with care. The gas
inside a halogen light
bulb is highly pressur-
ized, so dropping, knocki
ng, or scratching a
halogen light bulb can
cause it to shatter.
Never hold the halogen
light bulb with a bare
hand, dirty glove, etc. The oil from your hand could cause the bulb to break the next time the fog lights are used.If the glass surface is dirty, clean it with alcohol and let it dry completely before installing the bulb.
Rear combination lights
BK0209800US.book 25 ページ 2014年1月14日 火曜日 午前9時26分
Page 237 of 262
Replacement of light bulbs 9-26 Vehicle care and maintenance
9
2. Remove the screws (A) that hold the light unit and remove the light unit. 3. Move the light unit toward the rear of the vehicle and remove the pins (B) of the light unit from the vehicle.
4. Turn the socket counterclockwise to remove it.
5. Pull the bulb out of the socket. 6. To install the bulb, perform the removal steps in reverse.
N00935400108
1. Remove the clips (A), then lift the cover(B).
C- Tail and stop light (LED) - cannot be
replaced
D- Rear turn signal light E- Back up light
NOTE
The tail and stop lights use LEDs rather than bulbs. For repair and replacem
ent, contact a certi-
fied i-MiEV dealer.
Rear side-marker lights
BK0209800US.book 26 ページ 2014年1月14日 火曜日 午前9時26分
Page 238 of 262
Replacement of light bulbs
Vehicle care and maintenance 9-27
9
2. Turn the socket (C) counterclockwise to remove it. 3. Pull the bulb out of the socket.4. To install the bulb, perform the removal steps in reverse.
N00943900128
1. Remove the mounti
ng screws (A) and
remove the light unit. 2. While holding down the tab (B), pull out the connector.
3. Remove the screws (C) and then remove the bulb holder. 4. Pull the bulb out of the socket.5. To install the bulb, perform the removal steps in reverse.
High-mounted stop light
BK0209800US.book 27 ページ 2014年1月14日 火曜日 午前9時26分
Page 239 of 262
Vehicle care precautions 9-28 Vehicle care and maintenance
9
N00944001413
1. When removing the light unit (A), push it toward the left side
of the vehicle body.
2. Use a flat blade screwdriver into the tab (B) and pry gently to remove the lens. 3. Pull the bulb out of the socket.
4. To install the bulb, perform the removal steps in reverse.
N00945100195
In order to maintain the value of your vehicle, perform regular maintenance using the proper materials and procedures
. Be sure to use only
those materials and proc
edures that meet your
local environmental pollution control regula- tions. Choose the material
s you will use care-
fully, to be sure that they do not contain corrosives. If you are not sure, contact a certi- fied i-MiEV dealer for help in choosing thesematerials.
License plate lights
NOTE
When installing the light, insert tab (C) first then align and insert tab (D).
Vehicle care precautions
BK0209800US.book 28 ページ 2014年1月14日 火曜日 午前9時26分
Page 240 of 262

Cleaning the inside of your vehicle
Vehicle care and maintenance 9-29
9
These can all be danger
ous, and they all can
damage your vehicle.
N00945200079
After washing the inside of your vehicle withany cleaner, wipe it dry
in a shady, well venti-
lated area.
N00945300214
1. Lightly wipe these off with a soft clothsoaked in a mild soap and water solution. 2. Dip cloth in fresh water and wring out well. Using this cloth,
wipe off the deter-
gent thoroughly.
N00945500144
1. To maintain the value of your new vehi-cle, maintain the upholstery carefully andkeep the interior clean. Use a vacuum cleaner
and brush to clean
the seats. If stained,
vinyl and synthetic
leather should be clea
ned with an appro-
priate cleaner. Cloth fabrics can be cleaned with either
upholstery cleaner or a
mild soap and water solution. 2. Clean the carpeting with a vacuum cleaner and remove a
ny stains with carpet
cleaner. Oil and grea
se can be removed by
lightly dabbing with
a clean white cloth
and spot remover.
CAUTION Cleaning products can
be dangerous. Some
are poisonous. Others
are highly flammable.
Some are dangerous if you breathe theirfumes in a closed space. When you use any- thing in a container to clean your vehicle, be sure to follow the in
structions. Always open
your vehicle doors or windows when you’re cleaning the inside. Never use the following chemicals to clean your vehicle:• Gasoline• Carbon Tetrachloride• Benzine• Kerosene• Naphtha• Acetone• Turpentine• Paint Thinner• Lacquer Thinner• Nail Polish Remover
Cleaning the inside of your vehicle
CAUTION Do not use organic substances (solvents, benzine, kerosene, alc
ohol, gasoline, etc.) or
alkaline or acidic solutions.These chemicals can cause discoloring, staining or cracking of the surface. If you use cleaners or
polishing agents, make
sure their ingredients do not include the sub- stances mentioned above.NOTE
Always read the instru
ctions on the cleaner
label.
Plastic, vinyl leather, fabric and flocked parts
NOTE
Do not use cleaners,
conditioners, and pro-
tectants containing
silicones or wax.
Such products, when applied to the instru-ment panels or other pa
rts, may cause reflec-
tions on the windshiel
d and obscure vision.
Also, if such products
get on the switches of
the electrical accessories, it may lead to fail- ure of these accessories.
Upholstery
NOTE
If fuzzing is difficult to remove from the seat upholstery, draw a suitable defuzzing brush over the surface in
one direction.
BK0209800US.book 29 ページ 2014年1月14日 火曜日 午前9時26分