2014 MINI COUPE ROADSTER CONVERTIBLE remove
[x] Cancel search: removePage 165 of 224
▷If a warning triangle or portable hazard
warning lamp is required, set it up on the
roadside at an appropriate distance from
the rear of the vehicle. Comply with all
safety guidelines and regulations. ◀
The procedure to correct a flat tire depends on
the equipment in the vehicle:
▷Run-flat tires, refer to page 164.▷MINI Mobility System, refer to page 165.▷Wheel change with a compact wheel, refer
to page 181.
MINI Mobility System
Notes
▷Follow the instructions on using the Mobi‐
lity System found on the compressor and
sealant bottle.▷Use of the Mobility System may be ineffec‐
tive if tire damage is greater than approx.
1/8 in/4 mm in size.▷Contact the nearest service center if the tire
cannot be made drivable.▷If possible, do not remove foreign bodies
that have penetrated the tire.▷Pull the speed limit sticker off the sealant
bottle and apply it to the steering wheel.
Sealant and compressor
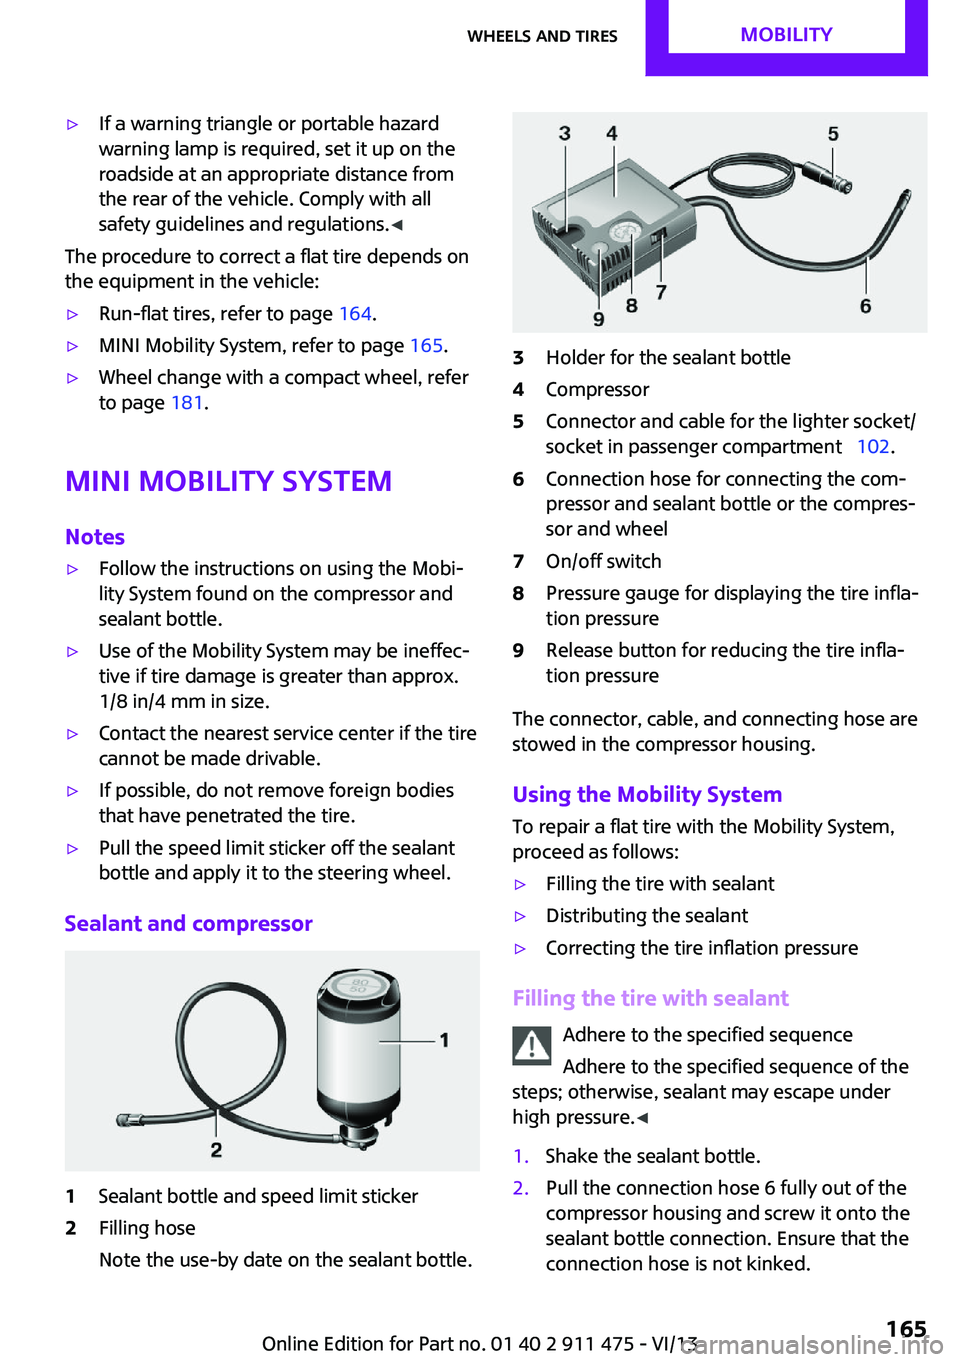
1Sealant bottle and speed limit sticker2Filling hose
Note the use-by date on the sealant bottle.3Holder for the sealant bottle4Compressor5Connector and cable for the lighter socket/
socket in passenger compartment 102.6Connection hose for connecting the com‐
pressor and sealant bottle or the compres‐
sor and wheel7On/off switch8Pressure gauge for displaying the tire infla‐
tion pressure9Release button for reducing the tire infla‐
tion pressure
The connector, cable, and connecting hose are
stowed in the compressor housing.
Using the Mobility System
To repair a flat tire with the Mobility System,
proceed as follows:
▷Filling the tire with sealant▷Distributing the sealant▷Correcting the tire inflation pressure
Filling the tire with sealant
Adhere to the specified sequence
Adhere to the specified sequence of the
steps; otherwise, sealant may escape under
high pressure. ◀
1.Shake the sealant bottle.2.Pull the connection hose 6 fully out of the
compressor housing and screw it onto the
sealant bottle connection. Ensure that the
connection hose is not kinked.Seite 165Wheels and tiresMobility165
Online Edition for Part no. 01 40 2 911 475 - VI/13
Page 177 of 224
Use a clean tissue, cloth or something similar,
or hold the bulb by its base. ◀
Caring for the headlamps, refer to page 192.
For bulb replacement that is not described
here, please contact the service center or a
workshop that works according to the repair
procedures of the manufacturer with corre‐
spondingly trained personnel.
For checking and adjusting headlamp aim,
please contact your MINI dealer.
Light-emitting diodes LEDs Light-emitting diodes installed behind translu‐
cent lenses serve as the light source for many
of the controls and displays in the vehicle.
These light-emitting diodes, which operate us‐
ing a concept similar to that applied in conven‐
tional lasers, are officially designated as Class 1
light-emitting diodes.
Do not remove the covers
Do not remove the covers, and never
stare into the unfiltered light for several hours;
otherwise, irritation of the retina could result. ◀
Headlamp glass
Condensation can form on the inside of the
headlamps in cool or humid weather. When the
light is switched on, the condensation evapo‐
rates after a short time. The headlamps do not
need to be changed.
If the condensation in the headlamps does not
evaporate after trips with the lights switched
on, and the amount of moisture in the head‐
lamps increases, for example if water droplets
form, have them checked by your service cen‐
ter.
Bi-xenon headlamps These bulbs have a very long life and the likeli‐
hood of failure is very low, provided that they
are not switched on and off excessively. If a
bulb should nevertheless fail, you can continuedriving cautiously with the front fog lamps, pro‐
vided this is permitted by local laws.
Do not perform work/bulb replacement
on xenon headlamps
Have any work on the xenon lighting system,
including bulb replacement, performed only by
a service center.
Due to the high voltage present in the system,
there is the danger of fatal injuries if work is
carried out improperly. ◀
Front lamps, bulb replacement
Halogen low beams and high beams
Bulb H13, 60/55 watt
Wear protective goggles and gloves
Halogen bulbs are pressurized. Therefore,
wear protective goggles and gloves. Otherwise,
there is a danger of injuries if the bulb is acci‐
dentally damaged during replacement. ◀
Attach the cover carefully
When attaching the cover, proceed care‐
fully; otherwise, leaks may occur, causing dam‐
age to the headlamp system. ◀
Access to the bulbs through the engine
compartment
Follow the general instructions on lamps and
bulbs, refer to page 176.
Low beam/high beam bulbs can be changed
from the engine compartment.Seite 177Replacing componentsMobility177
Online Edition for Part no. 01 40 2 911 475 - VI/13
Page 178 of 224
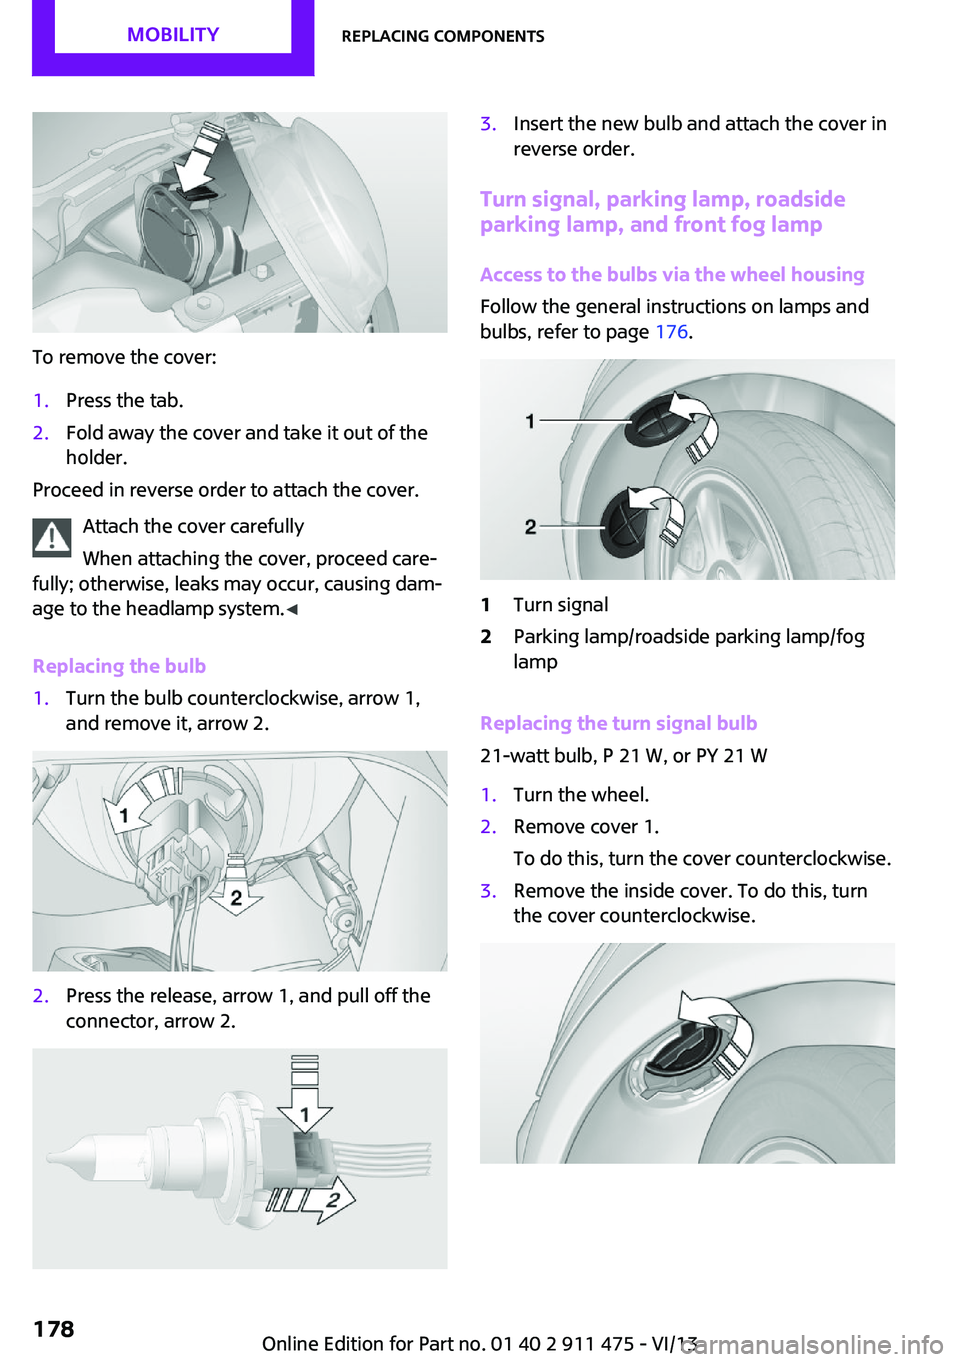
To remove the cover:
1.Press the tab.2.Fold away the cover and take it out of the
holder.
Proceed in reverse order to attach the cover.
Attach the cover carefully
When attaching the cover, proceed care‐
fully; otherwise, leaks may occur, causing dam‐
age to the headlamp system. ◀
Replacing the bulb
1.Turn the bulb counterclockwise, arrow 1,
and remove it, arrow 2.2.Press the release, arrow 1, and pull off the
connector, arrow 2.3.Insert the new bulb and attach the cover in
reverse order.
Turn signal, parking lamp, roadside
parking lamp, and front fog lamp
Access to the bulbs via the wheel housing
Follow the general instructions on lamps and
bulbs, refer to page 176.
1Turn signal2Parking lamp/roadside parking lamp/fog
lamp
Replacing the turn signal bulb
21-watt bulb, P 21 W, or PY 21 W
1.Turn the wheel.2.Remove cover 1.
To do this, turn the cover counterclockwise.3.Remove the inside cover. To do this, turn
the cover counterclockwise.Seite 178MobilityReplacing components178
Online Edition for Part no. 01 40 2 911 475 - VI/13
Page 179 of 224
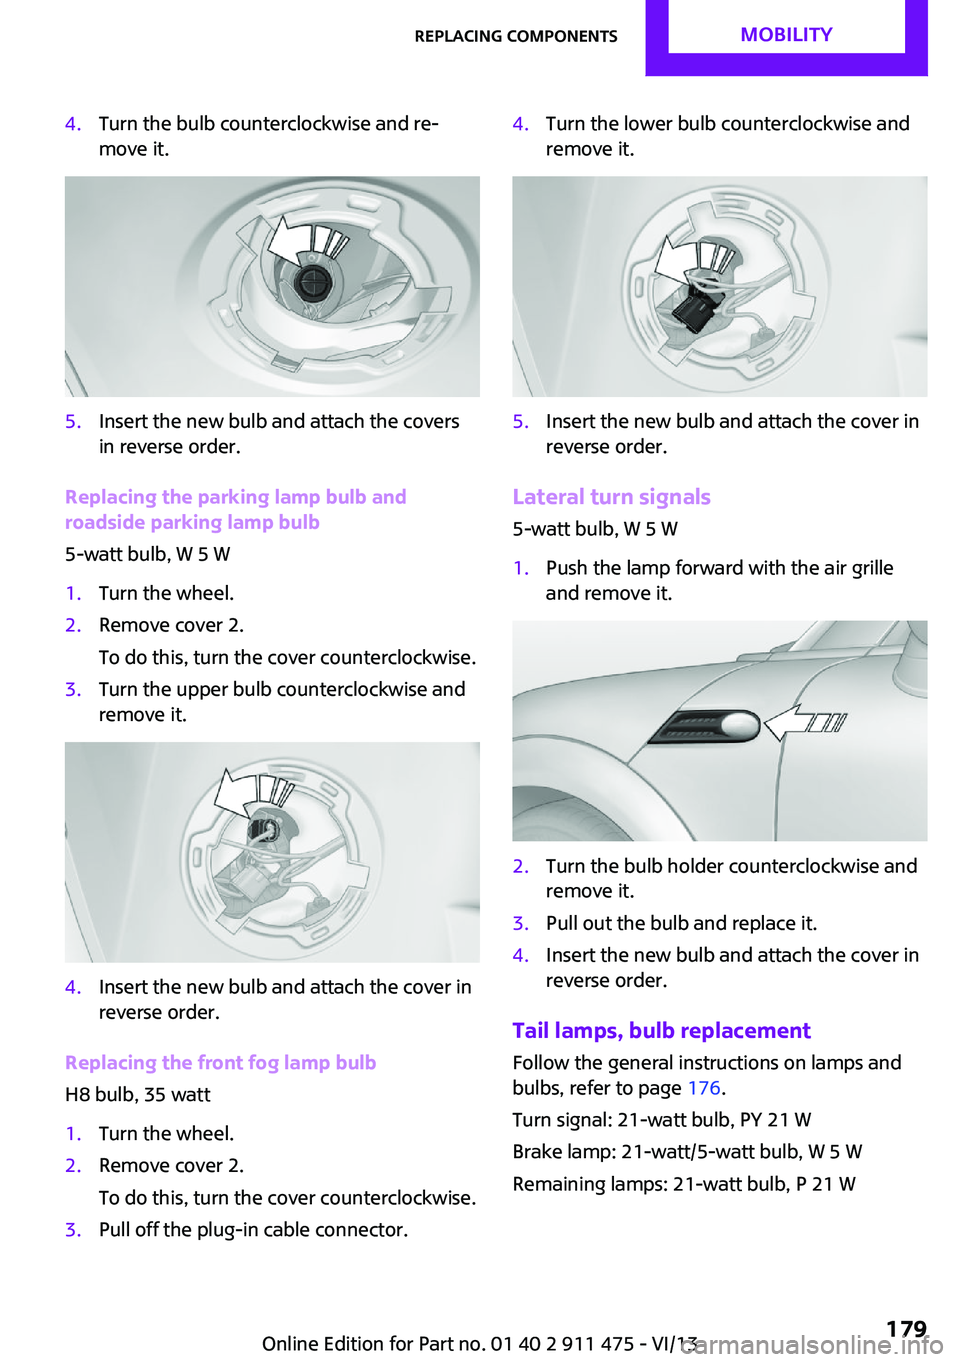
4.Turn the bulb counterclockwise and re‐
move it.5.Insert the new bulb and attach the covers
in reverse order.
Replacing the parking lamp bulb and
roadside parking lamp bulb
5-watt bulb, W 5 W
1.Turn the wheel.2.Remove cover 2.
To do this, turn the cover counterclockwise.3.Turn the upper bulb counterclockwise and
remove it.4.Insert the new bulb and attach the cover in
reverse order.
Replacing the front fog lamp bulb
H8 bulb, 35 watt
1.Turn the wheel.2.Remove cover 2.
To do this, turn the cover counterclockwise.3.Pull off the plug-in cable connector.4.Turn the lower bulb counterclockwise and
remove it.5.Insert the new bulb and attach the cover in
reverse order.
Lateral turn signals
5-watt bulb, W 5 W
1.Push the lamp forward with the air grille
and remove it.2.Turn the bulb holder counterclockwise and
remove it.3.Pull out the bulb and replace it.4.Insert the new bulb and attach the cover in
reverse order.
Tail lamps, bulb replacement
Follow the general instructions on lamps and
bulbs, refer to page 176.
Turn signal: 21-watt bulb, PY 21 W
Brake lamp: 21-watt/5-watt bulb, W 5 W
Remaining lamps: 21-watt bulb, P 21 W
Seite 179Replacing componentsMobility179
Online Edition for Part no. 01 40 2 911 475 - VI/13
Page 180 of 224
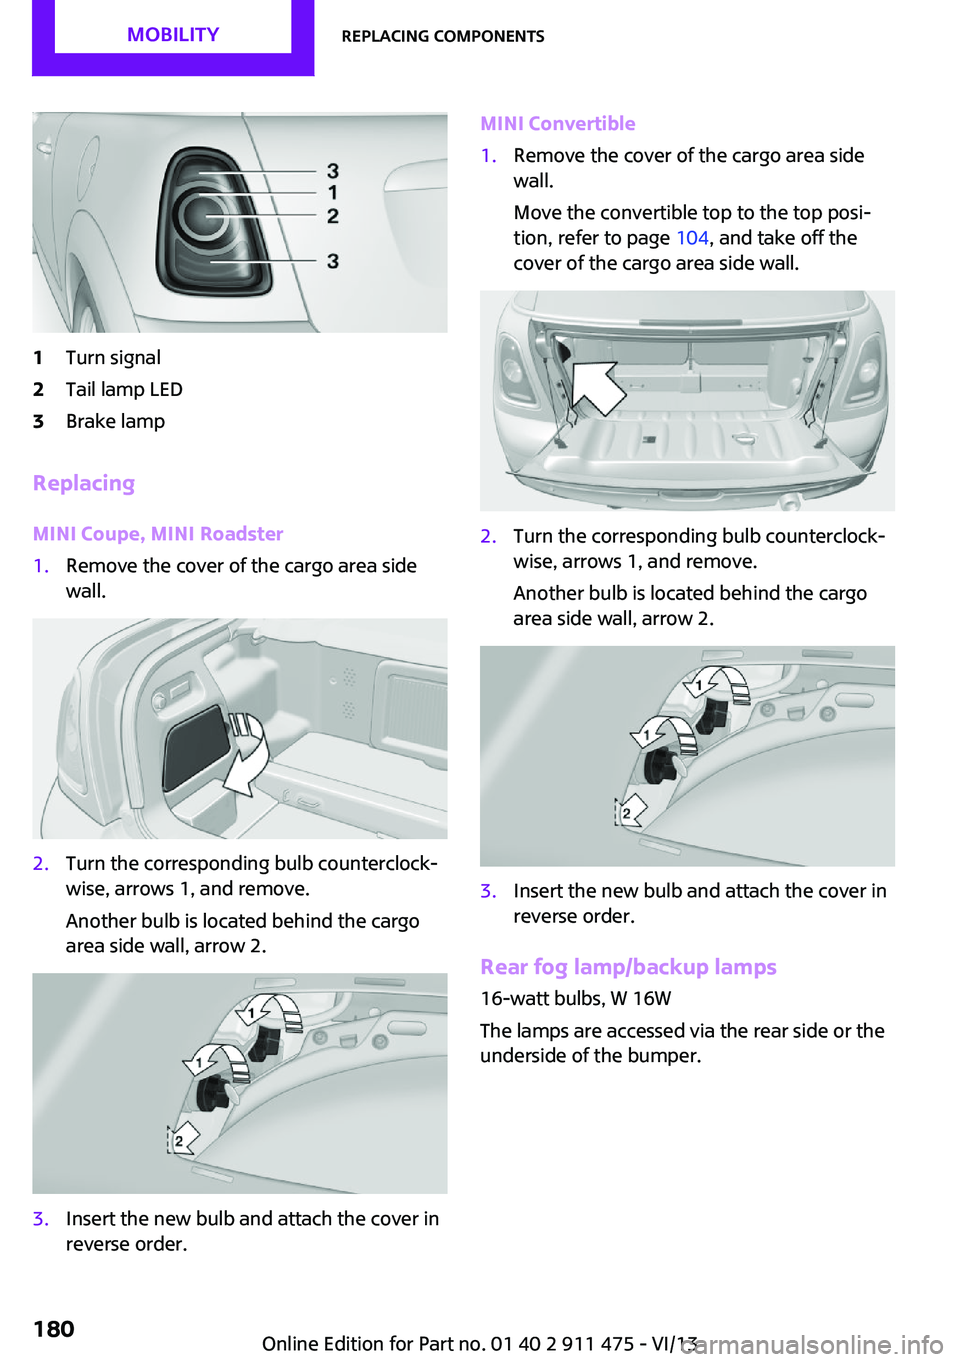
1Turn signal2Tail lamp LED3Brake lamp
Replacing
MINI Coupe, MINI Roadster
1.Remove the cover of the cargo area side
wall.2.Turn the corresponding bulb counterclock‐
wise, arrows 1, and remove.
Another bulb is located behind the cargo
area side wall, arrow 2.3.Insert the new bulb and attach the cover in
reverse order.MINI Convertible1.Remove the cover of the cargo area side
wall.
Move the convertible top to the top posi‐
tion, refer to page 104, and take off the
cover of the cargo area side wall.2.Turn the corresponding bulb counterclock‐
wise, arrows 1, and remove.
Another bulb is located behind the cargo
area side wall, arrow 2.3.Insert the new bulb and attach the cover in
reverse order.
Rear fog lamp/backup lamps
16-watt bulbs, W 16W
The lamps are accessed via the rear side or the
underside of the bumper.
Seite 180MobilityReplacing components180
Online Edition for Part no. 01 40 2 911 475 - VI/13
Page 181 of 224
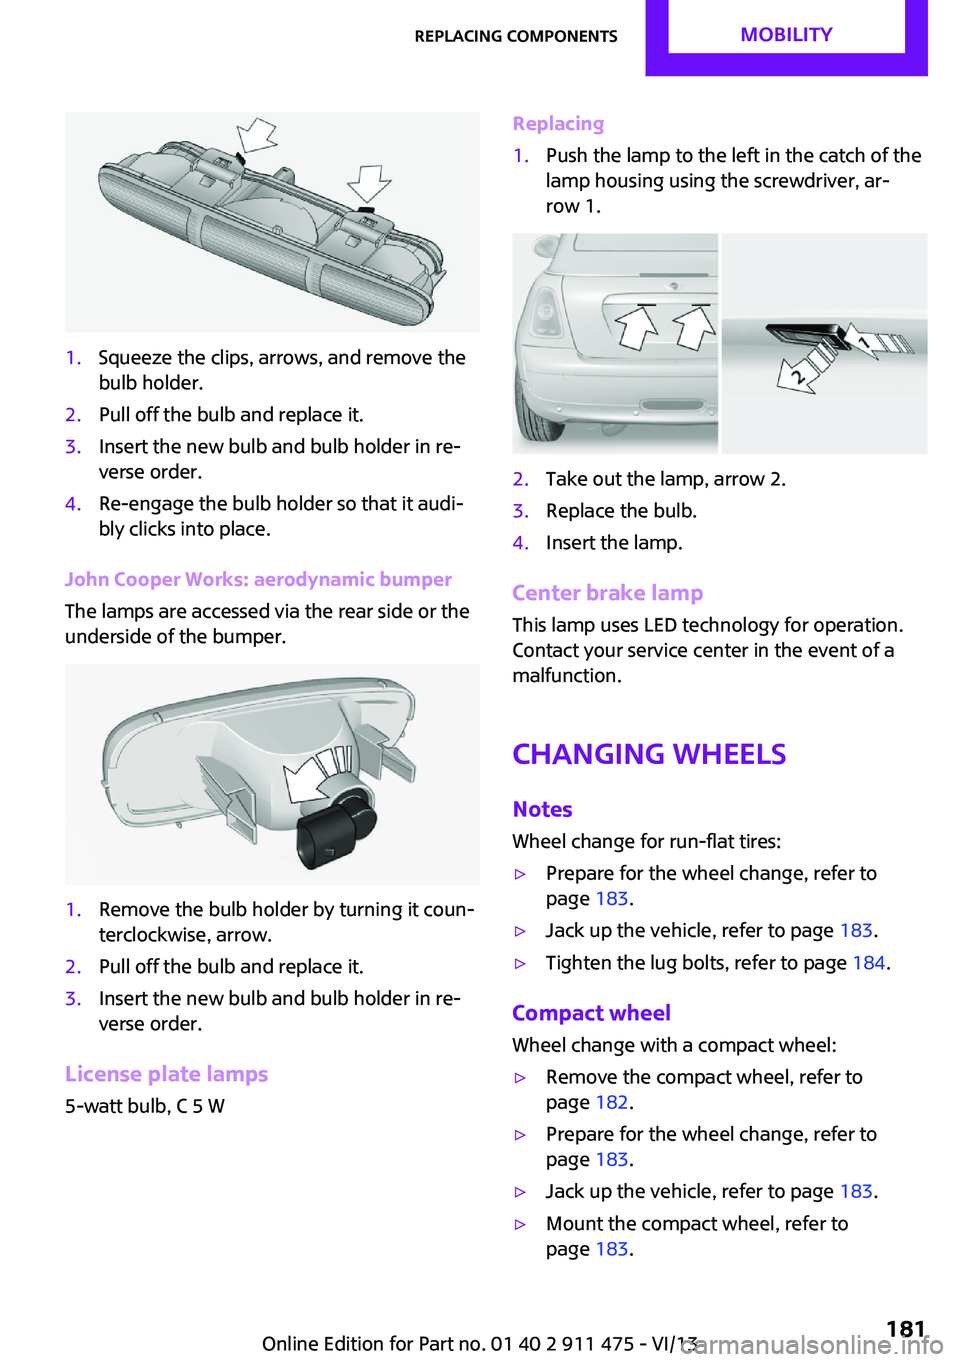
1.Squeeze the clips, arrows, and remove the
bulb holder.2.Pull off the bulb and replace it.3.Insert the new bulb and bulb holder in re‐
verse order.4.Re-engage the bulb holder so that it audi‐
bly clicks into place.
John Cooper Works: aerodynamic bumper
The lamps are accessed via the rear side or the
underside of the bumper.
1.Remove the bulb holder by turning it coun‐
terclockwise, arrow.2.Pull off the bulb and replace it.3.Insert the new bulb and bulb holder in re‐
verse order.
License plate lamps
5-watt bulb, C 5 W
Replacing1.Push the lamp to the left in the catch of the
lamp housing using the screwdriver, ar‐
row 1.2.Take out the lamp, arrow 2.3.Replace the bulb.4.Insert the lamp.
Center brake lamp
This lamp uses LED technology for operation.
Contact your service center in the event of a
malfunction.
Changing wheels Notes
Wheel change for run-flat tires:
▷Prepare for the wheel change, refer to
page 183.▷Jack up the vehicle, refer to page 183.▷Tighten the lug bolts, refer to page 184.
Compact wheel
Wheel change with a compact wheel:
▷Remove the compact wheel, refer to
page 182.▷Prepare for the wheel change, refer to
page 183.▷Jack up the vehicle, refer to page 183.▷Mount the compact wheel, refer to
page 183.Seite 181Replacing componentsMobility181
Online Edition for Part no. 01 40 2 911 475 - VI/13
Page 183 of 224

driving characteristics could result, for example
reduced track stability on braking, extended
braking distance, and altered self-steering
characteristics in the limit range. In conjunction
with winter tires, these characteristics are more
pronounced. ◀
Only mount one compact wheel
Only one compact wheel may be
mounted. Restore the wheels and tires to their
original size as quickly as possible. Failure to do
so is a safety risk. ◀
Check the tire inflation pressure at the next op‐
portunity and correct it if necessary. Replace
the defective tire as soon as possible and have
the new wheel balanced.
Preparing wheel change
Observe the safety precautions regarding flat
tires, refer to page 164.
Additional safety precautions in the event
of a wheel change
Change the wheel only on a level, firm surface
which is not slippery.
The vehicle or the jack could slip to the side if
you attempt to raise the vehicle on a soft or
slippery surface, snow, ice, tiles, etc. Do not use
a wooden block or similar object as a support
base for the jack, as this would prevent it from
extending to its full support height and reduce
its load-carrying capacity.
To avoid serious or fatal injury: never lie under
the vehicle, and never start the engine while it
is supported by the jack. ◀1.Place the folding wheel chock behind the
front wheel of the other vehicle side; if the
vehicle is on an incline, place it in front of
this wheel. If the vehicle is parked on a
steep incline, additionally secure the vehi‐
cle against rolling.2.Expose the lug bolts if necessary.3.Loosen the lug bolts a half turn.Jacking up vehicle
The vehicle jack is designed for changing
wheels only.
The vehicle jack is designed for changing
wheels only. Do not attempt to raise another
vehicle model with it or to raise any load of any
kind. To do so could cause accidents and per‐
sonal injury. ◀
1.Position the vehicle jack at the jacking point
closest to the wheel.
The entire surface of the jack base must
rest on the ground vertically beneath the
jacking point.2.Guide the jack head into the rectangular re‐
cess of the jacking point when cranking up.3.Jack the vehicle up until the wheel you are
changing is raised from the ground.
Mounting the compact wheel
1.Unscrew the lug bolts and remove the
wheel.2.Remove accumulations of mud or dirt from
the mounting surfaces of the wheel and
hub. Also clean the lug bolts.Seite 183Replacing componentsMobility183
Online Edition for Part no. 01 40 2 911 475 - VI/13
Page 184 of 224
3.Mount the new wheel.4.Screw in at least two bolts crosswise.5.Screw in the remaining lug bolts.6.Fully tighten all lug bolts in a diagonal pat‐
tern.7.Lower the vehicle.8.Remove the jack.
Retightening the lug bolts
Retighten the lug bolts diagonally.
Checking that the lug bolts are tight
Always have the lug bolts checked with a
calibrated torque wrench as soon as possible to
ensure that they are tightened to the specified
torque. Otherwise, incorrectly tightened lug
bolts are a hidden safety risk. ◀
The tightening torque equals
103.3 lb ft/140 Nm.
Replace the defective tire as soon as possible
and have the new wheel balanced.
Vehicle battery Maintenance
The battery is maintenance-free, i.e., the elec‐
trolyte will last for the life of the battery in tem‐
perate climate conditions.
The service center will be happy to answer any
questions on the battery.
Battery replacement Use approved vehicle batteries
Only use vehicle batteries that have been
approved for your vehicle by the manufacturer;
otherwise, the vehicle could be damaged and
systems or functions may not be fully availa‐
ble. ◀
Have the vehicle battery registered by the serv‐
ice center after it is replaced to ensure that all comfort functions are available without restric‐
tions and that any associated Check Control
messages are no longer displayed.
Charging the battery
Note Do not connect the charger to the socket
Do not connect the battery charger to the
socket installed in the vehicle at the factory as
this could damage the battery. ◀
Only charge the battery in the vehicle when the
engine is switched off. Connections, refer to
page 186.
General information Ensure that the battery is sufficiently charged to
achieve the full battery life.
It may be necessary to charge the battery in
the following cases:▷When the vehicle is frequently used to
travel short distances.▷When the vehicle has not been driven for
more than one month.
Power failure
After a temporary power failure, some equip‐
ment will be restricted in its use and will need
to be reinitialized. In addition, certain individual
settings will be lost and must be updated:
▷Time and date: the values must be up‐
dated, refer to page 70.▷Radio: the stations need to be stored again,
refer to page 128.
Disposing of old batteries
Have used batteries disposed of by the
service center after they are replaced or
take them to a recycling center.
Maintain the battery in an upright position for
transport and storage. Secure the battery so
that it does not tip over during transport.
Seite 184MobilityReplacing components184
Online Edition for Part no. 01 40 2 911 475 - VI/13