2014 MERCEDES-BENZ SLS AMG ROADSTER battery
[x] Cancel search: batteryPage 6 of 292
1, 2, 3 ...
12 V socket see Sockets
4ETS (Electronic Traction System) ....55 A
ABS (Anti-lock Braking System) Display message ............................ 165
Function/notes ................................ 54
Warning lamp ................................. 192
Activating/deactivating cooling
with air dehumidification .................108
ADAPTIVE BRAKE ................................. 58
Additional speedometer ...................158
Additives (engine oil) ........................282
Adjusting lumbar support ..................86
Air bags Display message ............................ 171
Front air bag (driver, front
passenger) ....................................... 40
Head bag ......................................... 42
Important safety notes ....................38
Knee bag .......................................... 41
PASSENGER AIR BAG OFF
indicator lamp .................................. 42
Safety guidelines ............................. 37
Side impact air bag ..........................41
Air-conditioning system
see Climate control
Air filter (display message) ..............180
AIRSCARF Switching on/off .............................. 88
AIRSCARF vents
Setting the blower output ..............114
Air vents
Important safety notes ..................113
Setting ........................................... 113
Setting the blower output of the
AIRSCARF vents ............................ .114
Setting the center air vents ...........114
Setting the side air vents ...............114
Switching AIRSCARF on/off ............88
Alarm system
see ATA (Anti-Theft Alarm system) AMG
Adaptive sport suspension system 140
Button for AMG menu ....................128
E-SELECT leve r.............................. 121
Menu (on-board computer) ............161
SETUP ............................................ 128
SPEEDSHIFT DCT 7-gear sport
transmission .................................. 121
Anti-lock braking system
see ABS (Anti-lock Braking System)
Anti-theft alarm system
see ATA (Anti-Theft Alarm system)
Ashtray ............................................... 203
ASSYST PLUS service interval
display
Hiding service messages ...............222
Service messages ..........................222
ATA (Anti-Theft Alarm system)
Activating/deactivating ...................58
Function .......................................... .58
Switching off the alarm ....................58
Audio menu (on-board computer) ....154
Audio system see separate operating instructions
Authorized Centers
see Qualified specialist workshop
Authorized Mercedes-Benz Center
see Qualified specialist workshop
Authorized workshops
see Qualified specialist workshop
AUTO lights
Display message ............................ 174
Automatic headlamp mode ................96 B
BAS (Brake Assist System) .................55
Battery Display message ............................ 185
Battery (SmartKey)
Checking .......................................... 65
Important safety notes ....................64
Replacing ......................................... 65
Battery (vehicle)
Charging ........................................ 239
Display message ............................ 178
Important safety notes ..................236
Jump starting ................................. 2404
Index
Page 15 of 292
Refrigerant (air-conditioning
system)
.......................................... 282
Washer fluid .................................. .284
Settings
Factory (on-board computer) .........160
On-board computer .......................157
Setting the air distribution ...............110
Setting the airflow ............................111
SETUP (on-board computer) .............161
Shift ranges ....................................... 127
Side impact air bag .............................41
Side marker lamp (display
message) ............................................ 176
Side windows Cleaning ......................................... 227
Convenience closing feature ............77
Convenience opening feature ..........76
Important safety information ...........75
Opening/closing .............................. 75
Opening/closing (all) .......................76
Problem (malfunction) .....................78
SmartKey ............................................. 68
Changing the battery .......................65
Changing the programming .............63
Checking the battery .......................65
Convenience closing feature ............77
Convenience opening feature ..........76
Display message ............................ 185
Door central locking/unlocking .......62
Loss ................................................. 66
Mechanical key ................................ 64
Opening/closing soft top .................80
Positions (ignition lock) .................119
Problem (malfunction) .....................66
Starting the engine ........................120
Unlocking/locking vehicle ...............68
SmartKey positions
KEYLESS-GO start function ............119
Snow chains ...................................... 251
Socket Glove box ...................................... .204
Sockets
Center console .............................. 204
Points to observe before use .........203
Soft top
Cleaning ......................................... 226
Display message ............................ 184
Important safety notes ....................78Opening/closing (SmartKey)
...........80
Opening/closing (with soft-top
switch) ............................................. 79
Problem (malfunction) .....................82
Relocking ......................................... 80
wind screen ..................................... 80
Soft-top switch .................................... 79
Specialist workshop ............................ 22
Speed, controlling see Cruise control
Speedometer
Activating/deactivating the
additional speedometer .................158
Digital ............................................ 152
In the Instrument cluster .................27
Selecting the unit of measurement 157
see Instrument cluster
SPORT handling mode
Warning lamp ................................. 193
SRS
see SRS (Supplemental Restraint
System)
SRS (Supplemental Restraint
System)
Display message ............................ 173
Introduction ..................................... 37
Warning lamp ................................. 194
Warning lamp (function) ................... 37
Standing lamps
Display message ............................ 176
Switching on/off .............................. 97
Starting (engine) ................................ 120
Steering wheel Adjusting (electrically) .....................89
Button overview ............................... 29
Buttons (on-board computer) ......... 151
Cleaning ......................................... 229
Important safety notes ....................88
Paddle shifters ............................... 125
Storing settings (memory function) .. 92
Stopwatch (RACETIMER) ................... 161
Stowage areas ................................... 200
Stowage compartments Armrest (under) ............................. 201
Center console .............................. 201
Cup holders ................................... 202
Glove box ...................................... .200
Important safety information .........200 Index
13
Page 24 of 292
In situations like this, the body, the
undercarriage, chassis parts, wheels or
tires could be damaged without the
damage being visible. Components
damaged in this way can unexpectedly fail
or, in the case of an accident, no longer
withstand the strain they are designed to.
If the underbody paneling is damaged,
combustible materials such as leaves,
grass or twigs can gather between the
underbody and the underbody paneling. If
these materials come in contact with hot
parts of the exhaust system for an
extended period, they can catch fire.
In such cases, have the vehicle checked
and repaired immediately at a qualified
specialist workshop. If on continuing your
journey you notice that driving safety is
impaired, pull over and stop the vehicle
immediately, paying attention to road and
traffic conditions. In such cases, visit a
qualified specialist workshop. Declarations of conformity
Vehicle components which receive
and/or transmit radio waves USA:
"The wireless devices of this vehicle
comply with Part 15 of the FCC Rules.
Operation is subject to the following two
conditions: 1) These devices may not cause
harmful interference, and 2) These devices
must accept any interference received,
including interference that may cause
undesired operation. Changes or
modifications not expressly approved by the
party responsible for compliance could void
the user’s authority to operate the
equipment."
Canada: "The wireless devices of this vehicle
comply with Industry Canada license-exempt
RSS standard(s). Operation is subject to the
following two conditions: (1) These devices
may not cause interference, and (2) These
devices must accept any interference, including interference that may cause
undesired operation of the device." Diagnostics connection
The diagnostics connection is only intended
for the connection of diagnostic equipment at
a qualified specialist workshop. G
WARNING
If you connect equipment to the diagnostics
connection in the vehicle, it may affect the
operation of the vehicle systems. As a result,
the operating safety of the vehicle could be
affected. There is a risk of an accident.
Do not connect any equipment to a
diagnostics connection in the vehicle. G
WARNING
Objects in the driver's footwell can restrict the
pedal travel or obstruct a depressed pedal.
The operating and road safety of the vehicle
is jeopardized. There is a risk of an accident.
Make sure that all objects in the vehicle are
stowed correctly, and that they cannot enter
the driver's footwell. Install the floormats
securely and as specified in order to ensure
sufficient clearance for the pedals. Do not use
loose floormats and do not place floormats on
top of one another.
! If the engine is switched off and
equipment on the diagnostics connection
is used, the starter battery may discharge.
Connecting equipment to the diagnostics
connection can lead to emissions monitoring
information being reset, for example. This
may lead to the vehicle failing to meet the
requirements of the next emissions test
during the main inspection. Qualified specialist workshop
An authorized Mercedes-Benz Center is a
qualified specialist workshop. It has the
necessary specialist knowledge, tools and 22
Introduction
Page 60 of 292
the brake system checked at a qualified
specialist workshop.
Observe information regarding indicator and
warning lamps (Y page 192) as well as
display messages (Y page 166).
EBD monitors and controls the brake
pressure on the rear wheels to improve
driving stability while braking. ADAPTIVE BRAKE
i Observe the "Important safety notes"
section ( Ypage 54).
ADAPTIVE BRAKE enhances braking safety
and offers increased braking comfort. In
addition to the braking function, ADAPTIVE
BRAKE also features the hill start assist
function ( Ypage 121). Theft deterrent locking system
Immobilizer
The immobilizer prevents your vehicle from
being started without the correct SmartKey.
When leaving the vehicle, always take the
SmartKey with you and lock the vehicle.
Anyone can start the vehicle if a valid
SmartKey has been left inside the vehicle.
X To activate: while the engine is running,
turn the Start/Stop button to key position
0 (Y page 119).
The engine stops.
or
X Remove the SmartKey from the ignition
lock.
X To deactivate: turn the Start/Stop button
to key position 2(Ypage 119) without
depressing the brake pedal.
i The immobilizer is always deactivated
when you start the engine.
In the event that the engine cannot be
started when the starter battery is fully
charged, the immobilizer may be faulty. Contact an authorized Mercedes-Benz
Center or call 1-800-FOR-MERCede
s(in the
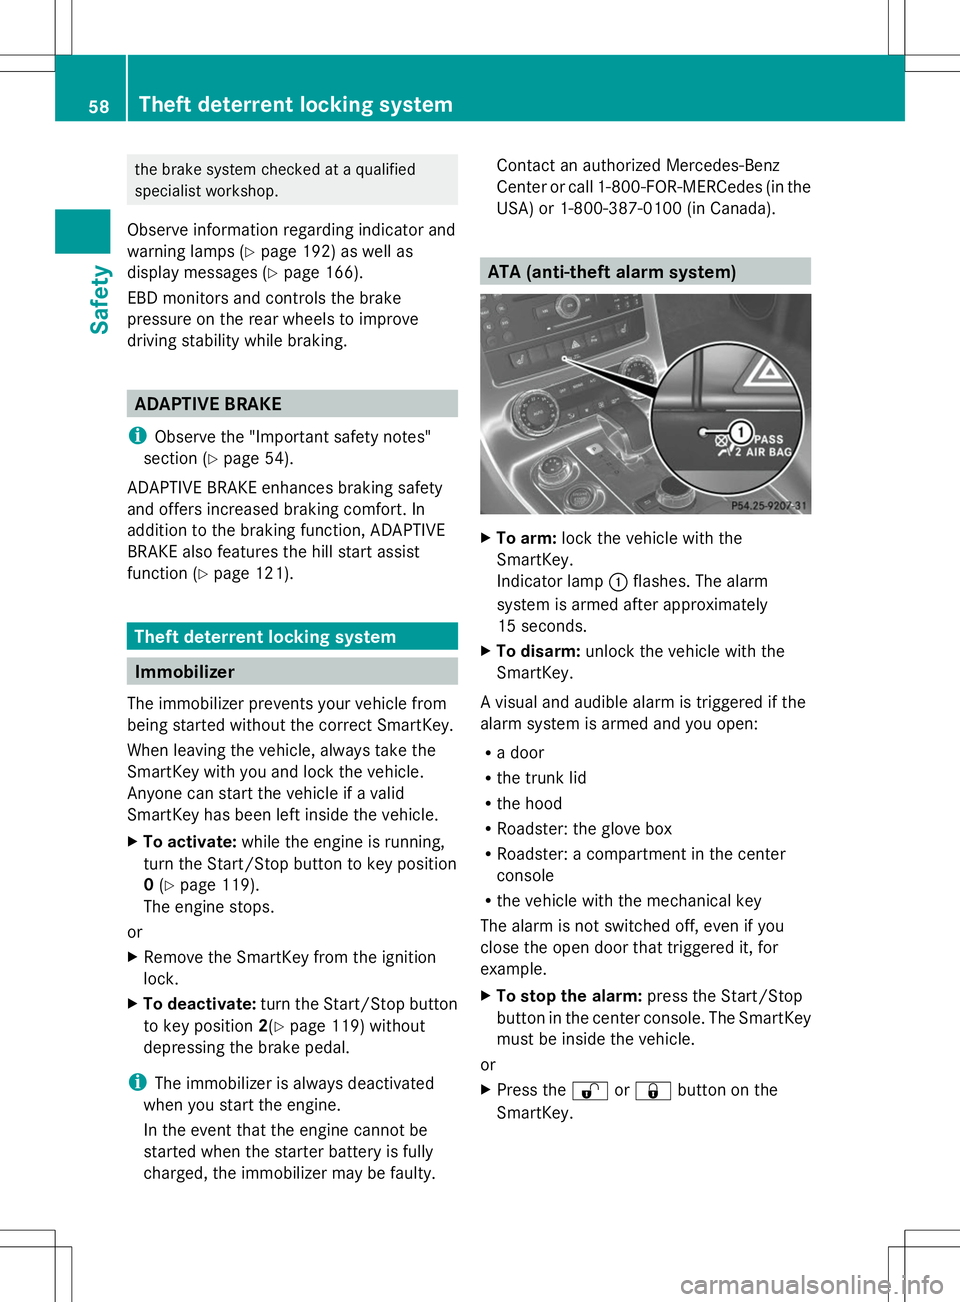
USA) or 1-800-387-010 0(in Canada). ATA (anti-theft alarm system)
X
To arm: lock the vehicle with the
SmartKey.
Indicator lamp :flashes. The alarm
system is armed after approximately
15 seconds.
X To disarm: unlock the vehicle with the
SmartKey.
A visual and audible alarm is triggered if the
alarm system is armed and you open:
R a door
R the trunk lid
R the hood
R Roadster: the glove box
R Roadster: a compartment in the center
console
R the vehicle with the mechanical key
The alarm is not switched off, even if you
close the open door that triggered it, for
example.
X To stop the alarm: press the Start/Stop
button in the center console. The SmartKey
must be inside the vehicle.
or
X Press the %or& button on the
SmartKey. 58
Theft deterrent locking systemSafety
Page 64 of 292
Useful information
i This Operator's Manual describes all
models and all standard and optional
equipment of your vehicle available at the
time of publication of the Operator's
Manual. Country-specific differences are
possible. Please note that your vehicle may
not be equipped with all features
described. This also applies to safety-
related systems and functions.
i Please read the information on qualified
specialist workshops (Y page 22).SmartKey
Key function
General notes i
USA only:
This device complies with Part 15 of the
FCC Rules. Operation is subject to the
following two conditions:
1. This device may not cause harmful
interference, and
2. this device must accept any interference
received, including interference that may
cause undesired operation of the device.
Any unauthorized modification to this
device could void the user's authority to
operate the equipment.
The Product label with FCC ID and IC
certification number can be found in the
battery case of the SmartKey.
i Canada only:
This device complies with RSS-210 of
Industry Canada. Operation is subject to
the following two conditions:
1. This device may not cause harmful
interference, and
2. this device must accept any interference
received, including interference that may
cause undesired operation of the device. Any unauthorized modification to this
device could void the user's authority to
operate the equipment.
The Product label with FCC ID and IC
certification number can be found in the
battery case of the SmartKey.
Locking/unlocking centrally The SmartKey centrally locks/unlocks:
R
the doors
R the trunk lid
R the fuel filler flap
R Roadster only: the glove box
R Roadster only: the stowage compartment
under the armrest G
WARNING
If children are left unsupervised in the vehicle,
they could:
R open the doors, thus endangering other
people or road users.
R get out and disrupt traffic.
R operate the vehicle's equipment.
Additionally, children could set the vehicle in
motion if, for example, they:
R release the parking brake.
R shifting the automatic transmission out of
park position P
R Start the engine.
There is a risk of an accident and injury.
When leaving the vehicle, always take the
SmartKey with you and lock the vehicle. Never
leave children or animals unattended in the
vehicle. Always keep the SmartKey out of
reach of children. 62
SmartKeyOpening and closing
Page 65 of 292
G
WARNING
When leaving the vehicle, always remove the
SmartKey from the ignition lock. Always take
the SmartKey with you and lock the vehicle.
Do not leave children unsupervised in the
vehicle, even if they are secured in a child
restraint system, and do not give them access
to an unlocked vehicle. A child's unsupervised
access to a vehicle could result in an accident
and/or serious personal injury. They could:
R injure themselves on vehicle parts
R be seriously or fatally injured by extreme
heat or cold
R injure themselves or have an accident with
vehicle equipment that may still be in
operation even after the SmartKey has
been removed from the ignition, such as the
seat adjustment, steering wheel
adjustment or memory function.
If children open a door, they could cause
severe or even fatal injury to other persons; if
they get out of the vehicle, they could injure
themselves when doing so or be seriously or
even fatally injured by any passing traffic.
Do not expose the child restraint system to
direct sunlight. The child restraint system's
metal parts, for example, could become very
hot, and a child could be burned on these
parts. G
WARNING
If you attach heavy or large objects to the
SmartKey, the SmartKey could be
unintentionally turned in the ignition lock. This
could cause the engine to be switched off.
There is a risk of an accident.
Do not attach any heavy or large objects to
the SmartKey. Remove any bulky key rings
before inserting the SmartKey into the
ignition lock.
! Keep the SmartKey away from strong
magnetic fields. Otherwise, the remote
control function could be affected.
Strong magnetic fields can occur in the
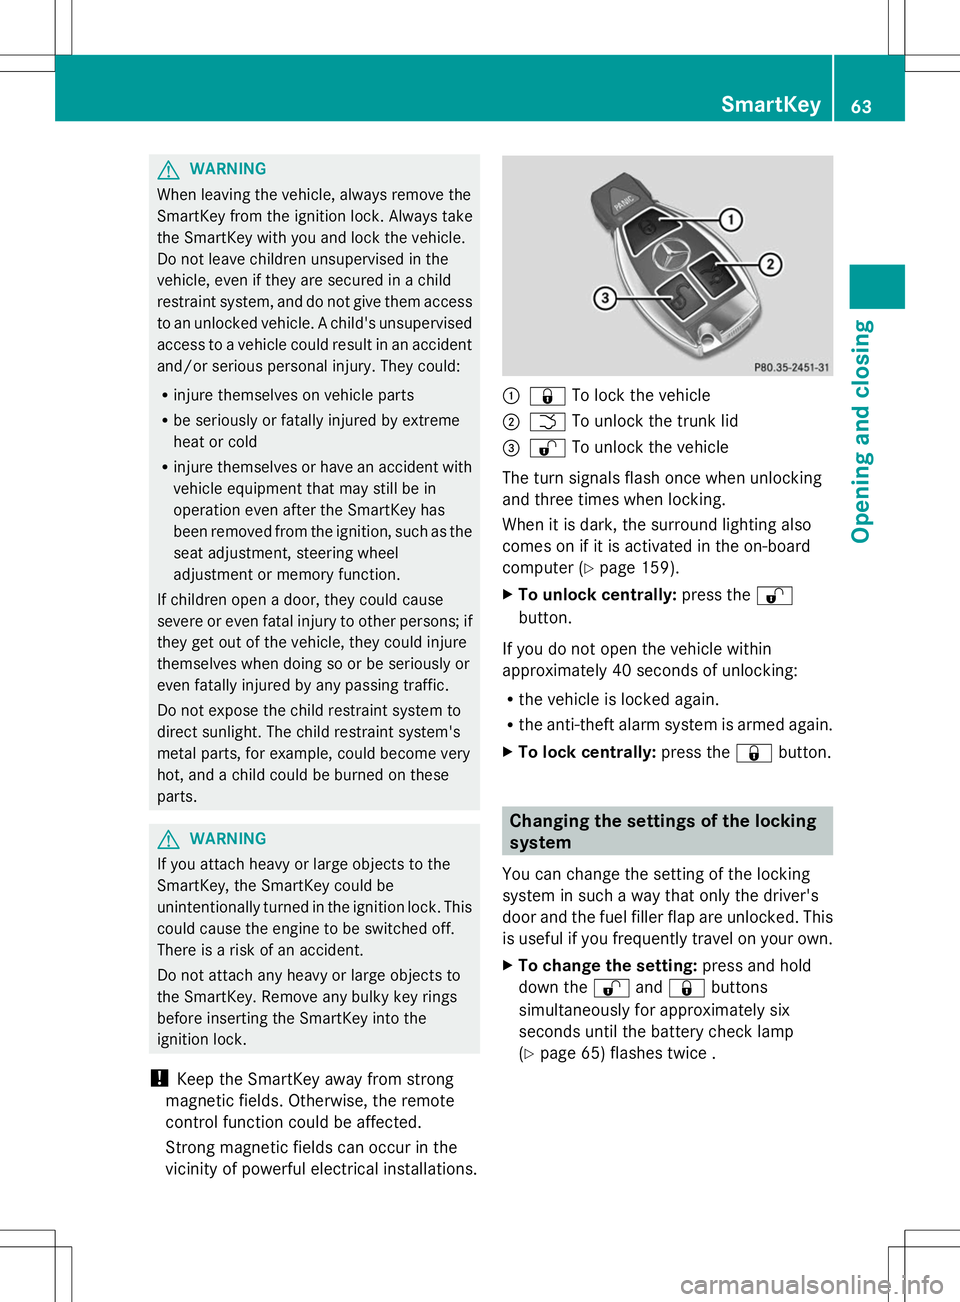
vicinity of powerful electrical installations. :
& To lock the vehicle
; F To unlock the trunk lid
= % To unlock the vehicle
The turn signals flash once when unlocking
and three times when locking.
When it is dark, the surround lighting also
comes on if it is activated in the on-board
computer (Y page 159).
X To unlock centrally: press the%
button.
If you do not open the vehicle within
approximately 40 seconds of unlocking:
R the vehicle is locked again.
R the anti-theft alarm system is armed again.
X To lock centrally: press the&button. Changing the settings of the locking
system
You can change the setting of the locking
system in such a way that only the driver's
door and the fuel filler flap are unlocked. This
is useful if you frequently travel on your own.
X To change the setting: press and hold
down the %and& buttons
simultaneously for approximately six
seconds until the battery check lamp
(Y page 65) flashes twice . SmartKey
63Opening and closing Z
Page 66 of 292
The SmartKey now functions as follows:
X
To unlock the driver's door: press the
% button once.
X To unlock centrally: press the%
button twice.
X To lock centrally: press the&button. Restoring the factory settings
X Press the %and& buttons
simultaneously for approximately six
seconds until the battery check lamp
flashes twice. Mechanical key
General notes If the vehicle can no longer be locked or
unlocked with the SmartKey, use the
mechanical key.
If you use the mechanical key to unlock and
open the driver's door, the anti-theft alarm
system will be triggered (Y page 58).
There are several ways to turn off the alarm:
X Press the %or& button on the
SmartKey.
or
X Insert the SmartKey into the ignition lock.
X To unlock the fuel filler flap: insert the
SmartKey into the ignition lock.
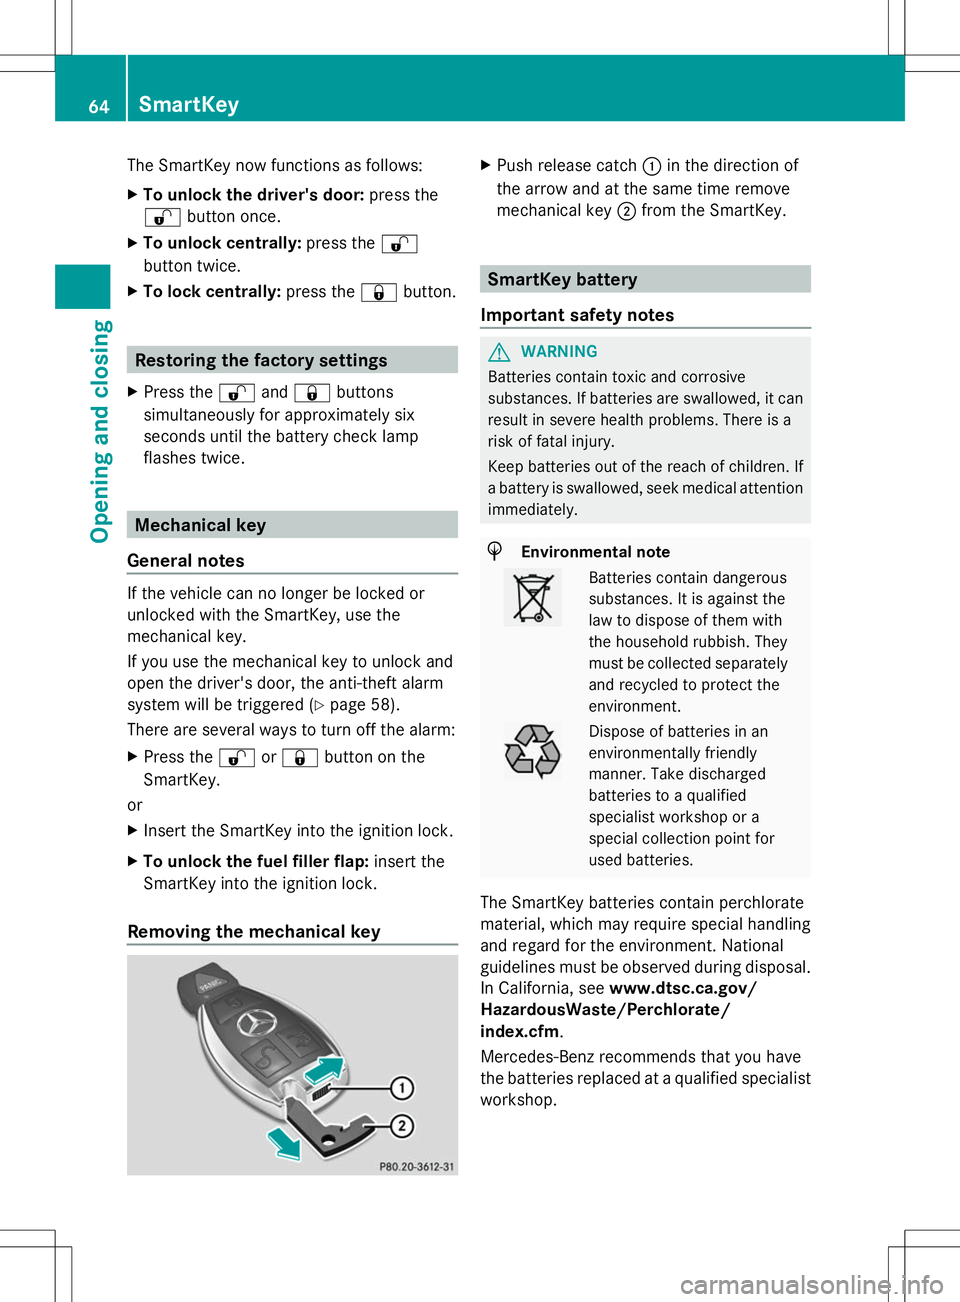
Removing the mechanical key X
Push release catch :in the direction of
the arrow and at the same time remove
mechanical key ;from the SmartKey. SmartKey battery
Important safety notes G
WARNING
Batteries contain toxic and corrosive
substances. If batteries are swallowed, it can
result in severe health problems. There is a
risk of fatal injury.
Keep batteries out of the reach of children. If
a battery is swallowed, seek medical attention
immediately. H
Environmental note Batteries contain dangerous
substances. It is against the
law to dispose of them with
the household rubbish. They
must be collected separately
and recycled to protect the
environment. Dispose of batteries in an
environmentally friendly
manner. Take discharged
batteries to a qualified
specialist workshop or a
special collection point for
used batteries.
The SmartKey batteries contain perchlorate
material, which may require special handling
and regard for the environment. National
guidelines must be observed during disposal.
In California, see www.dtsc.ca.gov/
HazardousWaste/Perchlorate/
index.cfm.
Mercedes-Benz recommends that you have
the batteries replaced at a qualified specialist
workshop. 64
SmartKeyOpening and closing
Page 67 of 292
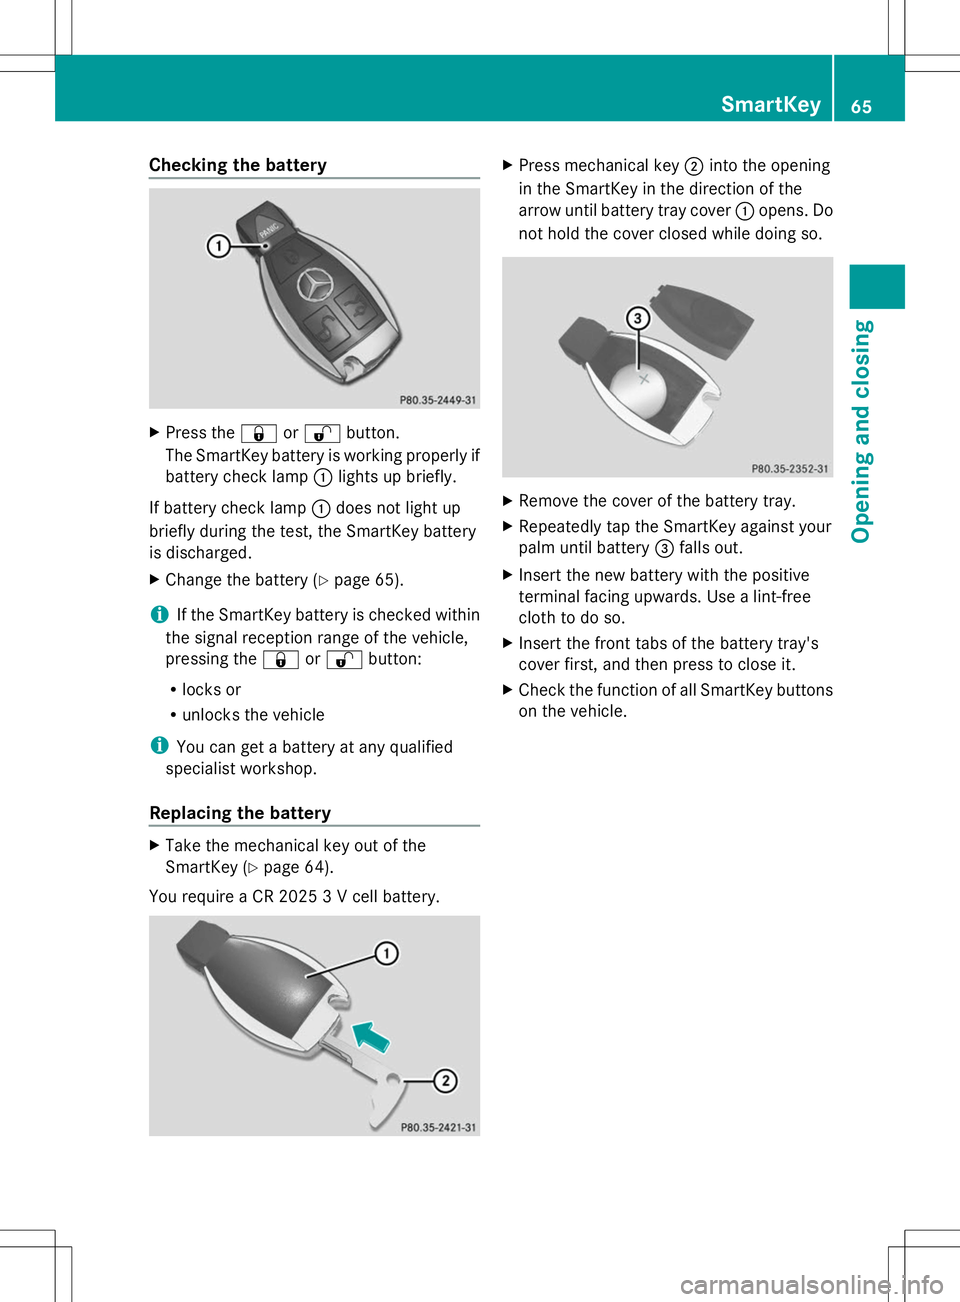
Checking the battery
X
Press the &or% button.
The SmartKey battery is working properly if
battery check lamp :lights up briefly.
If battery check lamp :does not light up
briefly during the test, the SmartKey battery
is discharged.
X Change the battery (Y page 65).
i If the SmartKey battery is checked within
the signal reception range of the vehicle,
pressing the &or% button:
R locks or
R unlocks the vehicle
i You can get a battery at any qualified
specialist workshop.
Replacing the battery X
Take the mechanical key out of the
SmartKey (Y page 64).
You require a CR 2025 3 V cell battery. X
Press mechanical key ;into the opening
in the SmartKey in the direction of the
arrow until battery tray cover :opens. Do
not hold the cover closed while doing so. X
Remove the cover of the battery tray.
X Repeatedly tap the SmartKey against your
palm until battery =falls out.
X Insert the new battery with the positive
terminal facing upwards. Use a lint-free
cloth to do so.
X Insert the front tabs of the battery tray's
cover first, and then press to close it.
X Check the function of all SmartKey buttons
on the vehicle. SmartKey
65Opening and closing Z