2014 MERCEDES-BENZ SLS AMG ROADSTER sensor
[x] Cancel search: sensorPage 147 of 292
General notes
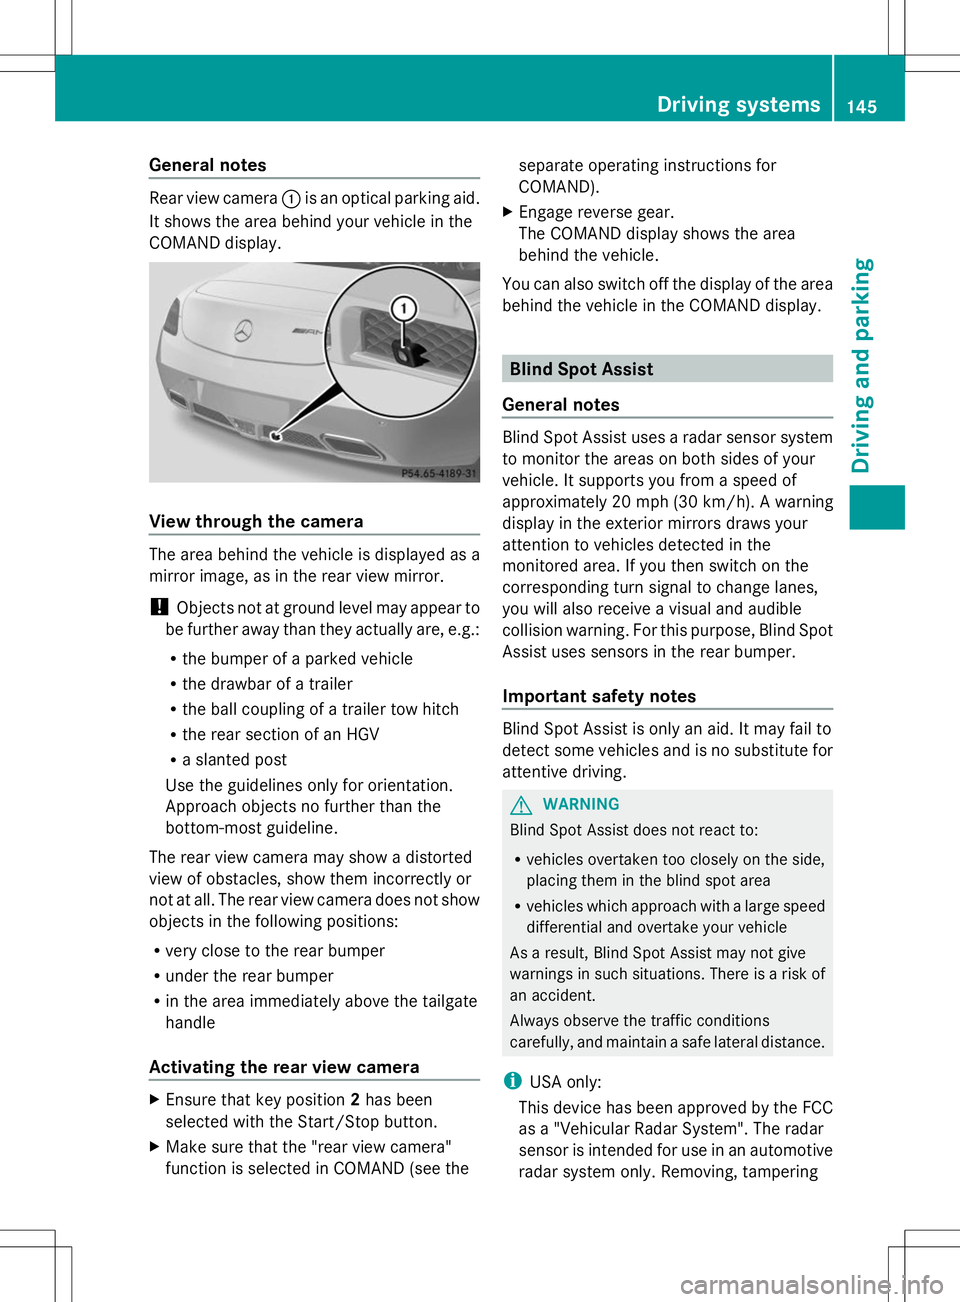
Rear view camera
:is an optical parking aid.
It shows the area behind your vehicle in the
COMAND display. View through the camera
The area behind the vehicle is displayed as a
mirror image, as in the rear view mirror.
! Objects not at ground level may appear to
be further away than they actually are, e.g.:
R the bumper of a parked vehicle
R the drawbar of a trailer
R the ball coupling of a trailer tow hitch
R the rear section of an HGV
R a slanted post
Use the guidelines only for orientation.
Approach objects no further than the
bottom-most guideline.
The rear view camera may show a distorted
view of obstacles, show them incorrectly or
not at all. The rear view camera does not show
objects in the following positions:
R very close to the rear bumper
R under the rear bumper
R in the area immediately above the tailgate
handle
Activating the rear view camera X
Ensure that key position 2has been
selected with the Start/Stop button.
X Make sure that the "rear view camera"
function is selected in COMAND (see the separate operating instructions for
COMAND).
X Engage reverse gear.
The COMAND display shows the area
behind the vehicle.
You can also switch off the display of the area
behind the vehicle in the COMAND display. Blind Spot Assist
General notes Blind Spot Assist uses a radar sensor system
to monitor the areas on both sides of your
vehicle. It supports you from a speed of
approximately 20 mph
(30 km/h). A warning
display in the exterior mirrors draws your
attention to vehicles detected in the
monitored area. If you then switch on the
corresponding turn signal to change lanes,
you will also receive a visual and audible
collision warning. For this purpose, Blind Spot
Assist uses sensors in the rear bumper.
Important safety notes Blind Spot Assist is only an aid. It may fail to
detect some vehicles and is no substitute for
attentive driving.
G
WARNING
Blind Spot Assist does not react to:
R vehicles overtaken too closely on the side,
placing them in the blind spot area
R vehicles which approach with a large speed
differential and overtake your vehicle
As a result, Blind Spot Assist may not give
warnings in such situations. There is a risk of
an accident.
Always observe the traffic conditions
carefully, and maintain a safe lateral distance.
i USA only:
This device has been approved by the FCC
as a "Vehicular Radar System". The radar
sensor is intended for use in an automotive
radar system only. Removing, tampering Driving systems
145Driving and parking Z
Page 148 of 292
with, or altering the device will void any
warranties, and is not permitted by the
FCC. Do not tamper with, alter, or use in
any non-approved way.
Any unauthorized modification to this
device could void the user’s authority to
operate the equipment.
Monitoring range of the sensors In particular, the detection of obstacles can
be impaired if:
R dirt on the sensors or anything else
covering the sensors
R there is poor visibility, e.g. due to fog, heavy
rain or snow
R a narrow vehicle traveling in front, e.g. a
motorbike or bicycle
R the road has very wide lanes
R the road has narrow lanes
R you are not driving in the middle of the lane
R there are barriers or similar lane borders
Vehicles in the monitoring range are then not
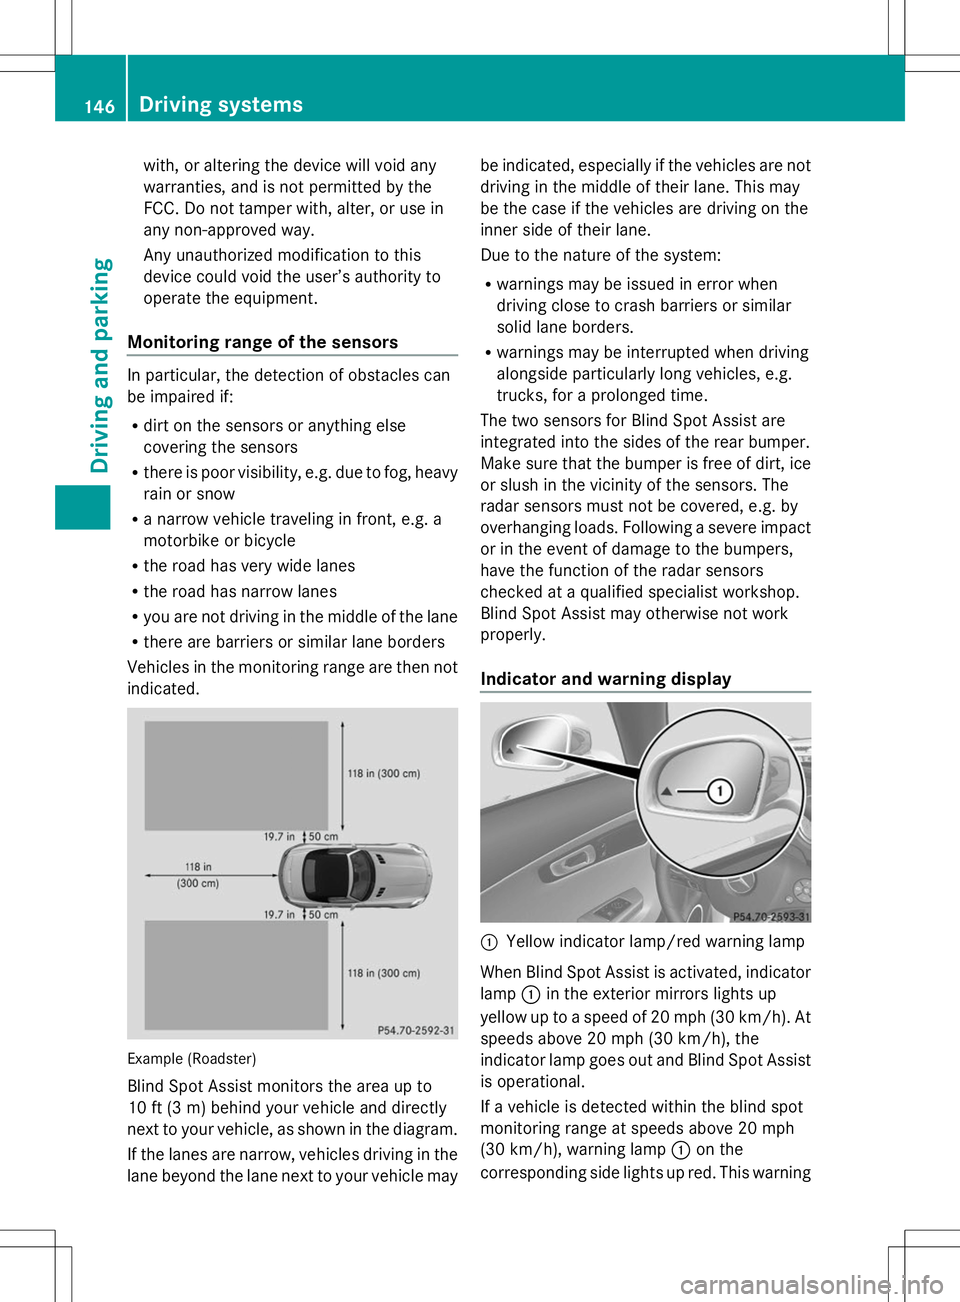
indicated. Example (Roadster)
Blind Spot Assist monitors the area up to
10 ft (3 m) behind your vehicle and directly
next to your vehicle, as shown in the diagram.
If the lanes are narrow, vehicles driving in the
lane beyond the lane next to your vehicle may be indicated, especially if the vehicles are not
driving in the middle of their lane. This may
be the case if the vehicles are driving on the
inner side of their lane.
Due to the nature of the system:
R
warnings may be issued in error when
driving close to crash barriers or similar
solid lane borders.
R warnings may be interrupted when driving
alongside particularly long vehicles, e.g.
trucks, for a prolonged time.
The two sensors for Blind Spot Assist are
integrated into the sides of the rear bumper.
Make sure that the bumper is free of dirt, ice
or slush in the vicinity of the sensors. The
radar sensors must not be covered, e.g. by
overhanging loads. Following a severe impact
or in the event of damage to the bumpers,
have the function of the radar sensors
checked at a qualified specialist workshop.
Blind Spot Assist may otherwise not work
properly.
Indicator and warning display :
Yellow indicator lamp/red warning lamp
When Blind Spot Assist is activated, indicator
lamp :in the exterior mirrors lights up
yellow up to a speed of 20 mph (30 km/h). At
speeds above 20 mph (30 km/h), the
indicator lamp goes out and Blind Spot Assist
is operational.
If a vehicle is detected within the blind spot
monitoring range at speeds above 20 mph
(30 km/h), warning lamp :on the
corresponding side lights up red. This warning 146
Driving systemsDriving and parking
Page 176 of 292

Display messages Possible causes/consequences and
M
MSolutions b
Check Check
Left
LeftLow
LowBeam
Beam
or
Check Right Low Check Right Low
Beam Beam The left or right-hand low-beam headlamp does not light up. In
addition, the high-beam headlamp is also inoperative.
X
Visit a qualified specialist workshop. b
AUTO AUTO
Lamp
LampFunction
Function
Inoperative
Inoperative The light sensor is defective.
USA only:
X
Switch off the daytime running lamps in the on-board computer
(Y page 158).
X Switch the lights on and off using the light switch. b
Check Rear Left Check Rear Left
Turn Signal Turn Signal
or
Check Rear Right Check Rear Right
Turn Signal Turn Signal The LEDs in the rear left or right-hand indicator lamp do not light
up.
X
Visit a qualified specialist workshop. b
Check Left Mirror Check Left Mirror
Turn Signal Turn Signal
or
Check Check
Right
RightMirror
Mirror
Turn Signal
Turn Signal None of the LEDs in the left or right-hand exterior mirrors light up.
X
Visit a qualified specialist workshop. b
Check Front Left Check Front Left
Turn Signal Turn Signal
or
Check Front Right Check Front Right
Turn Signal Turn Signal The LEDs in the front left or right-hand indicator lamp do not light
up.
X
Visit a qualified specialist workshop. b
Check Check
Center
Center Brake
Brake
Lamp
Lamp None of the LEDs in the high-mounted brake lamp light up.
X
Visit a qualified specialist workshop. 174
Display
messagesOn-board computer and displays
Page 181 of 292
Display messages Possible causes/consequences and
M
MSolutions 4
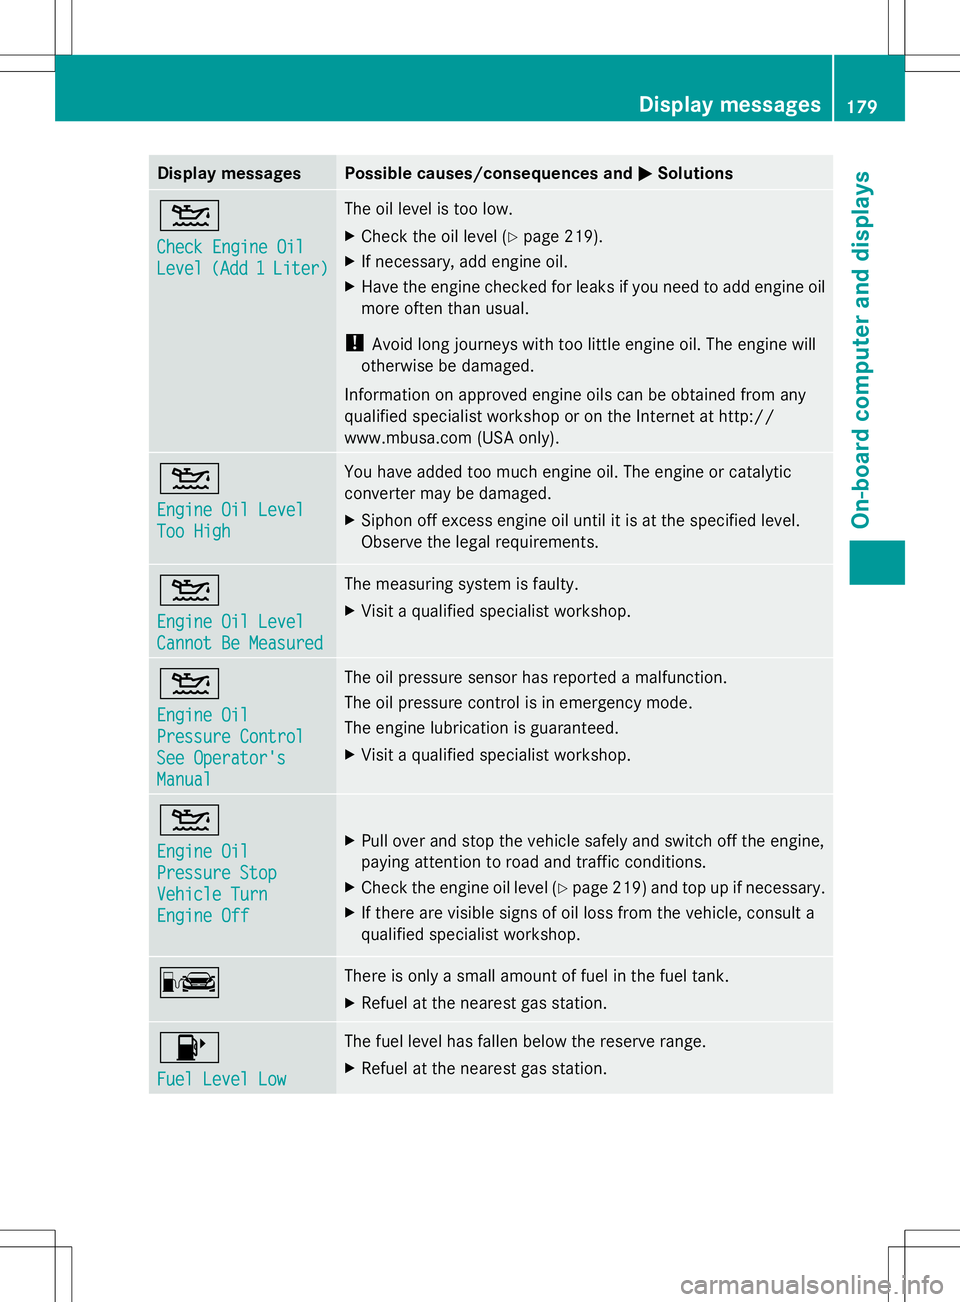
Check Engine Oil Check Engine Oil
Level Level
(Add 1
(Add 1 Liter)
Liter) The oil level is too low.
X
Check the oil level (Y page 219).
X If necessary, add engine oil.
X Have the engine checked for leaks if you need to add engine oil
more often than usual.
! Avoid long journeys with too little engine oil. The engine will
otherwise be damaged.
Information on approved engine oils can be obtained from any
qualified specialist workshop or on the Internet at http://
www.mbusa.com (USA only). 4
Engine Oil Level Engine Oil Level
Too High Too High You have added too much engine oil. The engine or catalytic
converter may be damaged.
X
Siphon off excess engine oil until it is at the specified level.
Observe the legal requirements. 4
Engine Oil Level Engine Oil Level
Cannot Be Measured Cannot Be Measured The measuring system is faulty.
X
Visit a qualified specialist workshop. 4
Engine Oil Engine Oil
Pressure Control Pressure Control
See Operator's See Operator's
Manual Manual The oil pressure sensor has reported a malfunction.
The oil pressure control is in emergency mode.
The engine lubrication is guaranteed.
X
Visit a qualified specialist workshop. 4
Engine Oil Engine Oil
Pressure Stop Pressure Stop
Vehicle Turn Vehicle Turn
Engine Off Engine Off
X
Pull over and stop the vehicle safely and switch off the engine,
paying attention to road and traffic conditions.
X Check the engine oil level (Y page 219) and top up if necessary.
X If there are visible signs of oil loss from the vehicle, consult a
qualified specialist workshop. C There is only a small amount of fuel in the fuel tank.
X
Refuel at the nearest gas station. 8
Fuel Level Low Fuel Level Low The fuel level has fallen below the reserve range.
X
Refuel at the nearest gas station. Display
messages
179On-board computer and displays Z
Page 183 of 292
Display messages Possible causes/consequences and
M
MSolutions Blind Spot Assist
Blind Spot Assist
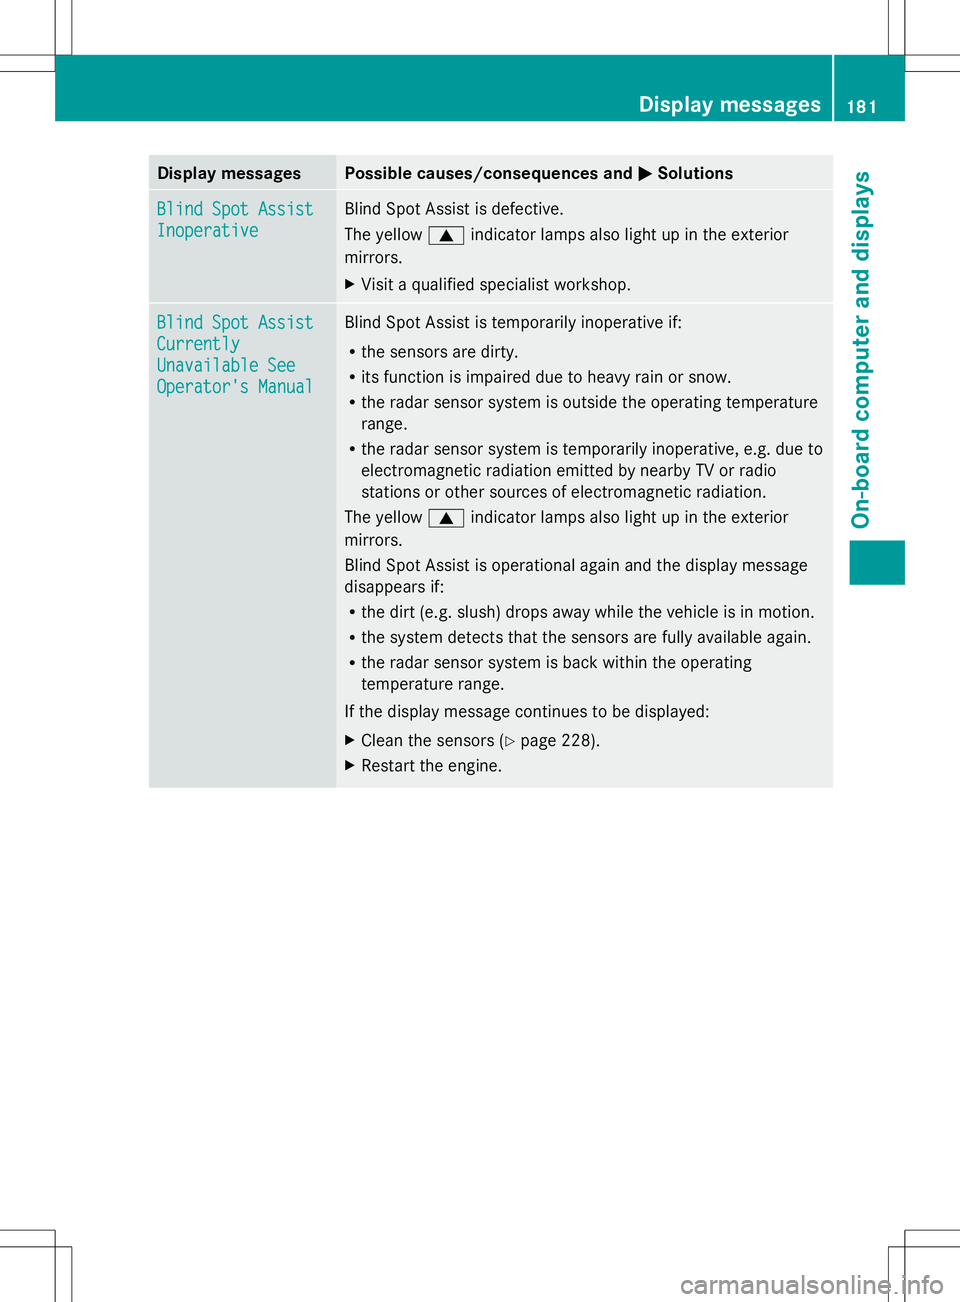
Inoperative Inoperative Blind Spot Assist is defective.
The yellow
9indicator lamps also light up in the exterior
mirrors.
X Visit a qualified specialist workshop. Blind Spot Assist Blind Spot Assist
Currently Currently
Unavailable See Unavailable See
Operator's Manual Operator's Manual Blind Spot Assist is temporarily inoperative if:
R
the sensors are dirty.
R its function is impaired due to heavy rain or snow.
R the radar sensor system is outside the operating temperature
range.
R the radar sensor system is temporarily inoperative, e.g. due to
electromagnetic radiation emitted by nearby TV or radio
stations or other sources of electromagnetic radiation.
The yellow 9indicator lamps also light up in the exterior
mirrors.
Blind Spot Assist is operational again and the display message
disappears if:
R the dirt (e.g. slush) drops away while the vehicle is in motion.
R the system detects that the sensors are fully available again.
R the radar sensor system is back within the operating
temperature range.
If the display message continues to be displayed:
X Clean the sensors (Y page 228).
X Restart the engine. Display
messages
181On-board computer and displays Z
Page 185 of 292

Display messages Possible causes/consequences and
M
MSolutions Tire
Tire
Press.
Press. Warning
Warning
Caution Tire
Caution Tire
Malfunction Malfunction The tire pressure in one or more tires has dropped suddenly. The
wheel position is shown in the multifunction display.
G WARNING
If you drive with a flat tire, there is a risk of the following hazards:
R a flat tire affects the ability to steer or brake the vehicle.
R you could lose control of the vehicle.
R continued driving with a flat tire will cause excessive heat build-
up and possibly a fire.
There is a risk of an accident.
X Stop the vehicle without making any sudden steering or braking
maneuvers. Pay attention to the traffic conditions as you do so.
X Secure the vehicle against rolling away ( Ypage 131).
X Check the tires and, if necessary, follow the instructions for a
flat tire (Y page 233). Tire Tire
Press.
Press. Monitor
Monitor
Currently
Currently
Unavailable Unavailable Due to a source of radio interference, no signals can be received
from the wheel sensors. The tire pressure monitor is temporarily
malfunctioning.
X
Drive on.
The tire pressure monitor restarts automatically as soon as the
problem has been solved. Tire Press. Tire Press.
Sensor(s)Missing Sensor(s)Missing There is no signal from the tire pressure sensor of one or several
wheels. The pressure of the affected tire is not displayed in the
multifunction display.
X
Have the faulty tire pressure sensor replaced at a qualified
specialist workshop. Tire Pressure Tire Pressure
Monitor Monitor
Inoperative No Inoperative No
Wheel Sensors Wheel Sensors The wheels mounted do not have a suitable tire pressure sensor.
The tire pressure monitor is deactivated.
X
Mount wheels with suitable tire pressure sensors.
The tire pressure monitor is activated automatically after driving
for a few minutes. Tire Pressure Tire Pressure
Monitor Monitor
Inoperative Inoperative The tire pressure monitor is faulty.
X
Visit a qualified specialist workshop. Display
messages
183On-board computer and displays Z
Page 230 of 292
!
Hold the wiper arm securely when folding
back. The windshield could be damaged if
the wiper arm smacks against it suddenly.
Cleaning the exterior lighting X
Clean the plastic lenses of the exterior
lighting using a wet sponge and a mild
cleaning agent, e.g. Mercedes-Benz car
shampoo or cleaning cloths.
! Only use cleaning agents or cleaning
cloths which are suitable for plastic light
lenses. Unsuitable cleaning agents or
cleaning cloths could scratch or damage
the plastic light lenses.
Cleaning the mirror turn signals !
Only use cleaning agents or cleaning
cloths that are suitable for plastic lenses.
Unsuitable cleaning agents or cleaning
cloths could scratch or damage the plastic
lenses of the mirror turn signals.
X Clean the plastic lenses of the mirror turn
signals in the exterior mirror housing using
a wet sponge and a mild cleaning agent,
e.g. Mercedes-Benz car shampoo or
cleaning cloths.
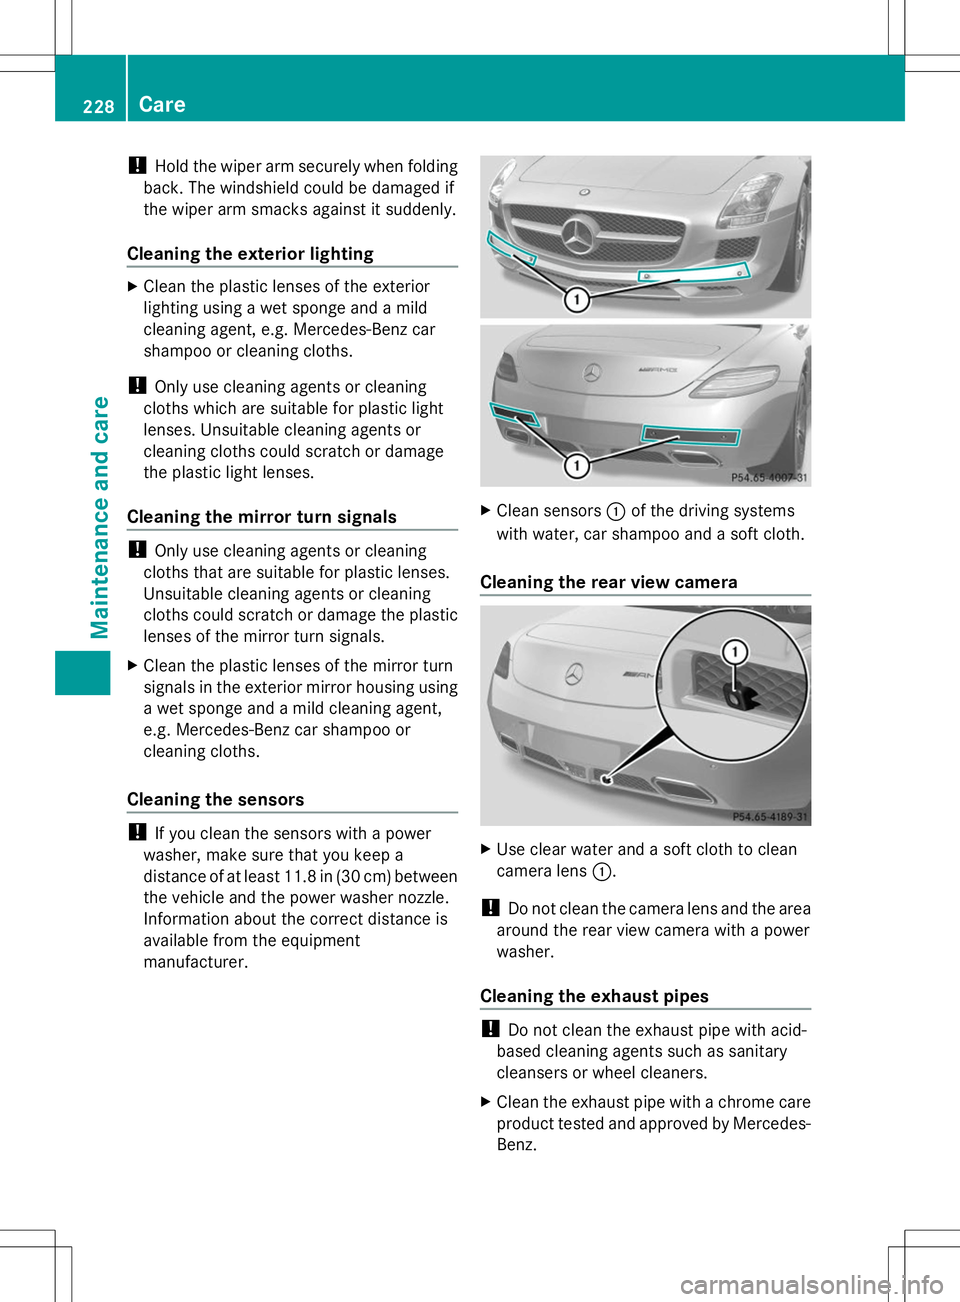
Cleaning the sensors !
If you clean the sensors with a power
washer, make sure that you keep a
distance of at least 11.8 in (30 cm) between
the vehicle and the power washer nozzle.
Information about the correct distance is
available from the equipment
manufacturer. X
Clean sensors :of the driving systems
with water, car shampoo and a soft cloth.
Cleaning the rear view camera X
Use clear water and a soft cloth to clean
camera lens :.
! Do not clean the camera lens and the area
around the rear view camera with a power
washer.
Cleaning the exhaust pipes !
Do not clean the exhaust pipe with acid-
based cleaning agents such as sanitary
cleansers or wheel cleaners.
X Clean the exhaust pipe with a chrome care
product tested and approved by Mercedes-
Benz. 228
CareMaintenance and care
Page 238 of 292
X
Stow the TIREFIT kit in a safe and
accessible place in the vehicle.
X Pull away immediately.
The maximum speed for a tire sealed with tire
sealant is 50 mph (80 km/h). The upper part
of the TIREFIT sticker must be affixed to the
instrument cluster in the driver's field of
vision.
! After use, excess TIREFIT may run out of
the filler hose. This could cause stains.
X Stop after driving for approximately ten
minutes and check the tire pressure with
the tire inflation compressor.
The tire pressure must now be at least
130 kPa (1.3 bar/19 psi).
i On tires that are equipped with a tire
pressure sensor (tire pressure monitor),
the use of sealant can lead to malfunction
messages and incorrect displays.
Therefore, use pressure gauge Bin the
TIREFIT kit to check and correct the tire
pressure. G
WARNING
If the required tire pressure is not reached
after driving for a short period, the tire is too
badly damaged. The tire sealant cannot repair
the tire in this instance. Damaged tires and a
tire pressure that is too low can significantly
impair the vehicle's braking and driving
characteristics. There is a risk of accident.
Do not continue driving. Contact a qualified
specialist workshop.
X Correct the tire pressure if it is still at least
130 kPa (1.3 bar/20 psi) (for the values,
see the Tire and Loading Information
placard on the driver's side B-pillar or tire
pressure table on the fuel filler flap).
To increase the tire pressure: switch on
the tire inflation compressor.
To reduce the tire pressure: open release
screw C.
! The manufacturer does not guarantee
that all tire damage can be repaired using the TIREFIT kit, particularly in the case of
cuts and punctures with a diameter of more
than four millimeters or on the sidewall. The
manufacturer is not responsible for
damage caused by inappropriate use of the
TIREFIT kit.
X Drive to the nearest workshop and have the
tire changed there.
X Have the tire sealant bottle replaced as
soon as possible at a qualified specialist
workshop, e.g. at an authorized Mercedes-
Benz Center. H
Environmental note
Have the used tire sealant bottle disposed of
professionally, e.g. at an authorized
Mercedes-Benz Center.
X Have the TIREFIT kit replaced every four
years at a qualified specialist workshop,
e.g. an authorized Mercedes-Benz Center. Battery (vehicle)
Important safety notes
Special tools and expert knowledge are
required when working on the battery, e.g.
removal and installing. You should therefore
have all work involving the battery carried out
at a qualified specialist workshop. 236
Battery (vehicle)Breakdown assistance