2014 MERCEDES-BENZ SLS AMG ROADSTER reset
[x] Cancel search: resetPage 94 of 292
Parking position for the exterior
mirror on the front-passenger side
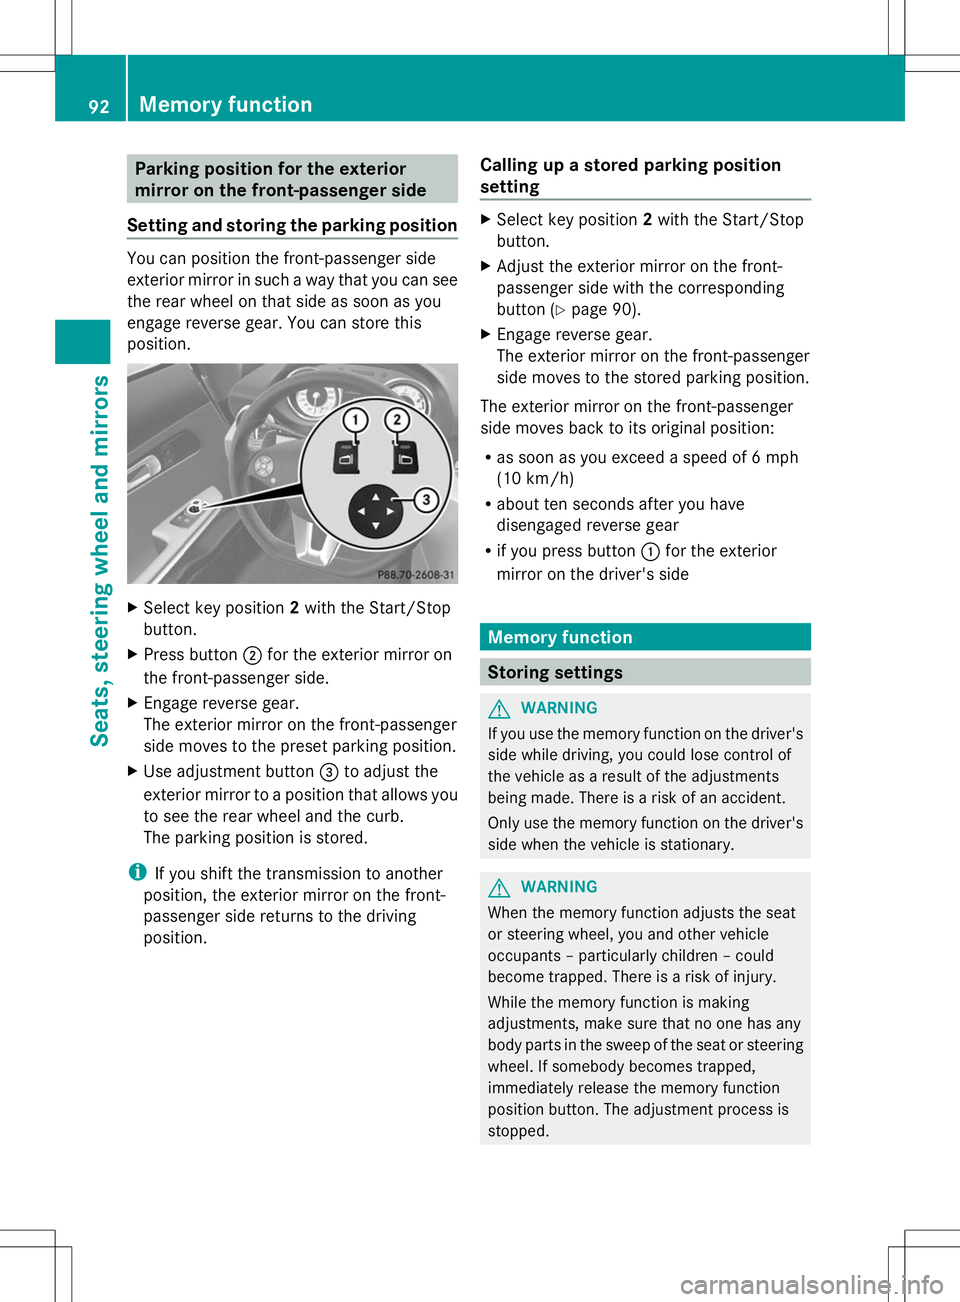
Setting and storing the parking position You can position the front-passenger side
exterior mirror in such a way that you can see
the rear wheel on that side as soon as you
engage reverse gear. You can store this
position. X
Select key position 2with the Start/Stop
button.
X Press button ;for the exterior mirror on
the front-passenger side.
X Engage reverse gear.
The exterior mirror on the front-passenger
side moves to the preset parking position.
X Use adjustment button =to adjust the
exterior mirror to a position that allows you
to see the rear wheel and the curb.
The parking position is stored.
i If you shift the transmission to another
position, the exterior mirror on the front-
passenger side returns to the driving
position. Calling up a stored parking position
setting X
Select key position 2with the Start/Stop
button.
X Adjust the exterior mirror on the front-
passenger side with the corresponding
button (Y page 90).
X Engage reverse gear.
The exterior mirror on the front-passenger
side moves to the stored parking position.
The exterior mirror on the front-passenger
side moves back to its original position:
R as soon as you exceed a speed of 6 mph
(10 km/h)
R about ten seconds after you have
disengaged reverse gear
R if you press button :for the exterior
mirror on the driver's side Memory function
Storing settings
G
WARNING
If you use the memory function on the driver's
side while driving, you could lose control of
the vehicle as a result of the adjustments
being made. There is a risk of an accident.
Only use the memory function on the driver's
side when the vehicle is stationary. G
WARNING
When the memory function adjusts the seat
or steering wheel, you and other vehicle
occupants – particularly children – could
become trapped. There is a risk of injury.
While the memory function is making
adjustments, make sure that no one has any
body parts in the sweep of the seat or steering
wheel. If somebody becomes trapped,
immediately release the memory function
position button. The adjustment process is
stopped. 92
Memory functionSeats, steering wheel and mirrors
Page 95 of 292
G
WARNING
Children could become trapped if they
activate the memory function, particularly
when unattended. There is a risk of injury.
When leaving the vehicle, always take the
SmartKey with you and lock the vehicle. Never
leave children unsupervised in the vehicle.
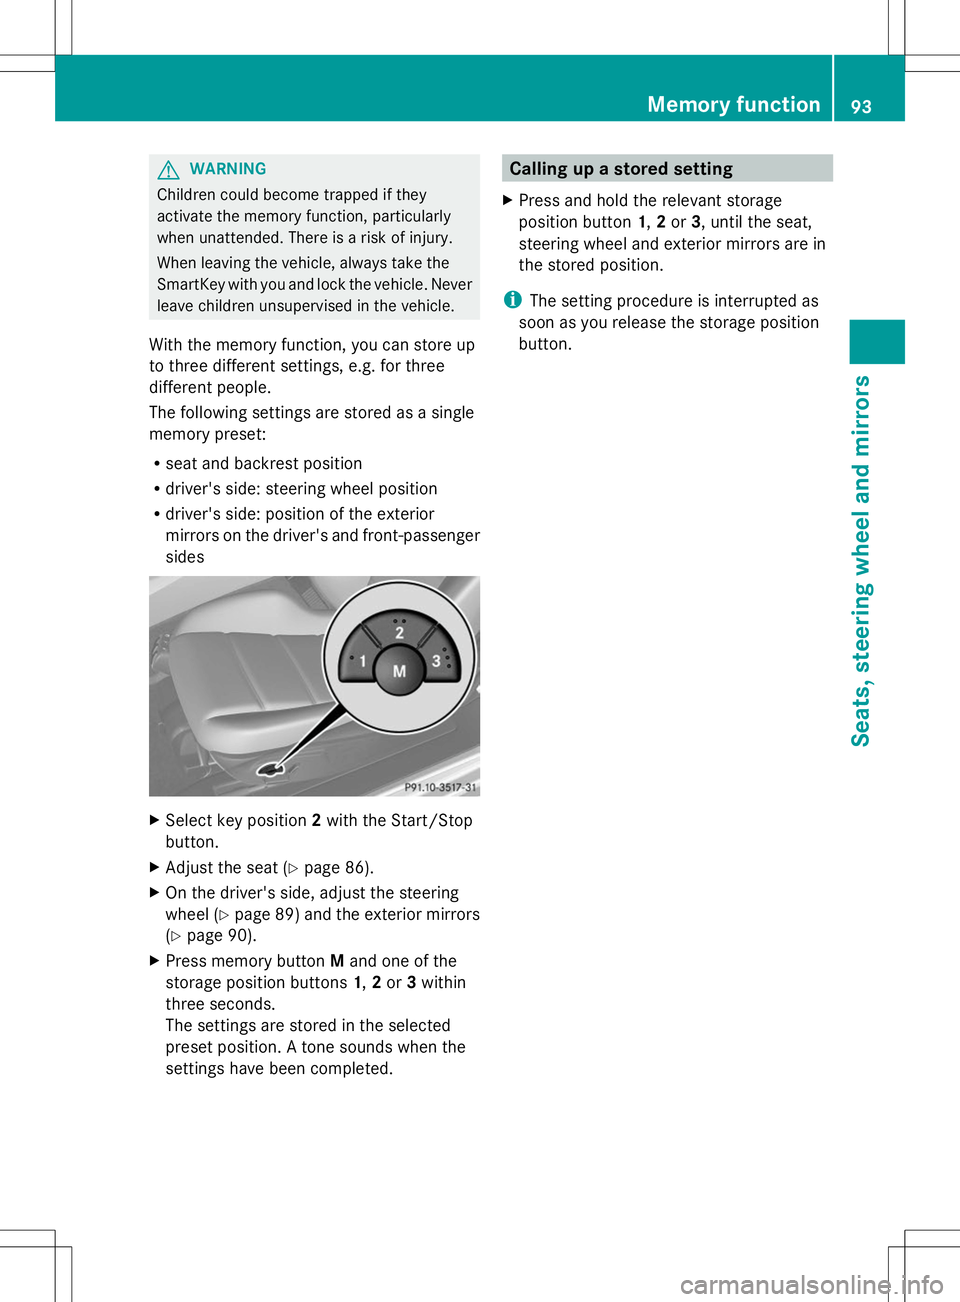
With the memory function, you can store up
to three different settings, e.g. for three
different people.
The following settings are stored as a single
memory preset:
R seat and backrest position
R driver's side: steering wheel position
R driver's side: position of the exterior
mirrors on the driver's and front-passenger
sides X
Select key position 2with the Start/Stop
button.
X Adjust the seat (Y page 86).
X On the driver's side, adjust the steering
wheel (Y page 89) and the exterior mirrors
(Y page 90).
X Press memory button Mand one of the
storage position buttons 1,2or 3within
three seconds.
The settings are stored in the selected
preset position. A tone sounds when the
settings have been completed. Calling up a stored setting
X Press and hold the relevant storage
position button 1,2or 3, until the seat,
steering wheel and exterior mirrors are in
the stored position.
i The setting procedure is interrupted as
soon as you release the storage position
button. Memory function
93Seats, steering wheel and mirrors Z
Page 101 of 292
only the turn signal lamp on the
corresponding side of the vehicle will flash.
X To switch off the hazard warning
lamps: press button :.
The hazard warning lamps switch off
automatically if the vehicle exceeds a speed
of 6 mph(10 km/h) again after a full brake
application.
i The hazard warning lamps still operate if
the ignition is switched off. Headlamp cleaning system
The headlamps are cleaned automatically if
the "Wipe with washer fluid" function is
operated five times (Y page 101) while the
lights are on and the engine is running. When
you switch off the ignition, the automatic
headlamp cleaning system is reset and
counting is resumed from 0. Headlamps fogged up on the inside
The headlamps may fog up on the inside if
there is high atmospheric humidity.
X Drive with the headlamps switched on.
The level of moisture diminishes,
depending on the length of the journey and
the weather conditions (humidity and
temperature).
If the level of moisture does not diminish:
X Have the headlamps checked at a qualified
specialist workshop. Interior lighting
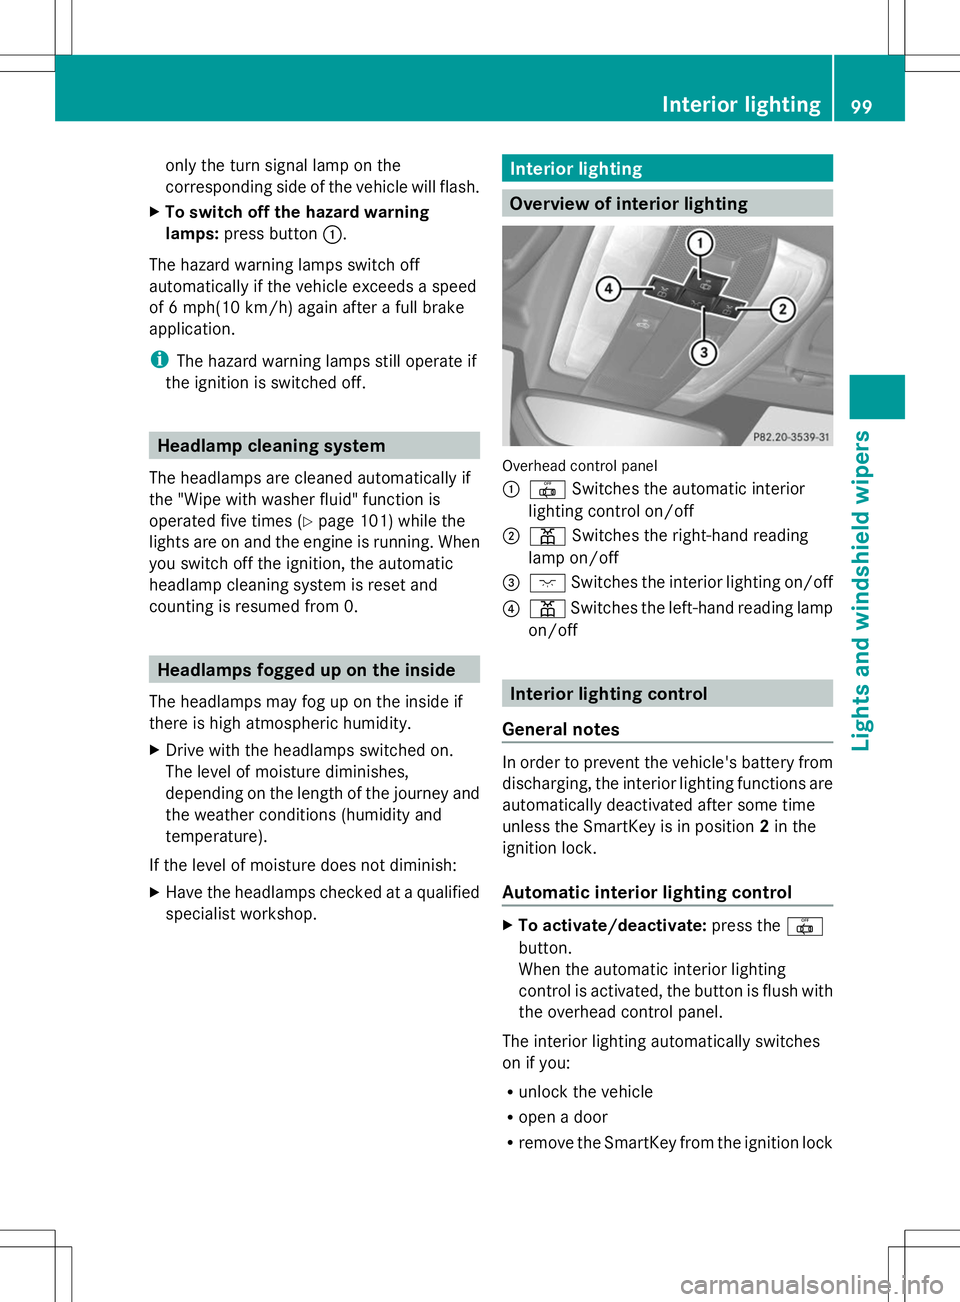
Overview of interior lighting
Overhead control panel
:
| Switches the automatic interior
lighting control on/off
; p Switches the right-hand reading
lamp on/off
= c Switches the interior lighting on/off
? p Switches the left-hand reading lamp
on/off Interior lighting control
General notes In order to prevent the vehicle's battery from
discharging, the interior lighting functions are
automatically deactivated after some time
unless the SmartKey is in position
2in the
ignition lock.
Automatic interior lighting control X
To activate/deactivate: press the|
button.
When the automatic interior lighting
control is activated, the button is flush with
the overhead control panel.
The interior lighting automatically switches
on if you:
R unlock the vehicle
R open a door
R remove the SmartKey from the ignition lock Interior lighting
99Lights and windshield wipers Z
Page 155 of 292
Trip computer "From Start" or "From
Reset" The values in the
From Start
From Startsubmenu are
calculated from the start of a journey whilst
the values in the From Reset
From Reset submenu are
calculated from the last time the submenu
was reset.
X Press the =or; button on the
steering wheel to select the Trip Tripmenu.
X Press the 9or: button to select
From Start
From Start orFrom Reset
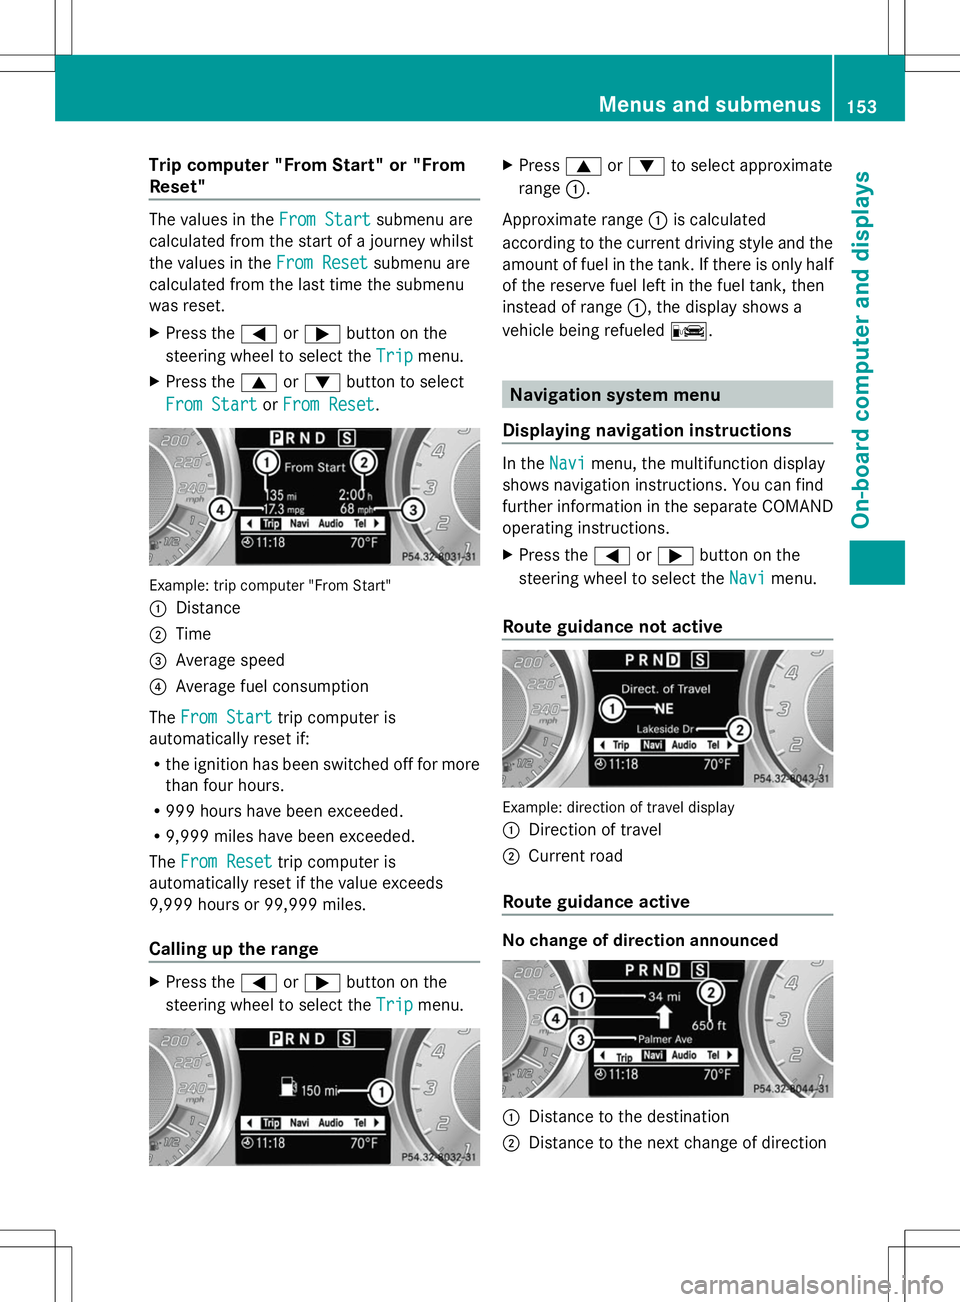
From Reset . Example: trip computer "From Start"
:
Distance
; Time
= Average speed
? Average fuel consumption
The From Start
From Start trip computer is
automatically reset if:
R the ignition has been switched off for more
than four hours.
R 999 hours have been exceeded.
R 9,999 miles have been exceeded.
The From Reset
From Reset trip computer is
automatically reset if the value exceeds
9,999 hours or 99,999 miles.
Calling up the range X
Press the =or; button on the
steering wheel to select the Trip Tripmenu. X
Press 9or: to select approximate
range :.
Approximate range :is calculated
according to the current driving style and the
amount of fuel in the tank. If there is only half
of the reserve fuel left in the fuel tank, then
instead of range :, the display shows a
vehicle being refueled C. Navigation system menu
Displaying navigation instructions In the
Navi Navimenu, the multifunction display
shows navigation instructions. You can find
further information in the separate COMAND
operating instructions.
X Press the =or; button on the
steering wheel to select the Navi Navimenu.
Route guidance not active Example: direction of travel display
:
Direction of travel
; Current road
Route guidance active No change of direction announced
:
Distance to the destination
; Distance to the next change of direction Menus and submenus
153On-board computer and displays Z
Page 162 of 292
Convenience
Activating/deactivating the EASY-
ENTRY/EXIT feature
G
WARNING
When the EASY-ENTRY/EXIT feature adjusts
the steering wheel, you and other vehicle
occupants – particularly children – could
become trapped. There is a risk of injury.
While the EASY-ENTRY/EXIT feature is
making adjustments, make sure that no one
has any body parts in the sweep of the
steering wheel.
If somebody becomes trapped:
R press one of the memory function position
buttons, or
R move the switch for steering wheel
adjustment in the opposite direction to that
in which the steering wheel is moving.
The adjustment process is stopped.
You can use the Easy EasyEntry/Exit:
Entry/Exit: function
to activate or deactivate the EASY-ENTRY/
EXIT feature (Y page 89).
X Press the =or; button on the
steering wheel to select the Settings
Settings
menu.
X Press the :or9 button to select the
Convenience Convenience submenu.
X Press ato confirm.
X Press the :or9 button to select the
Easy Entry/Exit
Easy Entry/Exit function.
You will see the selected setting: Enabled
Enabled
or Disabled
Disabled .
X Press the abutton to save the setting.
Switching the fold-in mirrors with the
locking feature on/off
If you switch on the Fold
Fold Mirrors
Mirrors in
inwhen
when
Locking
Locking function, the exterior mirrors fold in
when you lock the vehicle. If you unlock the
vehicle and then open the driver's or front-
passenger door, the exterior mirrors fold out
again. If you have switched the function on and you
fold the exterior mirrors in using the button
on the door (Y
page 91), they will not fold out
automatically. The exterior mirrors can then
only be folded out using the button on the
door.
X Press the =or; button on the
steering wheel to select the Settings Settings
menu.
X Press the :or9 button to select the
CONVENIENCE
CONVENIENCE submenu.
X Press ato confirm.
X Press the :or9 button to select the
Fold Mirrors in when Locking
Fold Mirrors in when Locking
function.
You will see the selected setting: Enabled Enabled
or Disabled
Disabled .
X Press the abutton to save the setting.
Restoring the factory settings For safety reasons, the
Lights:
Lights:function in
the LIGHTS
LIGHTS submenu is only reset if the
vehicle is stationary.
X Press the =or; button on the
steering wheel to select the Settings Settings
menu.
X Press the :or9 button to select the
Factory Settings
Factory Settings submenu.
X Press ato confirm.
The Reset All Settings?
Reset All Settings? message
appears.
X Press the :or9 button to select
Yes
Yes orNo
No.
X Press the abutton to confirm the
selection.
If you have selected Yes Yes, the multifunction
display shows a confirmation message. 160
Menus and submenusOn-board computer and displays
Page 164 of 292
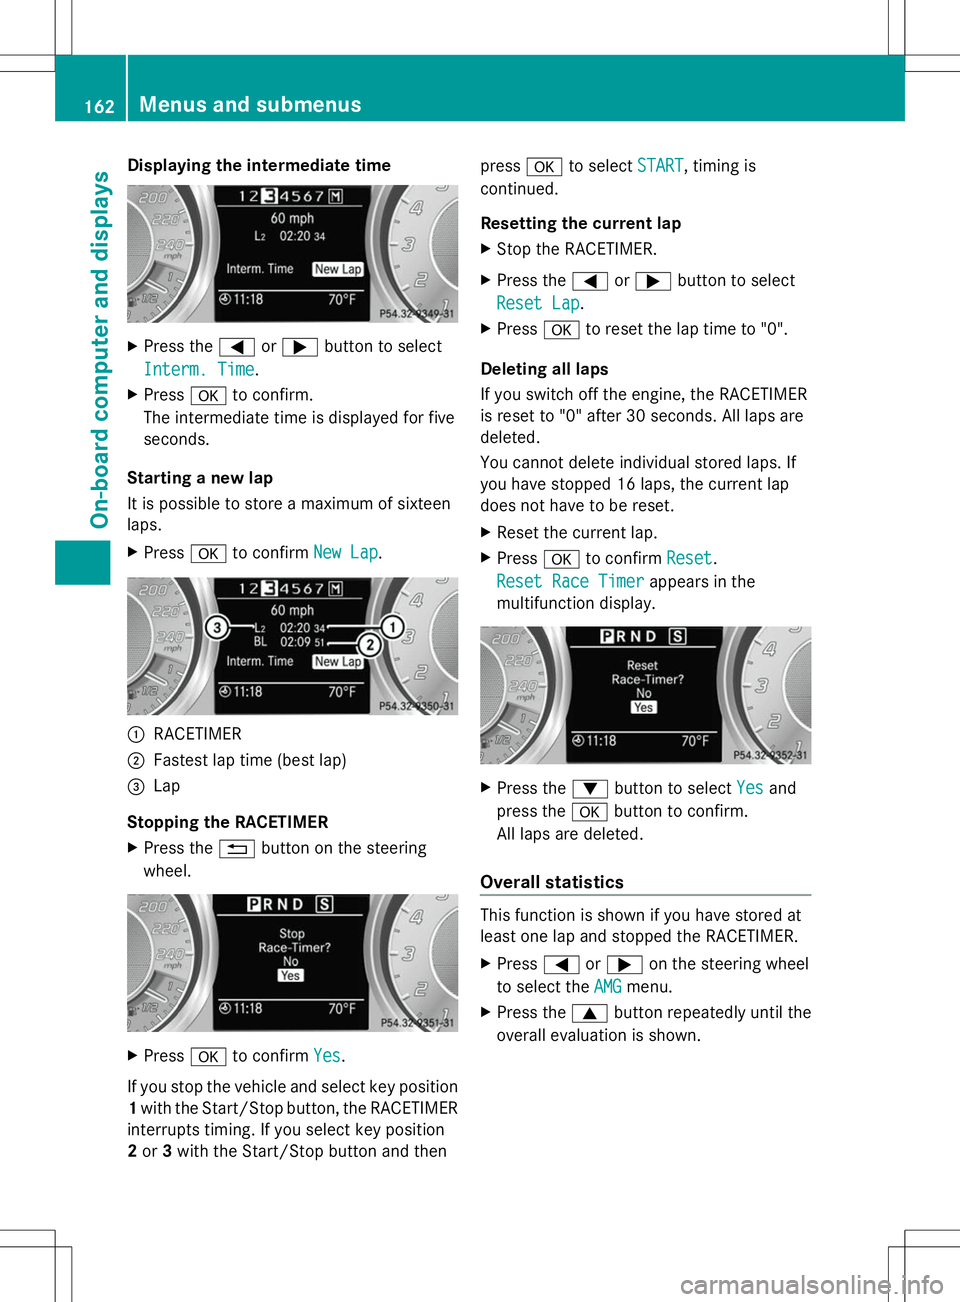
Displaying the intermediate time
X
Press the =or; button to select
Interm. Time Interm. Time.
X Press ato confirm.
The intermediate time is displayed for five
seconds.
Starting a new lap
It is possible to store a maximum of sixteen
laps.
X Press ato confirm New Lap New Lap. :
RACETIMER
; Fastest lap time (best lap)
= Lap
Stopping the RACETIMER
X Press the %button on the steering
wheel. X
Press ato confirm Yes Yes.
If you stop the vehicle and select key position
1 with the Start/Stop button, the RACETIMER
interrupts timing. If you select key position
2 or 3with the Start/Stop button and then press
ato select START
START , timing is
continued.
Resetting the current lap
X Stop the RACETIMER.
X Press the =or; button to select
Reset Lap Reset Lap .
X Press ato reset the lap time to "0".
Deleting all laps
If you switch off the engine, the RACETIMER
is reset to "0" after 30 seconds. All laps are
deleted.
You cannot delete individual stored laps. If
you have stopped 16 laps, the current lap
does not have to be reset.
X Reset the current lap.
X Press ato confirm Reset
Reset .
Reset Race Timer Reset Race Timer appears in the
multifunction display. X
Press the :button to select Yes
Yesand
press the abutton to confirm.
All laps are deleted.
Overall statistics This function is shown if you have stored at
least one lap and stopped the RACETIMER.
X Press =or; on the steering wheel
to select the AMG AMGmenu.
X Press the 9button repeatedly until the
overall evaluation is shown. 162
Menus and sub
menusOn-board computer and displays
Page 224 of 292
X
To open: pull cap:upwards by the tab.
X Add the premixed washer fluid.
X To close: press cap :onto the filler neck
until it engages.
If the washer fluid level drops below the
recommended minimum of 1 liter, a message
appears in the multifunction display
prompting you to add washer fluid
(Y page 185).
Further information on windshield washer
fluid/antifreeze (Y page 284).Maintenance
Service interval display
Service messages Information on the type of service and service
intervals (see the separate Maintenance
Booklet).
You can obtain further information from an
authorized Mercedes-Benz Center or at
http://www.mbusa.com (USA only).
The service interval message informs you of
the next service due date.
If a service due date has been exceeded, you
also hear a warning tone.
The multifunction display shows a service
message for several seconds, e.g.:
Next Service A in .. days
Next Service A in .. days
Service A Due Service A Due
Service A Exceeded by .. days Service A Exceeded by .. days
The letter indicates which service is due. A A
stands for a minor service and B
Bfor a major
service. A number or another letter may be
displayed after the letter. This figure indicates
any necessary additional maintenance work
to be performed.
You can obtain further information from an
authorized Mercedes-Benz Center.
The service interval display does not take into
account any periods of time during which the
battery is disconnected. Maintaining the time-dependent service
schedule:
X
Note down the service due date displayed
in the multifunction display before
disconnecting the battery.
or
X After reconnecting the battery, subtract
the battery disconnection periods from the
service date shown on the display.
i The service interval display does not
provide any information regarding the
engine's oil level. Observe the notes on the
engine oil level (Y page 219).
Hiding a service message X
Press the %ora button on the
steering wheel.
Displaying service messages X
Switch on the ignition.
X Press the =or; button on the
steering wheel to select the Serv. Serv.menu.
X Press the 9or: button to select the
ASSYST PLUS
ASSYST PLUS submenu and confirm by
pressing the abutton.
The service due date appears in the
multifunction display.
Points to remember Resetting the service interval display
A qualified specialist workshop, e.g. an
authorized Mercedes-Benz Center, will reset
the service interval display after the
necessary service work has been carried out.
You can also obtain further information on
maintenance work, for example.
! If the service interval display has been
reset unintentionally, have the setting
corrected at a Mercedes-Benz Center.
Have service work carried out as described
in the Maintenance Booklet. This may
otherwise lead to increased wear and 222
MaintenanceMaintenance and care
Page 226 of 292
Start the engine using the SmartKey.. Move
the transmission to Nwith the E-SELECT
lever. Use the SmartKey to switch the
engine off again and then turn the
SmartKey to position 2. Make sure that you
then leave the SmartKey in position 2. You
may otherwise damage the vehicle, the
transmission or the car wash.
Check the transmission position in the
instrument cluster.
! Use the E-SELECT lever to shift the
transmission to Nbefore switching the
engine off. If you open the driver's or front-
passenger door, the transmission remains
in this position for up to 30 minutes if the
SmartKey is in the ignition, even if the
engine is switched off. If you do not shift
the transmission to Nusing the E-SELECT
lever beforehand, it shifts automatically to
parking position Pand locks the wheels if
the driver's or front-passenger door is
opened and the engine is switched off. This
may damage the vehicle, the transmission
or the car wash.
Observe the information on maneuvering
(Y page 131).
! Before driving into an automatic car wash,
make sure that it is suitable for the
dimensions of the vehicle. In particular,
make sure that:
R there is enough ground clearance
between the vehicle underbody and the
guide rails of the automatic car wash.
R the clearance width of the automatic car
wash is sufficient, particularly the width
of the guide rails.
R you enter the automatic car wash
straight and in the center of the guide
rails in order to avoid damaging the tires
or wheel rims.
Fold in the exterior mirrors before the
vehicle is washed. The exterior mirrors
could otherwise be damaged. !
Make sure that:
R the side windows and the roof are
completely closed
R the climate control blower is switched off
R the windshield wiper switch is at position
0
The vehicle could otherwise be damaged.
! In portal car washes, the windshield
wipers may be moved up the windshield by
the cleaning brushes when the ignition is
switched off.
Set the Start/Stop button to key position
2 to reset the windshield wipers to their
original position.
! Preferably use automatic car washes with
adjustable high-pressure pre-cleaning. This
corresponds with the specification for the
Cabriolet program. In car washes that use
high water pressures, there is a risk that a
small amount of water may leak into the
vehicle.
! Cabriolet: do not treat the vehicle with
hot wax under any circumstances.
After using an automatic car wash, wipe off
wax and drying agents from the windshield
and the wiper blades. This will prevent smears
and reduce wiping noises caused by residue
on the windshield.
Washing by hand In some countries, washing by hand is only
allowed at specially equipped washing bays.
Observe the legal requirements in each
country.
X
Do not use hot water and do not wash the
vehicle in direct sunlight.
X Use a soft sponge to clean.
X Use a mild cleaning agent, such as a car
shampoo approved by Mercedes-Benz.
X Thoroughly hose down the vehicle with a
gentle jet of water.
X Do not point the water jet directly towards
the air inlet. 224
CareMaintenance and care