2014 MERCEDES-BENZ SLS AMG ROADSTER headlamp
[x] Cancel search: headlampPage 101 of 292
only the turn signal lamp on the
corresponding side of the vehicle will flash.
X To switch off the hazard warning
lamps: press button :.
The hazard warning lamps switch off
automatically if the vehicle exceeds a speed
of 6 mph(10 km/h) again after a full brake
application.
i The hazard warning lamps still operate if
the ignition is switched off. Headlamp cleaning system
The headlamps are cleaned automatically if
the "Wipe with washer fluid" function is
operated five times (Y page 101) while the
lights are on and the engine is running. When
you switch off the ignition, the automatic
headlamp cleaning system is reset and
counting is resumed from 0. Headlamps fogged up on the inside
The headlamps may fog up on the inside if
there is high atmospheric humidity.
X Drive with the headlamps switched on.
The level of moisture diminishes,
depending on the length of the journey and
the weather conditions (humidity and
temperature).
If the level of moisture does not diminish:
X Have the headlamps checked at a qualified
specialist workshop. Interior lighting
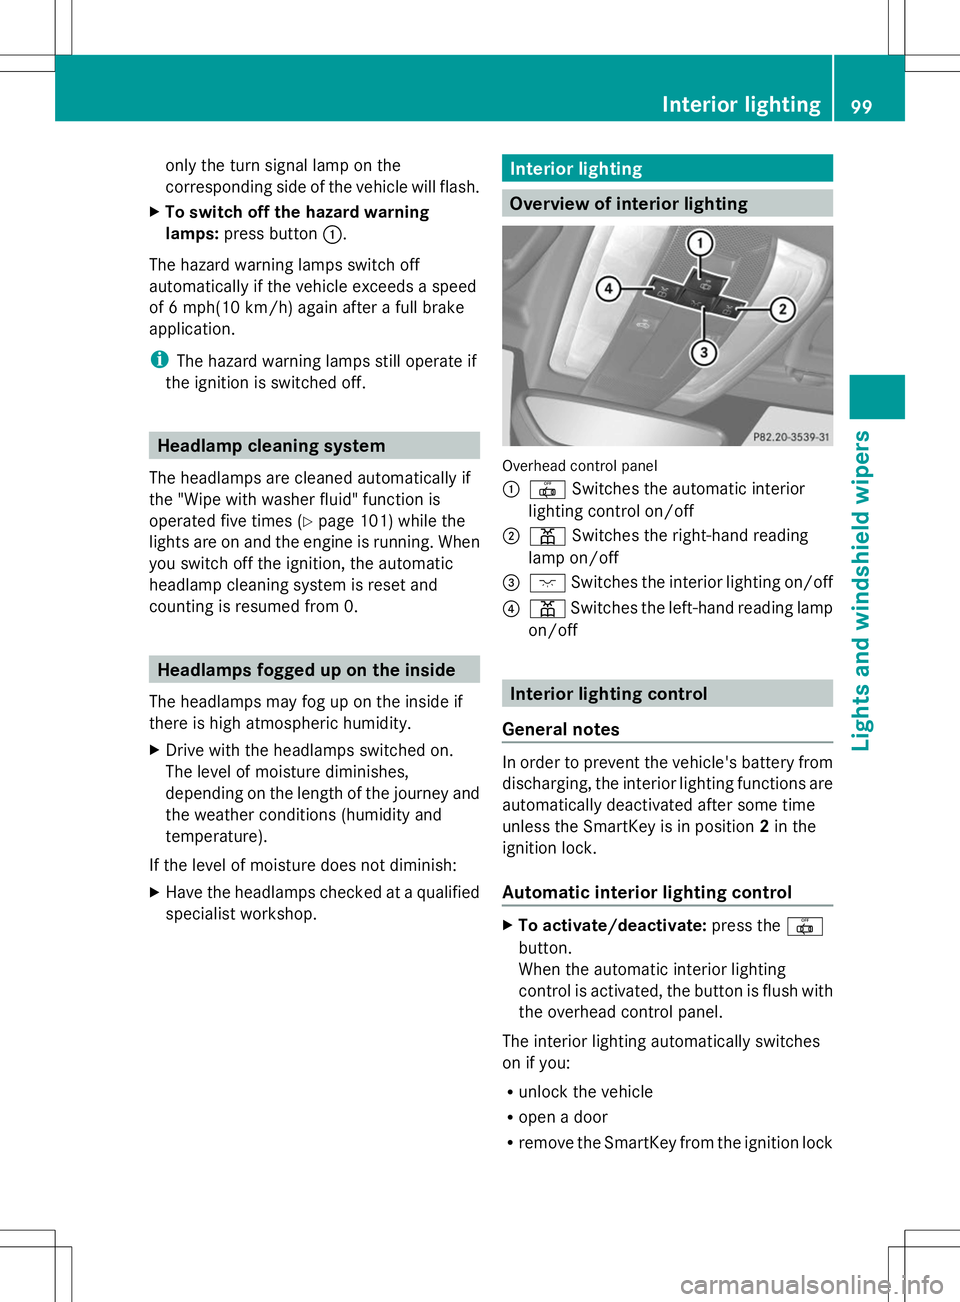
Overview of interior lighting
Overhead control panel
:
| Switches the automatic interior
lighting control on/off
; p Switches the right-hand reading
lamp on/off
= c Switches the interior lighting on/off
? p Switches the left-hand reading lamp
on/off Interior lighting control
General notes In order to prevent the vehicle's battery from
discharging, the interior lighting functions are
automatically deactivated after some time
unless the SmartKey is in position
2in the
ignition lock.
Automatic interior lighting control X
To activate/deactivate: press the|
button.
When the automatic interior lighting
control is activated, the button is flush with
the overhead control panel.
The interior lighting automatically switches
on if you:
R unlock the vehicle
R open a door
R remove the SmartKey from the ignition lock Interior lighting
99Lights and windshield wipers Z
Page 102 of 292
The interior light is activated for a short while
when the SmartKey is removed from the
ignition lock. You can activate this delayed
switch-off using the on-board computer
(Y page 159).
Manual interior lighting control X
To switch the interior lighting on/off:
press the cbutton.
X To switch the reading lamps on/off:
press the pbutton. Crash-responsive emergency lighting
The interior lighting is activated automatically
if the vehicle is involved in an accident.
X To switch off the crash-responsive
emergency lighting: press the hazard
warning lamp button.
or
X Lock and then unlock the vehicle using the
key. Replacing bulbs
Important safety notes
Xenon bulbs G
DANGER
Xenon bulbs carry a high voltage. You can get
an electric shock if you remove the cover of
the Xenon bulb and touch the electrical
contacts. There is a risk of fatal injury.
Never touch the parts or the electrical
contacts of the Xenon bulb. Always have work
on the Xenon bulbs carried out at a qualified
specialist workshop.
If your vehicle is equipped with Xenon bulbs,
you can recognize this by the following: the
cone of light from the Xenon bulbs moves
from the top to the bottom and back again
when you start the engine. For this to be observed, the lights must be switched on
before starting the engine.
Bulbs and lamps are an important aspect of
vehicle safety. You must therefore make sure
that these function correctly at all times.
Have the headlamp setting checked regularly.
Other bulbs
G
WARNING
Bulbs, lamps and connectors can get very hot
when operating. If you change a bulb, you
could burn yourself on these components.
There is a risk of injury.
Allow these components to cool down before
changing a bulb.
There are bulbs other than the Xenon bulbs
that you cannot replace. Replace only the
bulbs listed (Y page 101). Have the bulbs that
you cannot replace yourself changed at a
qualified specialist workshop.
If you require assistance changing bulbs,
consult a qualified specialist workshop.
Do not touch the glass tube of new bulbs with
your bare hands. Even minor contamination
can burn into the glass surface and reduce
the service life of the bulbs. Always use a lint-
free cloth or only touch the base of the bulb
when installing.
Only use bulbs of the correct type.
If the new bulb still does not light up, consult
a qualified specialist workshop.
Bulbs and lamps are an important aspect of
vehicle safety. You must therefore make sure
that these function correctly at all times.
Have the headlamp setting checked regularly. Changing the front bulbs
You cannot replace the bulbs at the front
yourself. Contact a qualified specialist
workshop which has the necessary specialist
knowledge and tools to carry out the work
required. Mercedes-Benz recommends that 100
Replacing bulbsLights and windshield wipers
Page 160 of 292
X
Press the =or; button on the
steering wheel to select the Settings
Settings
menu.
X Press the :or9 button to select the
INST. CLUSTER
INST. CLUSTER submenu.
X Press ato confirm.
X Press the :or9 button to select the
Display Unit Speed-/Odometer:
Display Unit Speed-/Odometer:
function.
You will see the selected setting: km kmor
miles
miles .
X Press the abutton to save the setting.
Permanent display for outside
temperature or additional speedometer
The Permanent Display: Outside Permanent Display: Outside
Temperature/Speedometer
Temperature/Speedometer allows you to
choose whether the multifunction display
shows the outside temperature or the speed
at the bottom right. The unit used in the
additional speedometer depends on the
display unit set (Y page 157).
X Press the =or; button on the
steering wheel to select the Settings
Settings
menu.
X Press the :or9 button to select the
Inst. cluster
Inst. cluster submenu.
X Press ato confirm.
X Press the :or9 button to select the
Permanent Display
Permanent Display function.
You will see the selected setting
Speedometer [km/h] Speedometer [km/h] orSpeedometer
Speedometer
[mph]
[mph] orOutside Temperature
Outside Temperature.
X Press the abutton to save the setting.
Lights Switching the daytime running lamps on/
off
This function is not available in Canada.
If you have activated the Lights:
Lights: function
and the light switch is in the Ãposition,
the daytime running lamps are switched on
automatically when the engine is running. If it is dark, the low-beam headlamps switch on
automatically.
In the dark, the following also light up:
R
the low-beam headlamps
R the standing lamps
R the tail lamps
R the license plate lamp
R the side marker lamps
X Press the =or; button on the
steering wheel to select the Settings
Settings
menu.
X Press the :or9 button to select the
LIGHTS LIGHTS submenu.
X Press ato confirm.
X Press the :or9 button to select the
Lights:
Lights: function.
You will see the selected setting: Enabled
Enabled
or Disabled
Disabled .
X Press the abutton to save the setting.
Setting the brightness for the display and
switches
You can use the Brightness Display/ Brightness Display/
Switches:
Switches: function to set the brightness of
the multifunction display and the switches in
the vehicle.
X Press the =or; button on the
steering wheel to select the Settings Settings
menu.
X Press the :or9 button to select the
LIGHTS
LIGHTS submenu.
X Press ato confirm.
X Press the :or9 button to select the
Brightness Display/Switches:
Brightness Display/Switches:
function.
You see the selected setting Level Levelwith a
value of between 0 and 100.
X Press the abutton to save the setting.
X Press the :or9 button to increase
or decrease the brightness. 158
Menus and submenusOn-board computer and displays
Page 161 of 292
Activating/deactivating surround
lighting and exterior lighting delayed
switch-off
The Locator Locator Lighting:
Lighting: function allows you
to set whether the exterior lighting should
come on when it is dark:
R for 40 seconds after unlocking the vehicle
with the key.
The exterior lighting switches off if you
open the driver’s door.
R for 15 seconds after switching off the
engine and closing the doors.
If the engine is switched off and no doors
are opened, or if an open door is not closed,
the exterior lighting goes out after
60 seconds.
If you activate the Locator Lighting:
Locator Lighting:
function, the following light up:
R the parking lamps
R the low-beam headlamps
R the license plate lamp
R the surround lighting in the exterior mirrors
X Press the =or; button on the
steering wheel to select the Settings
Settings
menu.
X Press the :or9 button to select the
LIGHTS
LIGHTS submenu.
X Press ato confirm.
X Press the :or9 button to select the
Locator Lighting:
Locator Lighting: function.
You will see the selected setting: Enabled Enabled
or Disabled
Disabled .
X Press the abutton to save the setting.
Deactivating the delayed switch-off
temporarily:
X Select key position 0with the Start/Stop
button before leaving the vehicle.
X Select key position 2and then key position
0 again with the Start/Stop button
The delayed shut-off is deactivated.
The delayed shut-off is reactivated the next
time you start the engine. Activating/deactivating the interior
lighting delayed switch-off
If you select key position
0with the Start/
Stop button when the Light. delay
Light. delay
function is activated, the interior lighting
lights up for approximately 20 seconds if it is
dark.
X Press the =or; button on the
steering wheel to select the Settings Settings
menu.
X Press the :or9 button to select the
Light
Light submenu.
X Press ato confirm.
X Press the :or9 button to select the
Light. delay
Light. delay function.
You will see the selected setting: on
onor
off
off .
X Press the abutton to save the setting.
Vehicle Activating/deactivating the automatic
door locking mechanism
If you select the
Automatic Door Lock: Automatic Door Lock:
function, the vehicle is centrally locked above
a speed of around 9 mph(15 km/h).
i For further information on the automatic
locking feature, see (Y page 70).
X Press the =or; button on the
steering wheel to select the Settings Settings
menu.
X Press the :or9 button to select the
Vehicle
Vehicle submenu.
X Press the abutton to confirm.
X Press the :or9 button to select the
Automatic door locks
Automatic door locks function.
You will see the selected setting: Enabled Enabled
or Disabled
Disabled .
X Press the abutton to save the setting. Menus and submenus
159On-board computer and displays Z
Page 176 of 292

Display messages Possible causes/consequences and
M
MSolutions b
Check Check
Left
LeftLow
LowBeam
Beam
or
Check Right Low Check Right Low
Beam Beam The left or right-hand low-beam headlamp does not light up. In
addition, the high-beam headlamp is also inoperative.
X
Visit a qualified specialist workshop. b
AUTO AUTO
Lamp
LampFunction
Function
Inoperative
Inoperative The light sensor is defective.
USA only:
X
Switch off the daytime running lamps in the on-board computer
(Y page 158).
X Switch the lights on and off using the light switch. b
Check Rear Left Check Rear Left
Turn Signal Turn Signal
or
Check Rear Right Check Rear Right
Turn Signal Turn Signal The LEDs in the rear left or right-hand indicator lamp do not light
up.
X
Visit a qualified specialist workshop. b
Check Left Mirror Check Left Mirror
Turn Signal Turn Signal
or
Check Check
Right
RightMirror
Mirror
Turn Signal
Turn Signal None of the LEDs in the left or right-hand exterior mirrors light up.
X
Visit a qualified specialist workshop. b
Check Front Left Check Front Left
Turn Signal Turn Signal
or
Check Front Right Check Front Right
Turn Signal Turn Signal The LEDs in the front left or right-hand indicator lamp do not light
up.
X
Visit a qualified specialist workshop. b
Check Check
Center
Center Brake
Brake
Lamp
Lamp None of the LEDs in the high-mounted brake lamp light up.
X
Visit a qualified specialist workshop. 174
Display
messagesOn-board computer and displays
Page 177 of 292
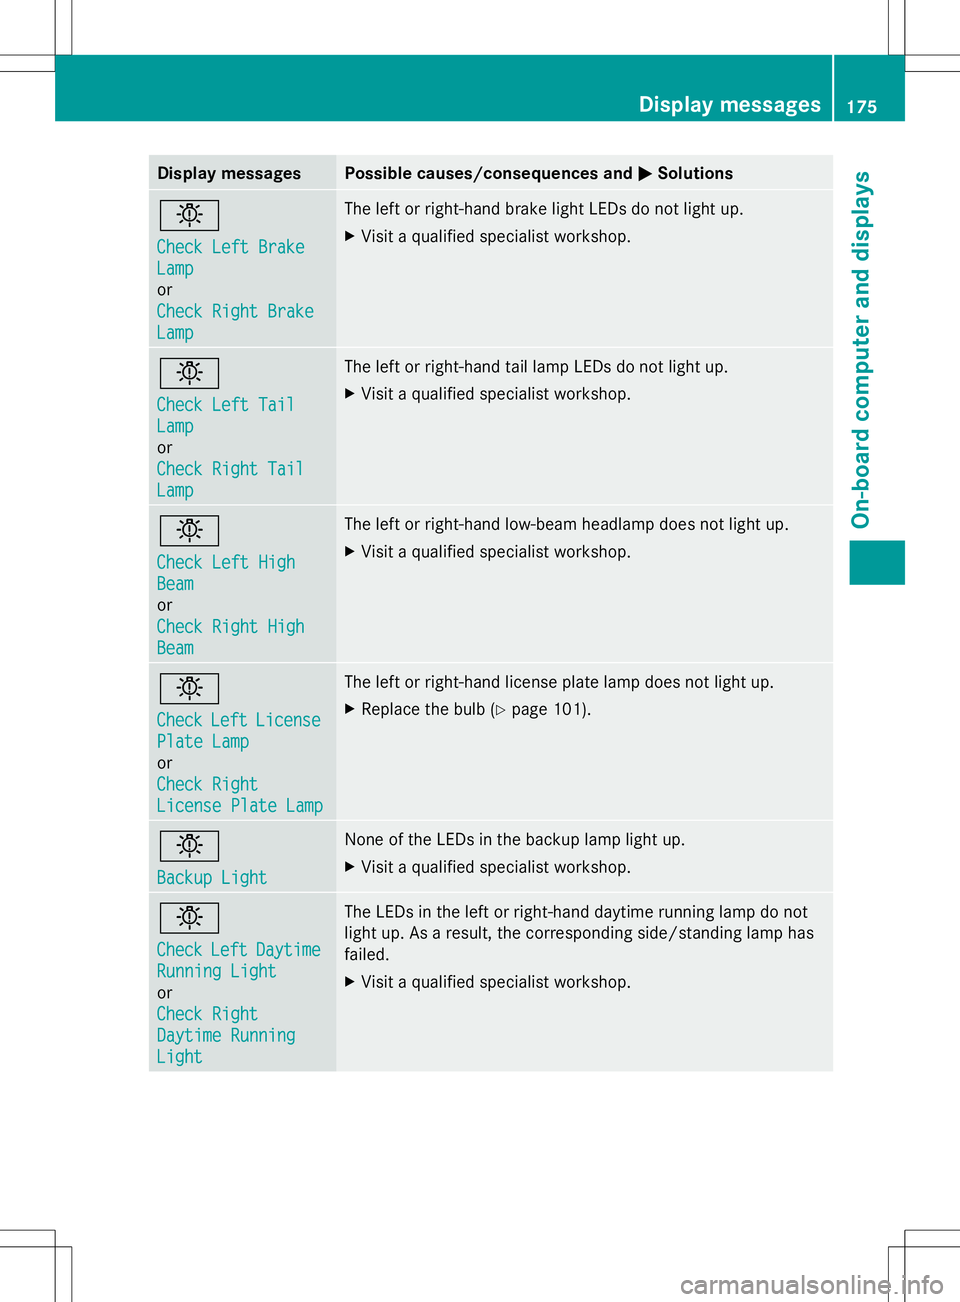
Display messages Possible causes/consequences and
M
MSolutions b
Check Left Brake Check Left Brake
Lamp Lamp
or
Check Right Brake Check Right Brake
Lamp Lamp The left or right-hand brake light LEDs do not light up.
X
Visit a qualified specialist workshop. b
Check Left Tail Check Left Tail
Lamp Lamp
or
Check Right Tail Check Right Tail
Lamp Lamp The left or right-hand tail lamp LEDs do not light up.
X
Visit a qualified specialist workshop. b
Check Left High Check Left High
Beam Beam
or
Check Right High Check Right High
Beam Beam The left or right-hand low-beam headlamp does not light up.
X
Visit a qualified specialist workshop. b
Check Check
Left
LeftLicense
License
Plate Lamp
Plate Lamp
or
Check Right Check Right
License Plate Lamp License Plate Lamp The left or right-hand license plate lamp does not light up.
X
Replace the bulb (Y page 101). b
Backup Light Backup Light None of the LEDs in the backup lamp light up.
X
Visit a qualified specialist workshop. b
Check Check
Left
LeftDaytime
Daytime
Running Light
Running Light
or
Check Right Check Right
Daytime Running Daytime Running
Light Light The LEDs in the left or right-hand daytime running lamp do not
light up. As a result, the corresponding side/standing lamp has
failed.
X
Visit a qualified specialist workshop. Display
messages
175On-board computer and displays Z
Page 223 of 292
G
WARNING
The engine cooling system is pressurized,
particularly when the engine is warm. When
opening the cap, you could be scalded by hot
coolant spraying out. There is a risk of injury.
Let the engine cool down before opening the
cap. Wear eye and hand protection when
opening the cap. Open the cap slowly half a
turn to allow pressure to escape.
Only check the coolant level when the vehicle
is on a level surface and the engine has cooled
down.
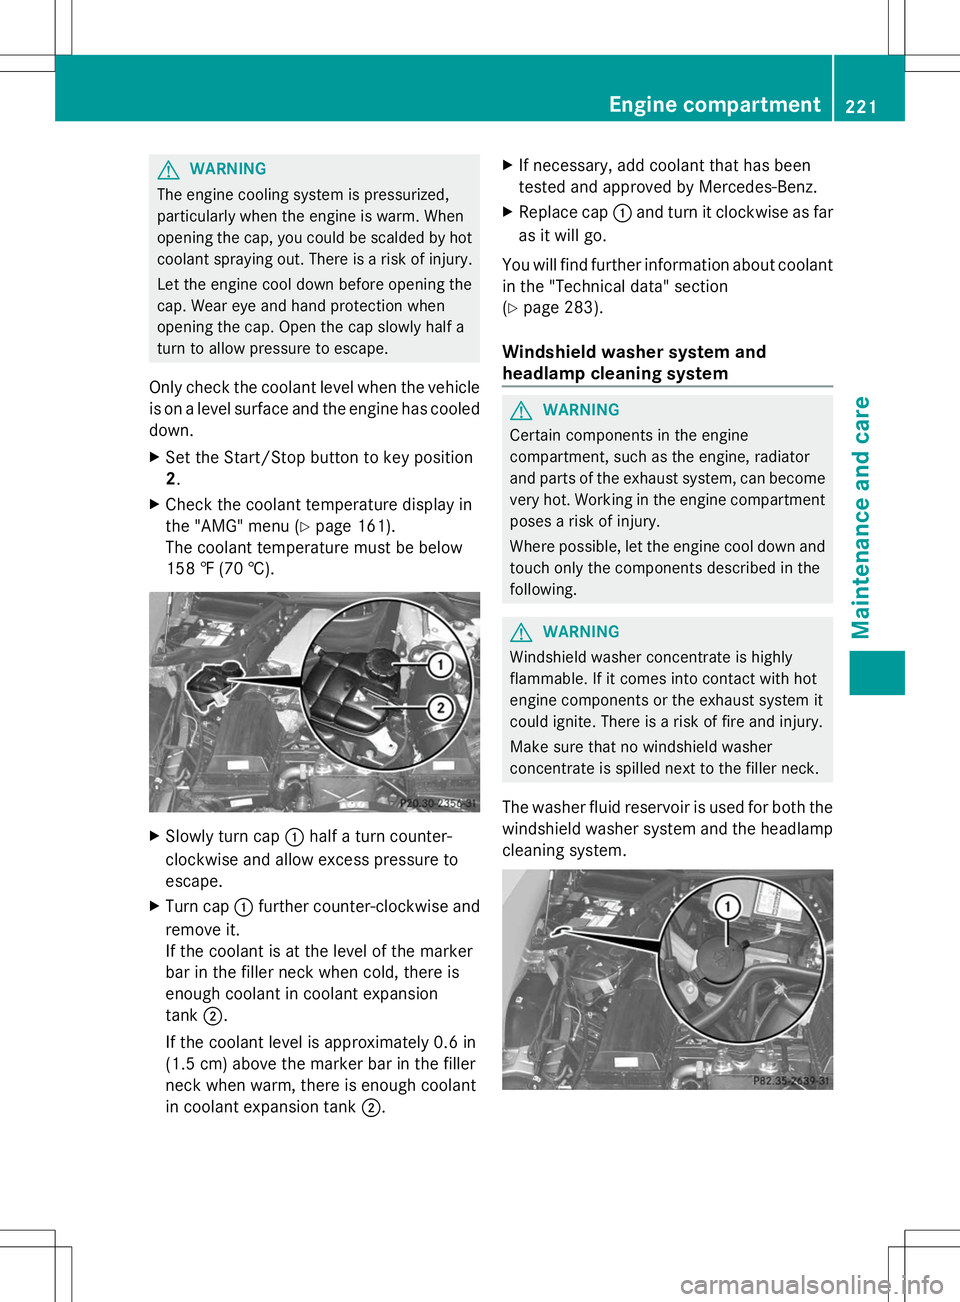
X Set the Start/Stop button to key position
2.
X Check the coolant temperature display in
the "AMG" menu (Y page 161).
The coolant temperature must be below
158 ‡ (70 †). X
Slowly turn cap :half a turn counter-
clockwise and allow excess pressure to
escape.
X Turn cap :further counter-clockwise and
remove it.
If the coolant is at the level of the marker
bar in the filler neck when cold, there is
enough coolant in coolant expansion
tank ;.
If the coolant level is approximately 0.6 in
(1.5 cm) above the marker bar in the filler
neck when warm, there is enough coolant
in coolant expansion tank ;.X
If necessary, add coolant that has been
tested and approved by Mercedes-Benz.
X Replace cap :and turn it clockwise as far
as it will go.
You will find further information about coolant
in the "Technical data" section
(Y page 283).
Windshield washer system and
headlamp cleaning system G
WARNING
Certain components in the engine
compartment, such as the engine, radiator
and parts of the exhaust system, can become
very hot. Working in the engine compartment
poses a risk of injury.
Where possible, let the engine cool down and
touch only the components described in the
following. G
WARNING
Windshield washer concentrate is highly
flammable. If it comes into contact with hot
engine components or the exhaust system it
could ignite. There is a risk of fire and injury.
Make sure that no windshield washer
concentrate is spilled next to the filler neck.
The washer fluid reservoir is used for both the
windshield washer system and the headlamp
cleaning system. Engine compartment
221Maintenance and care Z
Page 286 of 292
Comply with the important safety precautions
for service products when handling coolant
(Y
page 279).
The coolant is a mixture of water and
antifreeze/corrosion inhibitor. It performs
the following tasks:
R corrosion protection
R antifreeze protection
R raising the boiling point
If the coolant has antifreeze protection down
to -35 ‡ (-37 †), the boiling point of the
coolant during operation is approximately
266 ‡ (130 †).
The antifreeze/corrosion inhibitor
concentration in the engine cooling system
should:
R be at least 50%. This will protect the engine
cooling system against freezing down to
approximately -35 ‡ (-37 †).
R not exceed 55% (antifreeze protection
down to -49 ‡ [-45 †]). Otherwise, heat
will not be dissipated as effectively.
If the vehicle has lost coolant, add equal
amounts of water and antifreeze/corrosion
inhibitor. Mercedes-Benz recommends an
antifreeze/corrosion inhibitor concentrate in
accordance with MB Specifications for
Service Products 310.1.
The coolant is checked with every
maintenance interval at a qualified specialist
workshop.
i When the vehicle is first delivered, it is
filled with a coolant mixture that ensures
adequate antifreeze and corrosion
protection. Windshield/headlamp cleaning
system
Important safety notes !
Only use washer fluid that is suitable for
plastic lamp lenses, e.g. MB SummerFit or
MB WinterFit. Unsuitable washer fluid could damage the plastic lenses of the
headlamps.
! Do not add distilled or de-ionized water to
the washer fluid container. Otherwise, the
level sensor may be damaged.
! Only MB SummerFit and MB WinterFit
washer fluid should be mixed together. The
spray nozzles may otherwise become
blocked.
At temperatures above freezing:
X Fill the washer fluid reservoir with a mixture
of water and windshield washer fluid, e.g.
MB SummerFit.
Add 1 part MB SummerFit to 100 parts water.
At temperatures below freezing:
X Fill the washer fluid reservoir with a mixture
of water and windshield washer fluid, e.g.
MB WinterFit.
Adapt the mixing ratio to the outside
temperature.
R Down to 14 ‡ (Ò10 †): mix 1 part MB
WinterFit to 2 parts water.
R Down to Ò4 ‡ (Ò20 †): mix 1 part MB
WinterFit to 1 part water.
R Down to Ò20.2 ‡ (Ò29 †): mix 2 parts MB
WinterFit to 1 part water.
i Add windshield washer fluid, e.g. MB
SummerFit or MB WinterFit, to the washer
fluid all year round.
Filling capacities Model Capacity
All models
7.4 US qt (7.0 l)
Vehicle data, Coupe
Dimensions and weights
The data stated here specifically refers to a
vehicle with standard equipment. Consult an 284
Vehicle data, CoupeTechnical data