2014 MERCEDES-BENZ SLK ROADSTER window
[x] Cancel search: windowPage 138 of 357
When opening, make sure that nobody is
touching the side window. If someone
becomes trapped, press the Wswitch
immediately to open/close the side window
in the door. The side window stops. To con-
tinue closing the side window, pull on the
W switch.
X Convenience closing feature: press and
hold the gbutton until the side win-
dows are closed.
The indicator lamp in the gbutton lights
up. Air-recirculation mode is activated.
If parts of the body are in the closing area
during convenience closing, proceed as fol-
lows:
X Press the Wbutton for opening/closing
the side windows.
The side window stops.
X To then open the side window, press the
W button again.
i Notes on the reversing feature for the side
windows (Y page 83).
X Convenience opening feature: press and
hold the gbutton until the side win-
dows are opened. The side windows move
back to their original positions.
The indicator lamp in the gbutton goes
out. Air-recirculation mode is deactivated.
i If you open the side windows manually
after closing them with the convenience
closing feature, they will remain in this posi- tion when opened using the convenience
opening feature. Activating/deactivating the residual
heat function
General notes It is possible to make use of the residual heat
of the engine to continue heating the station- ary vehicle for up to 30 minutesafter the
engine has been switched off. The heating
time depends on the temperature that has
been set for the vehicle interior. Depending on the equipment level, the con-
trol panel has either the
Ìbutton or the
Á button.
Activating/deactivating X
Turn the key to position 0in the ignition
lock or remove it (Y page 141).
X To switch on: press theÌorÁ but-
ton.
The indicator lamp in the ÌorÁ
button lights up.
i The blower will run at a low speed regard-
less of the airflow setting.
i If you activate the residual heat function
at high temperatures, only the ventilation
will be activated. The blower runs at
medium speed.
X To switch off: press theÌorÁ
button.
The indicator lamp in the ÌorÁ
button goes out.
Residual heat is deactivated automatically: R after approximately 30 minutes
R when the ignition is switched on
R if the battery voltage drops Adjusting the air vents
Important safety notes
G
WARNING
Very hot or very cold air can flow from the air vents. This could result in burns or frostbite in the immediate vicinity of the air vents. There
is a risk of injury.
Make sure that all vehicle occupants always
maintain a sufficient distance to the air out-
lets. If necessary, redirect the airflow to
another area of the vehicle interior. G
WARNING
When AIRSCARF is switched on, very hot air
can flow from the vents in the head restraints. Adjusting the air vents
135Climate control
Z
Page 139 of 357
This could result in burns in the immediate
vicinity of the air vents. There is a risk of injury.
Reduce the heater output before it becomes
too hot.
In order to ensure the direct flow of fresh air
through the air vents into the vehicle interior, please observe the following notes:
R keep the air inlet grille on the bonnet and in
the engine compartment on the front-
passenger side free of blockages, such as
ice, snow or leaves.
R never cover the vents or ventilation grilles
in the vehicle interior.
i You can move the adjusters for the air
vents vertically or horizontally to set the
direction of the airflow.
i Optimal climate control function is ach-
ieved by opening the air vents fully and set- ting the adjusters to the middle position. Setting the centre air vents
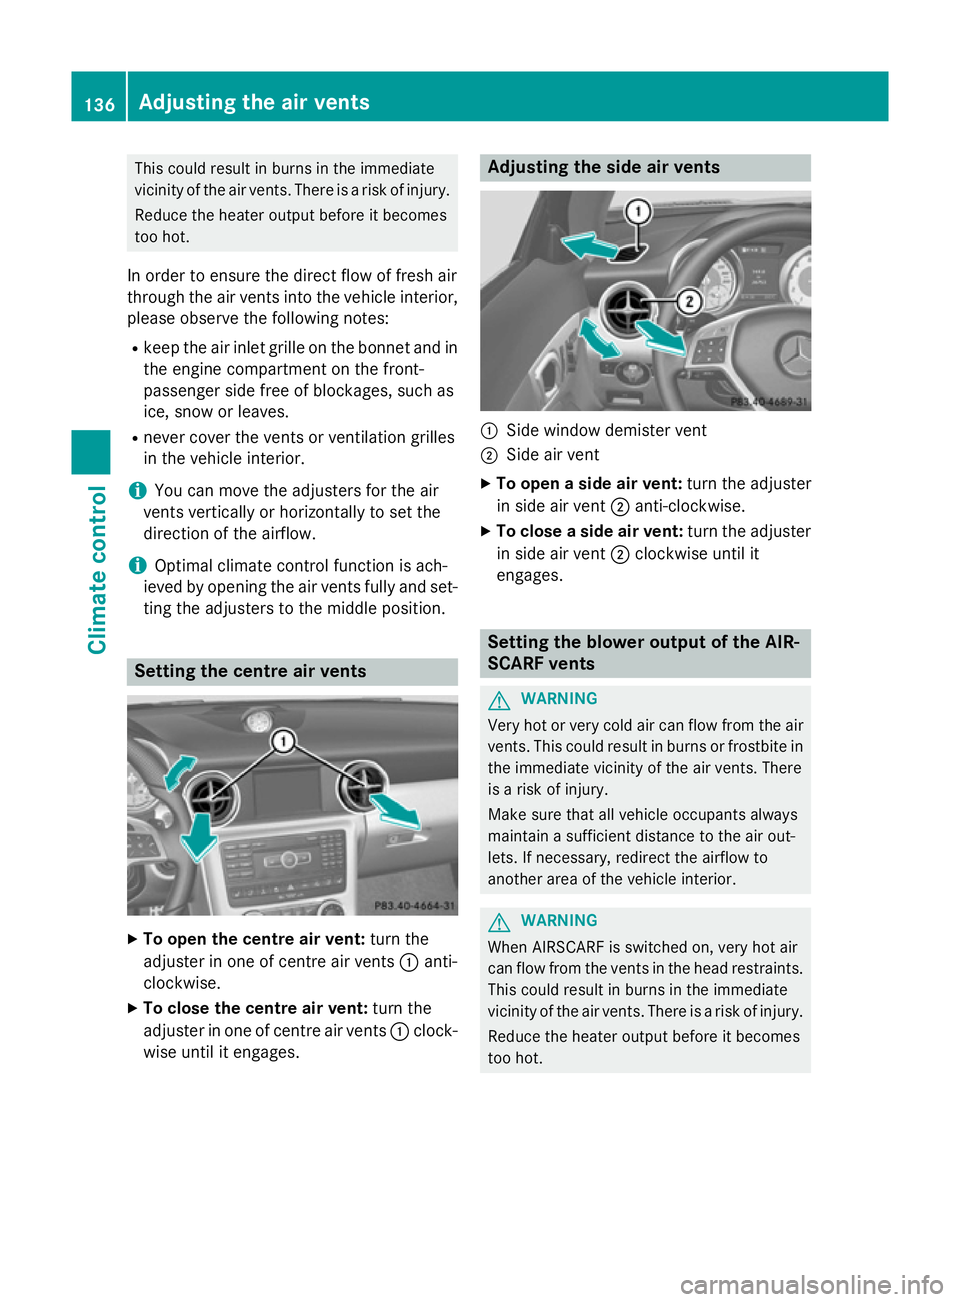
X
To open the centre air vent: turn the
adjuster in one of centre air vents :anti-
clockwise.
X To close the centre air vent: turn the
adjuster in one of centre air vents :clock-
wise until it engages. Adjusting the side air vents
:
Side window demister vent
; Side air vent
X To open a side air vent: turn the adjuster
in side air vent ;anti-clockwise.
X To close a side air vent: turn the adjuster
in side air vent ;clockwise until it
engages. Setting the blower output of the AIR-
SCARF vents
G
WARNING
Very hot or very cold air can flow from the air vents. This could result in burns or frostbite in the immediate vicinity of the air vents. There
is a risk of injury.
Make sure that all vehicle occupants always
maintain a sufficient distance to the air out-
lets. If necessary, redirect the airflow to
another area of the vehicle interior. G
WARNING
When AIRSCARF is switched on, very hot air
can flow from the vents in the head restraints. This could result in burns in the immediate
vicinity of the air vents. There is a risk of injury.
Reduce the heater output before it becomes
too hot. 136
Adjusting the air ventsClimate control
Page 171 of 357
Driving on flooded roads
!
Bear in mind that vehicles travelling in
front or in the opposite direction create
waves. This may cause the maximum per-
missible water depth to be exceeded.
These notes must be observed under all
circumstances. You could otherwise dam-
age the engine, the electronics or the trans- mission.
If you must drive on stretches of road on
which water has collected, please bear in
mind that:
R the maximum permissible fording depth in
still water is 12 cm
R you should drive no faster than walking
pace Winter driving
G
WARNING
If you shift down on a slippery road surface in an attempt to increase the engine's braking
effect, the drive wheels could lose their grip.
This increases the risk of skidding and having
an accident.
Do not shift down for additional engine brak-
ing on a slippery road surface. G
DANGER
If the exhaust pipe is blocked or adequate
ventilation is not possible, poisonous gases
such as carbon monoxide (CO) may enter the vehicle. This is the case, e.g. if the vehicle
becomes trapped in snow. There is a risk of
fatal injury.
If you leave the engine or the auxiliary heating
running, make sure the exhaust pipe and area
around the vehicle are clear of snow. To
ensure an adequate supply of fresh air, open a window on the side of the vehicle that is not
facing into the wind.
Have your vehicle winterproofed at a qualified specialist workshop at the onset of winter. You should drive particularly carefully on slip-
pery road surfaces. Avoid sudden accelera-
tion, steering and braking manoeuvres. Do
not use cruise control.
If the vehicle threatens to skid or cannot be
stopped when moving at low speed:
X Vehicles with manual transmission:
shift to neutral.
X Vehicles with automatic transmission:
shift the transmission to position N.
X Try to bring the vehicle under control by
using corrective steering.
The outside temperature indicator is not
designed to serve as an ice-warning device
and is therefore unsuitable for that purpose.
Changes in the outside temperature are dis-
played after a short delay.
Indicated temperatures just above the freez-
ing point do not guarantee that the road sur-
face is free of ice. The road may still be icy,
especially in wooded areas or on bridges. The
vehicle could skid if you fail to adapt your
driving style. Always adapt your driving style
and drive at a speed to suit the prevailing
weather conditions.
You should pay special attention to road con- ditions when temperatures are around the
freezing point.
Further information on driving with snow
chains, see (Y page 317).
For more information on driving with summer tyres, see (Y page 316).
Observe the notes in the "Winter operation"
section (Y page 316). Driving systems
Cruise control
General notes Cruise control maintains a constant road
speed for you. It brakes automatically in order
to avoid exceeding the set speed. On long and
steep downhill gradients, especially if the
vehicle is laden, you must select a lower gear 168
Driving syste
msDriving and parking
Page 234 of 357
Display messages
Possible causes/consequences and
M
MSolutions 6
Front Front
left
leftmalfunc‐
malfunc‐
tion Consult work‐
tion Consult work‐
shop shopor Front right
Front right
malfunction Con‐
malfunction Con‐
sult workshop sult workshop The restraint system has malfunctioned at the front on the left or
right. The 6warning lamp also lights up in the instrument clus-
ter.
G WARNING
The airbags or belt tensioners may either be triggered uninten-
tionally or, in the event of an accident, may not be triggered.
This poses an increased risk of injury. X Visit a qualified specialist workshop. 6
Left Left
windowbag
windowbag mal‐
mal‐
function Consult
function Consult
workshop workshoporRight Right
windowbag malfunc‐
windowbag malfunc‐
tion Consult work‐ tion Consult work‐
shop shop There is a malfunction in the left-hand and/or right-hand headbag.
The 6 warning lamp also lights up in the instrument cluster.
G WARNING
The left or right headbag may either be triggered unintentionally or,
in the event of an accident, may not be triggered.
This poses an increased risk of injury.
X Visit a qualified specialist workshop. Lights
i Display messages about LEDs:
This display message will only appear if all the LEDs have failed. Display messages
Possible causes/consequences and
M
MSolutions b
Left cornering Left cornering
light light
orRight cor‐
Right cor‐
nering light
nering light The left or right-hand cornering light is faulty.
X Check whether you are permitted to replace the bulb yourself
(Y page 118).
or
X Visit a qualified specialist workshop. b
Left dipped beam Left dipped beam
or
Right dipped Right dipped
beam
beam The left or right-hand dipped-beam headlamp is faulty.
X Check whether you are permitted to replace the bulb yourself
(Y page 118).
or
X Visit a qualified specialist workshop. Display
messages
231On-board computer and displays Z
Page 239 of 357
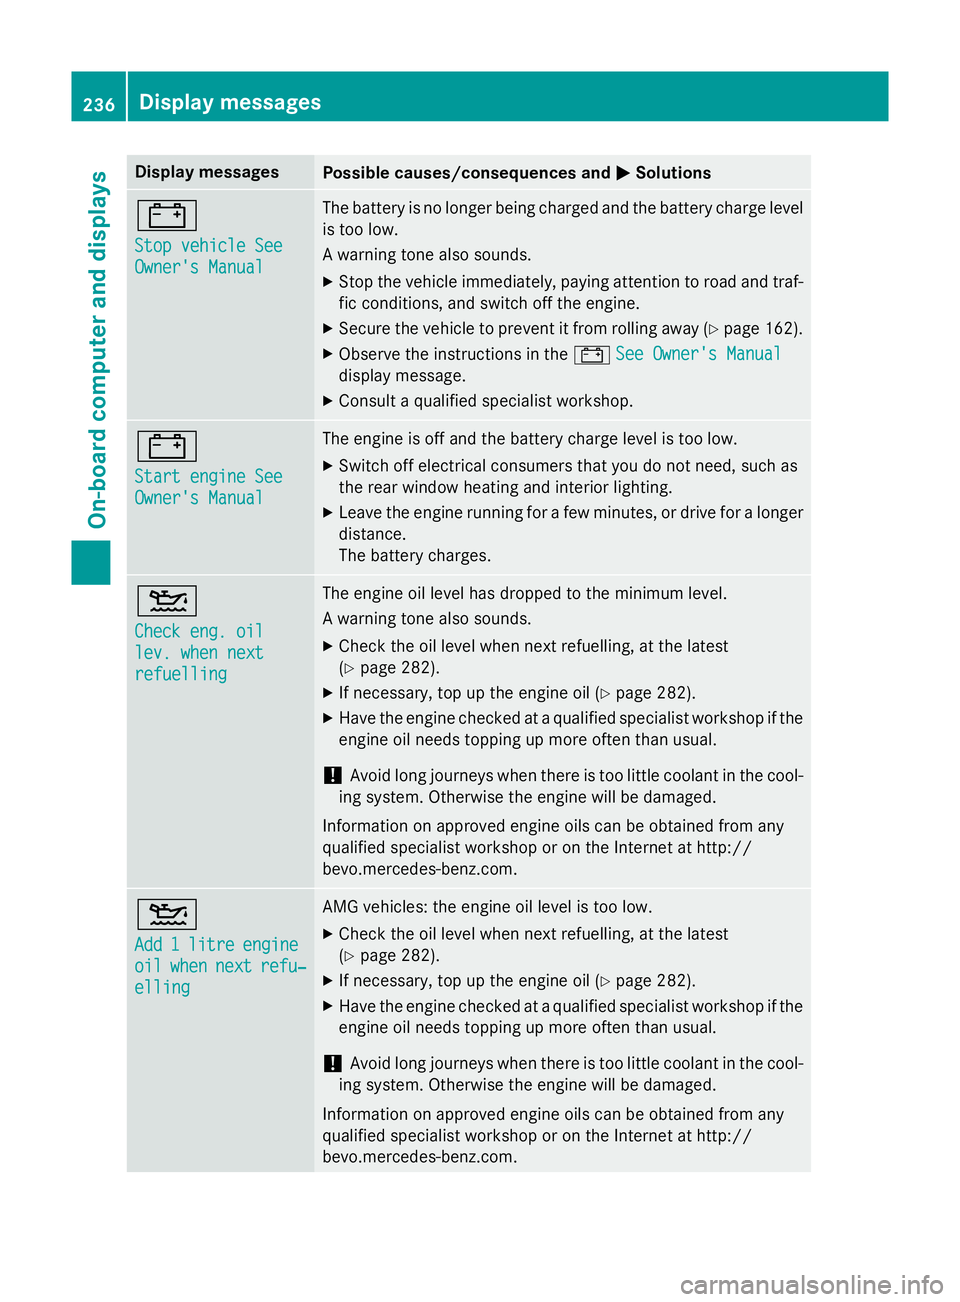
Display messages
Possible causes/consequences and
M
MSolutions #
Stop vehicle See Stop vehicle See
Owner's Manual Owner's Manual The battery is no longer being charged and the battery charge level
is too low.
A warning tone also sounds.
X Stop the vehicle immediately, paying attention to road and traf-
fic conditions, and switch off the engine.
X Secure the vehicle to prevent it from rolling away (Y page 162).
X Observe the instructions in the #See Owner's Manual See Owner's Manual
display message.
X Consult a qualified specialist workshop. #
Start engine See Start engine See
Owner's Manual Owner's Manual The engine is off and the battery charge level is too low.
X Switch off electrical consumers that you do not need, such as
the rear window heating and interior lighting.
X Leave the engine running for a few minutes, or drive for a longer
distance.
The battery charges. 4
Check eng. oil Check eng. oil
lev. when next lev. when next
refuelling refuelling The engine oil level has dropped to the minimum level.
A warning tone also sounds.
X Check the oil level when next refuelling, at the latest
(Y page 282).
X If necessary, top up the engine oil (Y page 282).
X Have the engine checked at a qualified specialist workshop if the
engine oil needs topping up more often than usual.
! Avoid long journeys when there is too little coolant in the cool-
ing system. Otherwise the engine will be damaged.
Information on approved engine oils can be obtained from any
qualified specialist workshop or on the Internet at http://
bevo.mercedes-benz.co m.4
Add Add
1
1litre
litre engine
engine
oil
oil when
when next
next refu‐
refu‐
elling
elling AMG vehicles: the engine oil level is too low.
X Check the oil level when next refuelling, at the latest
(Y page 282).
X If necessary, top up the engine oil (Y page 282).
X Have the engine checked at a qualified specialist workshop if the
engine oil needs topping up more often than usual.
! Avoid long journeys when there is too little coolant in the cool-
ing system. Otherwise the engine will be damaged.
Information on approved engine oils can be obtained from any
qualified specialist workshop or on the Internet at http://
bevo.mercedes-benz.com. 236
Display messagesOn-board computer and displays
Page 252 of 357
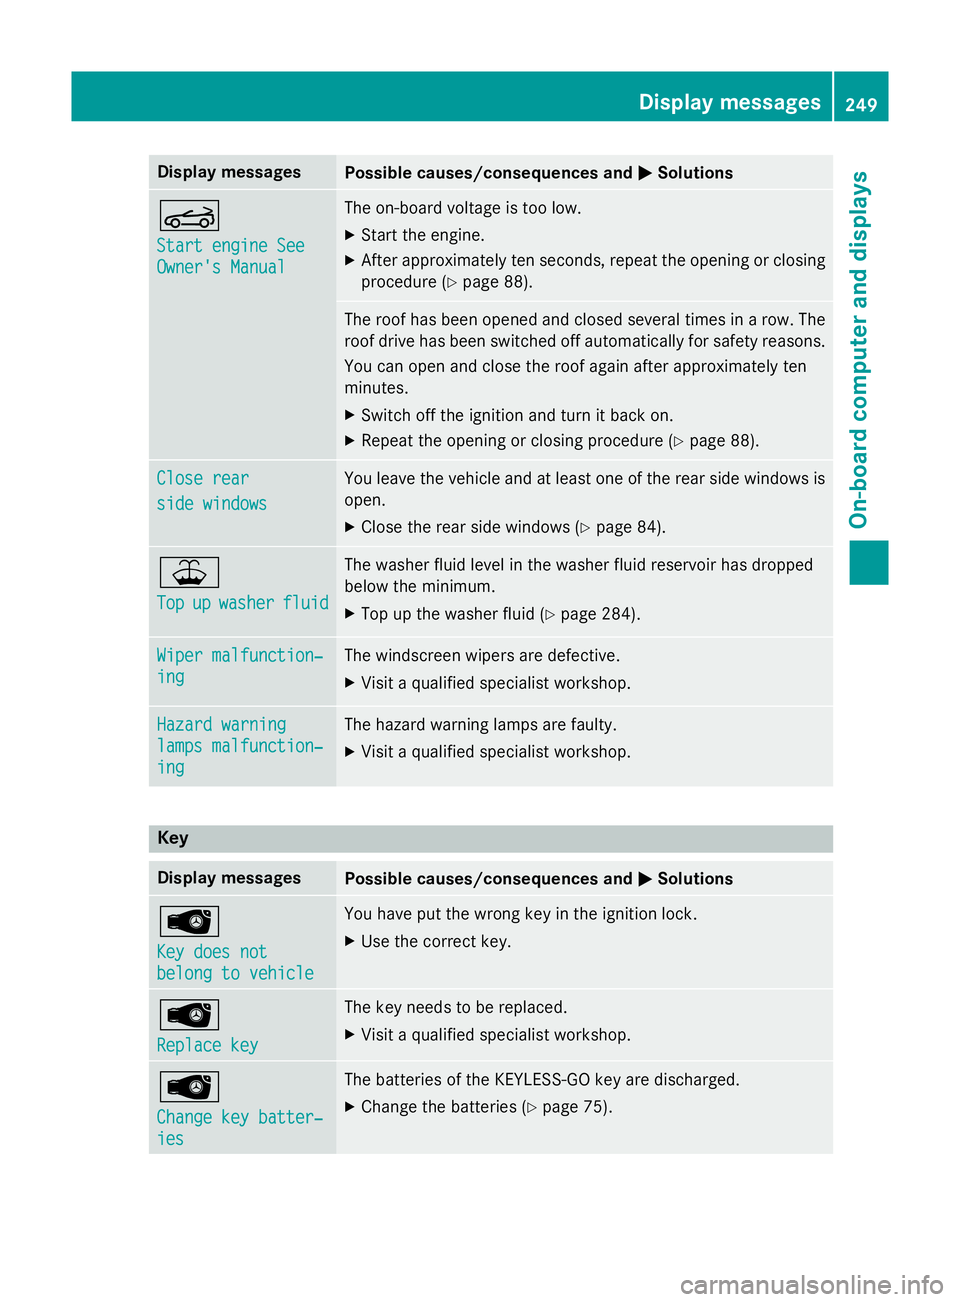
Display messages
Possible causes/consequences and
M
MSolutions K
Start engine See Start engine See
Owner's Manual Owner's Manual The on-board voltage is too low.
X Start the engine.
X After approximately ten seconds, repeat the opening or closing
procedure (Y page 88). The roof has been opened and closed several times in a row. The
roof drive has been switched off automatically for safety reasons.
You can open and close the roof again after approximately ten
minutes.
X Switch off the ignition and turn it back on.
X Repeat the opening or closing procedure (Y page 88).Close rear
Close rear
side windows side windows You leave the vehicle and at least one of the rear side windows is
open.
X Close the rear side windows (Y page 84).¥
Top Top
up
upwasher
washer fluid
fluid The washer fluid level in the washer fluid reservoir has dropped
below the minimum.
X Top up the washer fluid (Y page 284).Wiper malfunction‐ Wiper malfunction‐
ing ing The windscreen wipers are defective.
X Visit a qualified specialist workshop. Hazard warning
Hazard warning
lamps malfunction‐ lamps malfunction‐
ing ing The hazard warning lamps are faulty.
X Visit a qualified specialist workshop. Key
Display messages
Possible causes/consequences and
M
MSolutions Â
Key does not Key does not
belong to vehicle belong to vehicle You have put the wrong key in the ignition lock.
X Use the correct key. Â
Replace key Replace key The key needs to be replaced.
X Visit a qualified specialist workshop. Â
Change key batter‐ Change key batter‐
ies ies The batteries of the KEYLESS-GO key are discharged.
X Change the batteries (Y page 75). Display
messages
249On-board computer and displays Z
Page 271 of 357

Sun visors
Overview :
Mirror light
; Bracket
= Retaining strip, e.g. for a car park ticket
? Vanity mirror
A Mirror cover
i When driving at high speeds with the side
window or roof open:
If you have inserted a car park ticket into
retaining strip =, make sure that it is not
blown away by the wind.
Vanity mirror in the sun visor Mirror light
:only functions if the sun visor
is clipped into retainer ;and mirror cover A
has been folded up.
Glare from the side X
Fold down the sun visor.
X Pull the sun visor out of retainer ;.
X Swing the sun visor to the side.
X Slide the sun visor horizontally as required. Ashtray
X
To open: push the lower section of
cover :.
The cover opens.
X To remove the insert: lift insert=up;
and out.
X To refit the insert: press insert=into the
holder until it engages. Cigarette lighter
G
WARNING
You can burn yourself if you touch the hot
heating element or the socket of the cigarette lighter.
In addition, flammable materials can ignite if:
R the hot cigarette lighter falls
R a child holds the hot cigarette lighter to
objects, for example
There is a risk of fire and injury.
Always hold the cigarette lighter by the knob.
Always make sure that the cigarette lighter is
out of reach of children. Never leave children unattended in the vehicle. 268
FeaturesStowing and features
Page 280 of 357
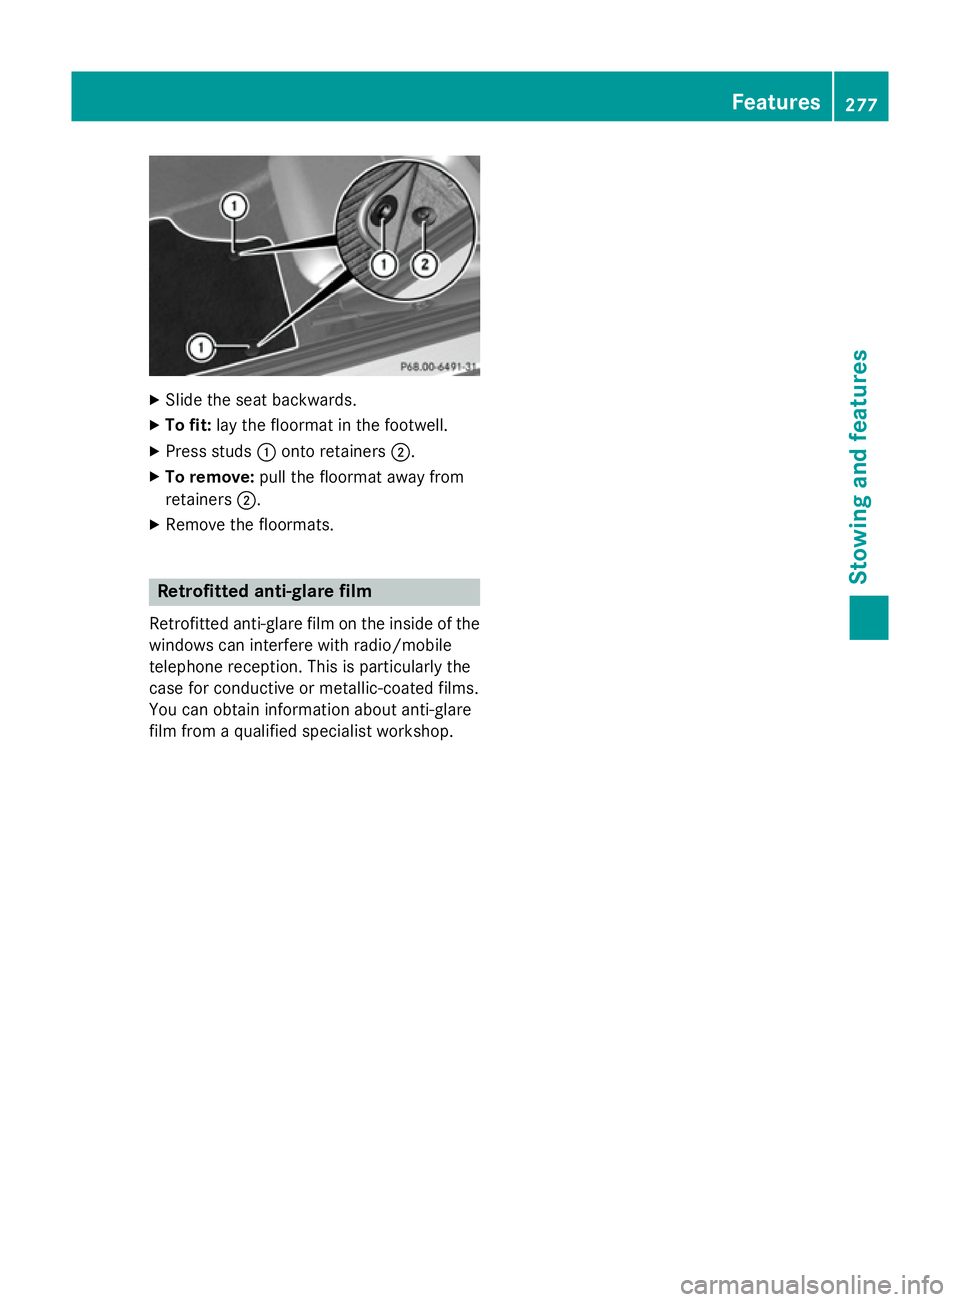
X
Slide the seat backwards.
X To fit: lay the floormat in the footwell.
X Press studs :onto retainers ;.
X To remove: pull the floormat away from
retainers ;.
X Remove the floormats. Retrofitted anti-glare film
Retrofitted anti-glare film on the inside of the
windows can interfere with radio/mobile
telephone reception. This is particularly the
case for conductive or metallic-coated films.
You can obtain information about anti-glare
film from a qualified specialist workshop. Features
277Stowing and features Z