2014 MERCEDES-BENZ SLK ROADSTER phone
[x] Cancel search: phonePage 268 of 357
Stowage compartment/telephone
compartment under the armrest
X
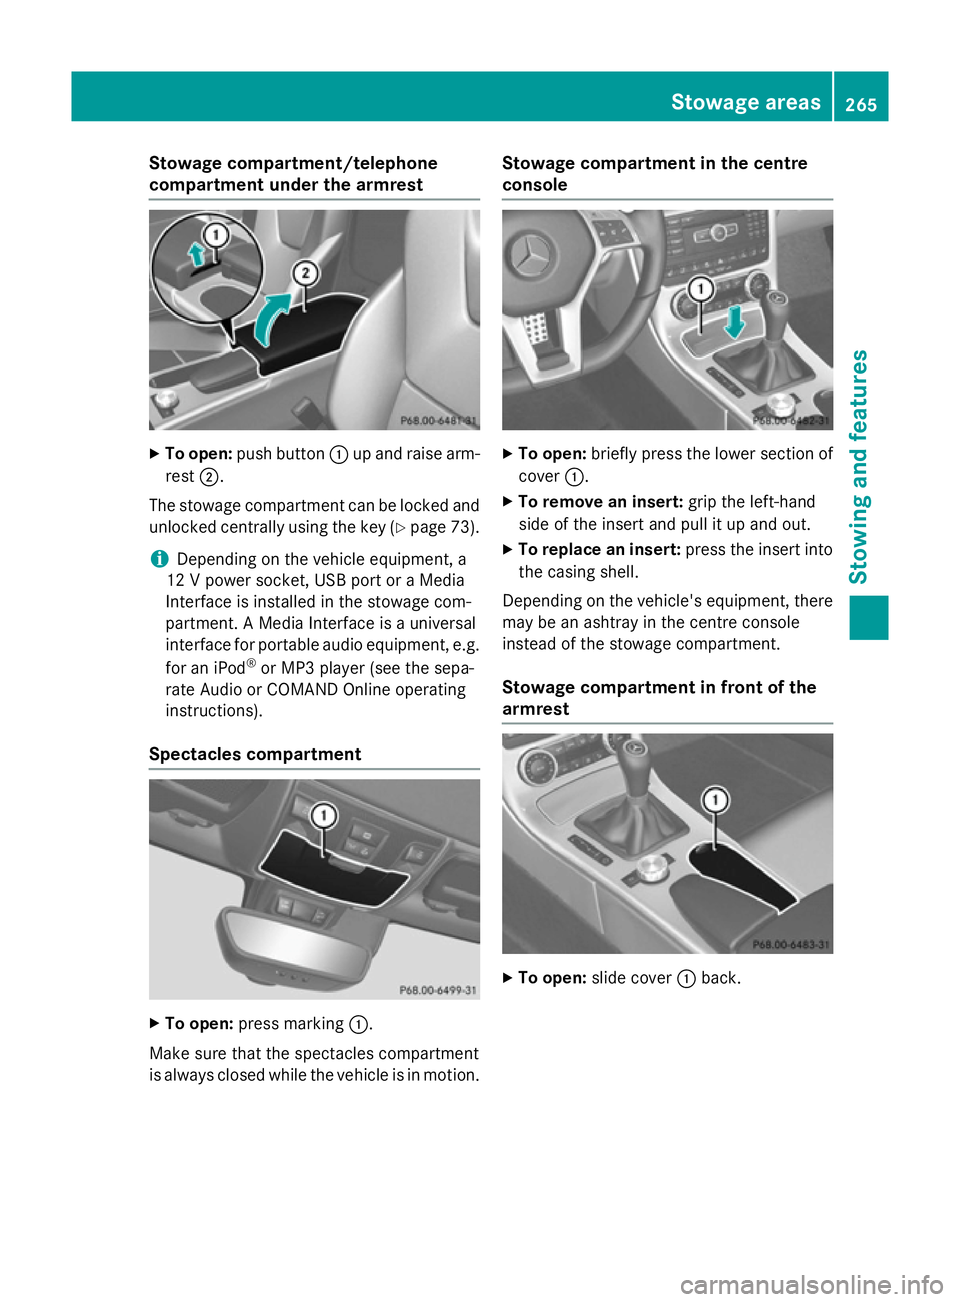
To open: push button :up and raise arm-
rest ;.
The stowage compartment can be locked and
unlocked centrally using the key (Y page 73).
i Depending on the vehicle equipment, a
12 V power socket, USB port or a Media
Interface is installed in the stowage com-
partment. A Media Interface is a universal
interface for portable audio equipment, e.g.
for an iPod ®
or MP3 player (see the sepa-
rate Audio or COMAND Online operating
instructions).
Spectacles compartment X
To open: press marking :.
Make sure that the spectacles compartment
is always closed while the vehicle is in motion. Stowage compartment in the centre
console
X
To open: briefly press the lower section of
cover :.
X To remove an insert: grip the left-hand
side of the insert and pull it up and out.
X To replace an insert: press the insert into
the casing shell.
Depending on the vehicle's equipment, there may be an ashtray in the centre console
instead of the stowage compartment.
Stowage compartment in front of the
armrest X
To open: slide cover :back. Stowage areas
265Stowing and features Z
Page 272 of 357
Your attention must always be focused on the
traffic conditions. Only use the cigarette
lighter when road and traffic conditions per-
mit.
X Turn the key to position 2in the ignition
lock (Y page 141).
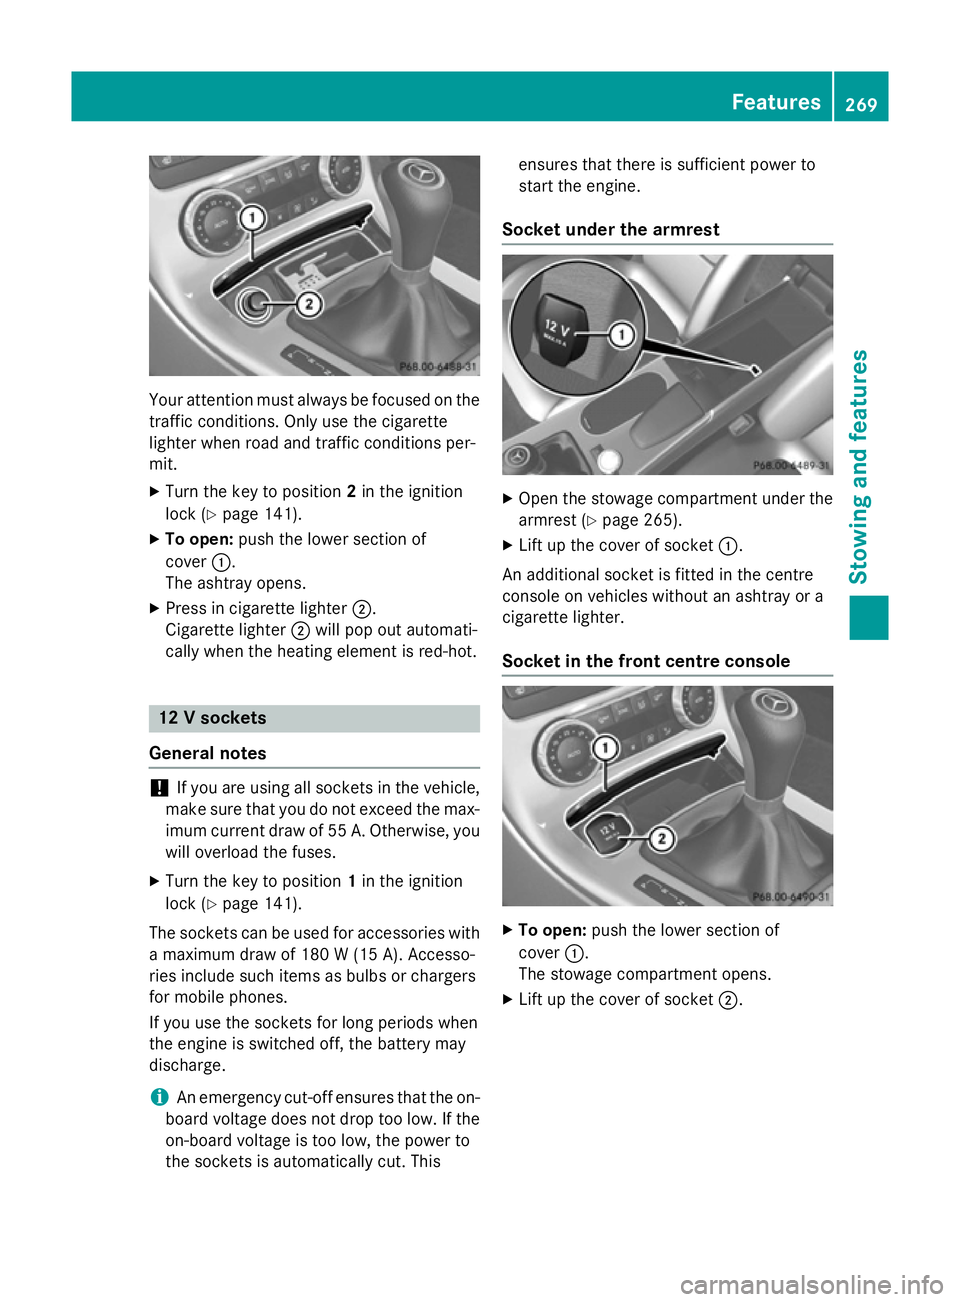
X To open: push the lower section of
cover :.
The ashtray opens.
X Press in cigarette lighter ;.
Cigarette lighter ;will pop out automati-
cally when the heating element is red-hot. 12 V sockets
General notes !
If you are using all sockets in the vehicle,
make sure that you do not exceed the max- imum current draw of 55 A. Otherwise, you
will overload the fuses.
X Turn the key to position 1in the ignition
lock (Y page 141).
The sockets can be used for accessories with a maximum draw of 180 W (15 A). Accesso-
ries include such items as bulbs or chargers
for mobile phones.
If you use the sockets for long periods when
the engine is switched off, the battery may
discharge.
i An emergency cut-off ensures that the on-
board voltage does not drop too low. If the
on-board voltage is too low, the power to
the sockets is automatically cut. This ensures that there is sufficient power to
start the engine.
Socket under the armrest X
Open the stowage compartment under the
armrest (Y page 265).
X Lift up the cover of socket :.
An additional socket is fitted in the centre
console on vehicles without an ashtray or a
cigarette lighter.
Socket in the front centre console X
To open: push the lower section of
cover :.
The stowage compartment opens.
X Lift up the cover of socket ;. Features
269Stowing and features Z
Page 273 of 357
Mobile phone
Important safety notes G
WARNING
Operating mobile communications equip-
ment while driving distracts you from paying
attention to traffic conditions. This could also cause you to lose control of the vehicle. There
is a risk of an accident.
Use this device only when the vehicle is sta-
tionary.
i You must observe the legal requirements
for the country in which you are currently
driving when operating mobile communi-
cations equipment in the vehicle.
If it is permitted by law to operate commu-
nications equipment while the vehicle is in
motion, you may only do so if the traffic sit-
uation permits. You may otherwise be dis-
tracted from the traffic conditions, cause
an accident and injure yourself and others.
Excessive levels of electromagnetic radiation
may cause damage to your health and to the
health of others. The use of an exterior aerial takes into consideration the scientific discus-
sion surrounding the possible health risk
posed by electromagnetic fields.
Mercedes-Benz recommends the use of an
approved exterior aerial. This ensures:
R optimal mobile phone reception quality in
the vehicle
R that mutual interference between the vehi-
cle electronics and mobile phones is mini-
mised
An exterior aerial has the following advan-
tages:
R it conducts the electromagnetic fields gen-
erated by a wireless device to the exterior
R the field strength in the vehicle interior is
lower than in a vehicle that does not have
an exterior aerial
Information on retrofitting two-way radios
and mobile phones (RF transmitters)
(Y page 340). General notes There are various mobile phone brackets that
may be fitted in your vehicle; in some cases,
these are country-specific.
You can connect a Bluetooth ®
-capable
mobile phone with Audio 20 or COMAND
Online via the Bluetooth ®
interface. This also
applies if your vehicle is equipped with con-
venience telephony.
More information on suitable mobile phones,
mobile phone brackets and on connecting
Bluetooth ®
-capable mobile phones with
Audio 20 or COMAND Online can be obtained:
R at your Mercedes-Benz Service Centre
R on the Internet at http://www.mercedes-
benz.com/connect
i The functions and services available when
you use the phone depend on your mobile
phone model and service provider.
Using a mobile phone If the mobile phone is inserted in the mobile
phone bracket, the mobile phone will be
charged and connected with the exterior aer-
ial.
X Open the telephone compartment
(Y page 265).
X Place the mobile phone bracket into the
pre-installed fitting; see the separate instal-
lation instructions for the mobile phone fit-
ting.
X Insert the mobile phone into the mobile
phone bracket; see the separate installa-
tion instructions for the mobile phone fit-
ting.
Operating the mobile phone You can operate the telephone using the
6
and~ buttons on the multifunction
steering wheel. You can operate other mobile
phone functions via the on-board computer
(Y page 208). 270
FeaturesStowing and features
Page 274 of 357
When you remove the key from the ignition
lock, the mobile phone is disconnected from
the hands-free system. Active calls will first
be transferred to the mobile phone directly. Garage door opener
General notes The HomeLink
®
garage door opener integra-
ted in the rear-view mirror allows you to oper-
ate up to three different door and gate sys-
tems.
Once programmed, the integrated garage
door opener in the rear-view mirror will
assume the function of the garage door sys-
tem's remote control. Please also read the
operating instructions for the garage door
system.
When programming a garage door opener,
park the vehicle outside the garage. Do not
run the engine while programming.
The garage door opener is only available for
certain countries. Observe the legal require-
ments for each individual country.
The HomeLink ®
garage door opener is com-
patible with most European garage and gate
opener drives. More information on Home-
Link ®
and/or compatible products is availa-
ble:
R at a qualified specialised workshop
R via the HomeLink ®
Hotline
(0) 08000 466 354 65 or alternatively
+49 (0) 6838 907-277
R on the Internet at
http://www.homelink.com
Important safety notes G
WARNING
When you operate or program the garage door with the integrated garage door opener, per-
sons in the range of movement of the garage
door can become trapped or struck by the
garage door. There is a risk of injury. When using the integrated garage door
opener, always make sure that nobody is
within the range of movement of the garage
door.
G
WARNING
Combustion engines emit poisonous exhaust
gases such as carbon monoxide. Inhaling
these exhaust gases leads to poisoning. There is a risk of fatal injury. Therefore never leave
the engine running in enclosed spaces with-
out sufficient ventilation.
Programming Programming buttons
Pay attention to the "Important safety notes"
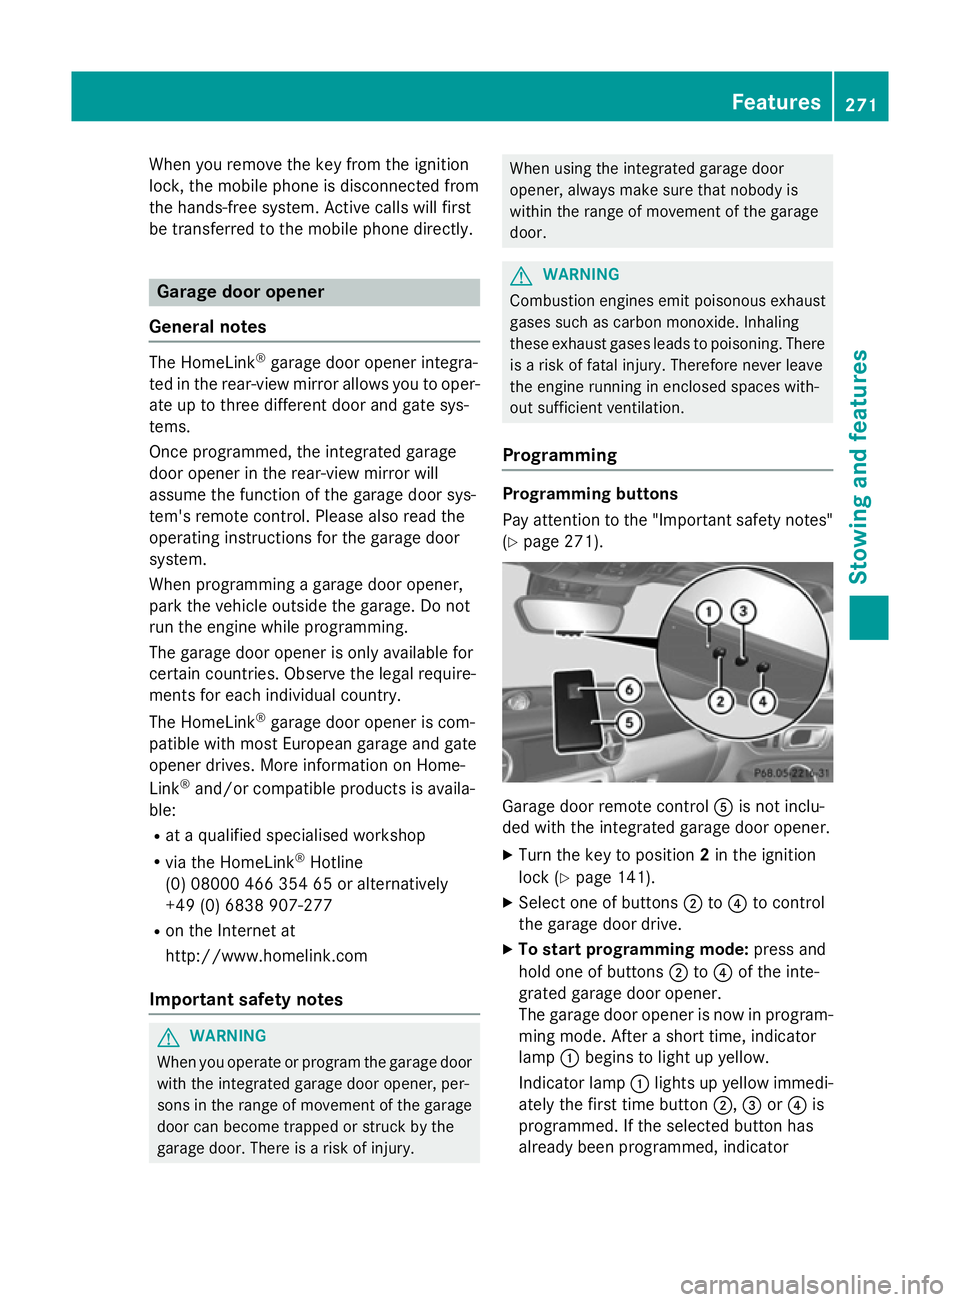
(Y page 271). Garage door remote control
Ais not inclu-
ded with the integrated garage door opener.
X Turn the key to position 2in the ignition
lock (Y page 141).
X Select one of buttons ;to? to control
the garage door drive.
X To start programming mode: press and
hold one of buttons ;to? of the inte-
grated garage door opener.
The garage door opener is now in program- ming mode. After a short time, indicator
lamp :begins to light up yellow.
Indicator lamp :lights up yellow immedi-
ately the first time button ;,=or? is
programmed. If the selected button has
already been programmed, indicator Features
271Stowing and features Z
Page 280 of 357
X
Slide the seat backwards.
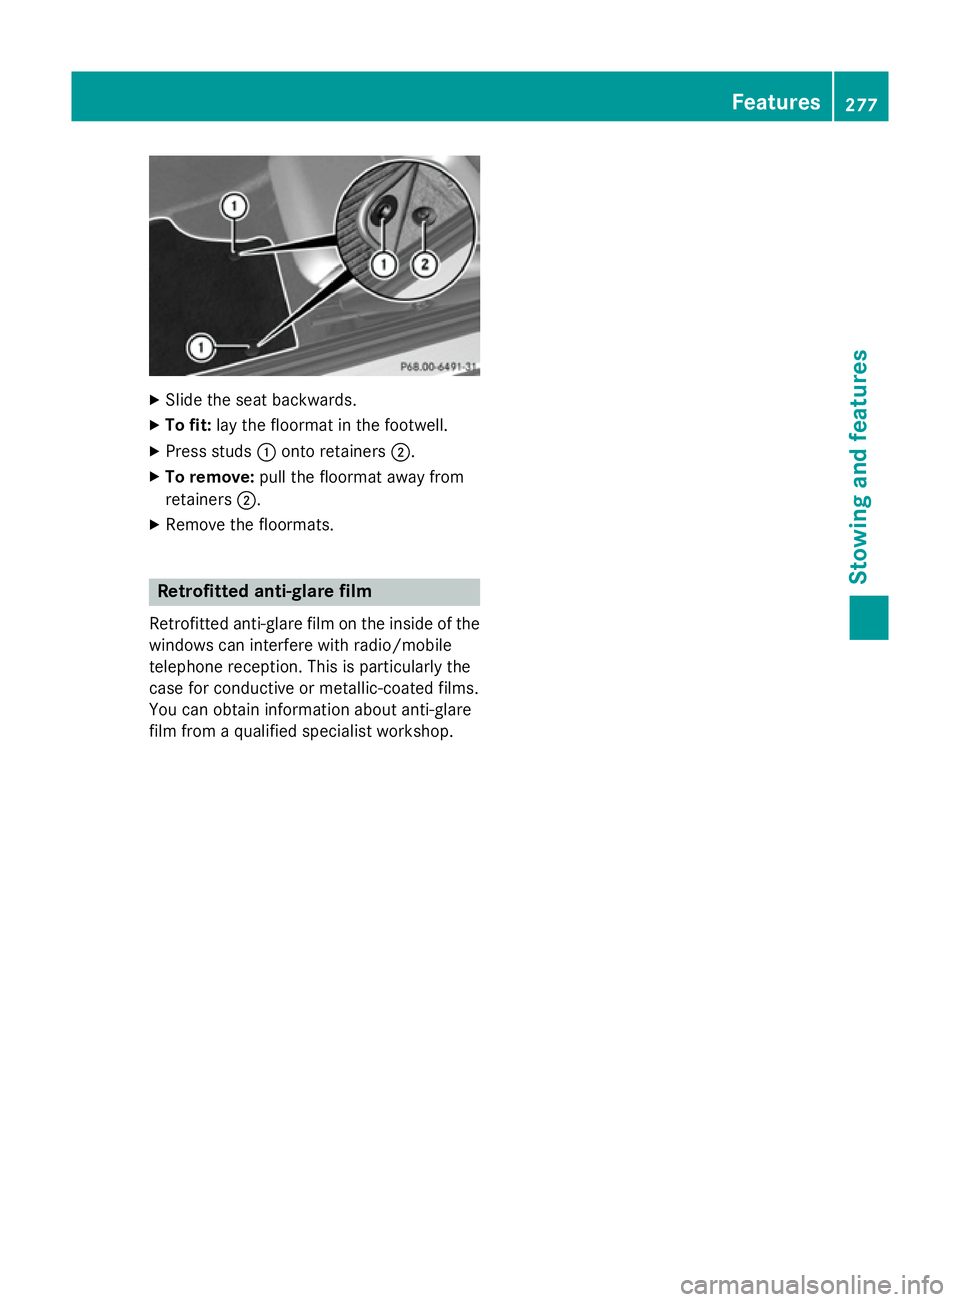
X To fit: lay the floormat in the footwell.
X Press studs :onto retainers ;.
X To remove: pull the floormat away from
retainers ;.
X Remove the floormats. Retrofitted anti-glare film
Retrofitted anti-glare film on the inside of the
windows can interfere with radio/mobile
telephone reception. This is particularly the
case for conductive or metallic-coated films.
You can obtain information about anti-glare
film from a qualified specialist workshop. Features
277Stowing and features Z
Page 286 of 357
G
WARNING
If engine oil comes into contact with hot com- ponents in the engine compartment, it may
ignite. There is a risk of fire and injury.
Make sure that engine oil does not spill out
over the filler neck. Allow the engine to cool
down and thoroughly clean the components
that have come into contact with engine oil
before you start the engine. H
Environmental note
When topping up the oil, take care not to spill
any. If oil enters the soil or waterways, it is
harmful to the environment.
! Only use engine oils and oil filters that
have been approved for vehicles with a ser-
vice system. You can obtain a list of the
engine oils and oil filters tested and
approved in accordance with the
Mercedes-Benz Specifications for Service
Products at any Mercedes-Benz Service
Centre.
Damage to the engine or exhaust system is caused by the following:
R using engine oils and oil filters that have
not been specifically approved for the
service system
R changing the engine oil and oil filter after
missing the change interval required by
the service system
R using engine oil additives
! Do not add too much oil. If the oil level is
above the "max" mark on the dipstick, too
much oil has been added. This can lead to
damage to the engine or the catalytic con-
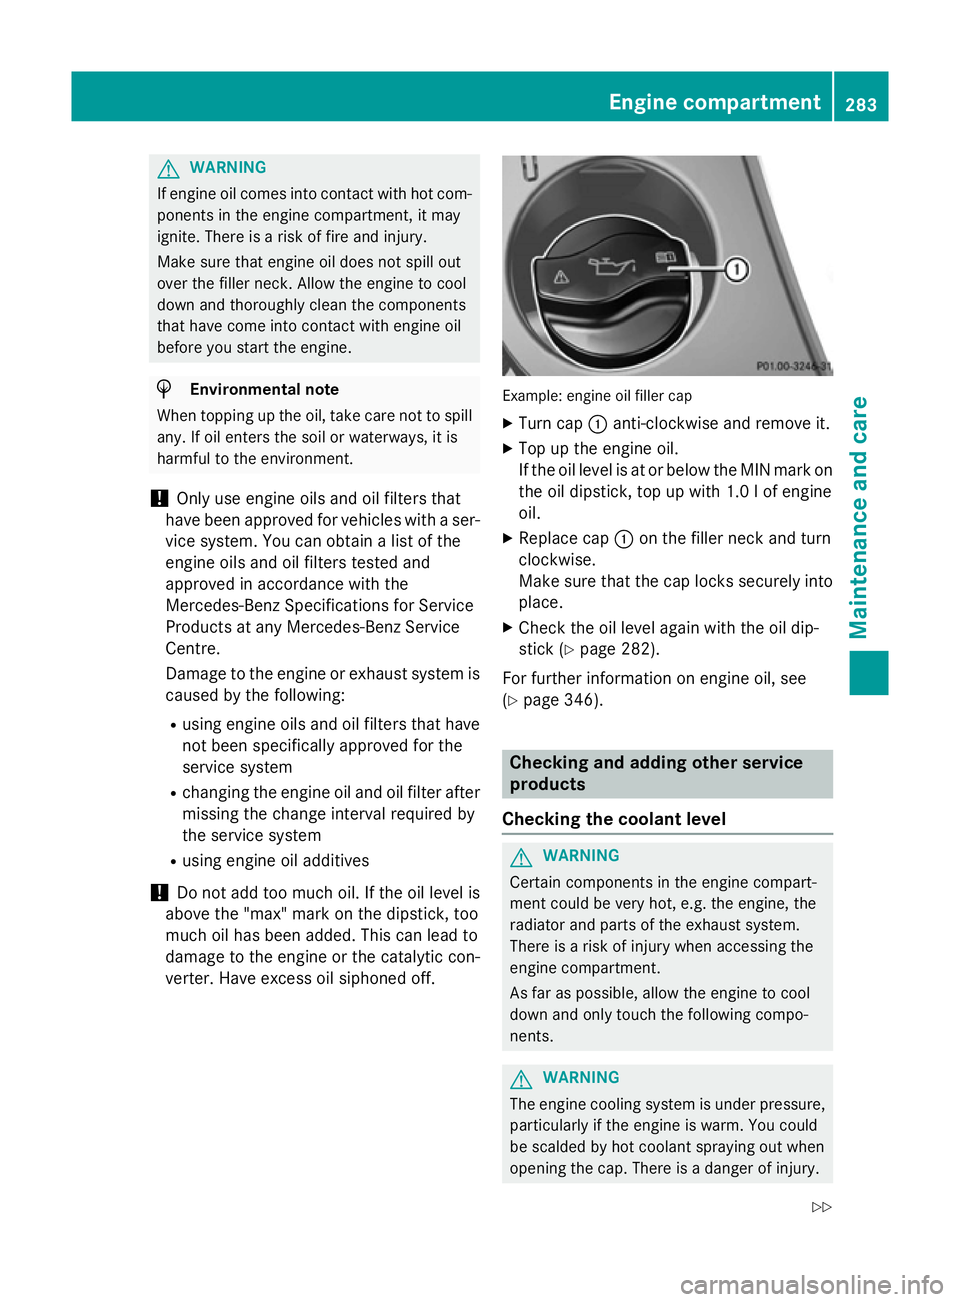
verter. Have excess oil siphoned off. Example: engine oil filler cap
X Turn cap :anti-clockwise and remove it.
X Top up the engine oil.
If the oil level is at or below the MIN mark on
the oil dipstick, top up with 1.0 lof engine
oil.
X Replace cap :on the filler neck and turn
clockwise.
Make sure that the cap locks securely into place.
X Check the oil level again with the oil dip-
stick (Y page 282).
For further information on engine oil, see
(Y page 346). Checking and adding other service
products
Checking the coolant level G
WARNING
Certain components in the engine compart-
ment could be very hot, e.g. the engine, the
radiator and parts of the exhaust system.
There is a risk of injury when accessing the
engine compartment.
As far as possible, allow the engine to cool
down and only touch the following compo-
nents. G
WARNING
The engine cooling system is under pressure, particularly if the engine is warm. You could
be scalded by hot coolant spraying out when
opening the cap. There is a danger of injury. Engine compartment
283Maintenance and care
Z
Page 303 of 357
instrument cluster where it will be easily
seen by the driver.
X Stop after driving for approximately ten
minutes and check the tyre pressure with
the tyre inflation compressor.
The tyre pressure must now be at least
130 kPa (1.3 bar/19 psi). G
WARNING
If the required tyre pressure is not reached
after driving for a short period, the tyre is too badly damaged. The tyre sealant cannot
repair the tyre in this instance. Damaged tyres and a tyre pressure that is too low can signif-
icantly impair the vehicle's braking and driv-
ing characteristics. There is a risk of accident.
Do not continue driving. Contact a qualified
specialist workshop.
i In your vehicle, you will find a sticker with
the Mercedes-Benz Service24h telephone
number, e.g. on the B-pillar on the driver's
side.
X Correct the tyre pressure if it is still at least
130 kPa (1.3 bar/19 psi) (see the fuel filler
flap for values).
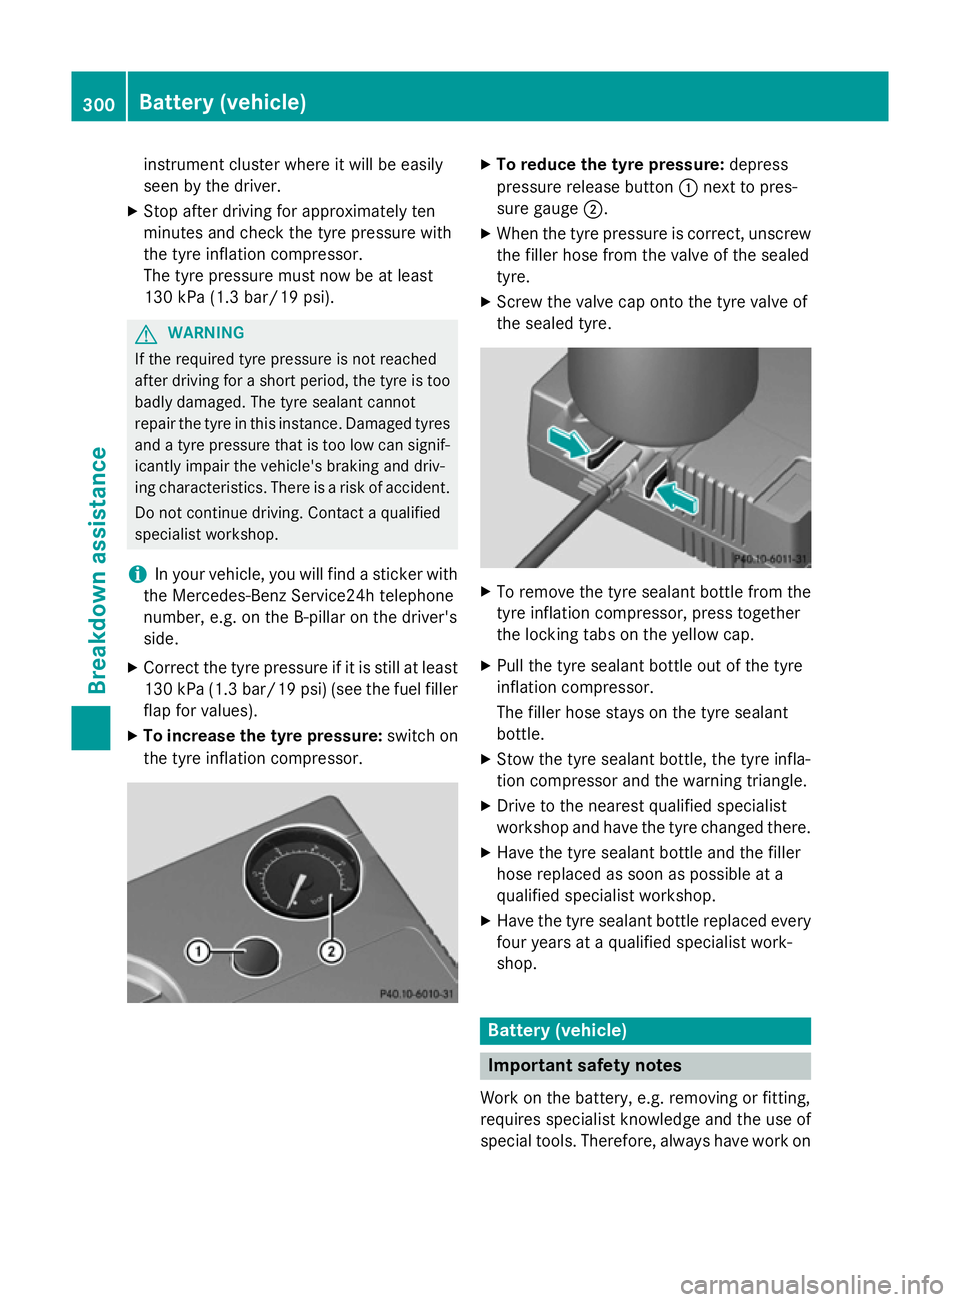
X To increase the tyre pressure: switch on
the tyre inflation compressor. X
To reduce the tyre pressure: depress
pressure release button :next to pres-
sure gauge ;.
X When the tyre pressure is correct, unscrew
the filler hose from the valve of the sealed
tyre.
X Screw the valve cap onto the tyre valve of
the sealed tyre. X
To remove the tyre sealant bottle from the
tyre inflation compressor, press together
the locking tabs on the yellow cap.
X Pull the tyre sealant bottle out of the tyre
inflation compressor.
The filler hose stays on the tyre sealant
bottle.
X Stow the tyre sealant bottle, the tyre infla-
tion compressor and the warning triangle.
X Drive to the nearest qualified specialist
workshop and have the tyre changed there.
X Have the tyre sealant bottle and the filler
hose replaced as soon as possible at a
qualified specialist workshop.
X Have the tyre sealant bottle replaced every
four years at a qualified specialist work-
shop. Battery (vehicle)
Important safety notes
Work on the battery, e.g. removing or fitting,
requires specialist knowledge and the use of
special tools. Therefore, always have work on 300
Battery (vehicle)Breakdown assistance
Page 324 of 357
first be taught-in to the tyre pressure monitor.
If there is a substantial loss of pressure, the
warning threshold for the warning message is aligned to the reference values taught-in.
Restart the tyre pressure monitor after
adjusting to the cold tyre pressure
(Y page 322). The current pressures are
saved as new reference values. This will
ensure that a warning message will only
appear if the tyre pressure drops significantly.
The tyre pressure monitor does not warn you
of an incorrectly set tyre pressure. Observe
the notes on the recommended tyre pressure
(Y page 318).
The tyre pressure monitor is not able to warn
you of a sudden loss of pressure, e.g. if the
tyre is penetrated by a foreign object. In the
event of a sudden loss of pressure, bring the
vehicle to a halt by braking carefully. Avoid
abrupt steering manoeuvres.
The tyre pressure monitor has a yellow warn-
ing lamp in the instrument cluster for indicat- ing a pressure loss or malfunction. Depending
on how the warning lamp flashes or lights up, a tyre pressure that is too low or a malfunc-
tion in the tyre pressure monitor is indicated:
R if the warning lamp is lit continuously, the
tyre pressure on one or more tyres is sig-
nificantly too low. The tyre pressure moni-
tor is not malfunctioning.
R if the warning lamp flashes for around a
minute and then remains lit constantly, the tyre pressure monitor is malfunctioning.
i In addition to the warning lamp, a mes-
sage appears in the multifunction display.
Further information can be found under
(Y page 243).
If the tyre pressure monitor is malfunctioning,
it may take more than ten minutes for the tyre pressure warning lamp to inform you of the
malfunction by flashing for approximately one
minute and then remaining lit. When the fault
has been rectified, the tyre pressure warning lamp goes out after you have driven for a few
minutes. The tyre pressure values indicated by the on-
board computer may differ from those meas-
ured at a filling station using a pressure
gauge. The tyre pressures shown by the on-
board computer refer to those measured at
sea level. At high altitudes, the tyre pressure
values indicated by a pressure gauge are
higher than those shown by the on-board
computer. In this case, do not reduce the tyre
pressures.
The operation of the tyre pressure monitor
can be affected by interference from radio
transmitting equipment (e.g. radio head-
phones, two-way radios) that may be being
operated in or near the vehicle.
Checking the tyre pressure electroni-
cally X
Make sure that the key is in position 2
(Y page 141) in the ignition lock.
X Press the =or; button on the steer-
ing wheel to select the Serv. Serv.menu.
X Press the 9or: button to select
Tyre pressure
Tyre pressure.
X Press the abutton.
The current tyre pressure for each wheel
will be displayed in the multifunction dis-
play.
If the vehicle has been parked for over
20 minutes ,the Tyre Tyre pressures
pressures will
willbe
be
displayed after a few minutes of
displayed after a few minutes of
driving driving message appears.
After a teach-in period, the tyre pressure
monitor automatically detects new wheels or
new sensors. As long as a clear allocation of
the tyre pressure values to the individual
wheels is not possible, the Tyre pressure Tyre pressure
monitor active
monitor active display message is shown
instead of the tyre pressure display. The tyre
pressures are already being monitored.
i If an emergency spare wheel is fitted, for
a few minutes the system may continue to
show the tyre pressure of the wheel that
has been removed. If this occurs, note that the value displayed for the position where Tyre pressure
321Wheels and tyres Z