2014 MERCEDES-BENZ SLK ROADSTER airbag
[x] Cancel search: airbagPage 59 of 357
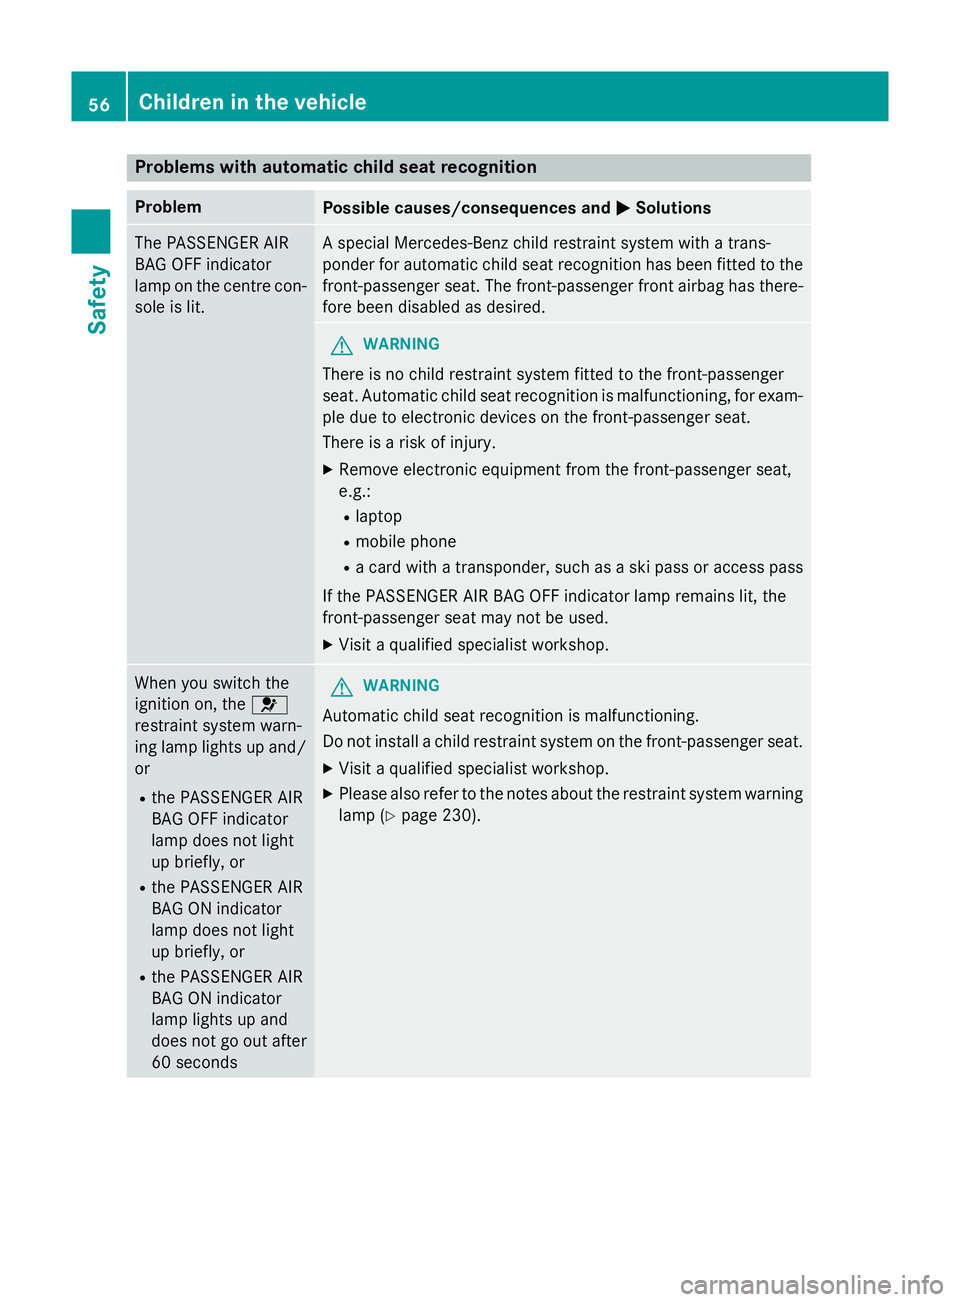
Problems with automatic child seat recognition
Problem
Possible causes/consequences and
M
MSolutions The PASSENGER AIR
BAG OFF indicator
lamp on the centre con-
sole is lit. A special Mercedes-Benz child restraint system with a trans-
ponder for automatic child seat recognition has been fitted to the
front-passenger seat. The front-passenger front airbag has there- fore been disabled as desired. G
WARNING
There is no child restraint system fitted to the front-passenger
seat. Automatic child seat recognition is malfunctioning, for exam-
ple due to electronic devices on the front-passenger seat.
There is a risk of injury.
X Remove electronic equipment from the front-passenger seat,
e.g.:
R laptop
R mobile phone
R a card with a transponder, such as a ski pass or access pass
If the PASSENGER AIR BAG OFF indicator lamp remains lit, the
front-passenger seat may not be used. X Visit a qualified specialist workshop. When you switch the
ignition on, the
6
restraint system warn-
ing lamp lights up and/ or
R the PASSENGER AIR
BAG OFF indicator
lamp does not light
up briefly, or
R the PASSENGER AIR
BAG ON indicator
lamp does not light
up briefly, or
R the PASSENGER AIR
BAG ON indicator
lamp lights up and
does not go out after
60 seconds G
WARNING
Automatic child seat recognition is malfunctioning.
Do not install a child restraint system on the front-passenger seat. X Visit a qualified specialist workshop.
X Please also refer to the notes about the restraint system warning
lamp (Y page 230). 56
Children in the vehicleSafety
Page 99 of 357
Useful information
i This Owner's Manual describes all mod-
els, series and optional equipment for your
vehicle that were available at the time of
going to press. National variations are pos- sible. Note that your vehicle may not be
equipped with all of the functions descri-
bed. This is also the case for systems and
functions relevant to safety.
i Read the information on qualified special-
ist workshops: (Y page 24). Correct driver's seat position
X
Observe the safety guidelines on seat
adjustment (Y page 97).
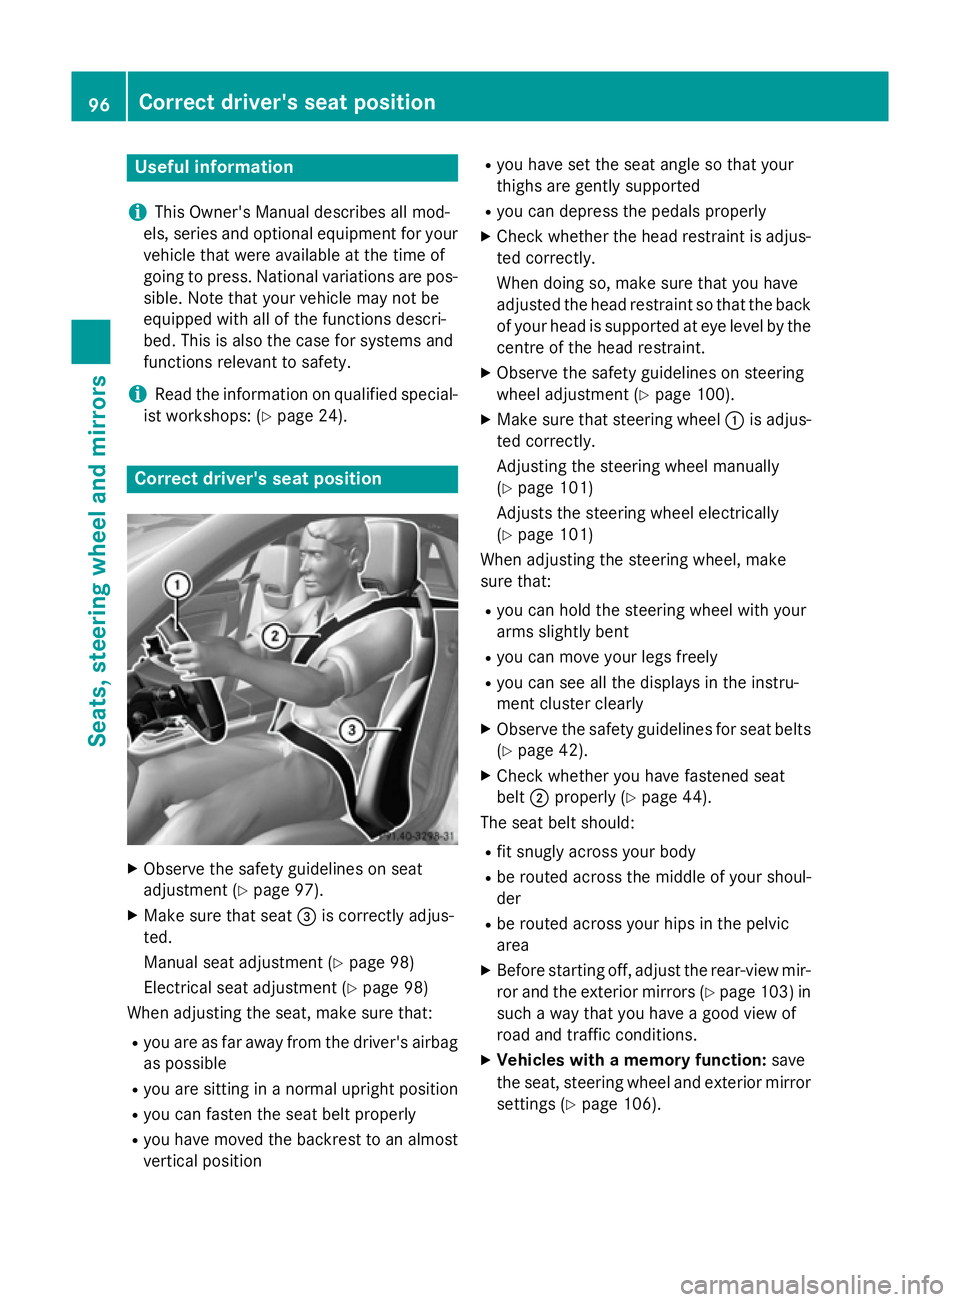
X Make sure that seat =is correctly adjus-
ted.
Manual seat adjustment (Y page 98)
Electrical seat adjustment (Y page 98)
When adjusting the seat, make sure that:
R you are as far away from the driver's airbag
as possible
R you are sitting in a normal upright position
R you can fasten the seat belt properly
R you have moved the backrest to an almost
vertical position R
you have set the seat angle so that your
thighs are gently supported
R you can depress the pedals properly
X Check whether the head restraint is adjus-
ted correctly.
When doing so, make sure that you have
adjusted the head restraint so that the back
of your head is supported at eye level by the centre of the head restraint.
X Observe the safety guidelines on steering
wheel adjustment (Y page 100).
X Make sure that steering wheel :is adjus-
ted correctly.
Adjusting the steering wheel manually
(Y page 101)
Adjusts the steering wheel electrically
(Y page 101)
When adjusting the steering wheel, make
sure that:
R you can hold the steering wheel with your
arms slightly bent
R you can move your legs freely
R you can see all the displays in the instru-
ment cluster clearly
X Observe the safety guidelines for seat belts
(Y page 42).
X Check whether you have fastened seat
belt ;properly (Y page 44).
The seat belt should:
R fit snugly across your body
R be routed across the middle of your shoul-
der
R be routed across your hips in the pelvic
area
X Before starting off, adjust the rear-view mir-
ror and the exterior mirrors (Y page 103) in
such a way that you have a good view of
road and traffic conditions.
X Vehicles with a memory function: save
the seat, steering wheel and exterior mirror
settings (Y page 106). 96
Correct driver's seat positionSeats, steering wheel and mirrors
Page 100 of 357
Seats
Important safety notes
G
WARNING
If children adjust the seats, they could
become trapped, especially if they are unat-
tended. There is a risk of injury.
When leaving the vehicle, always take the key with you and lock the vehicle. Never leave
children unattended in the vehicle.
The seats can still be adjusted when there is
no key in the ignition lock. G
WARNING
When adjusting a seat, you or another vehicle occupant could become trapped by the guiderail of the seat, for instance. There is a risk of
injury.
Make sure that no one has any part of their
body within the sweep of the seat when
adjusting it.
Observe the safety notes on "Airbags"
(Y page 45) and "Children in the Vehicle"
(Y page 51). G
WARNING
If the driver's seat is not engaged, it can move unexpectedly while the vehicle is in motion.
This could cause you to lose control of the
vehicle. There is a risk of an accident.
Always make sure that the driver's seat is
engaged before starting the engine. G
WARNING
If you adjust the seat height carelessly, you or other vehicle occupants could be trapped andthereby injured. Children in particular could
accidentally press the electrical seat adjust-
ment buttons and become trapped. There is a
risk of injury.
While moving the seats, make sure that your
hands or other body parts do not get under the
lever assembly of the seat adjustment sys-
tem. G
WARNING
The head restraints cannot provide the inten-
ded protection unless they are fitted and
adjusted correctly. There is an increased risk of injury to the head and neck in the event of
an accident or sudden braking, for example.
Always drive with the head restraints fitted.
Ensure that the centre of the head restraints
support the back of each vehicle occupant's
head at eye level before driving off. G
WARNING
You could lose control of the vehicle while
driving if you:
R adjust the driver's seat, steering wheel or
mirror
R fasten the seat belt.
There is a risk of an accident.
Adjust the driver's seat, steering wheel or
mirror and fasten the seat belt before starting
the engine.
! To avoid damage to the seats and the seat
heating, observe the following information:
R do not spill any liquids on the seats. If
liquid is spilled on the seats, dry them as
soon as possible.
R if the seat covers are damp or wet, do not
switch on the seat heating. The seat
heating should also not be used to dry
the seats.
R clean the seat covers as recommended;
see the "Interior care" section.
R do not transport heavy loads on the
seats. Do not place sharp objects on the
seat cushions, e.g. knives, nails or tools. The seats should only be occupied by
passengers, if possible.
R when the seat heating is in operation, do
not cover the seats with insulating mate- rials, e.g. blankets, coats, bags, seat cov-
ers, child seats or booster seats.
! Make sure that there are no objects in the
footwell under or behind the seats when
moving the seats back. There is a risk that Seats
97Seats, steering wheel and mirrors Z
Page 116 of 357
Combination switch
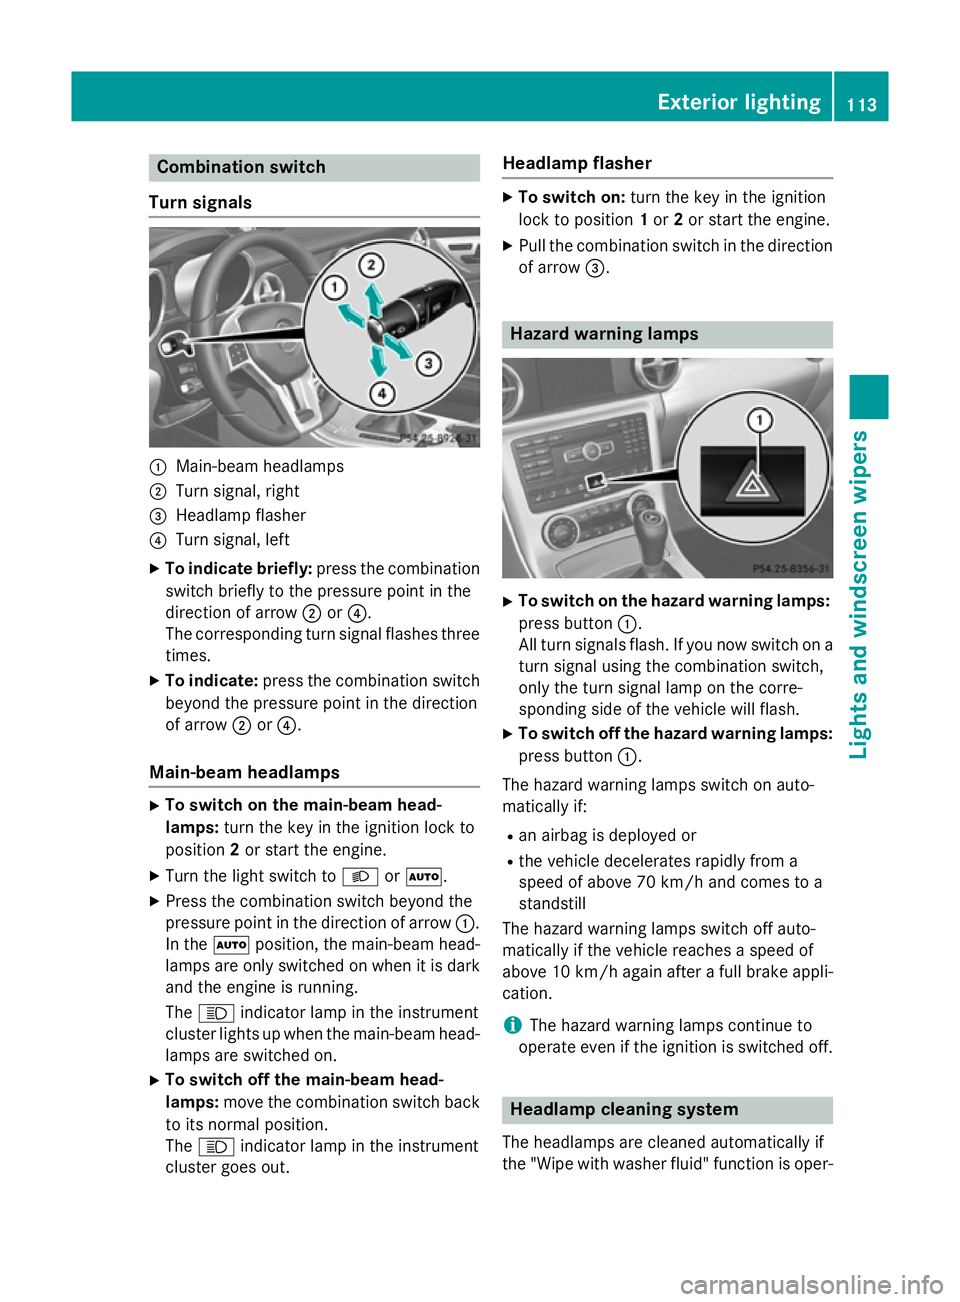
Turn signals :
Main-beam headlamps
; Turn signal, right
= Headlamp flasher
? Turn signal, left
X To indicate briefly: press the combination
switch briefly to the pressure point in the
direction of arrow ;or?.
The corresponding turn signal flashes three
times.
X To indicate: press the combination switch
beyond the pressure point in the direction
of arrow ;or?.
Main-beam headlamps X
To switch on the main-beam head-
lamps: turn the key in the ignition lock to
position 2or start the engine.
X Turn the light switch to LorÃ.
X Press the combination switch beyond the
pressure point in the direction of arrow :.
In the Ãposition, the main-beam head-
lamps are only switched on when it is dark
and the engine is running.
The K indicator lamp in the instrument
cluster lights up when the main-beam head-
lamps are switched on.
X To switch off the main-beam head-
lamps: move the combination switch back
to its normal position.
The K indicator lamp in the instrument
cluster goes out. Headlamp flasher X
To switch on: turn the key in the ignition
lock to position 1or 2or start the engine.
X Pull the combination switch in the direction
of arrow =. Hazard warning lamps
X
To switch on the hazard warning lamps:
press button :.
All turn signals flash. If you now switch on a turn signal using the combination switch,
only the turn signal lamp on the corre-
sponding side of the vehicle will flash.
X To switch off the hazard warning lamps:
press button :.
The hazard warning lamps switch on auto-
matically if:
R an airbag is deployed or
R the vehicle decelerates rapidly from a
speed of above 70 km/h and comes to a
standstill
The hazard warning lamps switch off auto-
matically if the vehicle reaches a speed of
above 10 km/h again after a full brake appli- cation.
i The hazard warning lamps continue to
operate even if the ignition is switched off. Headlamp cleaning system
The headlamps are cleaned automatically if
the "Wipe with washer fluid" function is oper- Exterior lighting
113Lights and windscreen wipers Z
Page 233 of 357
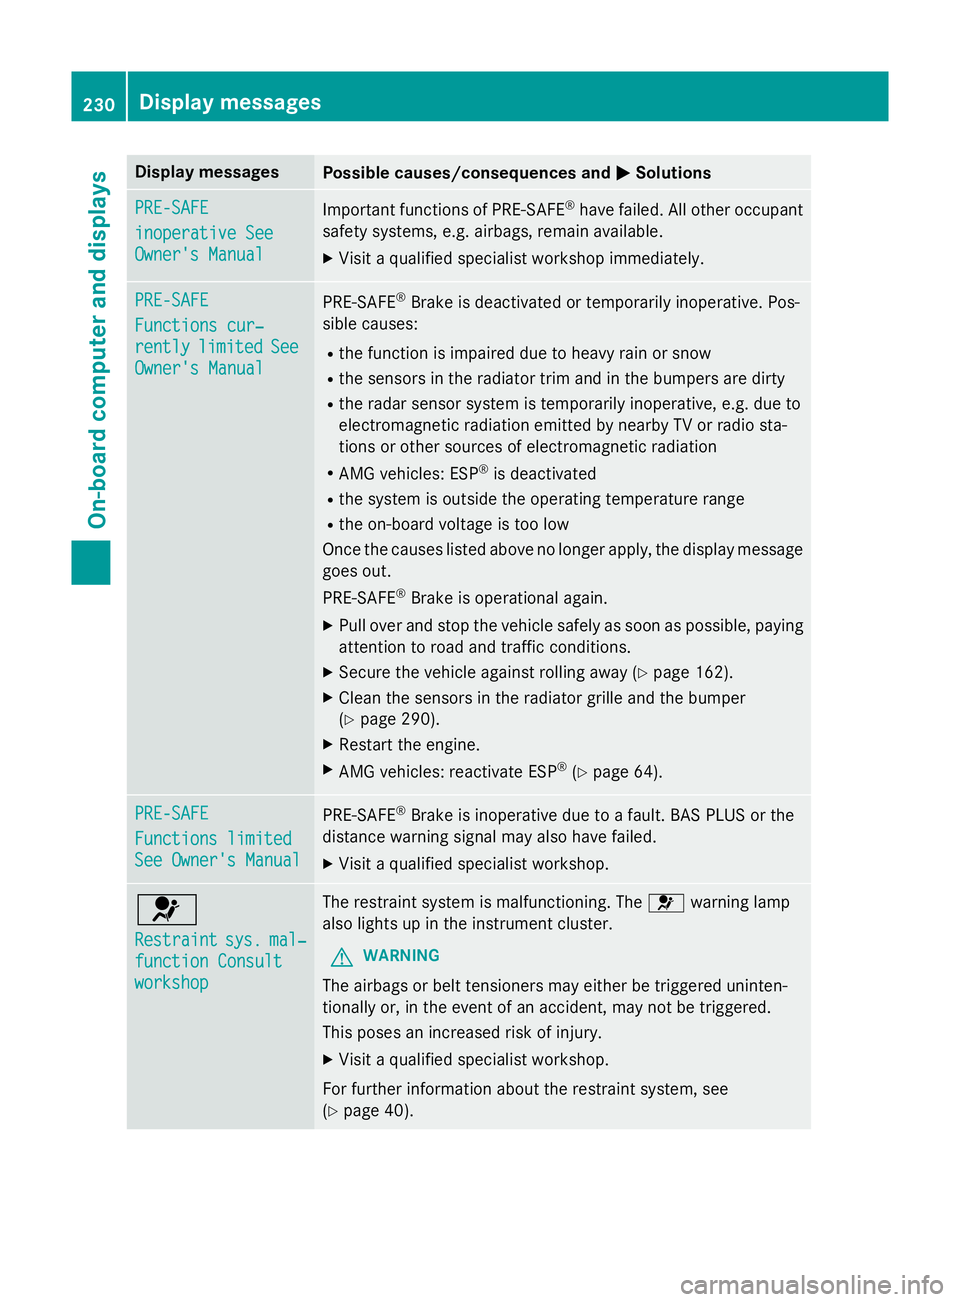
Display messages
Possible causes/consequences and
M
MSolutions PRE-SAFE
PRE-SAFE
inoperative See inoperative See
Owner's Manual Owner's Manual
Important functions of PRE-SAFE
®
have failed. All other occupant
safety systems, e.g. airbags, remain available.
X Visit a qualified specialist workshop immediately. PRE-SAFE
PRE-SAFE
Functions cur‐ Functions cur‐
rently rently
limited
limited See
See
Owner's Manual
Owner's Manual PRE
‑SAFE ®
Brake is deactivated or temporarily inoperative. Pos-
sible causes:
R the function is impaired due to heavy rain or snow
R the sensors in the radiator trim and in the bumpers are dirty
R the radar sensor system is temporarily inoperative, e.g. due to
electromagnetic radiation emitted by nearby TV or radio sta-
tions or other sources of electromagnetic radiation
R AMG vehicles: ESP ®
is deactivated
R the system is outside the operating temperature range
R the on-board voltage is too low
Once the causes listed above no longer apply, the display message goes out.
PRE ‑SAFE ®
Brake is operational again.
X Pull over and stop the vehicle safely as soon as possible, paying
attention to road and traffic conditions.
X Secure the vehicle against rolling away (Y page 162).
X Clean the sensors in the radiator grille and the bumper
(Y page 290).
X Restart the engine.
X AMG vehicles: reactivate ESP ®
(Y page 64). PRE-SAFE PRE-SAFE
Functions limited Functions limited
See Owner's Manual See Owner's Manual
PRE-SAFE
®
Brake is inoperative due to a fault. BAS PLUS or the
distance warning signal may also have failed.
X Visit a qualified specialist workshop. 6
Restraint Restraint
sys.
sys.mal‐
mal‐
function Consult
function Consult
workshop workshop The restraint system is malfunctioning. The
6warning lamp
also lights up in the instrument cluster.
G WARNING
The airbags or belt tensioners may either be triggered uninten-
tionally or, in the event of an accident, may not be triggered.
This poses an increased risk of injury. X Visit a qualified specialist workshop.
For further information about the restraint system, see
(Y page 40). 230
Display
messagesOn-board computer and displays
Page 234 of 357
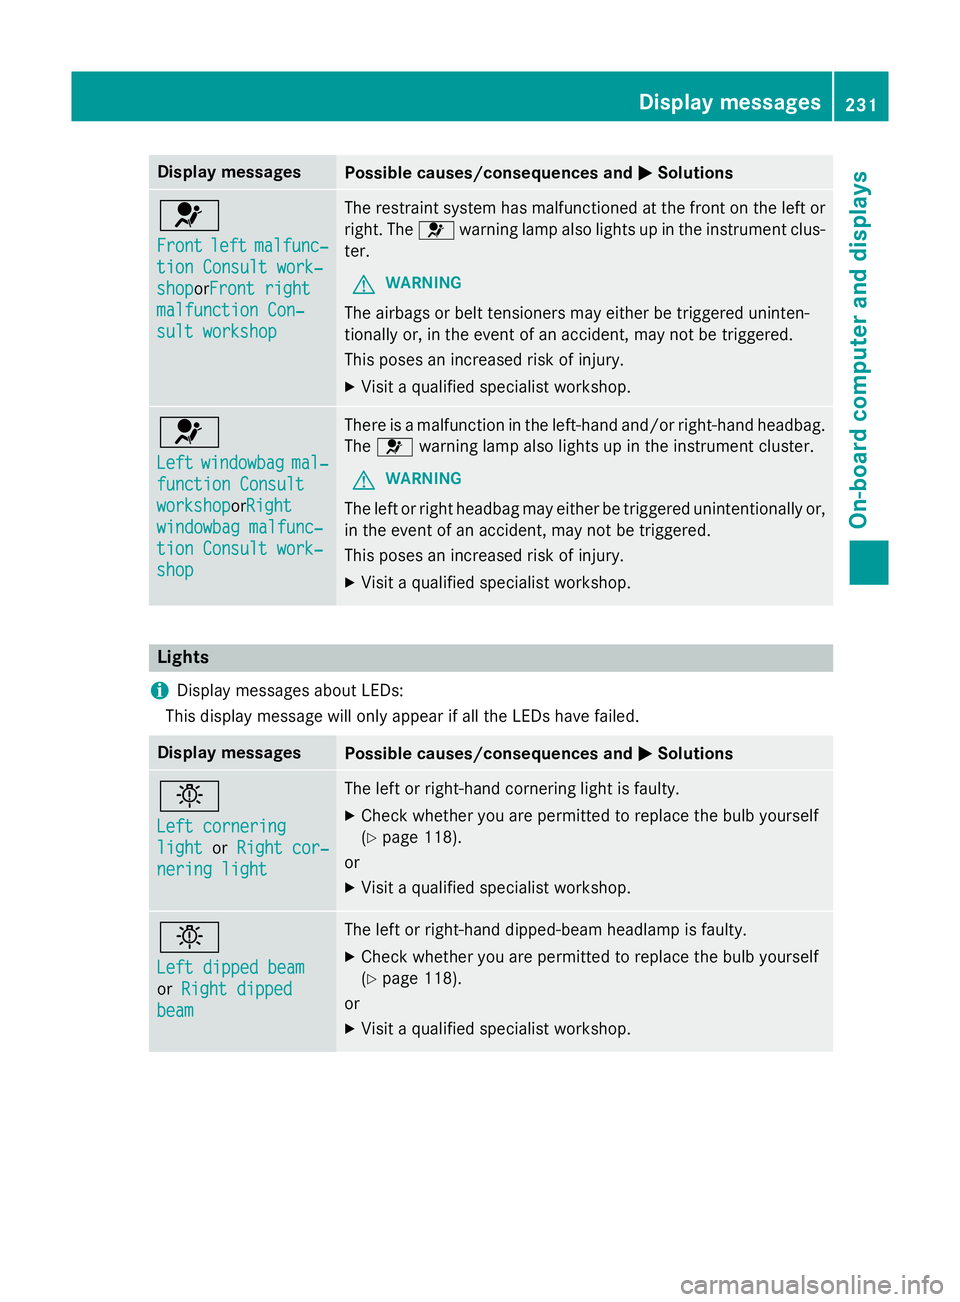
Display messages
Possible causes/consequences and
M
MSolutions 6
Front Front
left
leftmalfunc‐
malfunc‐
tion Consult work‐
tion Consult work‐
shop shopor Front right
Front right
malfunction Con‐
malfunction Con‐
sult workshop sult workshop The restraint system has malfunctioned at the front on the left or
right. The 6warning lamp also lights up in the instrument clus-
ter.
G WARNING
The airbags or belt tensioners may either be triggered uninten-
tionally or, in the event of an accident, may not be triggered.
This poses an increased risk of injury. X Visit a qualified specialist workshop. 6
Left Left
windowbag
windowbag mal‐
mal‐
function Consult
function Consult
workshop workshoporRight Right
windowbag malfunc‐
windowbag malfunc‐
tion Consult work‐ tion Consult work‐
shop shop There is a malfunction in the left-hand and/or right-hand headbag.
The 6 warning lamp also lights up in the instrument cluster.
G WARNING
The left or right headbag may either be triggered unintentionally or,
in the event of an accident, may not be triggered.
This poses an increased risk of injury.
X Visit a qualified specialist workshop. Lights
i Display messages about LEDs:
This display message will only appear if all the LEDs have failed. Display messages
Possible causes/consequences and
M
MSolutions b
Left cornering Left cornering
light light
orRight cor‐
Right cor‐
nering light
nering light The left or right-hand cornering light is faulty.
X Check whether you are permitted to replace the bulb yourself
(Y page 118).
or
X Visit a qualified specialist workshop. b
Left dipped beam Left dipped beam
or
Right dipped Right dipped
beam
beam The left or right-hand dipped-beam headlamp is faulty.
X Check whether you are permitted to replace the bulb yourself
(Y page 118).
or
X Visit a qualified specialist workshop. Display
messages
231On-board computer and displays Z
Page 260 of 357
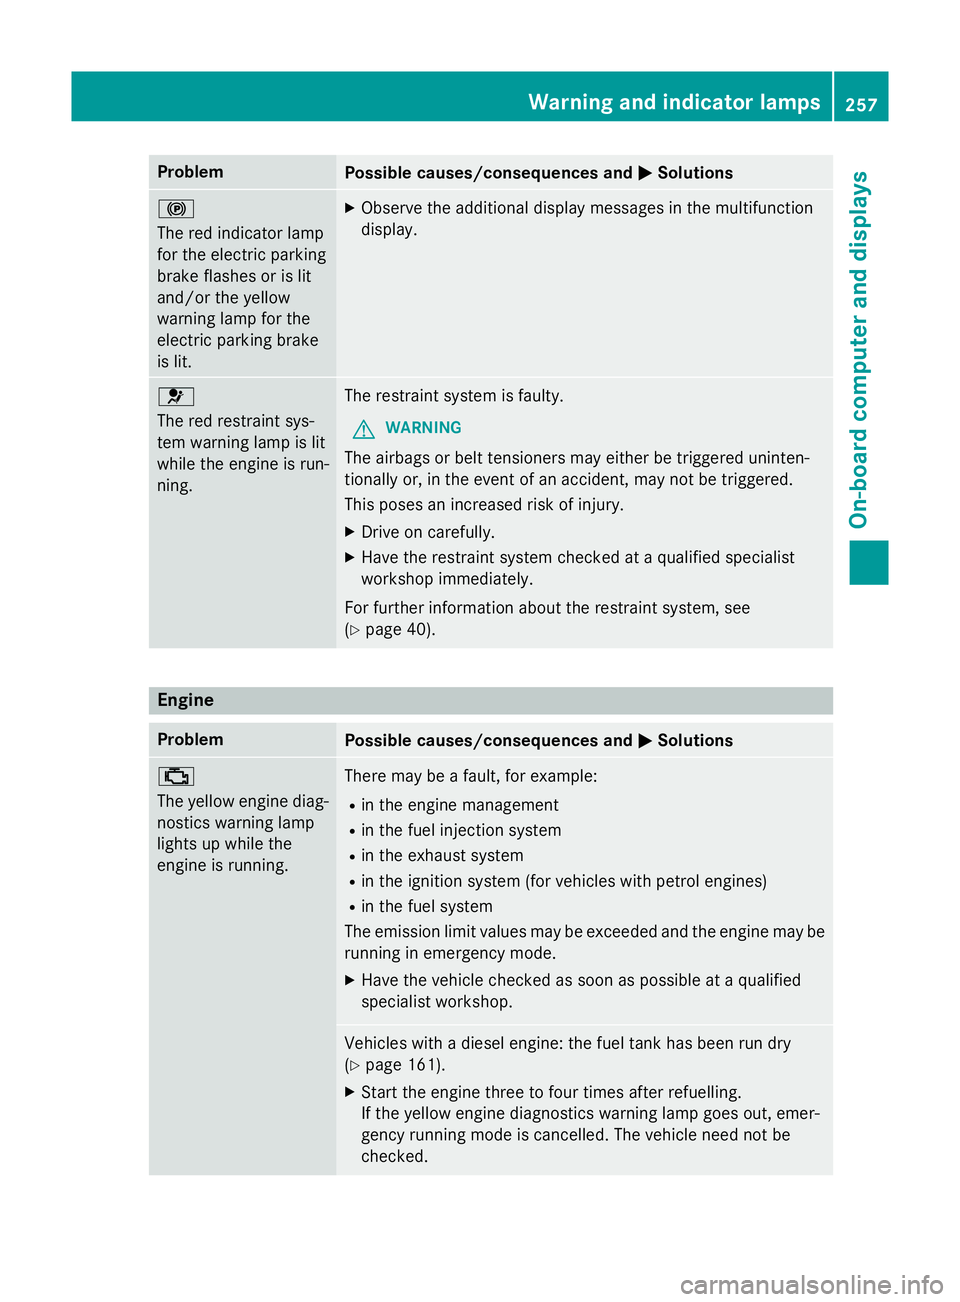
Problem
Possible causes/consequences and
M
MSolutions !
The red indicator lamp
for the electric parking
brake flashes or is lit
and/or the yellow
warning lamp for the
electric parking brake
is lit. X
Observe the additional display messages in the multifunction
display. 6
The red restraint sys-
tem warning lamp is lit
while the engine is run-
ning.
The restraint system is faulty.
G WARNING
The airbags or belt tensioners may either be triggered uninten-
tionally or, in the event of an accident, may not be triggered.
This poses an increased risk of injury. X Drive on carefully.
X Have the restraint system checked at a qualified specialist
workshop immediately.
For further information about the restraint system, see
(Y page 40). Engine
Problem
Possible causes/consequences and
M MSolutions ;
The yellow engine diag-
nostics warning lamp
lights up while the
engine is running. There may be a fault, for example:
R in the engine management
R in the fuel injection system
R in the exhaust system
R in the ignition system (for vehicles with petrol engines)
R in the fuel system
The emission limit values may be exceeded and the engine may be running in emergency mode.
X Have the vehicle checked as soon as possible at a qualified
specialist workshop. Vehicles with a diesel engine: the fuel tank has been run dry
(Y
page 161).
X Start the engine three to four times after refuelling.
If the yellow engine diagnostics warning lamp goes out, emer-
gency running mode is cancelled. The vehicle need not be
checked. Warning and indicator lamps
257On-board computer and displays Z
Page 293 of 357
Mercedes-Benz car shampoo or cleaning
cloths.
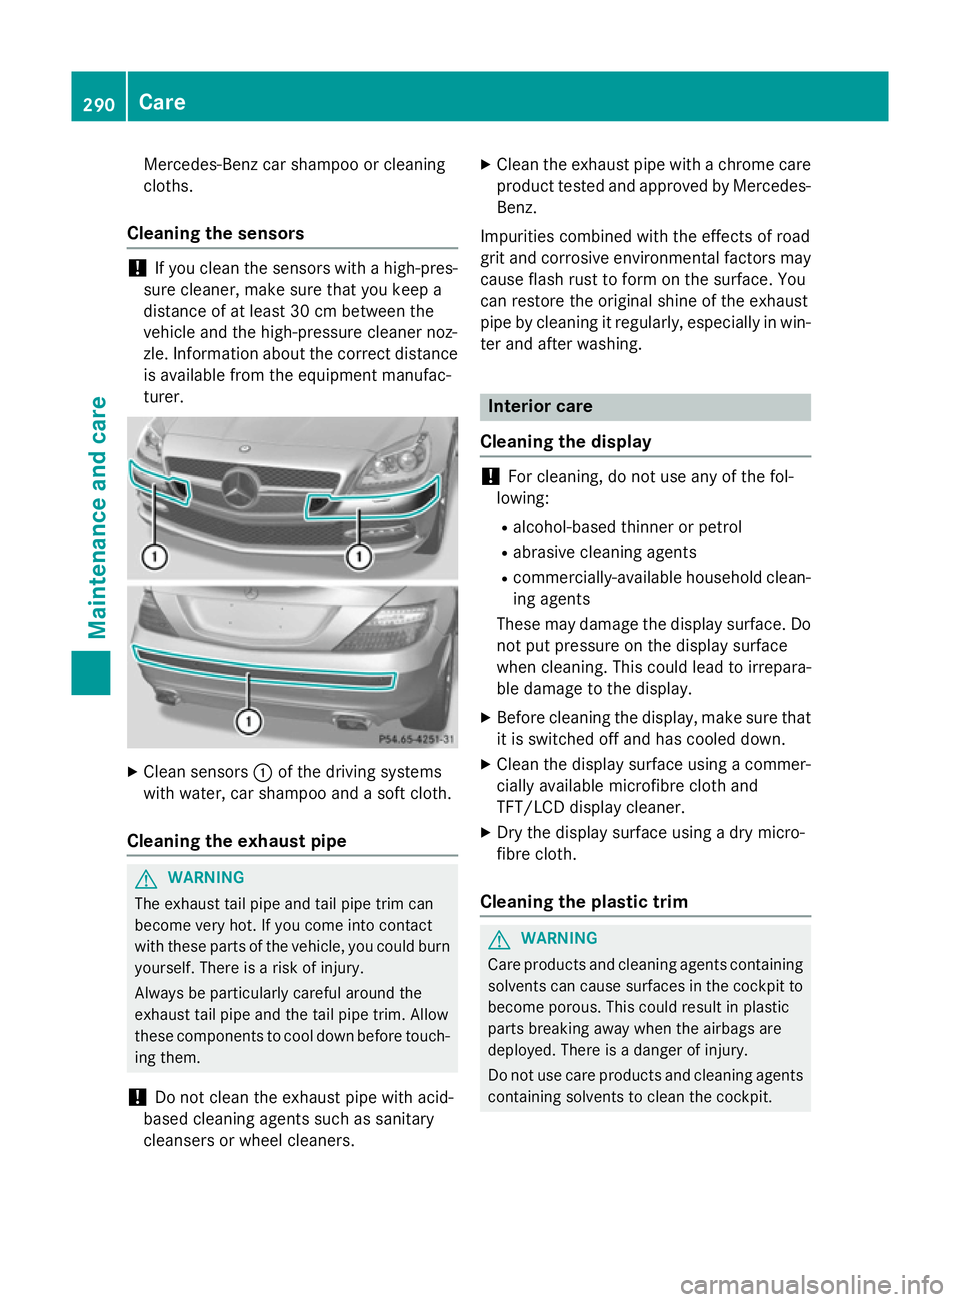
Cleaning the sensors !
If you clean the sensors with a high-pres-
sure cleaner, make sure that you keep a
distance of at least 30 cm between the
vehicle and the high-pressure cleaner noz-
zle. Information about the correct distance is available from the equipment manufac-
turer. X
Clean sensors :of the driving systems
with water, car shampoo and a soft cloth.
Cleaning the exhaust pipe G
WARNING
The exhaust tail pipe and tail pipe trim can
become very hot. If you come into contact
with these parts of the vehicle, you could burn
yourself. There is a risk of injury.
Always be particularly careful around the
exhaust tail pipe and the tail pipe trim. Allow
these components to cool down before touch-
ing them.
! Do not clean the exhaust pipe with acid-
based cleaning agents such as sanitary
cleansers or wheel cleaners. X
Clean the exhaust pipe with a chrome care
product tested and approved by Mercedes-
Benz.
Impurities combined with the effects of road
grit and corrosive environmental factors may cause flash rust to form on the surface. You
can restore the original shine of the exhaust
pipe by cleaning it regularly, especially in win- ter and after washing. Interior care
Cleaning the display !
For cleaning, do not use any of the fol-
lowing:
R alcohol-based thinner or petrol
R abrasive cleaning agents
R commercially-available household clean-
ing agents
These may damage the display surface. Do not put pressure on the display surface
when cleaning. This could lead to irrepara-
ble damage to the display.
X Before cleaning the display, make sure that
it is switched off and has cooled down.
X Clean the display surface using a commer-
cially available microfibre cloth and
TFT/LCD display cleaner.
X Dry the display surface using a dry micro-
fibre cloth.
Cleaning the plastic trim G
WARNING
Care products and cleaning agents containing solvents can cause surfaces in the cockpit to
become porous. This could result in plastic
parts breaking away when the airbags are
deployed. There is a danger of injury.
Do not use care products and cleaning agents containing solvents to clean the cockpit. 290
CareMaintenance and care